*********************************************************************************************************************************************
OCTOBER 2025 UPDATE
*********************************************************************************************************************************************
KIER HARDY
*********************************************************************************************************************************************
ALAN DEWEY
*********************************************************************************************************************************************
STEVE CARTER
*********************************************************************************************************************************************
ANDY LEE
*********************************************************************************************************************************************
GREG BROOKES
*********************************************************************************************************************************************
MIKE WHITCHURCH
*********************************************************************************************************************************************
PAUL JAMES
*********************************************************************************************************************************************
![]()
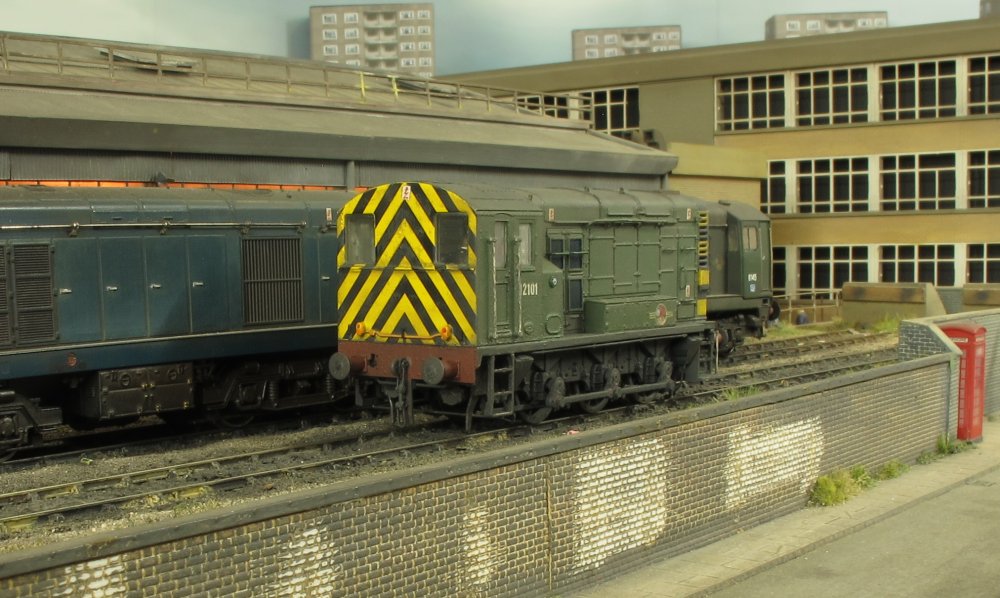 LMS / British Railways Class 11 shunting locomotive number 12101 (allocated to Willesden depot)
is seen here at Hornsey Road between duties. This is a recent addition to the fleet, fitted
with a Howes Next 18 ESU Loksound V5 micro decoder.
LMS / British Railways Class 11 shunting locomotive number 12101 (allocated to Willesden depot)
is seen here at Hornsey Road between duties. This is a recent addition to the fleet, fitted
with a Howes Next 18 ESU Loksound V5 micro decoder.
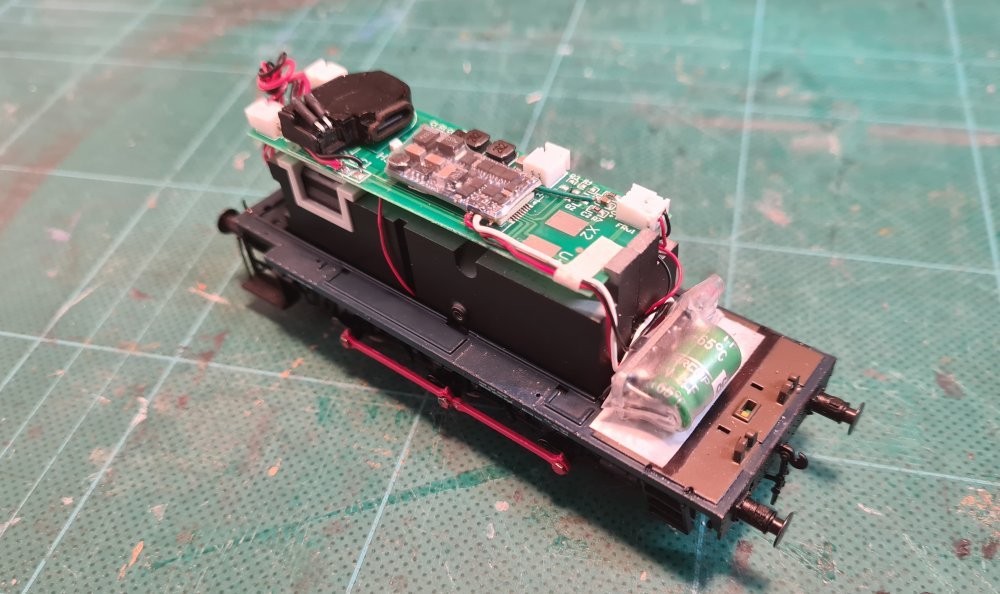 With reliability being the key to satisfactory and enjoyable operation, it kept cutting
out in service despite having clean wheels & track. A Train-O-Matic Smart Power Pack
(stay alive) has now been fitted, the only suitable place to fit it being in the cab.
Some surgery was required to the bottom of the control desk for it to fit, and since
being reassembled, you wouldn't know it's there.
With reliability being the key to satisfactory and enjoyable operation, it kept cutting
out in service despite having clean wheels & track. A Train-O-Matic Smart Power Pack
(stay alive) has now been fitted, the only suitable place to fit it being in the cab.
Some surgery was required to the bottom of the control desk for it to fit, and since
being reassembled, you wouldn't know it's there.
 The only other modification (apart from a repaint into green livery) was the removal of the
unrealistic cab light - no loss there! Additional detail added to include coupling banger
plate and the pipe connecting the 2 tanks below the bufferbeam.
The only other modification (apart from a repaint into green livery) was the removal of the
unrealistic cab light - no loss there! Additional detail added to include coupling banger
plate and the pipe connecting the 2 tanks below the bufferbeam.
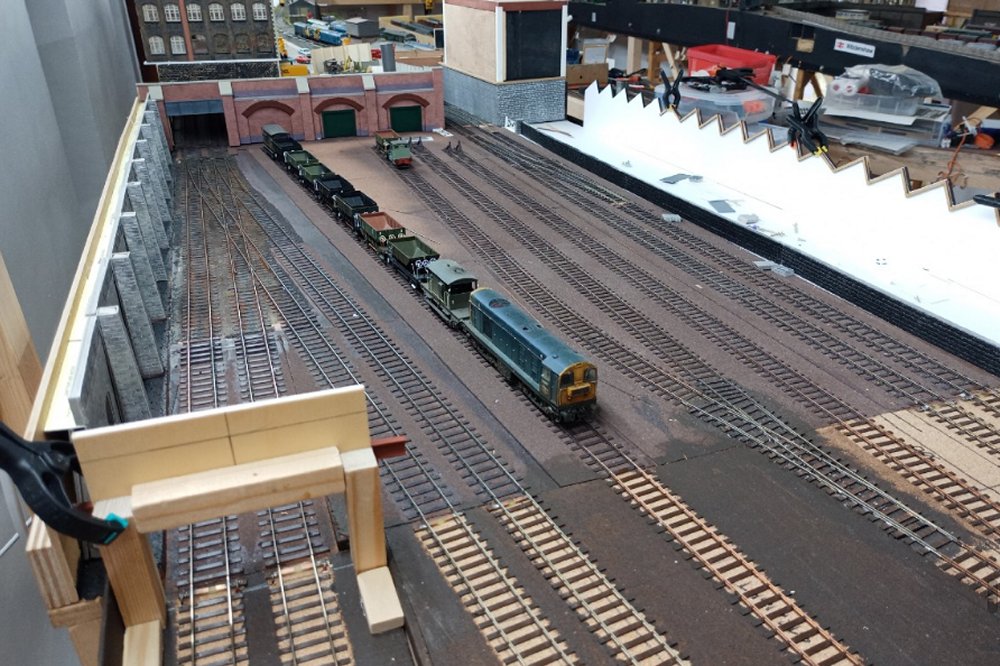
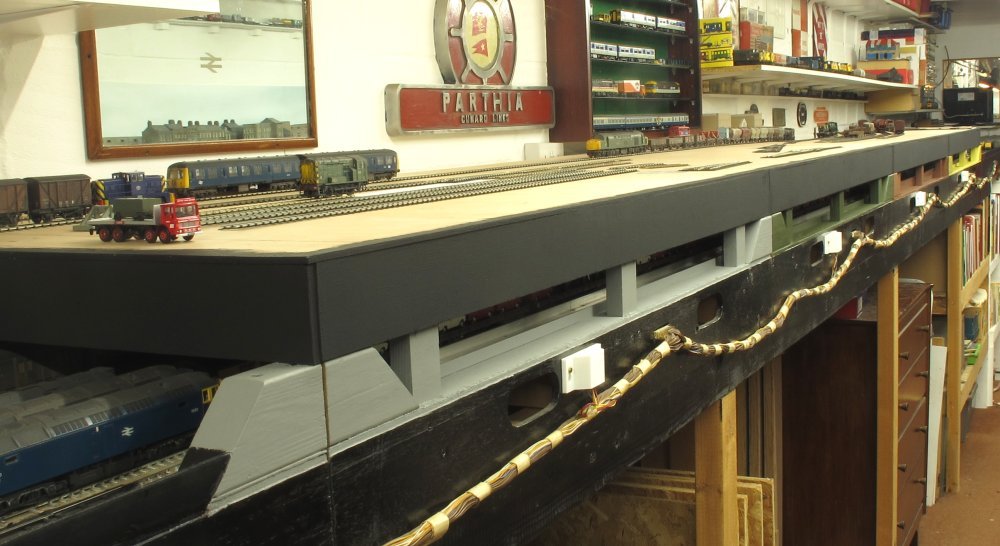 The 4 baseboards for the new East London based layout have been completed and sit on top
of the main Hornsey Bdy storage sidings, with access from the 1:20 ramp which was featured
last month. The grey, green, brown and yellow facias correspond to the sections on the
control panels, and although visibility of the yard is now compromised, it's a small price
to pay for a new train set project.
The 4 baseboards for the new East London based layout have been completed and sit on top
of the main Hornsey Bdy storage sidings, with access from the 1:20 ramp which was featured
last month. The grey, green, brown and yellow facias correspond to the sections on the
control panels, and although visibility of the yard is now compromised, it's a small price
to pay for a new train set project.
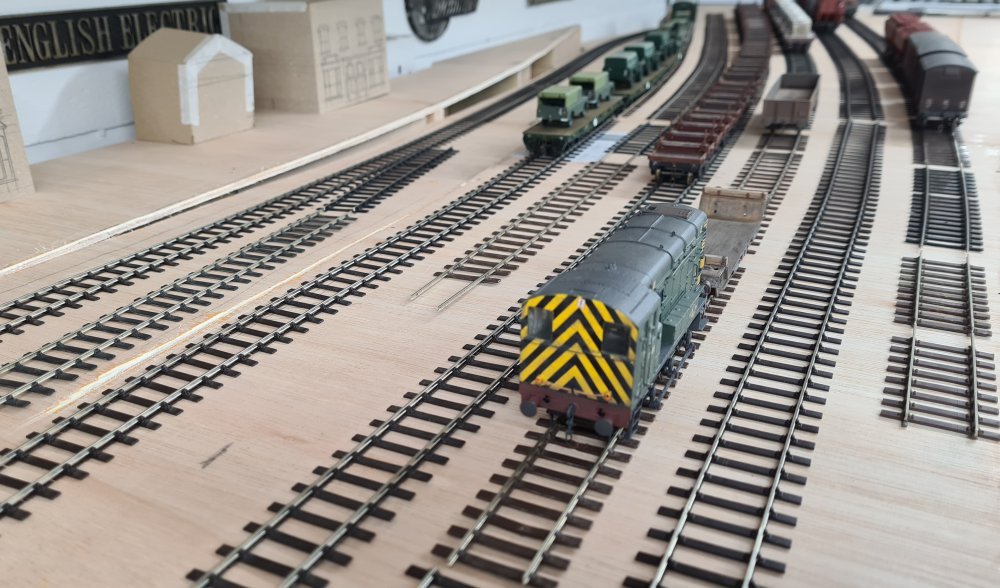
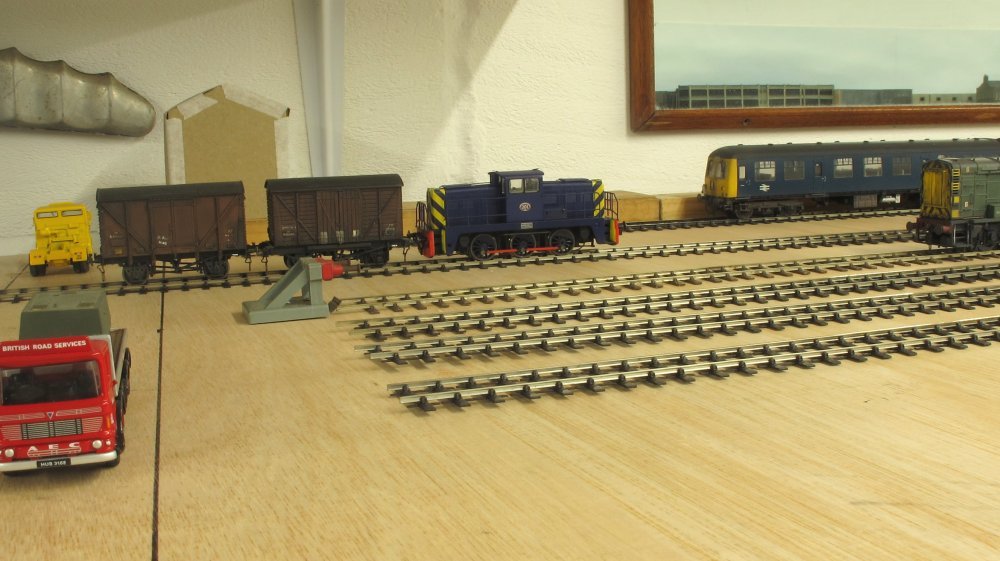 The track plan for the terminus station and exchange sidings has still yet to be decided,
but with several sections of track and a few points, things can be planned out full
scale. This scenrio shows a 2-car Cravens DMU in the station, whilst a Port of London
Authority Yorkshire Engine Co Janus brings a couple of vans from the docks and over the
tramway level crossing into the exchange sidings. The Oxford Rail Janus was a very quick
and easy conversion to EM, by reprofiling the flanges and regauging the existing wheels.
It runs as sweet as a nut, and thank you to Jonny for donating this model to the project.
The track plan for the terminus station and exchange sidings has still yet to be decided,
but with several sections of track and a few points, things can be planned out full
scale. This scenrio shows a 2-car Cravens DMU in the station, whilst a Port of London
Authority Yorkshire Engine Co Janus brings a couple of vans from the docks and over the
tramway level crossing into the exchange sidings. The Oxford Rail Janus was a very quick
and easy conversion to EM, by reprofiling the flanges and regauging the existing wheels.
It runs as sweet as a nut, and thank you to Jonny for donating this model to the project.
 A view from the other end of the new scene, showing a selection of wagons in the sidings.
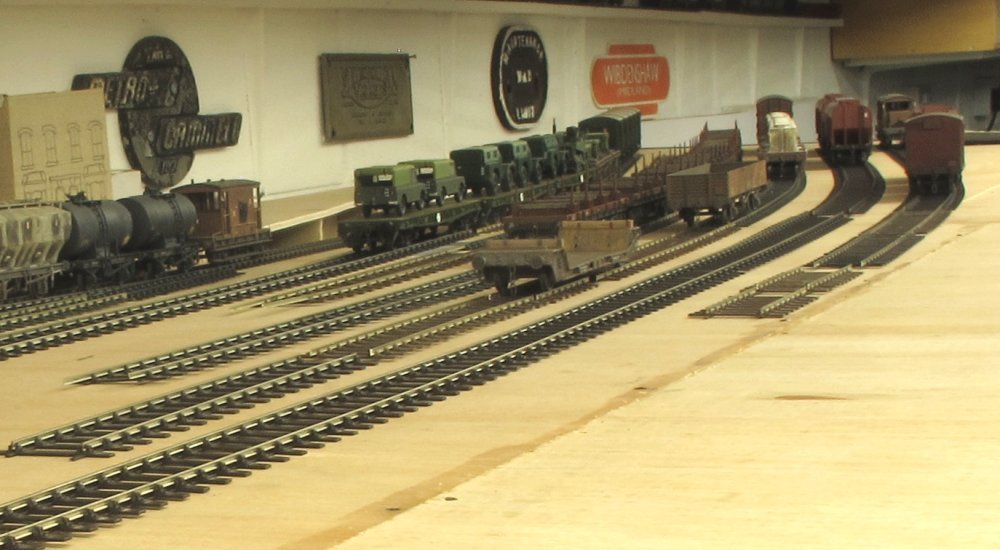 As well as some shunting activity, despatching wagons to the docks and forming trains
ready for the national rail network, these sidings will be useful for displaying a variety
of wagons - inspired by the exchange sidings at Shenston Road and Canada Street.
As well as some shunting activity, despatching wagons to the docks and forming trains
ready for the national rail network, these sidings will be useful for displaying a variety
of wagons - inspired by the exchange sidings at Shenston Road and Canada Street.
 Another similar view showing the access incline from the main layout. I will have to find
alternative places for some of the smaller plates displayed on the wall when the shallow
backscene is fitted.
Another similar view showing the access incline from the main layout. I will have to find
alternative places for some of the smaller plates displayed on the wall when the shallow
backscene is fitted.
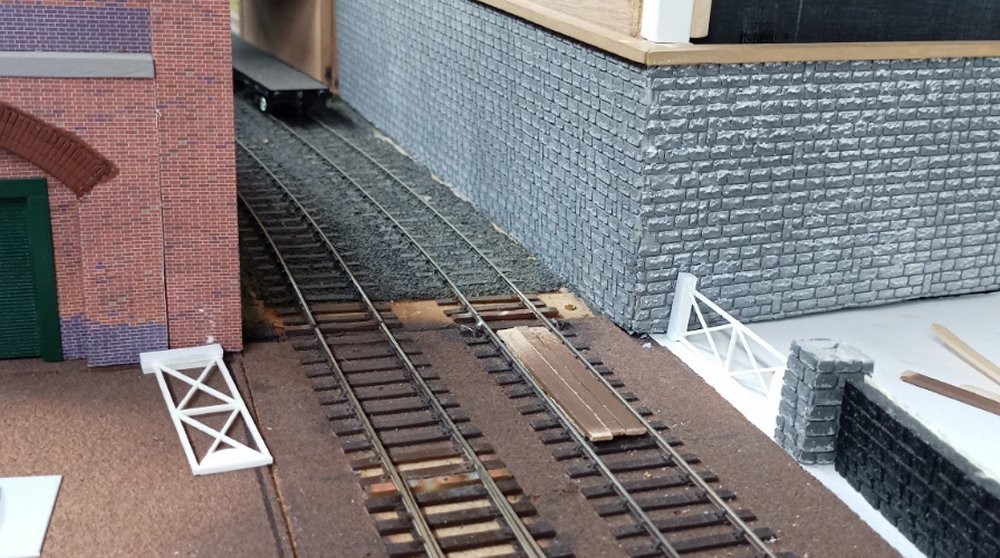
 After playing around with various bits of track, it became apparent that at least one
double slip was required. Instead of building one from scratch (copperclad and C&L chairs),
I acquired one of the Finetrax kits.
After playing around with various bits of track, it became apparent that at least one
double slip was required. Instead of building one from scratch (copperclad and C&L chairs),
I acquired one of the Finetrax kits.
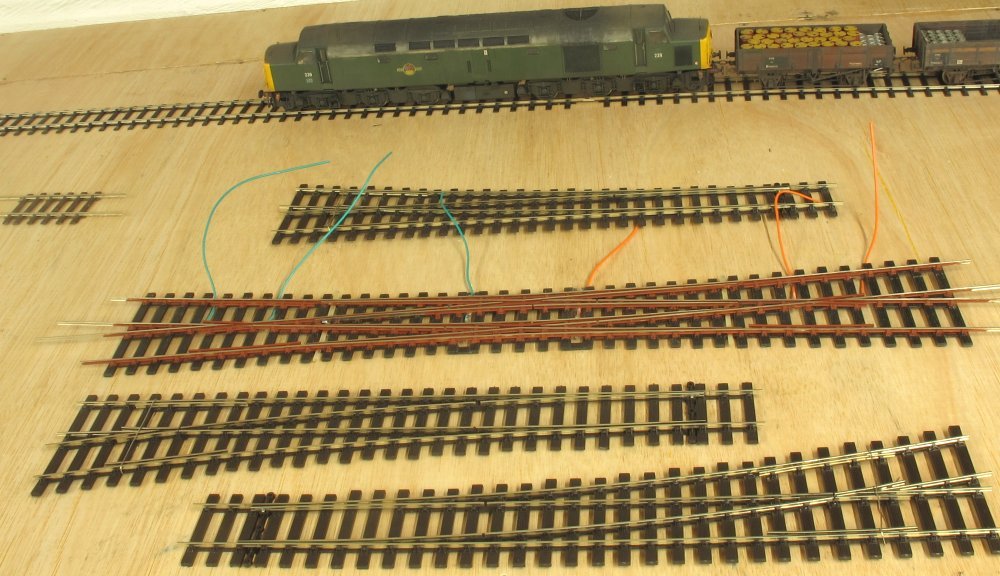 It was far from a case of just shaking the box, but has turned out well in the end. I wasn't
keen on the supplied tiebars, so replacements were made from reinforced fibreglass strip
utilising the pivoting pins soldered to the pointblades. Also shown in this image are 3 of
the EMGS B6 points as manufactured by Peco.
It was far from a case of just shaking the box, but has turned out well in the end. I wasn't
keen on the supplied tiebars, so replacements were made from reinforced fibreglass strip
utilising the pivoting pins soldered to the pointblades. Also shown in this image are 3 of
the EMGS B6 points as manufactured by Peco.
 A 5 inch gauge D1011 Western Thunderer was spotted at the recent Stroud Miniature Railway
running day, which inspired me to replicate the shot with my D1033 Western Trooper, although
mine is a bit dirtier.
A 5 inch gauge D1011 Western Thunderer was spotted at the recent Stroud Miniature Railway
running day, which inspired me to replicate the shot with my D1033 Western Trooper, although
mine is a bit dirtier.
![]()
 Whitley appeared at the Cambridge show last month, where the opportunity to take a snap of
D8205 was had. It will return to the paintshop for a little more colour detailing. The
presssing work at the moment is wagon weight, running and getting to grips fully with DCC.
The lag between movement and brakes etc is a little off-putting to me. I suspect in an
exhibition hall the volume needs to be turned up so I can tell what the status is particuarly
when it comes to the railbuses.
Whitley appeared at the Cambridge show last month, where the opportunity to take a snap of
D8205 was had. It will return to the paintshop for a little more colour detailing. The
presssing work at the moment is wagon weight, running and getting to grips fully with DCC.
The lag between movement and brakes etc is a little off-putting to me. I suspect in an
exhibition hall the volume needs to be turned up so I can tell what the status is particuarly
when it comes to the railbuses.
![]()
 Sporadic work has been carried out on some of the Bogie Bolster inspired projects. The Swindon
built BR diagram 1/480 BORAIL WE vehicles were fitted with unusual 5' 6" plate bogies which
seem to be a hybrid version of GWR / BR practices in that they carried GWR inspired heavy
duty axleboxes on BR type plate frames without access holes and were fitted with L section
bracing strips and twin bolster springs rather than the more usual one.
Sporadic work has been carried out on some of the Bogie Bolster inspired projects. The Swindon
built BR diagram 1/480 BORAIL WE vehicles were fitted with unusual 5' 6" plate bogies which
seem to be a hybrid version of GWR / BR practices in that they carried GWR inspired heavy
duty axleboxes on BR type plate frames without access holes and were fitted with L section
bracing strips and twin bolster springs rather than the more usual one.
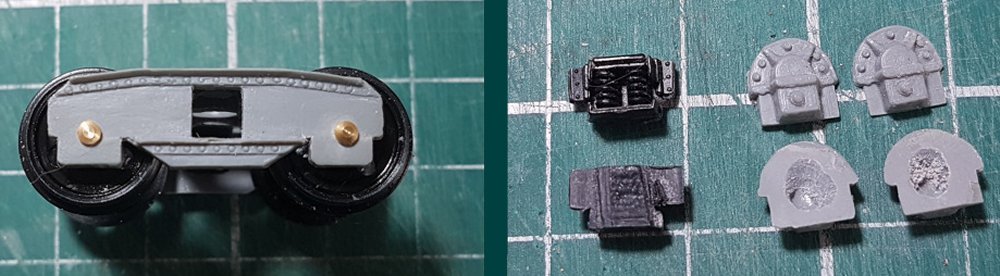 I am not aware of the availability of such types in either r-t-r or kit forms so a hybrid
version of my own was created. Cambrian C68 BR Plate bogies had their single bolster spring
cut out and the backing plates for the oil axleboxes filed off whilst their C73 kit provided
the necessary GWR axleboxes. It was intended to scratch build the twin bolster spring
fittings but as my other bogie bolster Cs are to be fitted with Cambrian BR style bogies
then I had a number of spare Mainline bogie frames to hand. Carefully sanding away the rear
of the frames released the moulded spring assemblies and then filing away behind the horn
guides allows them to be inserted into the Cambrian bogies in a realistic fashion.
I am not aware of the availability of such types in either r-t-r or kit forms so a hybrid
version of my own was created. Cambrian C68 BR Plate bogies had their single bolster spring
cut out and the backing plates for the oil axleboxes filed off whilst their C73 kit provided
the necessary GWR axleboxes. It was intended to scratch build the twin bolster spring
fittings but as my other bogie bolster Cs are to be fitted with Cambrian BR style bogies
then I had a number of spare Mainline bogie frames to hand. Carefully sanding away the rear
of the frames released the moulded spring assemblies and then filing away behind the horn
guides allows them to be inserted into the Cambrian bogies in a realistic fashion.
 Another one of the Mainline bogie bolster C projects is to depict a BR diagram 1/475 wagon
which had fixed central bolsters with only the two outer ones being capable of altering
position and so the two central mounting points have been removed from the side curb rail.
Another one of the Mainline bogie bolster C projects is to depict a BR diagram 1/475 wagon
which had fixed central bolsters with only the two outer ones being capable of altering
position and so the two central mounting points have been removed from the side curb rail.
 The inner and outer bolsters for the type were slightly different in design; the movable
outer pair had full height tubular fittings whilst the fixed centre pair had reduced
height ones. The two types are can be obtained as cast items from Rumney Models but
Evergreen plastic strip is the basis for my versions.
The inner and outer bolsters for the type were slightly different in design; the movable
outer pair had full height tubular fittings whilst the fixed centre pair had reduced
height ones. The two types are can be obtained as cast items from Rumney Models but
Evergreen plastic strip is the basis for my versions.
 Another Bogie Bolster type which I can just about include within my preferred 1961
operating period is the BR diagram 1/479 Bogie Bolster E, with the early members of Lot
3343 being most suitable (B923300 - B924399 built by Ashford between July 1961 to July 1962).
Another Bogie Bolster type which I can just about include within my preferred 1961
operating period is the BR diagram 1/479 Bogie Bolster E, with the early members of Lot
3343 being most suitable (B923300 - B924399 built by Ashford between July 1961 to July 1962).
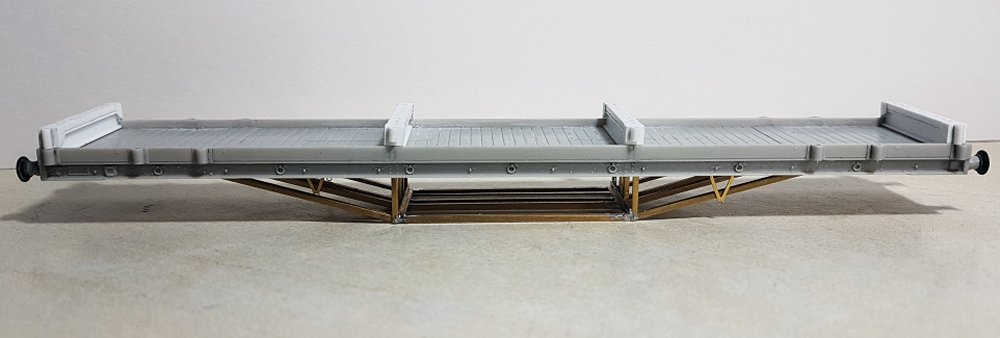
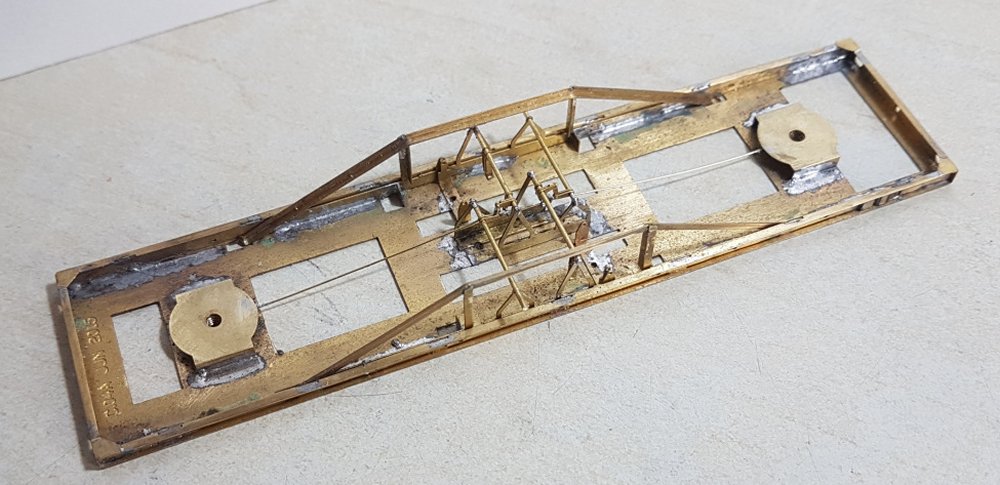 As per the bogie bolster Cs, Rumney models do a detailing kit for the old Lima BBE
renditions (C.04) which can be upgraded to a full etched chassis with their C.04A kit.
Seen here under construction, the brake gear is quite intricate but certainly looks the part.
As per the bogie bolster Cs, Rumney models do a detailing kit for the old Lima BBE
renditions (C.04) which can be upgraded to a full etched chassis with their C.04A kit.
Seen here under construction, the brake gear is quite intricate but certainly looks the part.
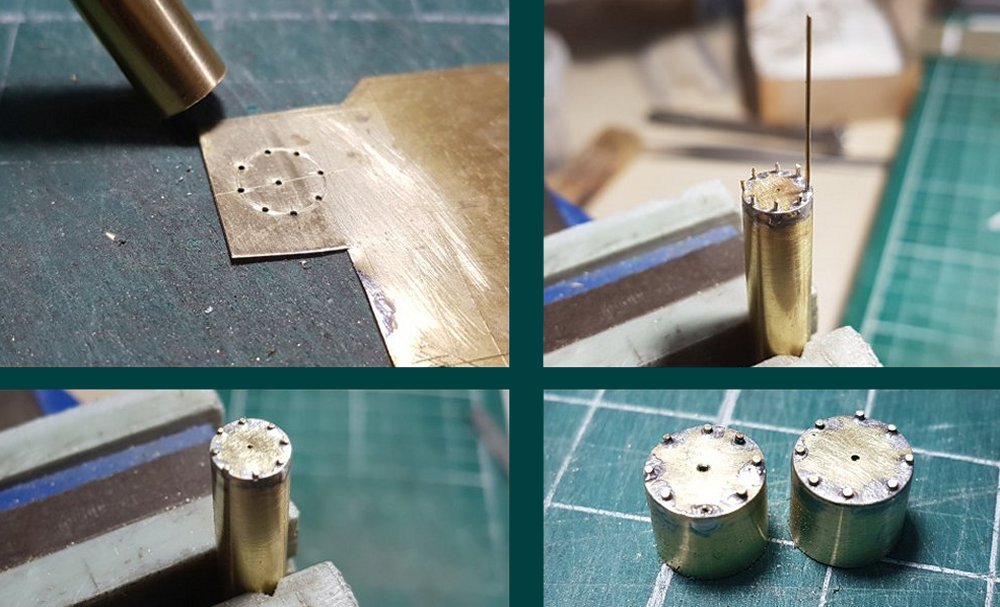 The kits do not come with the two required 18" brake cylinders which Justin recommends
sourcing from either ABS or Lanarkshire Model Supplies but which unfortunately are not
available from either source at the present time and so once more scratch building became
the default option. Using the line drawing from 'An Illustrated History of BR wagons
Volume One' as a guide, the vacuum cylinder diameter was estimated at 7.5mm and a
suitable online source provided a 300mm long thin walled (0.25mm thick) brass tube. The
first step was to scribe the outline of the tube onto 0.25mm thick brass sheet and then
mark out its central point along with eight equidistant points just inside the
circumference before then drilling them out using an 0.6mm drill bit. Next step was to
then solder the tube to the brass sheet and then cut and shape the sheet to match the
tube profile. Lengths of 0.6mm wire were then soldered into the eight holes before being
cut and filed to represent the securing bolts (the central hole is left temporarily
vacant as this houses the cylinder shaft which needs to be matched to the relevant
operating lever when fitted to the chassis).
The kits do not come with the two required 18" brake cylinders which Justin recommends
sourcing from either ABS or Lanarkshire Model Supplies but which unfortunately are not
available from either source at the present time and so once more scratch building became
the default option. Using the line drawing from 'An Illustrated History of BR wagons
Volume One' as a guide, the vacuum cylinder diameter was estimated at 7.5mm and a
suitable online source provided a 300mm long thin walled (0.25mm thick) brass tube. The
first step was to scribe the outline of the tube onto 0.25mm thick brass sheet and then
mark out its central point along with eight equidistant points just inside the
circumference before then drilling them out using an 0.6mm drill bit. Next step was to
then solder the tube to the brass sheet and then cut and shape the sheet to match the
tube profile. Lengths of 0.6mm wire were then soldered into the eight holes before being
cut and filed to represent the securing bolts (the central hole is left temporarily
vacant as this houses the cylinder shaft which needs to be matched to the relevant
operating lever when fitted to the chassis).
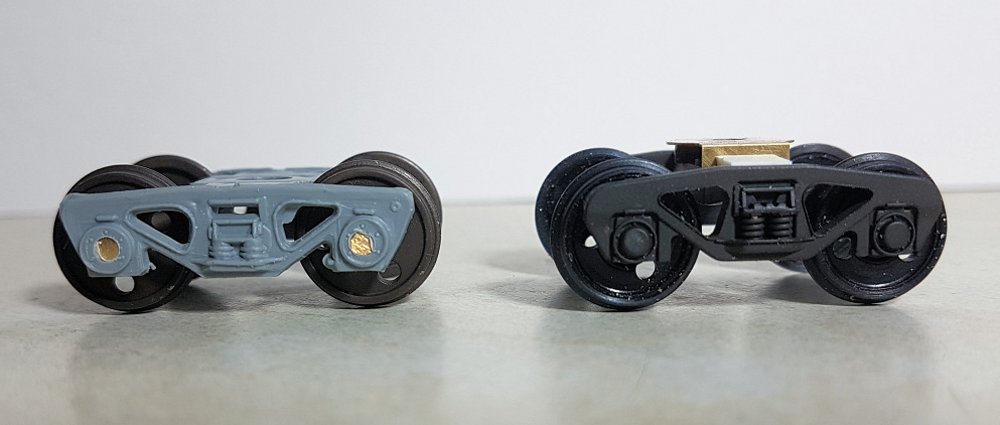 Bogie bolster E wagons were equipped with 'Ridemaster' cast bogies built under licence by
Davis & Lloyd; those fitted to Lima wagons are miserable shrunken versions so were
immediately discounted. Cambrian cater for such bogies with their C72 kit but this to my
eyes is also not an entirely convincing rendition (seen here compared against the eventual
r-t-r option)and whilst the former Stenson Models CC57B bogie kit would be another route
thoughts turned to using components from the r-t-r arena. First in the frame are the Dapol
versions of the very same vehicle as I am undertaking to portray along with vehicles later
rebuilt from them by BR to create 'Turbot' ballast wagons but reviews seem to suggest that
converting them to EM gauge is anything but straight forward which left one final option
in the form of Kernow Model Railways 'Turbot' ballast wagons (I think they originally
intended to do the Bogie Bolster E as well but dropped out after Dapol broke cover with
theirs). Unfortunately the bogies are not available separately and so the cheapest version
of a Kernow Turbot was purchased and the bogies removed. As they come it is straight forward
to swap axles for EM ones but I prefer to use brass bearings so Gibson waisted types were
fitted and subset into the frames by carefully using a hot soldering iron to create a very
free rolling bogie.
Bogie bolster E wagons were equipped with 'Ridemaster' cast bogies built under licence by
Davis & Lloyd; those fitted to Lima wagons are miserable shrunken versions so were
immediately discounted. Cambrian cater for such bogies with their C72 kit but this to my
eyes is also not an entirely convincing rendition (seen here compared against the eventual
r-t-r option)and whilst the former Stenson Models CC57B bogie kit would be another route
thoughts turned to using components from the r-t-r arena. First in the frame are the Dapol
versions of the very same vehicle as I am undertaking to portray along with vehicles later
rebuilt from them by BR to create 'Turbot' ballast wagons but reviews seem to suggest that
converting them to EM gauge is anything but straight forward which left one final option
in the form of Kernow Model Railways 'Turbot' ballast wagons (I think they originally
intended to do the Bogie Bolster E as well but dropped out after Dapol broke cover with
theirs). Unfortunately the bogies are not available separately and so the cheapest version
of a Kernow Turbot was purchased and the bogies removed. As they come it is straight forward
to swap axles for EM ones but I prefer to use brass bearings so Gibson waisted types were
fitted and subset into the frames by carefully using a hot soldering iron to create a very
free rolling bogie.
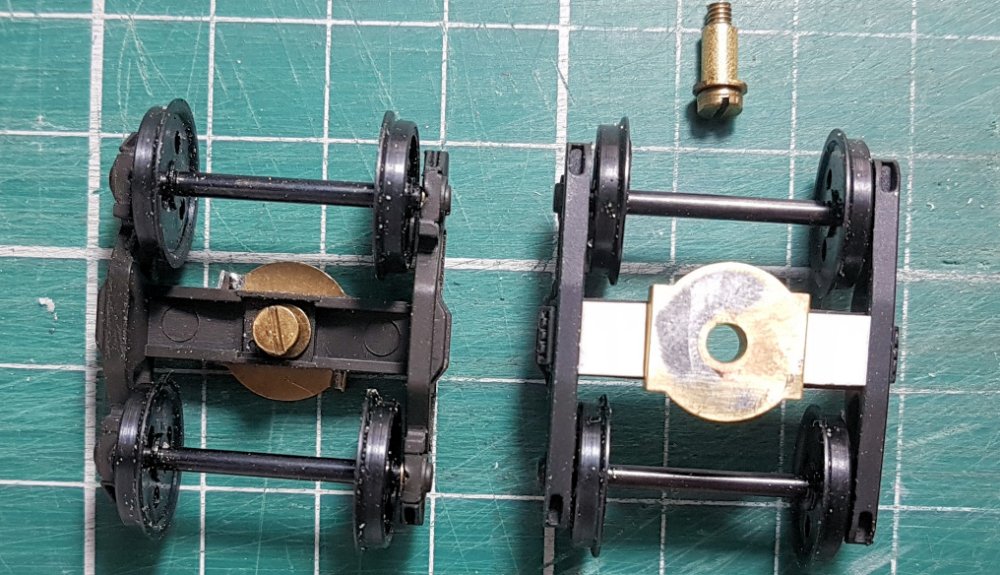 Fortunately the use of an alternative to the Rumney Bogie Bolster C etched mounts on those
wagons meant some were available for use on the BBE and were a relatively simple process to
fit with an added bonus that the ride height of the wagon was correct without having to resort
to spacers. The other components used were two pieces of 1.5mm thick plasticard one either
side of the brass mount and a shouldered screw fabricated from a brass screw, washer and tubing.
Fortunately the use of an alternative to the Rumney Bogie Bolster C etched mounts on those
wagons meant some were available for use on the BBE and were a relatively simple process to
fit with an added bonus that the ride height of the wagon was correct without having to resort
to spacers. The other components used were two pieces of 1.5mm thick plasticard one either
side of the brass mount and a shouldered screw fabricated from a brass screw, washer and tubing.
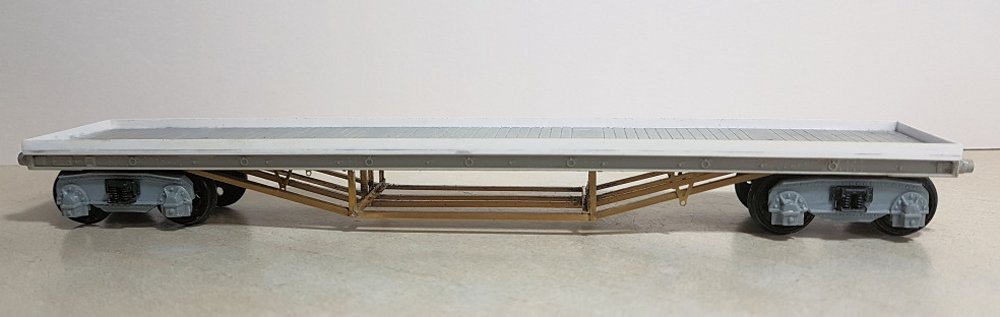
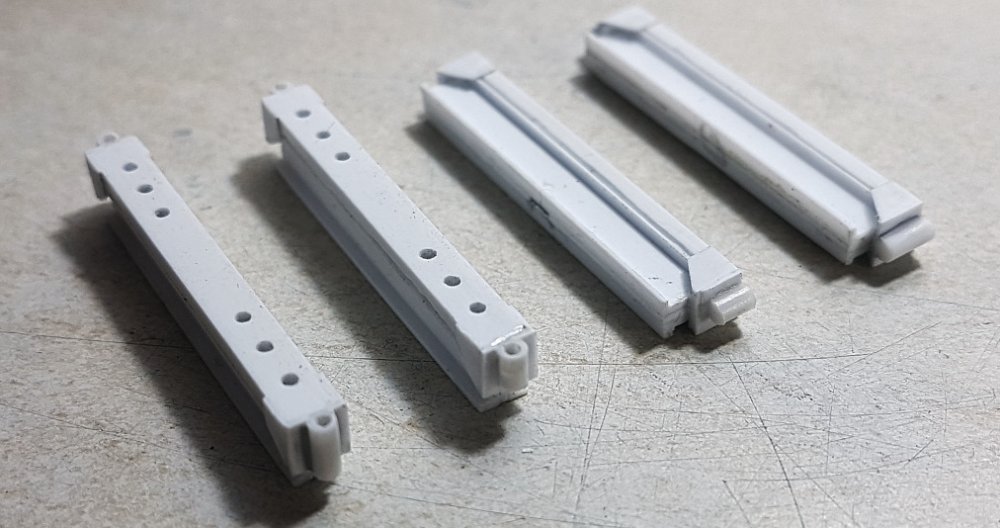
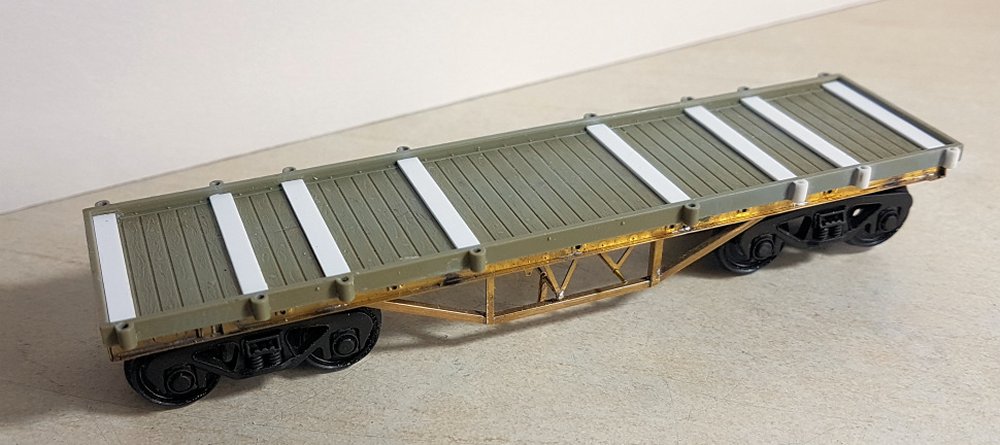
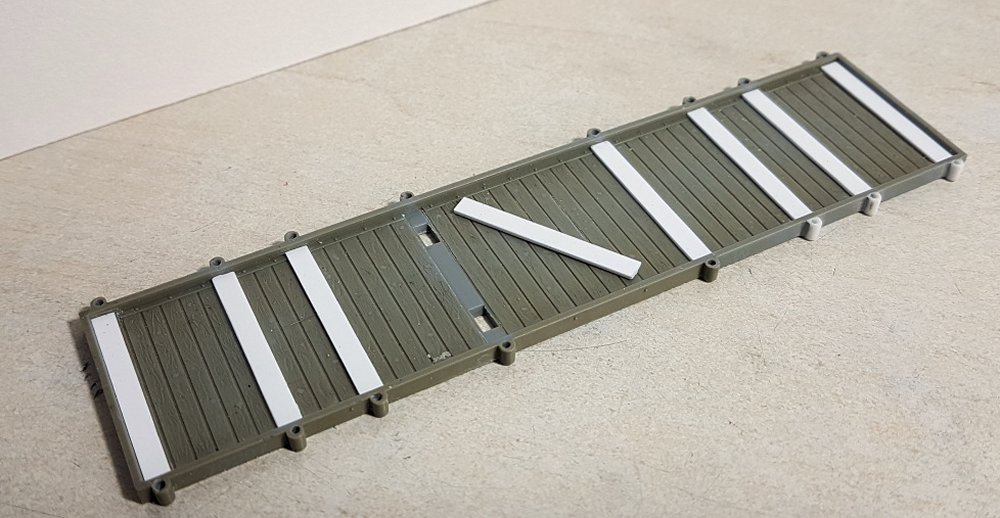 Very little of the Lima model is needed with only the floor and curb rails used and everything
else cut away (the plastic can be quite brittle hence the three white sockets replacing those
that disintegrated whilst being drilled out!). Each bolster position on the prototypes was
marked by a slightly raised floor plank under each which Lima did not include. What they did
include was a 0.25mm recess for fitting their bolsters into position so for these four
Evergreen 136 strip (0.75 x 3.2mm) is used whilst for those positions without a recess
Evergreen 126 (0.5 x 3.2mm) is utilised thus ensuring all eight are set to an equal height.
Very little of the Lima model is needed with only the floor and curb rails used and everything
else cut away (the plastic can be quite brittle hence the three white sockets replacing those
that disintegrated whilst being drilled out!). Each bolster position on the prototypes was
marked by a slightly raised floor plank under each which Lima did not include. What they did
include was a 0.25mm recess for fitting their bolsters into position so for these four
Evergreen 136 strip (0.75 x 3.2mm) is used whilst for those positions without a recess
Evergreen 126 (0.5 x 3.2mm) is utilised thus ensuring all eight are set to an equal height.
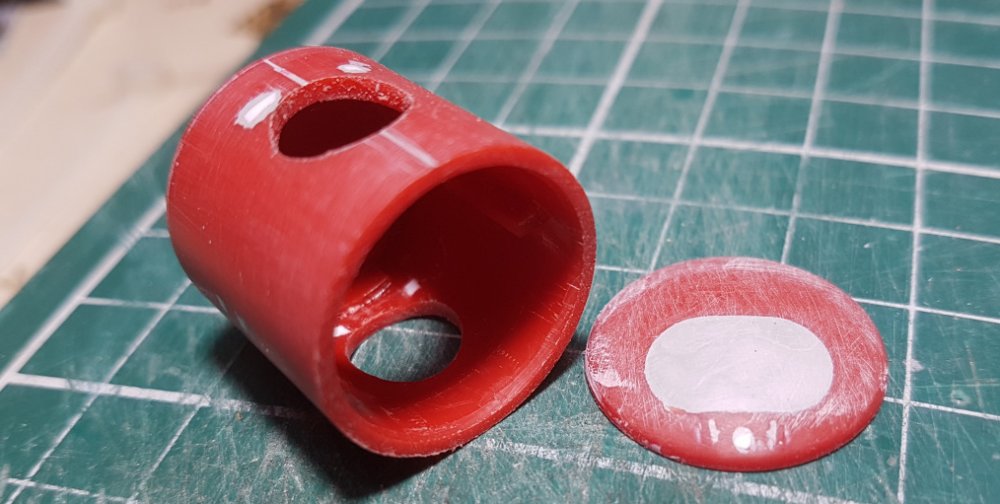 A surprise delivery by Royal Mail reminded me that I had pre-ordered an Ellis Clark Trains
demountable tank with a view to maybe providing an alternative load for a delivery lorry.
Nice as it was I couldn't really envisage using it as intended for carrying beer by road
so was carefully (!) deconstructed to see what could be produced from it. One possibility
is the smaller diagram 1/330 tank (remove the centre portion to give a tank length of
approx. 28mm, add a raised domed lid and then cut the frame accordingly to match) but once
again the traffics carried were very specific.
A surprise delivery by Royal Mail reminded me that I had pre-ordered an Ellis Clark Trains
demountable tank with a view to maybe providing an alternative load for a delivery lorry.
Nice as it was I couldn't really envisage using it as intended for carrying beer by road
so was carefully (!) deconstructed to see what could be produced from it. One possibility
is the smaller diagram 1/330 tank (remove the centre portion to give a tank length of
approx. 28mm, add a raised domed lid and then cut the frame accordingly to match) but once
again the traffics carried were very specific.
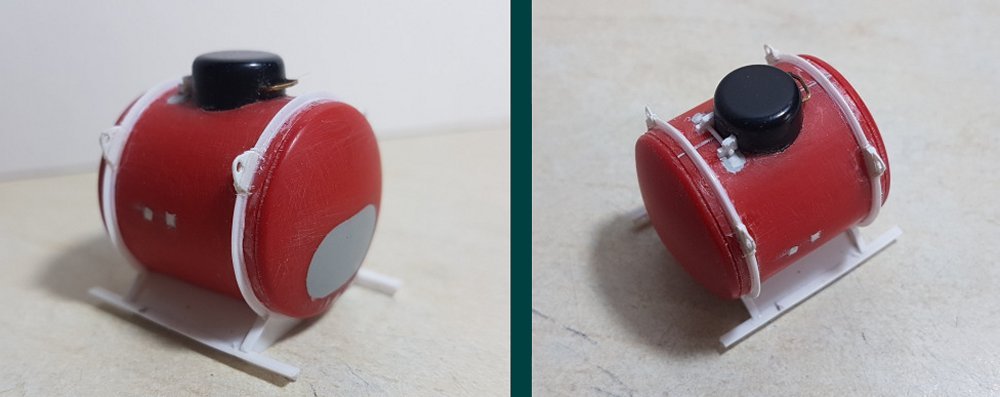 A more likely cargo for the good businesses of Sheppycroft would be chemical rather than
alcoholic in nature, so a slightly larger version of the small tanks used by Associated
Octel for ethylene dibromide traffic from Hayle was cobbled together (using Evergreen
plastic strips and the domed part of a tender taken from and Airfix BR Mogul kit!) with
a view to it being used for the conveyance of Acetic acid.
A more likely cargo for the good businesses of Sheppycroft would be chemical rather than
alcoholic in nature, so a slightly larger version of the small tanks used by Associated
Octel for ethylene dibromide traffic from Hayle was cobbled together (using Evergreen
plastic strips and the domed part of a tender taken from and Airfix BR Mogul kit!) with
a view to it being used for the conveyance of Acetic acid.
![]()
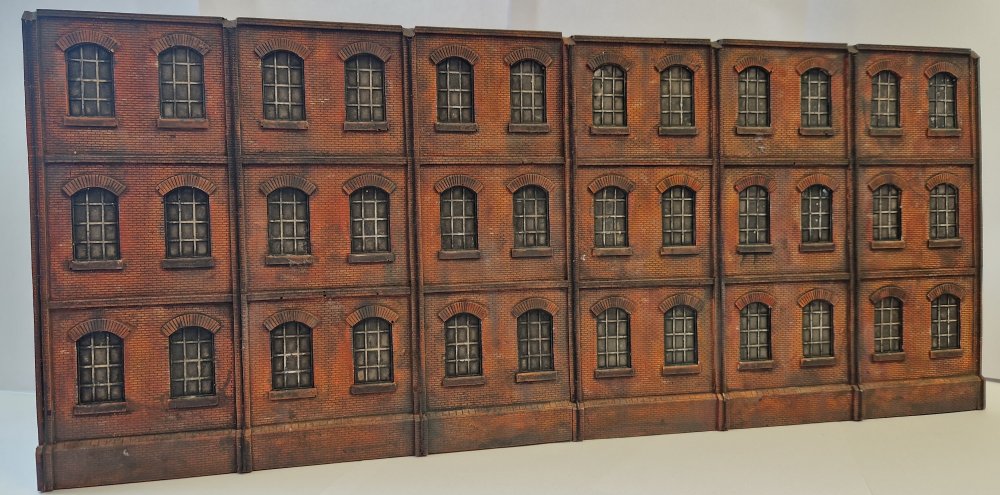 These two Skytrex castings were modified by chopping off the gable end roof sections. I
painted and weathered these using the techniques described in last month's update. White
primer base, burnt umber washes etc. I prefer these to the four that I made in last April's
update, as the brickwork looks better on these.
These two Skytrex castings were modified by chopping off the gable end roof sections. I
painted and weathered these using the techniques described in last month's update. White
primer base, burnt umber washes etc. I prefer these to the four that I made in last April's
update, as the brickwork looks better on these.
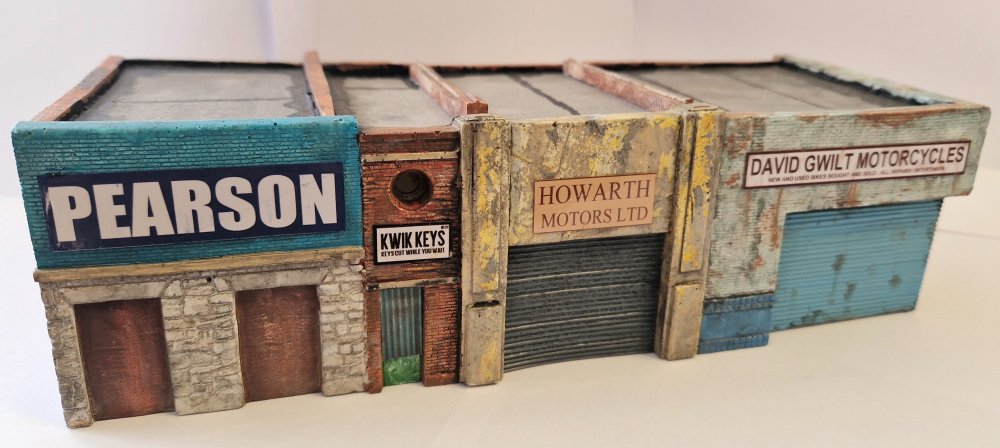 This is a Downtown Deco Ho hydrocal kit, which I purchased off ebay and arrived smashed
into loads of tiny pieces. So I repaired it and made silicone moulds to cast all the parts
out of resin. It's now alot sturdier! I wanted to make it a small block of car and motorbike
repair workshops looking very run-down and decayed. The kit was a block of shops, but by
adding roller shutters to the front using corrugated plasticard, it looks a bit more workshop
like. The roof is cardboard with washes of black poster paint thickly daubed on to represent
the tar lines of the roof panels. All painted and weathered with new signage, using the
techniques described last month.
This is a Downtown Deco Ho hydrocal kit, which I purchased off ebay and arrived smashed
into loads of tiny pieces. So I repaired it and made silicone moulds to cast all the parts
out of resin. It's now alot sturdier! I wanted to make it a small block of car and motorbike
repair workshops looking very run-down and decayed. The kit was a block of shops, but by
adding roller shutters to the front using corrugated plasticard, it looks a bit more workshop
like. The roof is cardboard with washes of black poster paint thickly daubed on to represent
the tar lines of the roof panels. All painted and weathered with new signage, using the
techniques described last month.
![]()
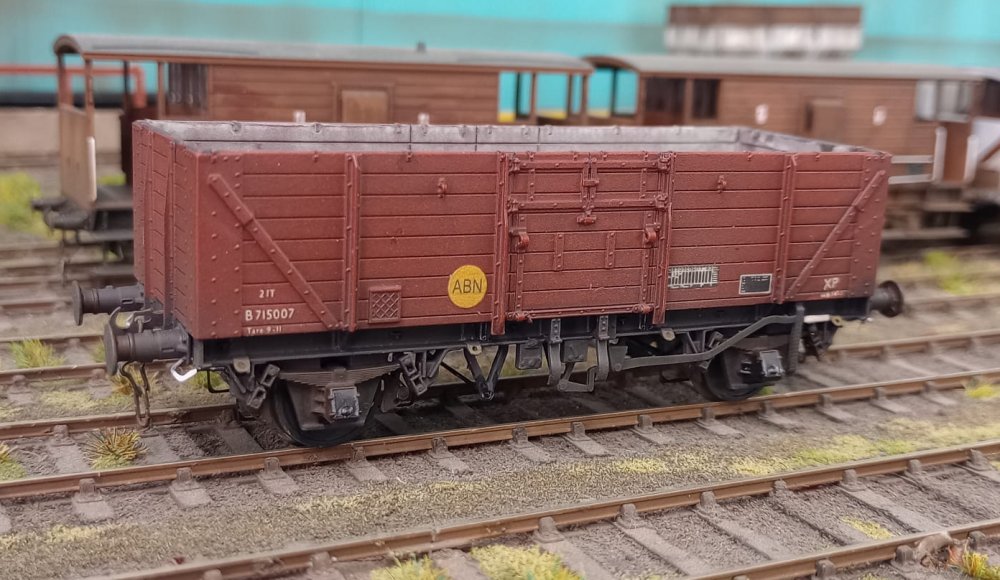 This ferry open wagon from 1957 is one of the latest 3D prints from Iron Mink on
Thingiverse, finished in an early 1970s guise for use in the Air Brake Network.
This ferry open wagon from 1957 is one of the latest 3D prints from Iron Mink on
Thingiverse, finished in an early 1970s guise for use in the Air Brake Network.
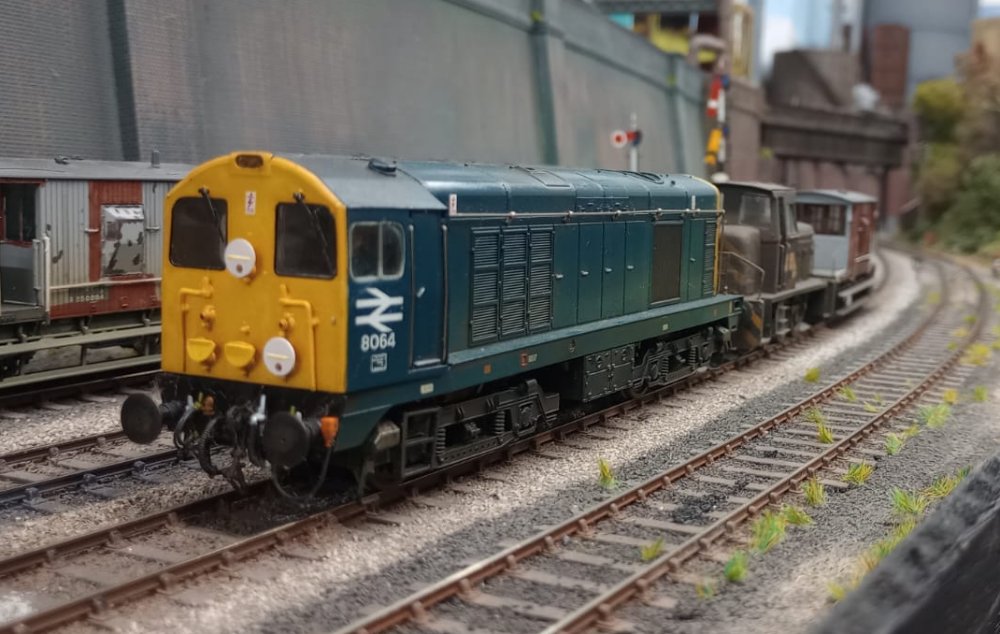 English Electric type 1 number 8064 is captured hauling NCB English Electric 0-6-0 No7.
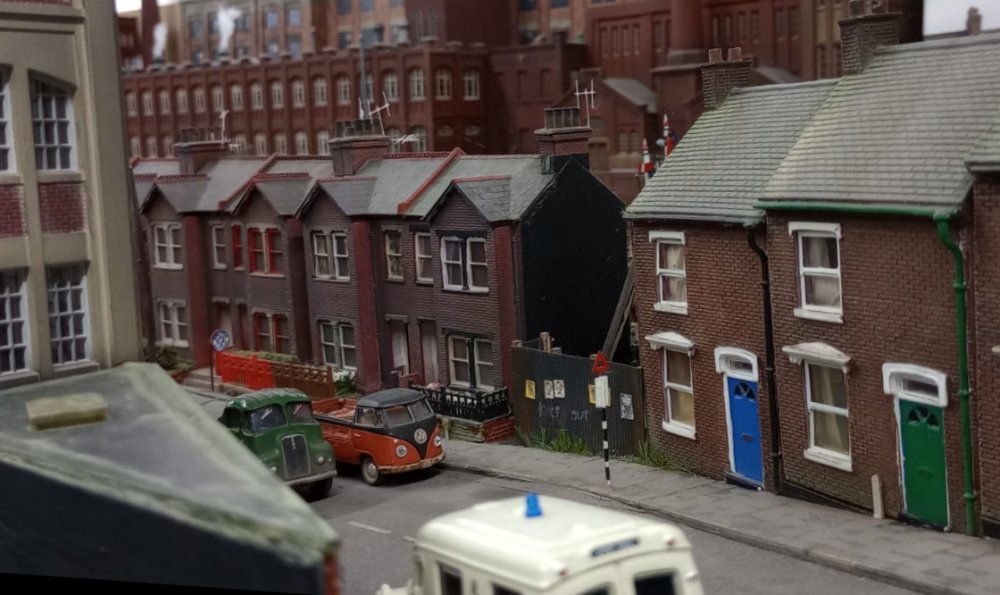 Next up is a few snaps taken on Station Road, shown here with the brewery towering up behind.
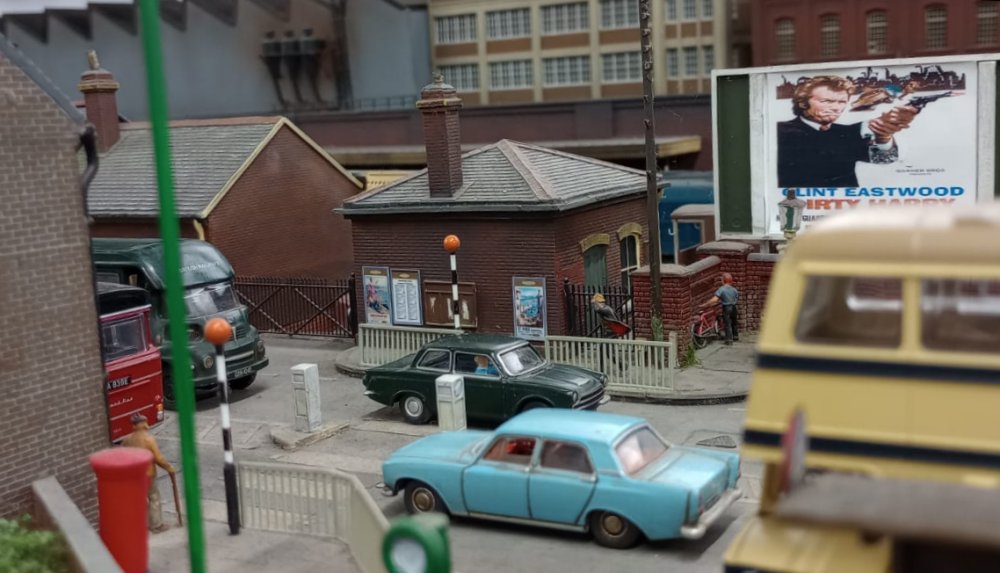 A busy road during rush hour - cross at your peril.....
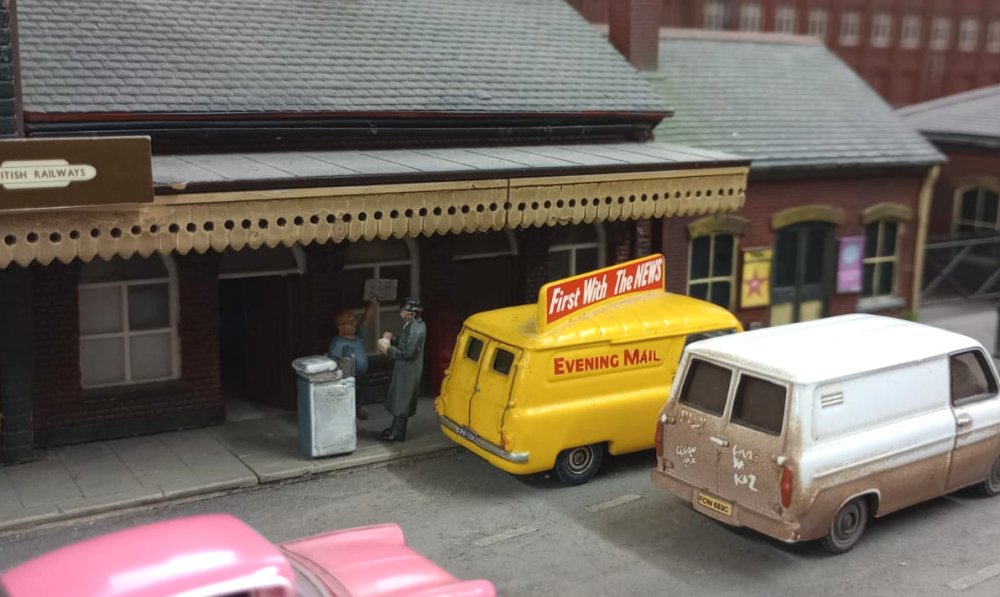 ..... and grab a copy of the Evening Mail on your way home.
![]()
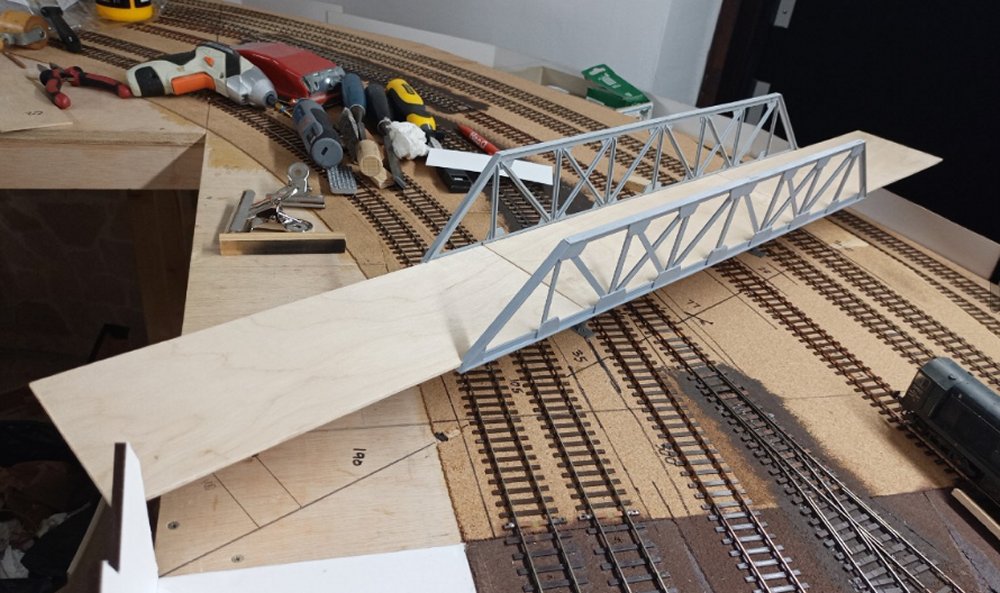
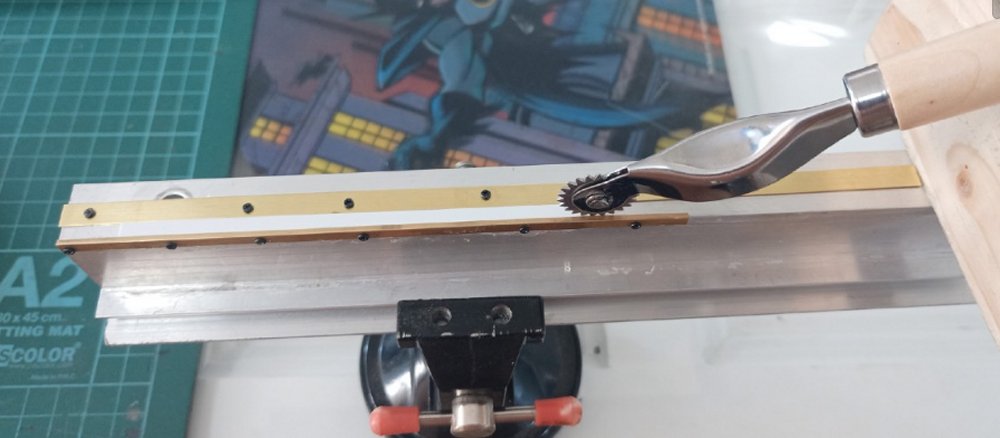 To break up the openness of the PW baseboards, I've decided on a girder bridge to span the
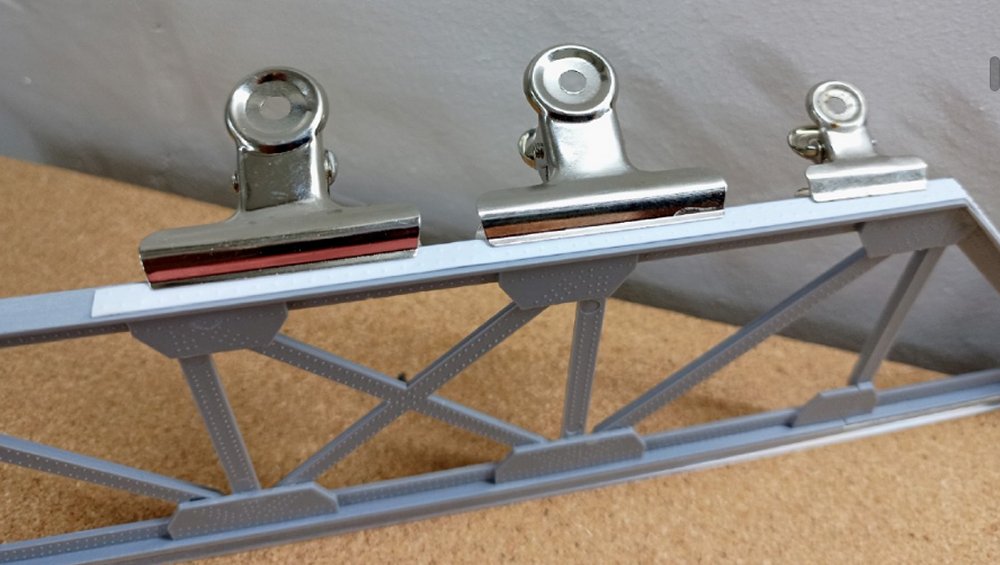
corner, utilising the Airfix kit. I made some reinforcing plates from plasticard strip by
constructing a jig and using a pounce wheel to indent the rear and give equal spacing.
To break up the openness of the PW baseboards, I've decided on a girder bridge to span the
corner, utilising the Airfix kit. I made some reinforcing plates from plasticard strip by
constructing a jig and using a pounce wheel to indent the rear and give equal spacing.
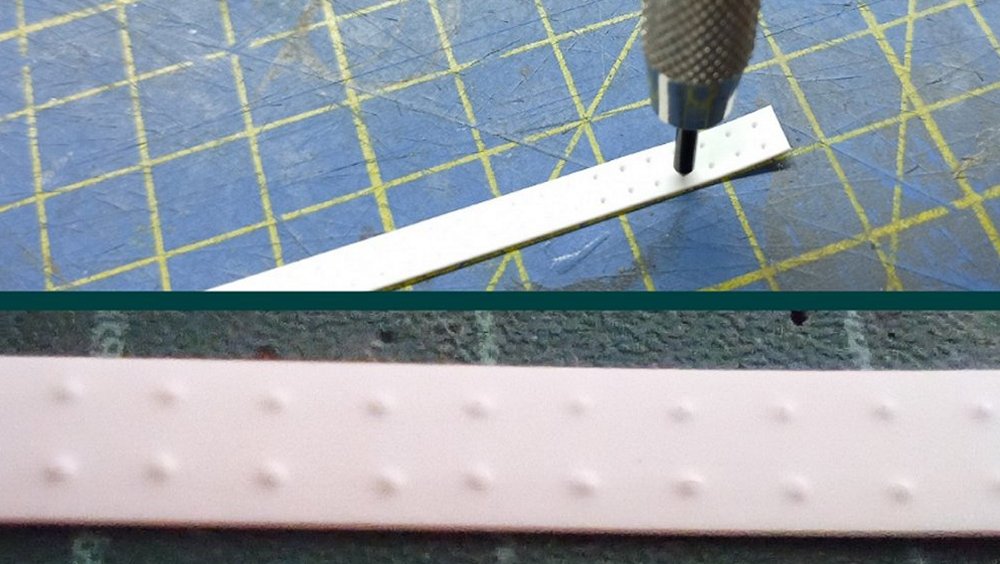 The indents were then pushed out with a 2mm axle held in a pin vice.
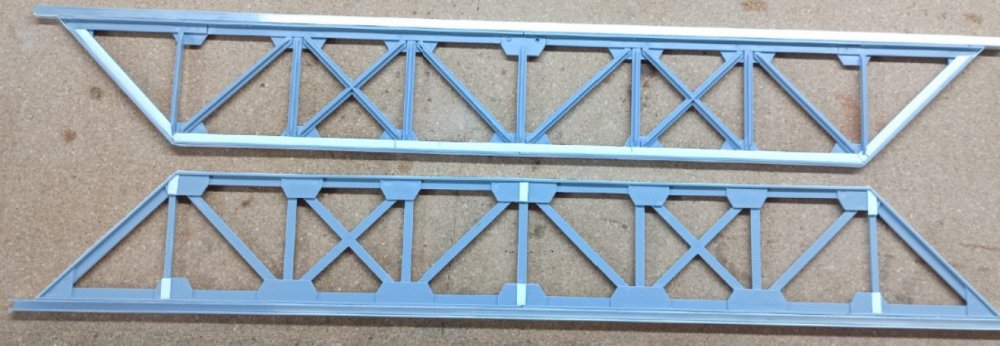 The kits can be joined together with an adaptor piece. A double length pair of sides was constructed.
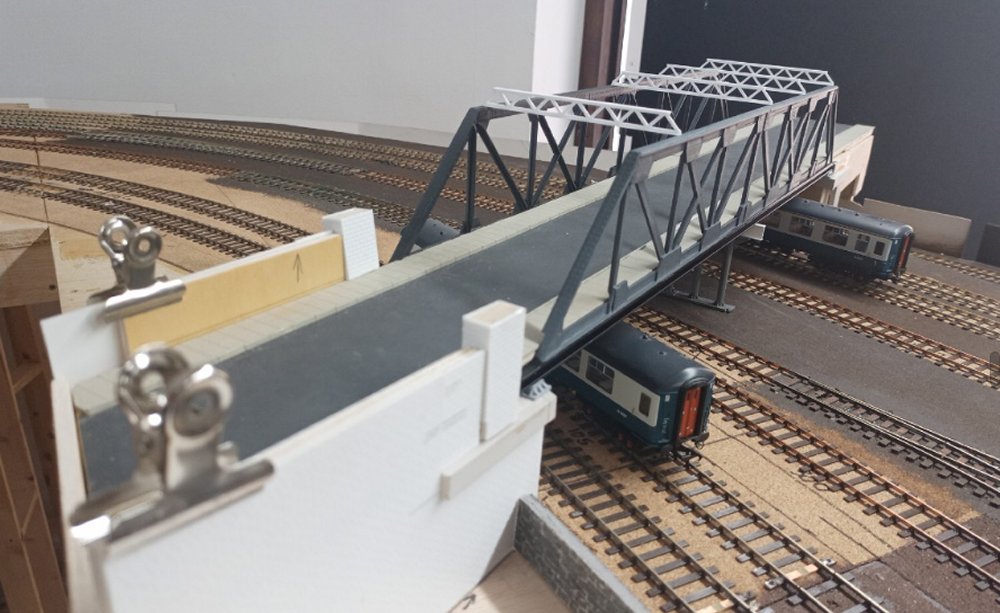
 Showing the reinforcing plates fitted to the bridge, helping to hide the join.
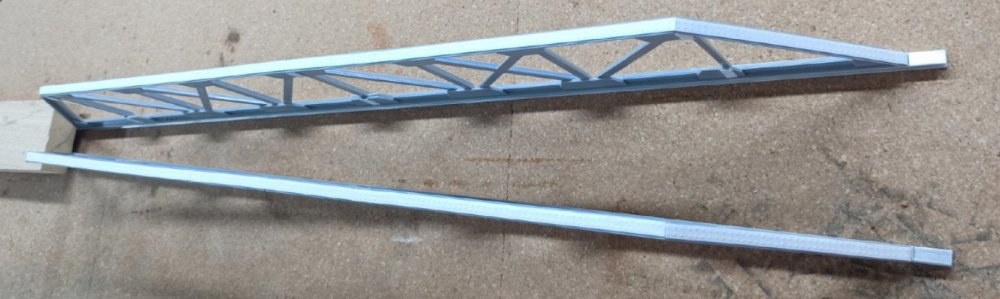 These were glued on in the relevant places and they were mounted on some 6mm aluminium
channel for strength.Ā
These were glued on in the relevant places and they were mounted on some 6mm aluminium
channel for strength.Ā
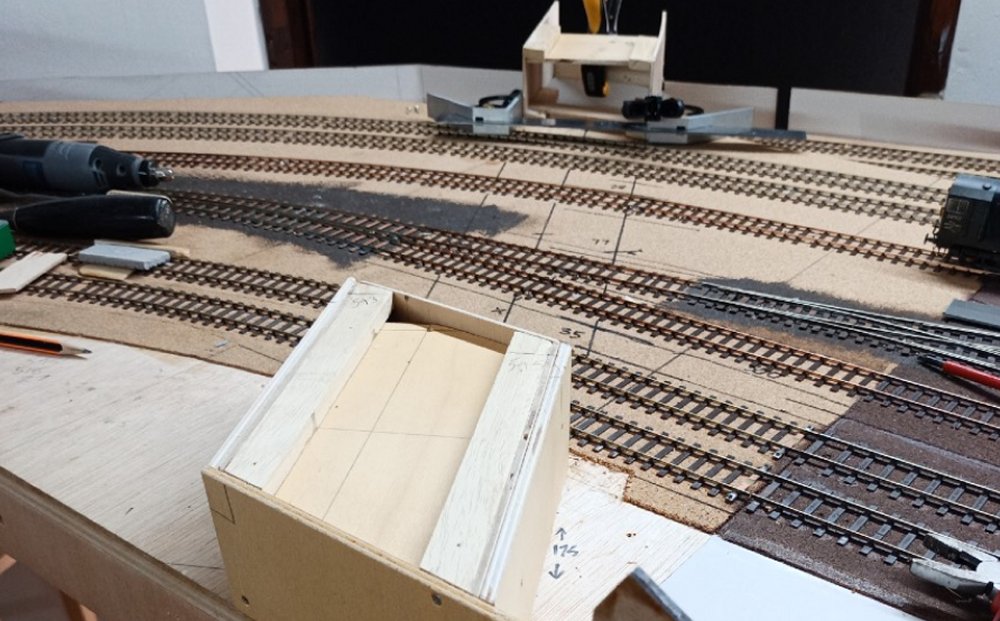 Two abutments were measured and constructed from plywood to resist any movement due to
temperature and these were clad with South Eastern finecast brick sheets.
Two abutments were measured and constructed from plywood to resist any movement due to
temperature and these were clad with South Eastern finecast brick sheets.
 The sub roadbed was constructed from laminated ply sheets.
 Scale Model Scenery paving and scratch built kerbstones from plasticard strip, with fine
emery cloth for the tarmac surface.
Wooden jigs were made to hold the bridge sides in
position and cross beams cut from plastruct girder mouldings, and fitted temporarily in position.
Scale Model Scenery paving and scratch built kerbstones from plasticard strip, with fine
emery cloth for the tarmac surface.
Wooden jigs were made to hold the bridge sides in
position and cross beams cut from plastruct girder mouldings, and fitted temporarily in position.
 A centre support pillar was fashioned from 2 old Triang incline supports.
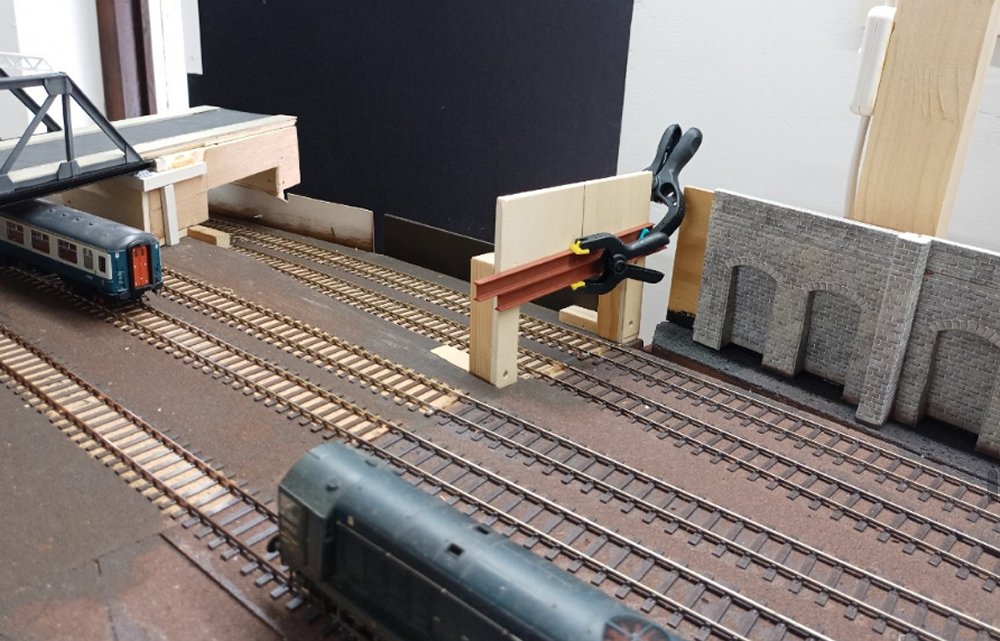 To cover the entrance to the incline down to the fiddle yard, a tunnel mouth of some variety
is currently under consideration, and this will also run along to the bridge abutment
allowing for development above.
To cover the entrance to the incline down to the fiddle yard, a tunnel mouth of some variety
is currently under consideration, and this will also run along to the bridge abutment
allowing for development above.
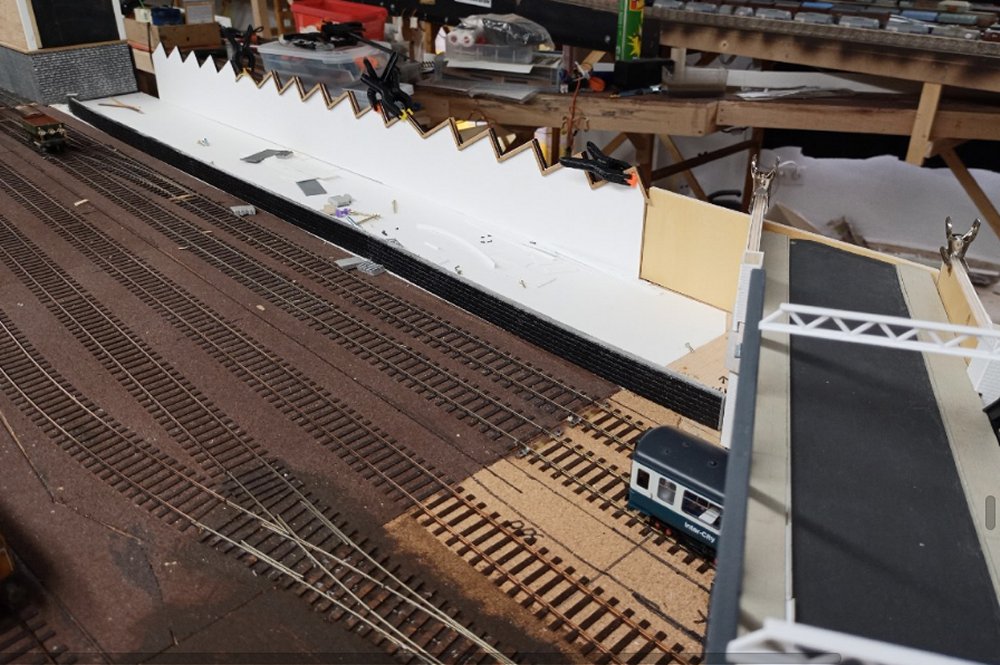 To cover the gap on the inside of the layout, a low relief northlight building is being
constructed.....
To cover the gap on the inside of the layout, a low relief northlight building is being
constructed.....
 ...... and is currently awaiting brick sheets and some idea of a design for windows and doors etc.
 Vehicular access to the PW yard is being thought about. The first idea is something along these
lines although this may change in future.
Vehicular access to the PW yard is being thought about. The first idea is something along these
lines although this may change in future.
![]()
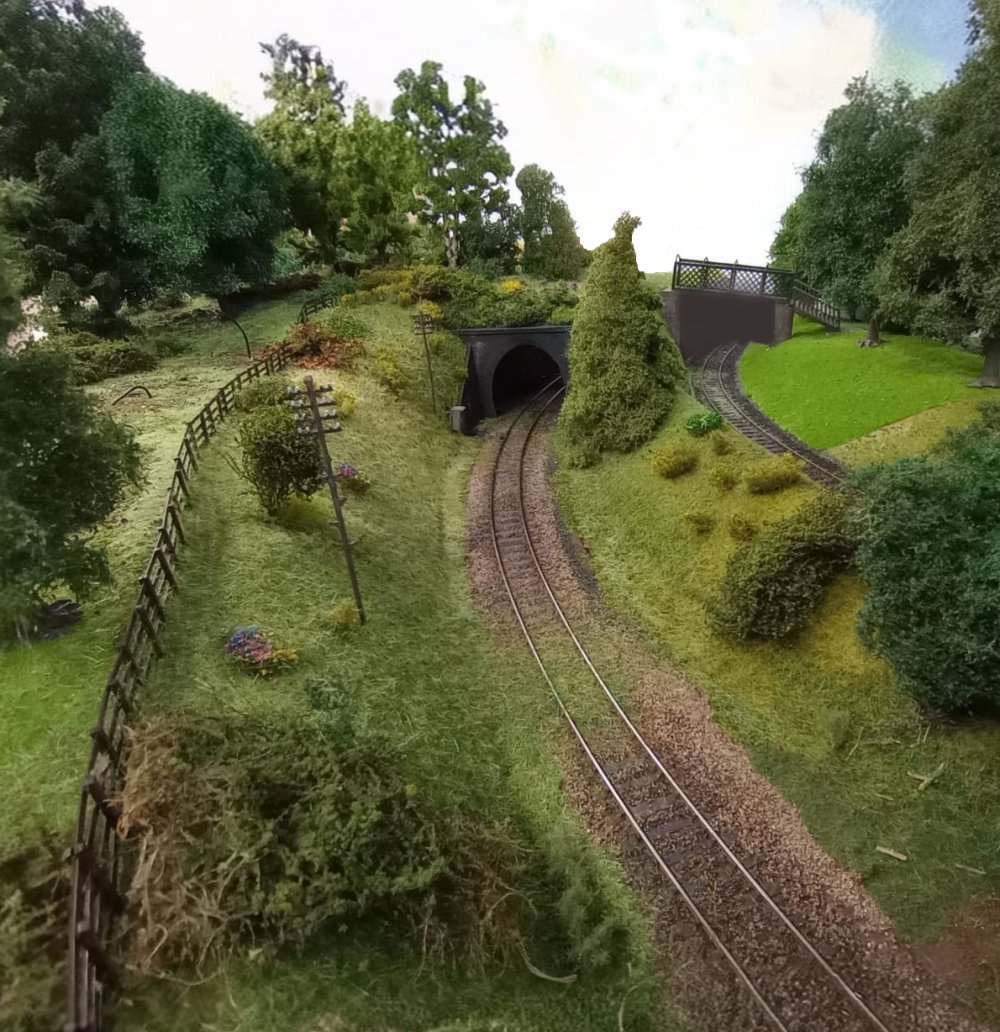 Slow progress continues with the scenic work on Wood End Sidings, adding trees, foliage
and various grass fibres. Here's an update picture showing the branch line looking towards
the tunnel, with the industrial siding to the right.
Slow progress continues with the scenic work on Wood End Sidings, adding trees, foliage
and various grass fibres. Here's an update picture showing the branch line looking towards
the tunnel, with the industrial siding to the right.