*********************************************************************************************************************************************
SEPTEMBER 2025 UPDATE
*********************************************************************************************************************************************
MIKE WHITCHURCH
*********************************************************************************************************************************************
KIER HARDY
*********************************************************************************************************************************************
GREG BROOKES
*********************************************************************************************************************************************
HYWEL THOMAS
*********************************************************************************************************************************************
ANDY LEE
*********************************************************************************************************************************************
IAN MANDERSON
*********************************************************************************************************************************************
MATT OWEN
*********************************************************************************************************************************************
KARL CROWTHER
*********************************************************************************************************************************************
![]()
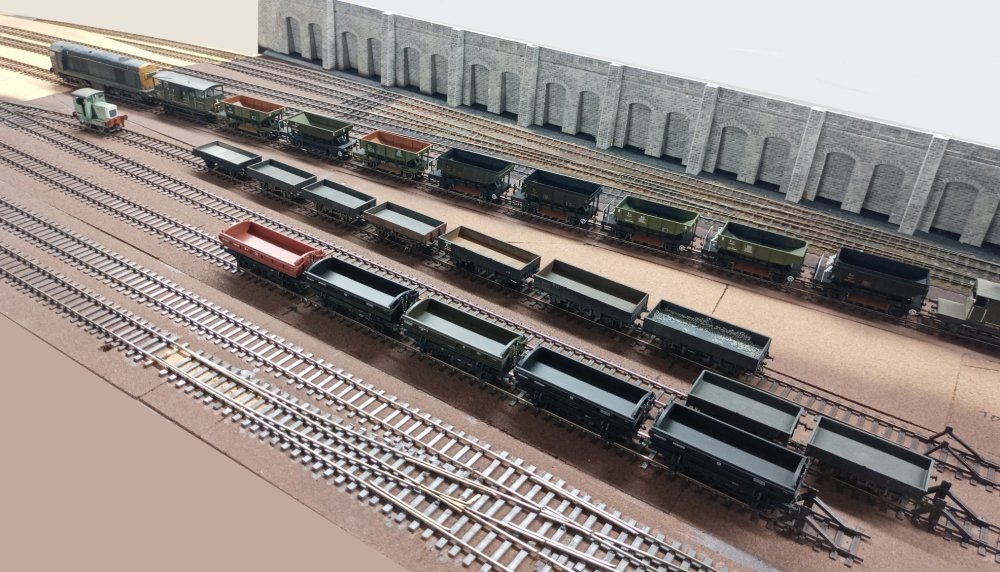 Work on the layout has slowly but steadily progressed, with the continuation of the engineers
yard being the focus of attention.
Work on the layout has slowly but steadily progressed, with the continuation of the engineers
yard being the focus of attention.
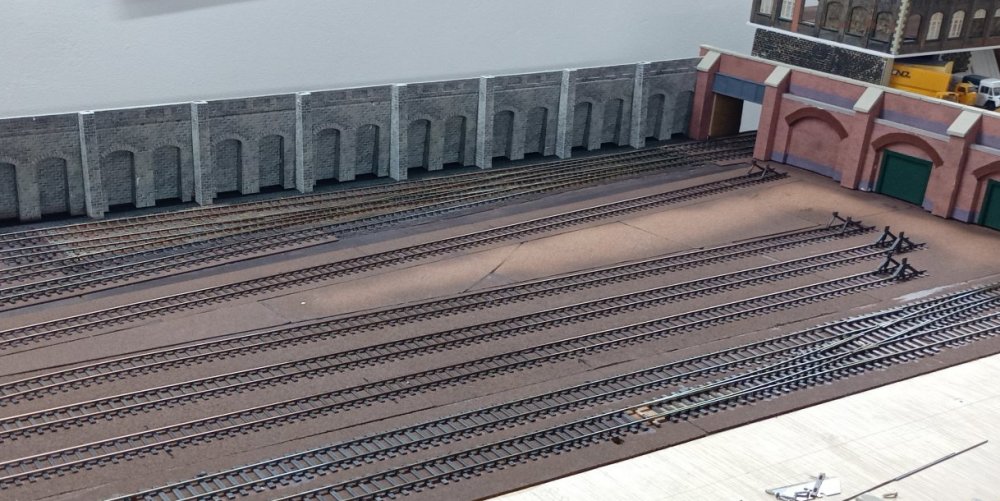 The arches and retaining wall are now awaiting weathering / bedding in of some variety. Buffer
stops were built and fitted - 2 Lanarkshire versions and 2 repurposed from elsewhere on the
layout, so some parts do live on!
The arches and retaining wall are now awaiting weathering / bedding in of some variety. Buffer
stops were built and fitted - 2 Lanarkshire versions and 2 repurposed from elsewhere on the
layout, so some parts do live on!
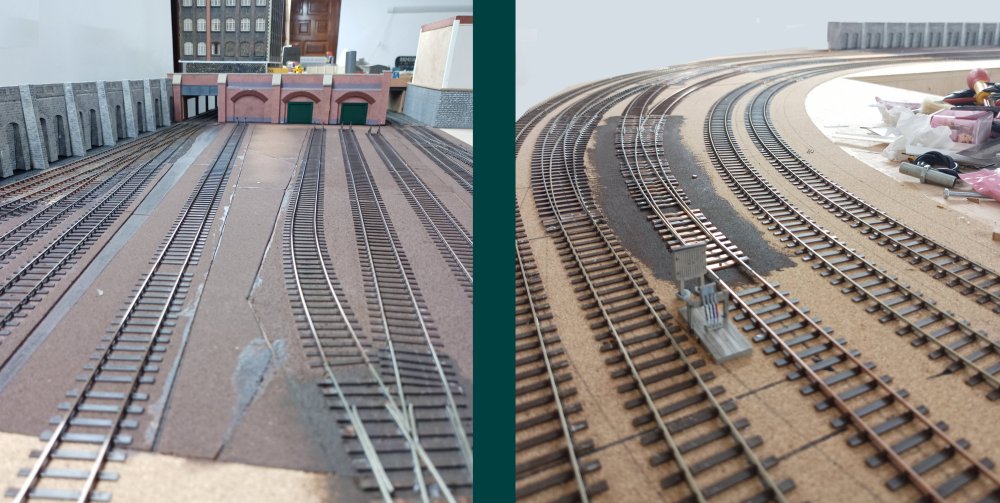 A Bachmann ground frame has been sourced and will control the access and egress from the
yard. The underboard wiring and feeds are complete, current work is focussing on the
servo controls for the turnouts.
A Bachmann ground frame has been sourced and will control the access and egress from the
yard. The underboard wiring and feeds are complete, current work is focussing on the
servo controls for the turnouts.
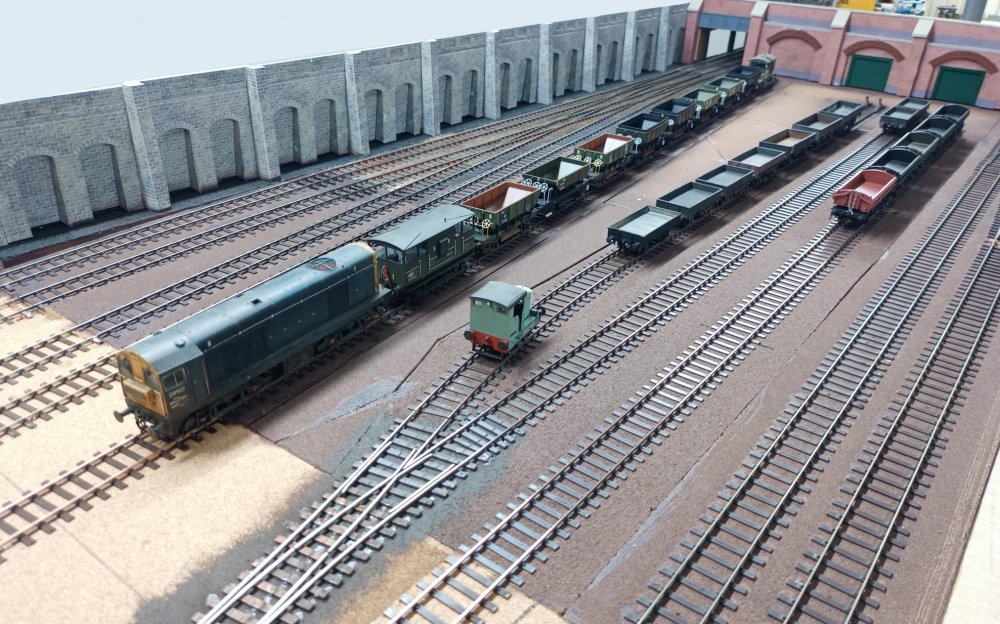 The track bed was sprayed with a suitably grotty colour, not with a commonly available track
spray as in the UK, that sort of thing doesn't exist over here in Spain, so a visit to
interrogate the local DIY sheds produced something vaguely usable.
The track bed was sprayed with a suitably grotty colour, not with a commonly available track
spray as in the UK, that sort of thing doesn't exist over here in Spain, so a visit to
interrogate the local DIY sheds produced something vaguely usable.
![]()
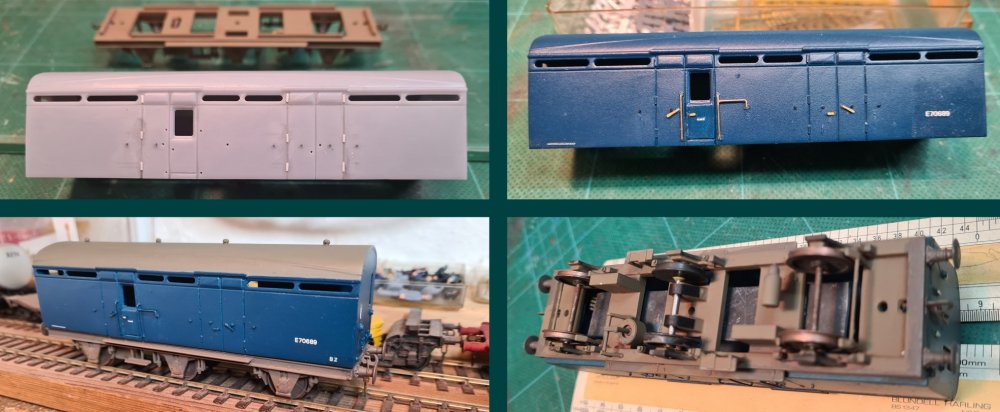 Here's another one of Jonny's designs (available as a free download from
Iron Mink on Thingiverse),
of a LNER Thompson BZ 6-wheeled luggage brake van number E70689. The pinpoints have been removed
from the centre axle and sits in a pair of cups (with black retaining straps) allowing plenty of
sideways movement to negotiate points and curves.
Here's another one of Jonny's designs (available as a free download from
Iron Mink on Thingiverse),
of a LNER Thompson BZ 6-wheeled luggage brake van number E70689. The pinpoints have been removed
from the centre axle and sits in a pair of cups (with black retaining straps) allowing plenty of
sideways movement to negotiate points and curves.
 The 3D print includes door handles, hinges and bumps stops on the sides, but I decided to add
these as separate items after sanding smooth due to the striations on my print.
The 3D print includes door handles, hinges and bumps stops on the sides, but I decided to add
these as separate items after sanding smooth due to the striations on my print.
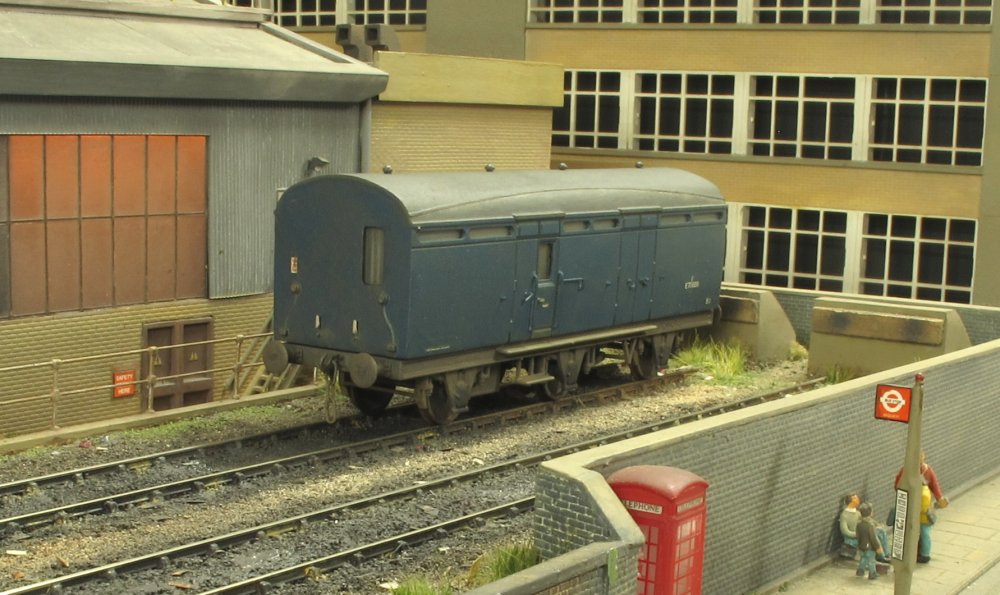 These vehicles were built from 1950 and lasted in service until the late 1970s, and used mainly
in parcels trains due to their exclusion from passenger trains.
These vehicles were built from 1950 and lasted in service until the late 1970s, and used mainly
in parcels trains due to their exclusion from passenger trains.
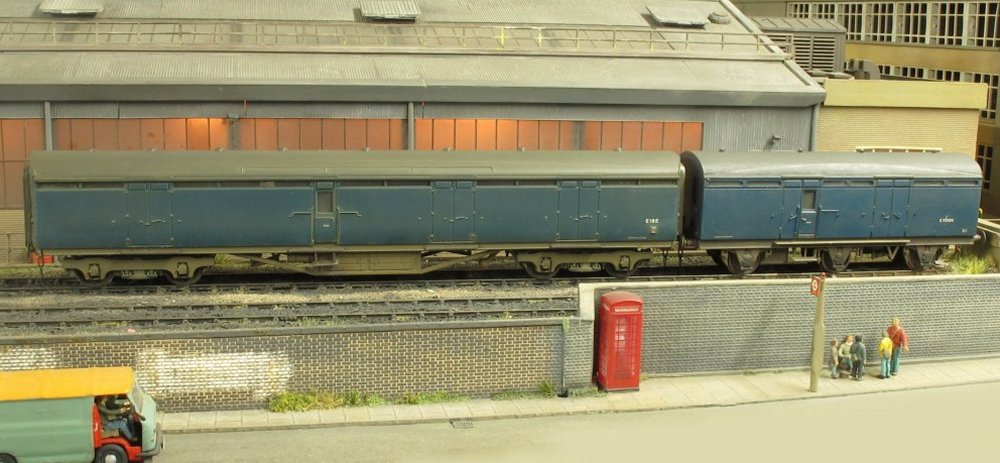 The BZ is seen here next to a Thompson full brake (Bachmann) numbered E18E as originally used
on the Flying Scotsman and Junior Scotsman services.
The BZ is seen here next to a Thompson full brake (Bachmann) numbered E18E as originally used
on the Flying Scotsman and Junior Scotsman services.
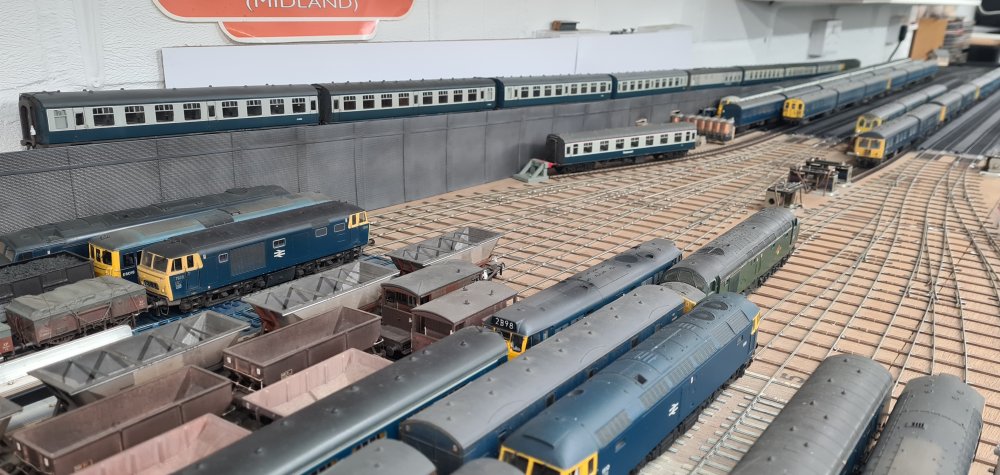 A start has been made on a 1:20 access ramp at the back of the storage yard, which will form a
branch line to a new 16ft portable sub-layout located above the existing main storage sidings.
It will be based in the East London area featuring a freight exchange sidings serving the docks
with a single platform station served by DMUs. There should also be enough space for an industrial
area (scrapyard / factory) with the excuse to run some private owner locomotives. For now, the ramp
is used to stable stock, so it will be unlikely to see this 8-coach passenger train when operational.
A start has been made on a 1:20 access ramp at the back of the storage yard, which will form a
branch line to a new 16ft portable sub-layout located above the existing main storage sidings.
It will be based in the East London area featuring a freight exchange sidings serving the docks
with a single platform station served by DMUs. There should also be enough space for an industrial
area (scrapyard / factory) with the excuse to run some private owner locomotives. For now, the ramp
is used to stable stock, so it will be unlikely to see this 8-coach passenger train when operational.
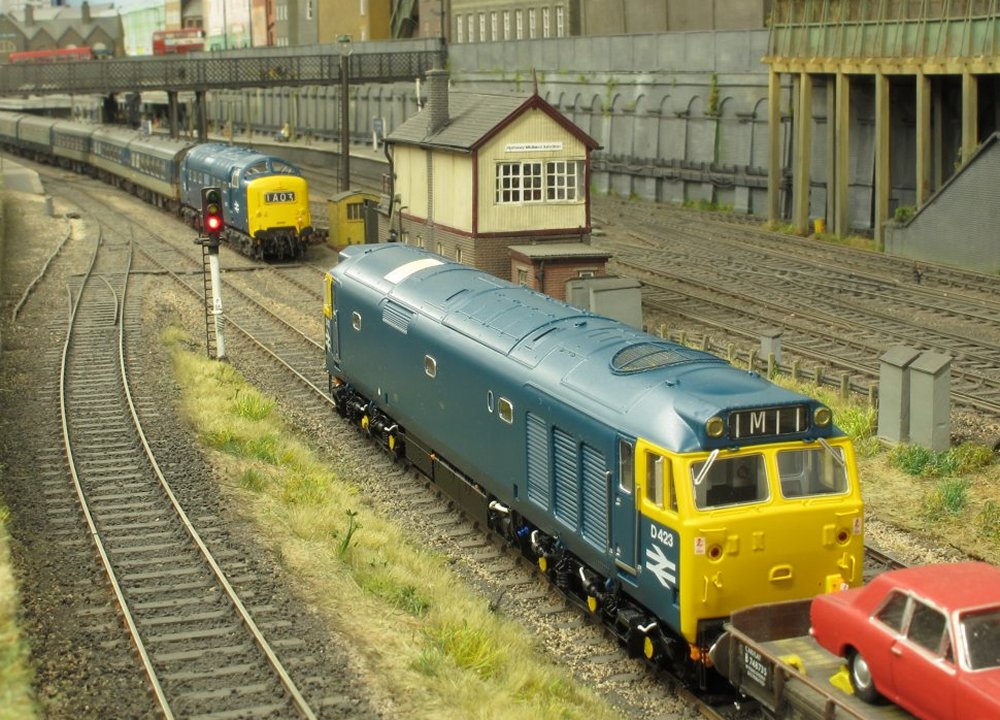 A snap of 2 new Accurascale models recently converted to EM gauge and on test. Deltic 9002 The
Kings Own Yorkshire Light Infantry for the Hornsey fleet, and Class 50 number 423 for the
Shenston Road fleet, both awaiting weathering (and at the very least painting those brake
cylinder pipes on the bogies black).
A snap of 2 new Accurascale models recently converted to EM gauge and on test. Deltic 9002 The
Kings Own Yorkshire Light Infantry for the Hornsey fleet, and Class 50 number 423 for the
Shenston Road fleet, both awaiting weathering (and at the very least painting those brake
cylinder pipes on the bogies black).
![]()
 With camera in hand, it's time for another visit to Shenston Road. A zoom shot captures
D1068 Western Reliance at the south end of the station with a rake of mineral wagons.
With camera in hand, it's time for another visit to Shenston Road. A zoom shot captures
D1068 Western Reliance at the south end of the station with a rake of mineral wagons.
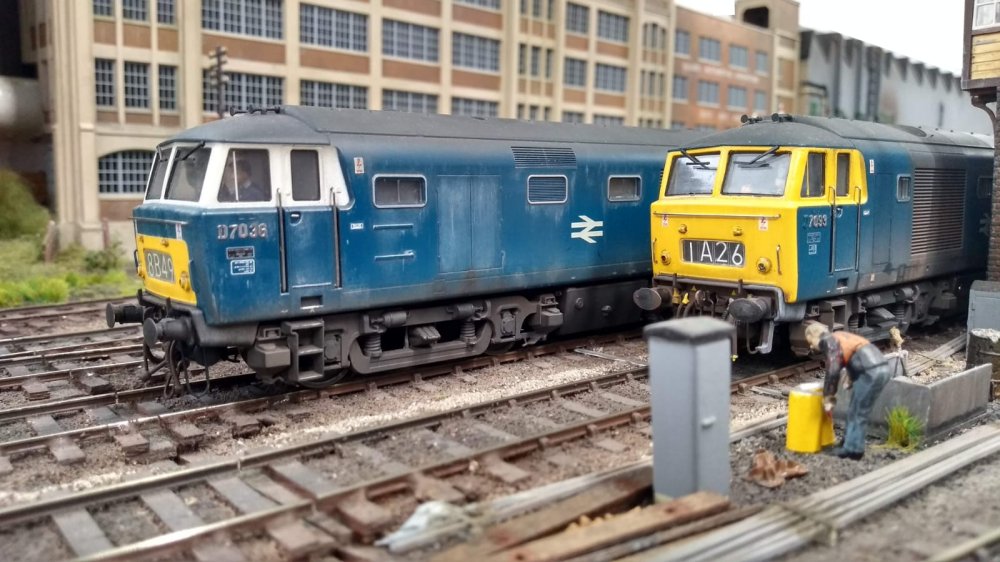 Whilst at the north end of the station are Hymeks D7036 and 7093.
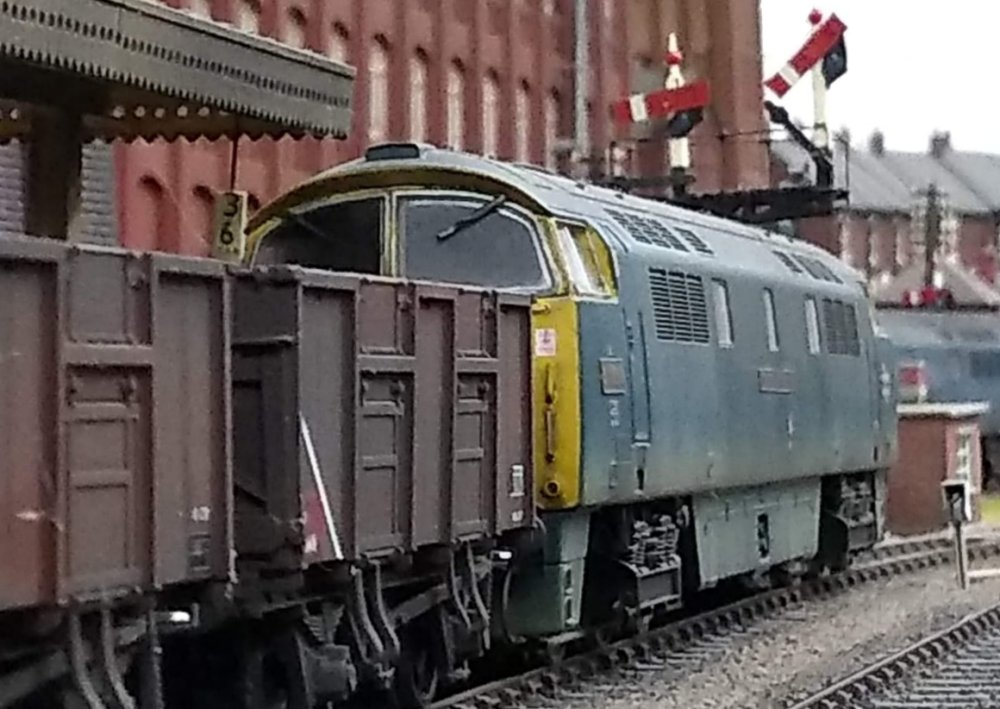
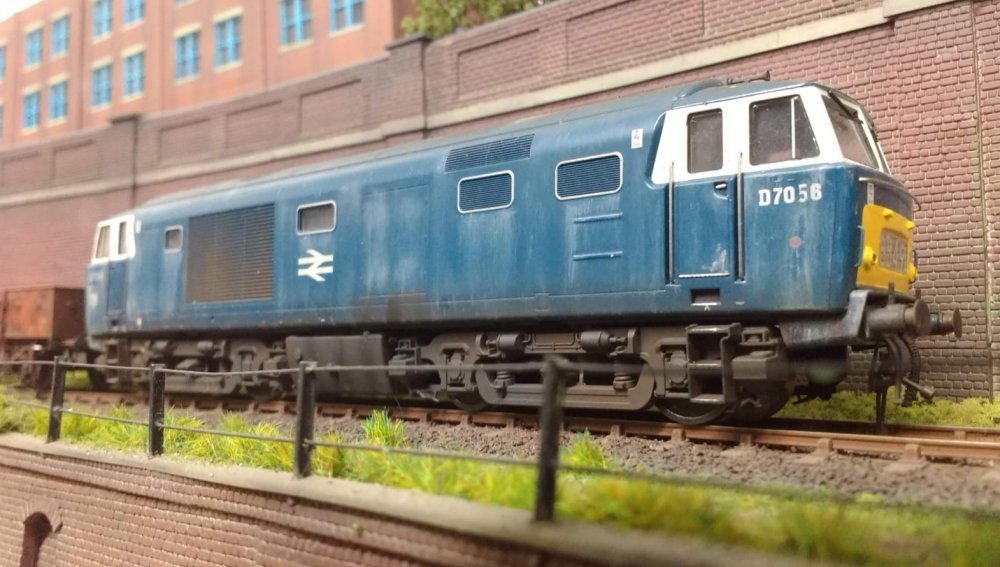 Another Hymek D7056 on the branch line from the steelworks. Compared to the previous
photograph, it can be seen that the etched cabside numbers make a big difference, so this
loco is next in line for new numerals.
Another Hymek D7056 on the branch line from the steelworks. Compared to the previous
photograph, it can be seen that the etched cabside numbers make a big difference, so this
loco is next in line for new numerals.
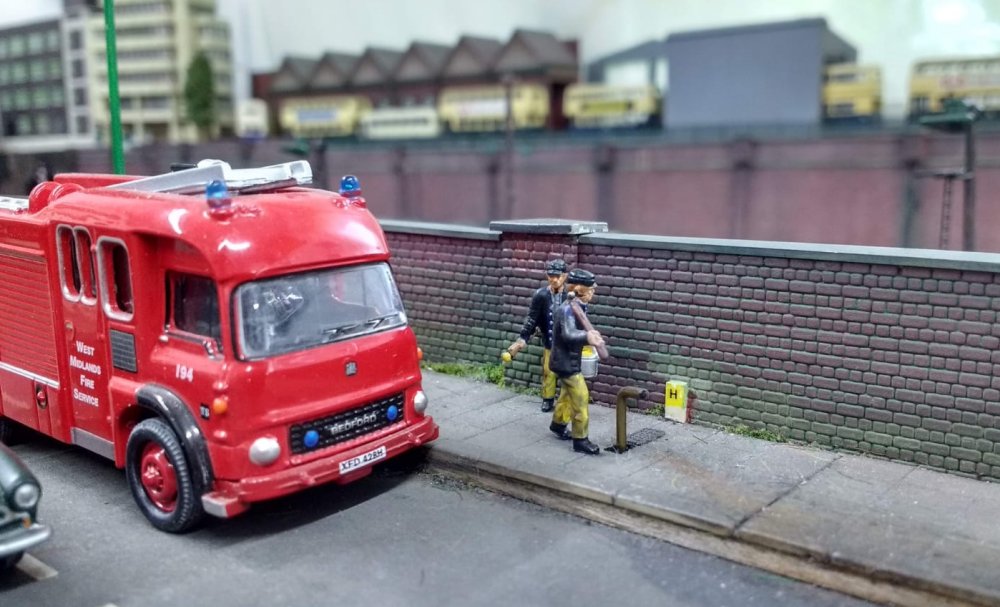 The West Midlands Fire Brigade perform tests with a standpipe on Station Road.
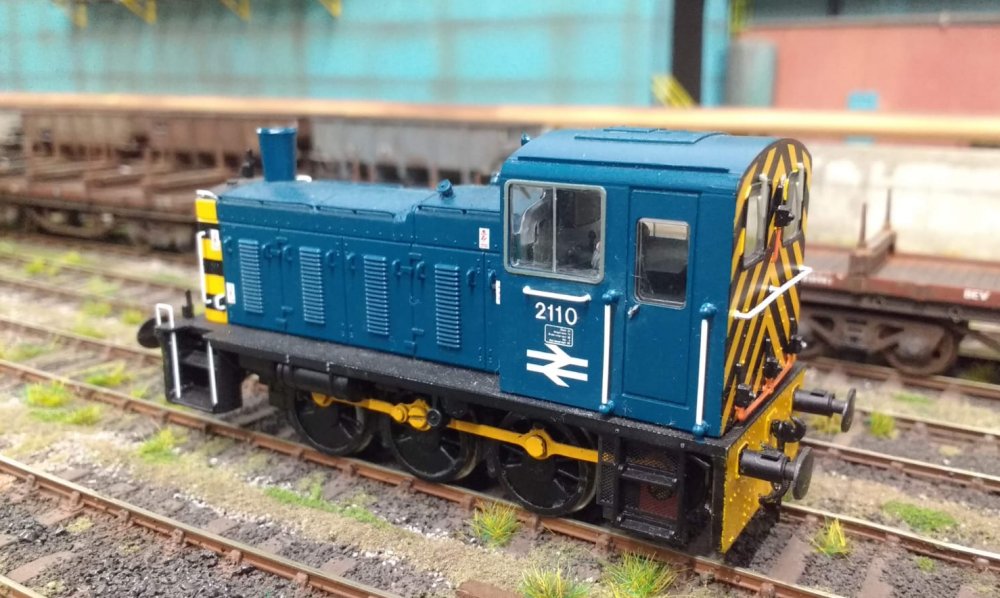 Class 03 number 2110 is seen here in ex-works condition sporting its new blue livery.
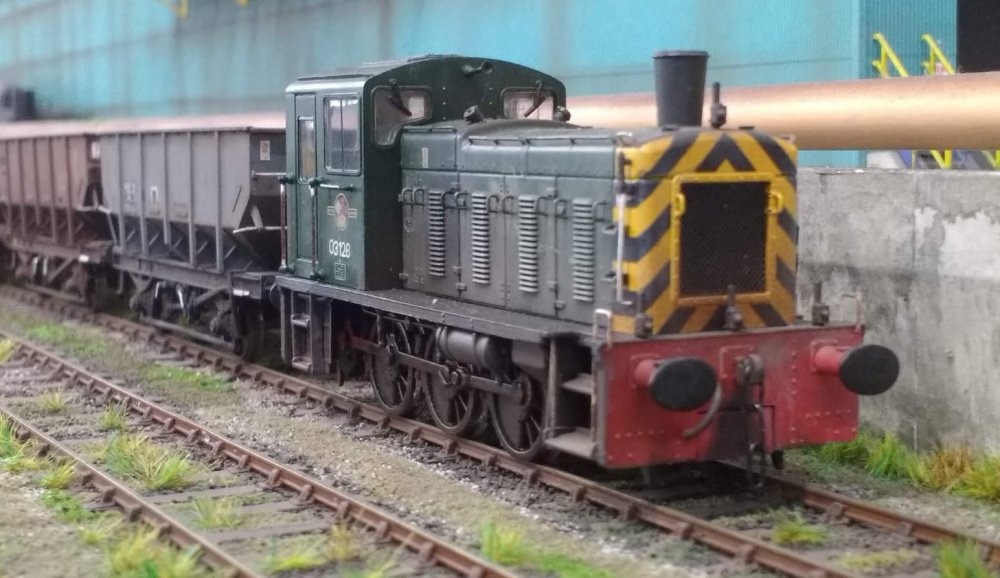 Green liveried Class 03 03128 in the steelworks exchange sidings shunting hopper wagons.
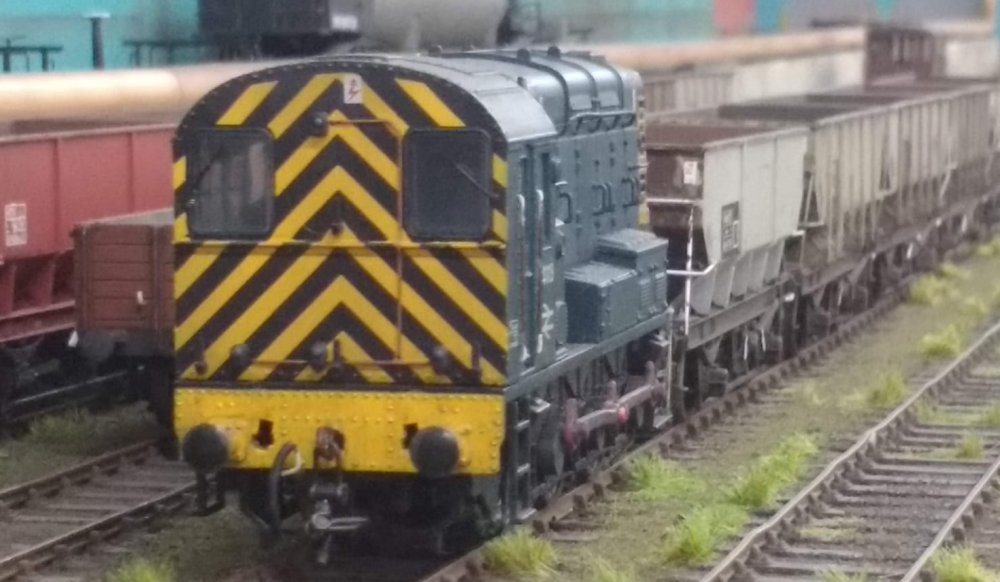 Here's a Class 08 - 4118 shunting hopper wagons in the exchange sidings.
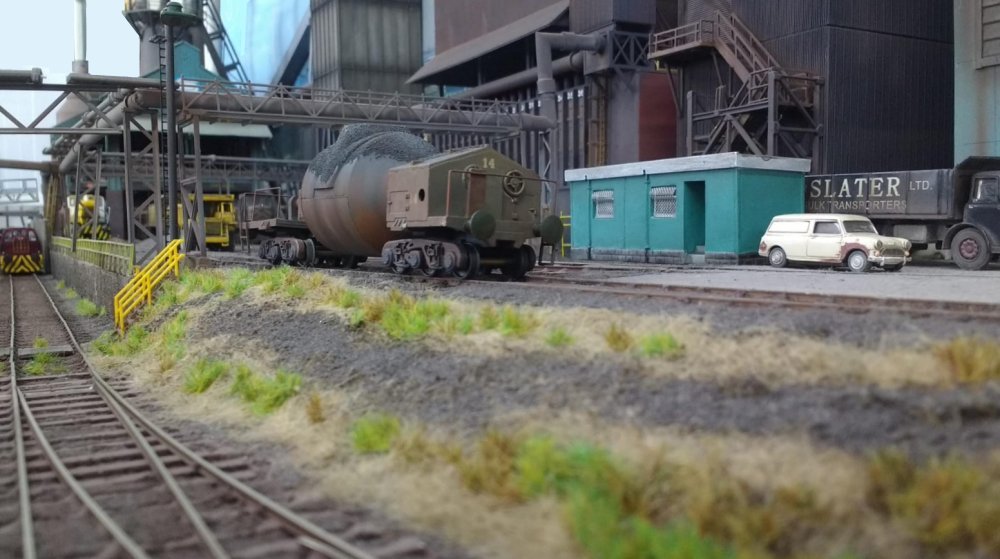 As we get closer to the steelworks, a Torpedo molten metal car can be seen, used in the transfer
of molten iron from the blast furnace to the basic oxygen plant that converts it into steel.
As we get closer to the steelworks, a Torpedo molten metal car can be seen, used in the transfer
of molten iron from the blast furnace to the basic oxygen plant that converts it into steel.
 On hire NCB English Electric 0-6-0 No7 is captured moving molten metal cars at the blast furnace.
![]()
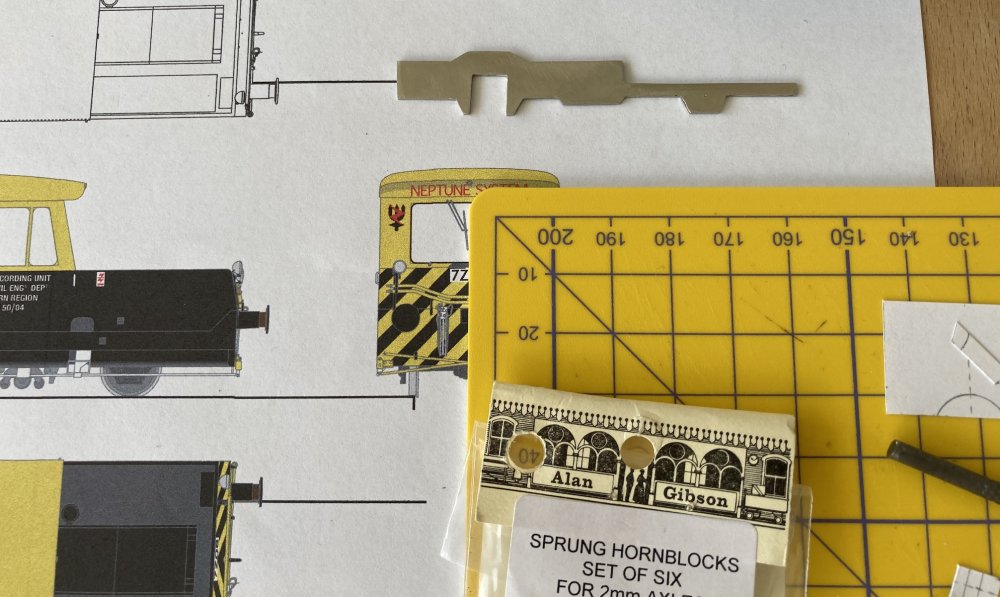 A project that has long been put off (partly due to my lack of experience in chassis building!)
was for a Matisa Neptune track recording unit. I drew up some plans for this around five years
back but nothing happened. And then Jonny sent me one of his 3D prints and I had no excuses
left. Originally it was going to be a simple rigid chassis but having found a set of Gibson
sprung horn blocks (that I have no memory of buying), I decided some simple springing might
improve performance on this tiny machine. A simple chassis was made from nickel silver tack
soldered together before cutting to make sure everything was aligned.
A project that has long been put off (partly due to my lack of experience in chassis building!)
was for a Matisa Neptune track recording unit. I drew up some plans for this around five years
back but nothing happened. And then Jonny sent me one of his 3D prints and I had no excuses
left. Originally it was going to be a simple rigid chassis but having found a set of Gibson
sprung horn blocks (that I have no memory of buying), I decided some simple springing might
improve performance on this tiny machine. A simple chassis was made from nickel silver tack
soldered together before cutting to make sure everything was aligned.
 With the basic chassis design decided I now needed to see if I could squeeze a High Level Kits
Micro-mizer gearbox into the thing. I used 10.5mm Lowmac wheels so also had to make sure that
there was enough clearance for them to rotate. The Neptunes featured big windows so I was keen
from the beginning to make sure the interior was clear enough to add in the recording desks
and other equipment. Here we see Jonny’s 3D print marked up ready for cutting.
With the basic chassis design decided I now needed to see if I could squeeze a High Level Kits
Micro-mizer gearbox into the thing. I used 10.5mm Lowmac wheels so also had to make sure that
there was enough clearance for them to rotate. The Neptunes featured big windows so I was keen
from the beginning to make sure the interior was clear enough to add in the recording desks
and other equipment. Here we see Jonny’s 3D print marked up ready for cutting.
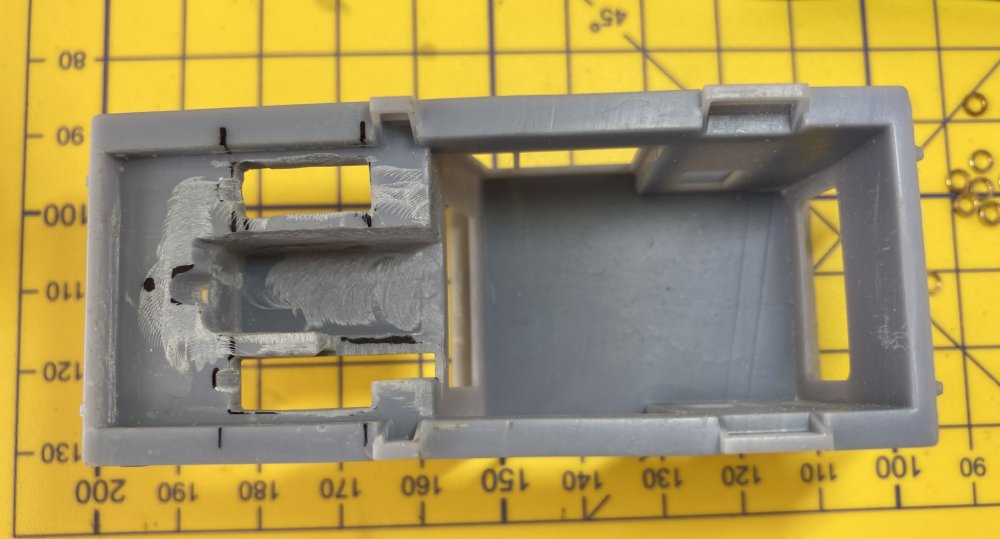 And here’s the results of half and hour with a cutting bit in the Proxxon. When cutting resin
I’d recommend a good mask and safety goggles as it can get quite dusty and that dust is most
certainly not good for you. Although the wheel cut-outs go right through the floor I’d worked
out that they would clear a thin 10-thou overlay on the deck so would not be visible when complete.
And here’s the results of half and hour with a cutting bit in the Proxxon. When cutting resin
I’d recommend a good mask and safety goggles as it can get quite dusty and that dust is most
certainly not good for you. Although the wheel cut-outs go right through the floor I’d worked
out that they would clear a thin 10-thou overlay on the deck so would not be visible when complete.
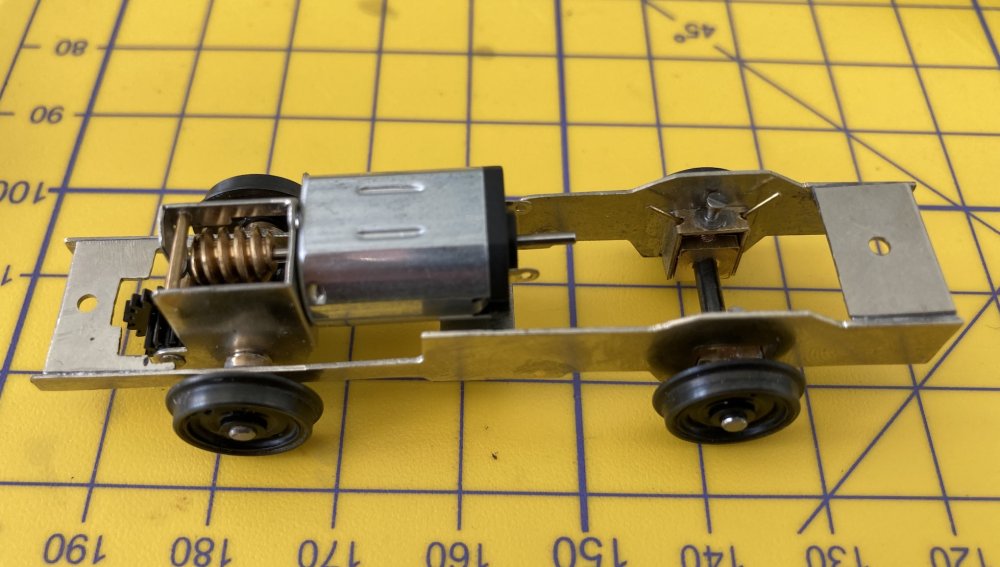 This is the chassis with the motor and gearbox fitted. The motor is slightly wider that the
bonnet on the print but again a small additional cover of thin plastic sheet hid everything
nicely. As the desk on the Neptune was quite wide the back end of the motor was completely
covered from view. The sprung horn blocks were set slightly higher that the finished axle
height to allow for the weight of the body, which then brought everything level.
This is the chassis with the motor and gearbox fitted. The motor is slightly wider that the
bonnet on the print but again a small additional cover of thin plastic sheet hid everything
nicely. As the desk on the Neptune was quite wide the back end of the motor was completely
covered from view. The sprung horn blocks were set slightly higher that the finished axle
height to allow for the weight of the body, which then brought everything level.
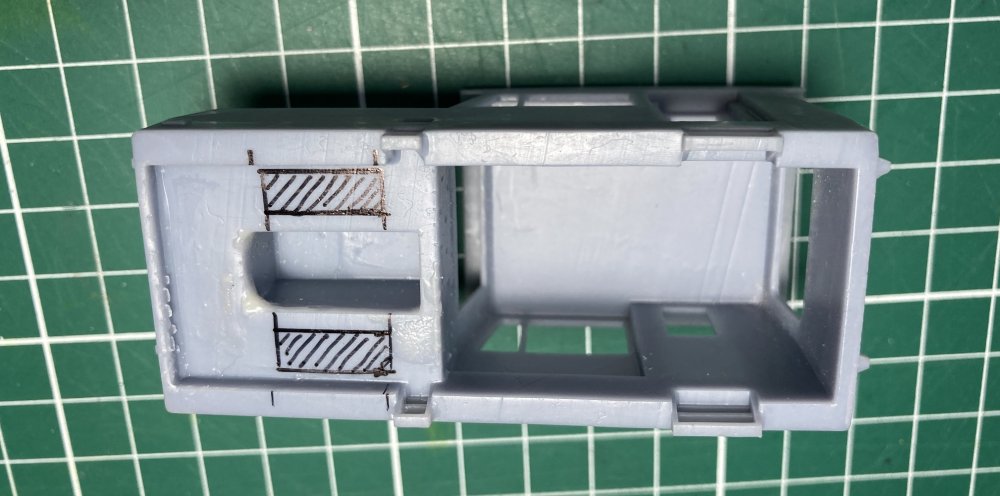
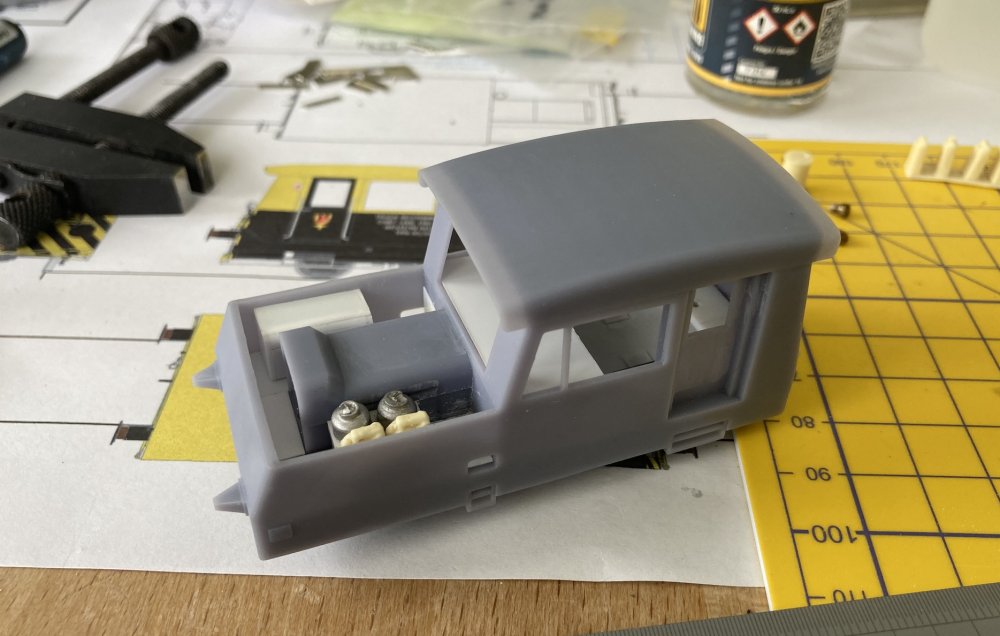
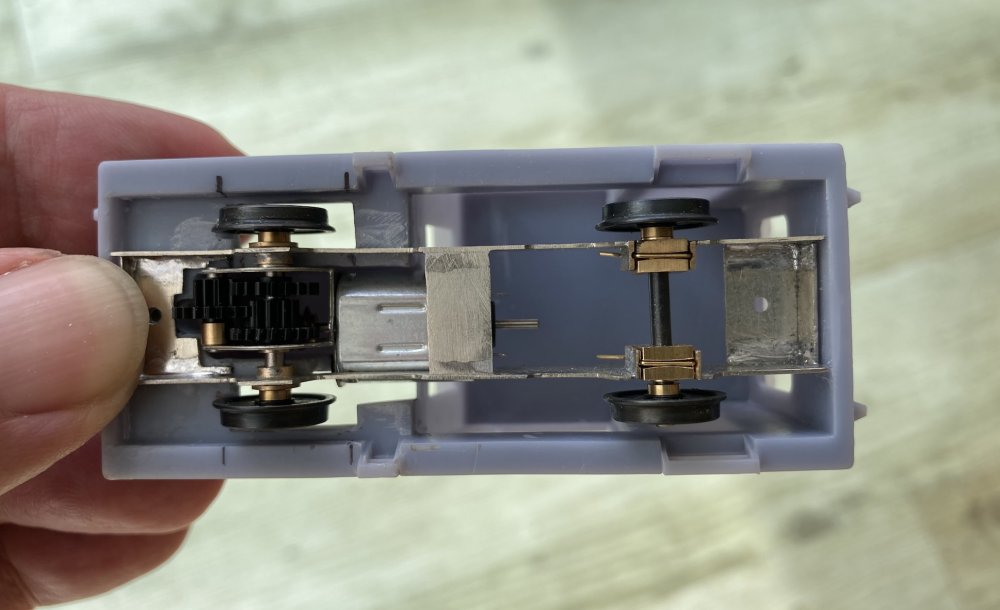 This shows how the chassis fits into the modified 3D print, all the gaps being easy to cover
up at a later point. There were two distinct versions of the Neptune - the PV5 (with the
overhanging roof) and the PV6 (with the taller flush roof), but, as I discovered when
researching the things, every single one of the 13 machines is different! This ranges from
quite significant bodywork alterations, usually to the area around the bonnet, to window
arrangements and positioning of spotlights. Mine was going to be TRN 50/04, commonly seen
around South Wales but pick your variant carefully!
This shows how the chassis fits into the modified 3D print, all the gaps being easy to cover
up at a later point. There were two distinct versions of the Neptune - the PV5 (with the
overhanging roof) and the PV6 (with the taller flush roof), but, as I discovered when
researching the things, every single one of the 13 machines is different! This ranges from
quite significant bodywork alterations, usually to the area around the bonnet, to window
arrangements and positioning of spotlights. Mine was going to be TRN 50/04, commonly seen
around South Wales but pick your variant carefully!
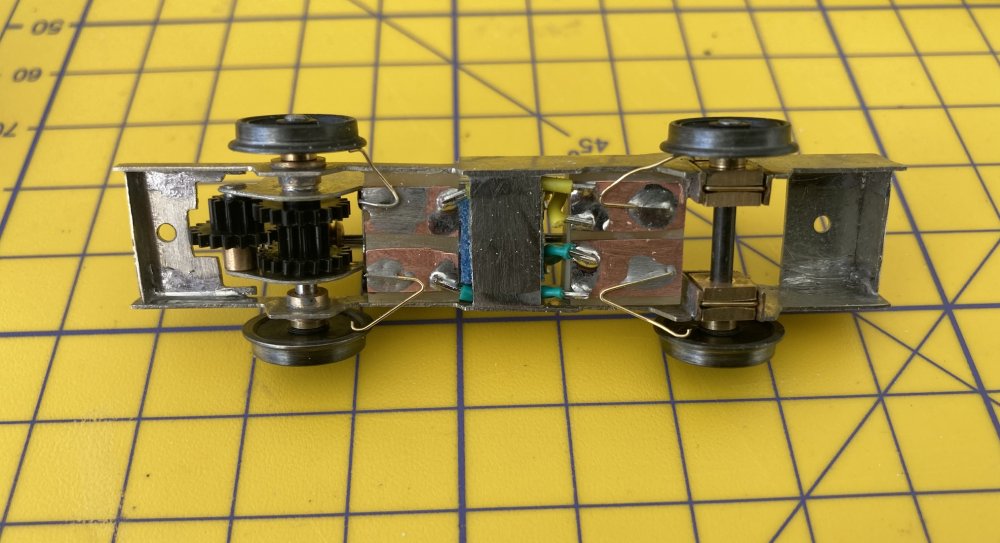 This is the finished chassis, now with sprung pick-ups to each wheel, a thin rubber cushion
for the motor which is held down by the pick-up wiring from the copper clad board. Not the
neatest thing but it seems to work well, which I guess is the point.
This is the finished chassis, now with sprung pick-ups to each wheel, a thin rubber cushion
for the motor which is held down by the pick-up wiring from the copper clad board. Not the
neatest thing but it seems to work well, which I guess is the point.
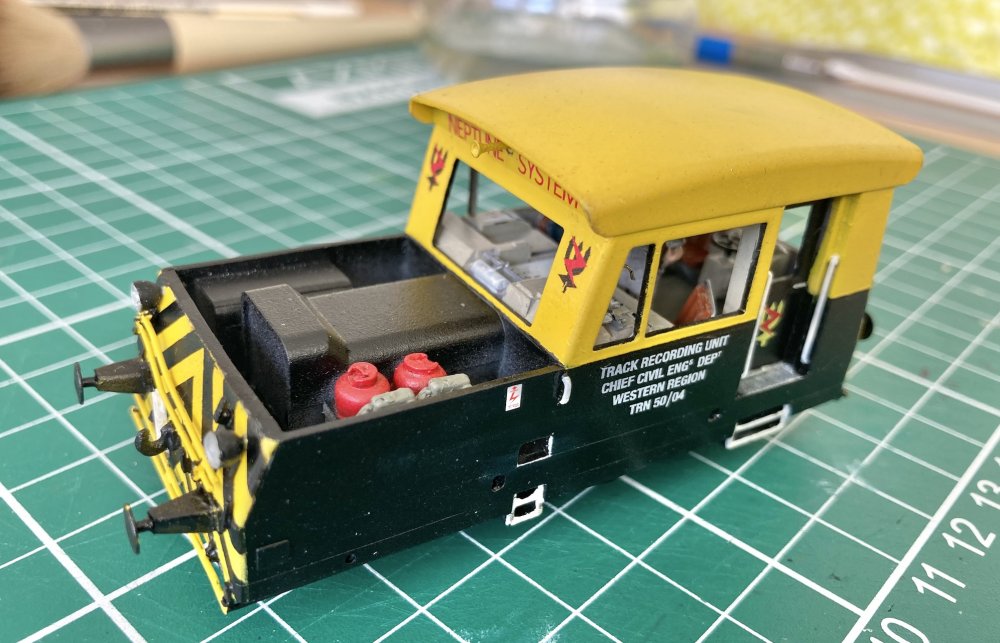
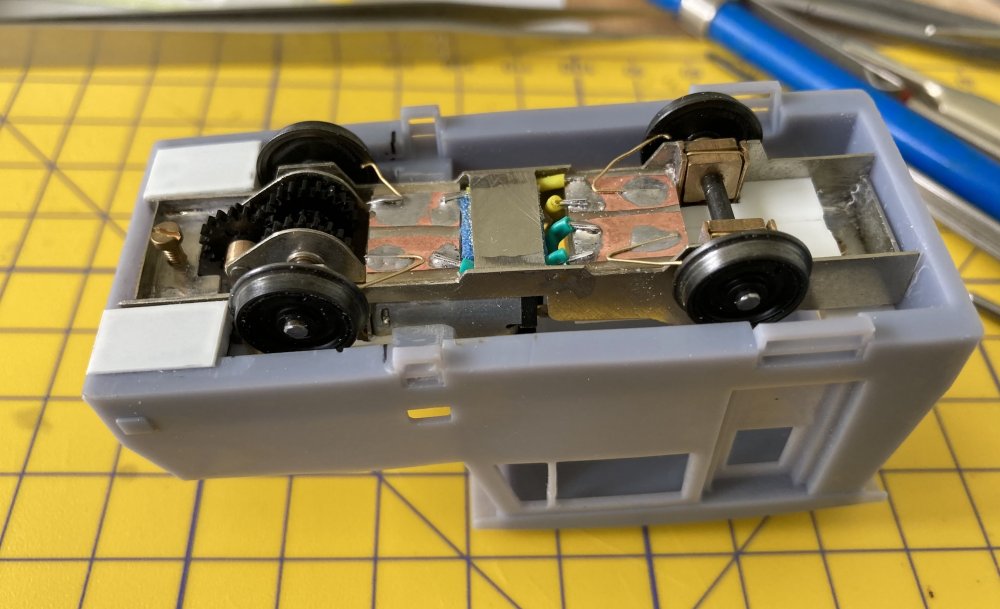 Here it is fitted to the body with one screw ready for tightening and the other out of sight at
the right hand end. The white plastic covers small weight boxes - liquid lead shot was added to
every available space to give the thing some traction. Also at this point the original buffers
had been removed as they looked a bit small compared to my reference photos. Their distinctive
profile meant each would have to be made individually.
Here it is fitted to the body with one screw ready for tightening and the other out of sight at
the right hand end. The white plastic covers small weight boxes - liquid lead shot was added to
every available space to give the thing some traction. Also at this point the original buffers
had been removed as they looked a bit small compared to my reference photos. Their distinctive
profile meant each would have to be made individually.
 The body itself needs to be detailed to suit the individual example, as mentioned above. I
added the two distinctive seam lines along the body side with a panel line scriber and also
added a tool box to the deck (another handy place for lead shot!) plus two Calor gas canisters
and a pair of jerry cans. I’ve also seen various cans of lubricant and even a ladder stashed
around the bonnet (incidentally hiding a Leyland 370 diesel engine on the real things).
The body itself needs to be detailed to suit the individual example, as mentioned above. I
added the two distinctive seam lines along the body side with a panel line scriber and also
added a tool box to the deck (another handy place for lead shot!) plus two Calor gas canisters
and a pair of jerry cans. I’ve also seen various cans of lubricant and even a ladder stashed
around the bonnet (incidentally hiding a Leyland 370 diesel engine on the real things).
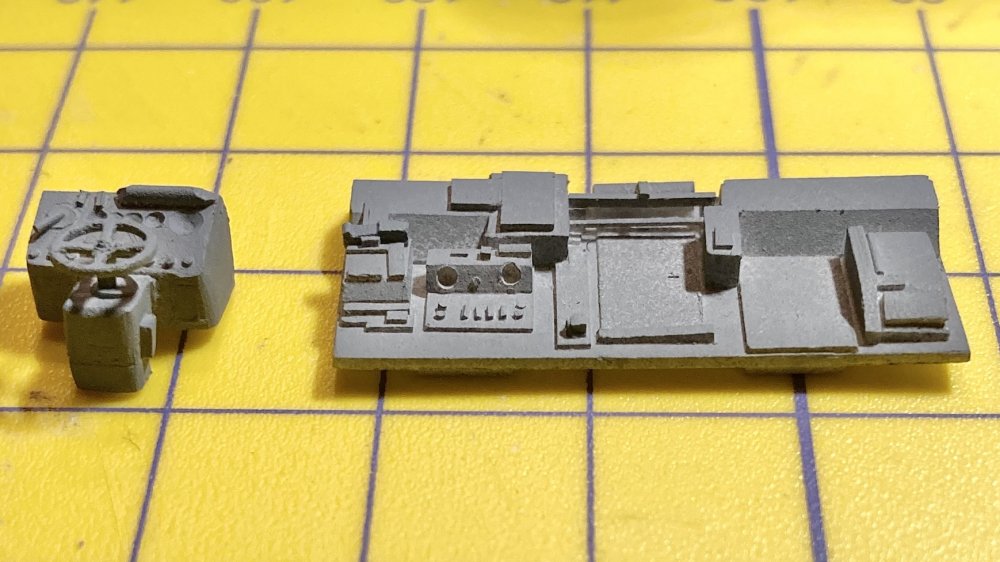 Now for the fiddly bits. This is the desk and the rear driving position made up from various
bit of Evergreen strip and carved plastic. A colour image of a Neptune deck shows that most of
the surfaces were painted rail grey with a rail blue front to the cabinet housing the tracing
equipment in the deck centre. These will be painted up and added through the large side windows
after the body has been sprayed.
Now for the fiddly bits. This is the desk and the rear driving position made up from various
bit of Evergreen strip and carved plastic. A colour image of a Neptune deck shows that most of
the surfaces were painted rail grey with a rail blue front to the cabinet housing the tracing
equipment in the deck centre. These will be painted up and added through the large side windows
after the body has been sprayed.
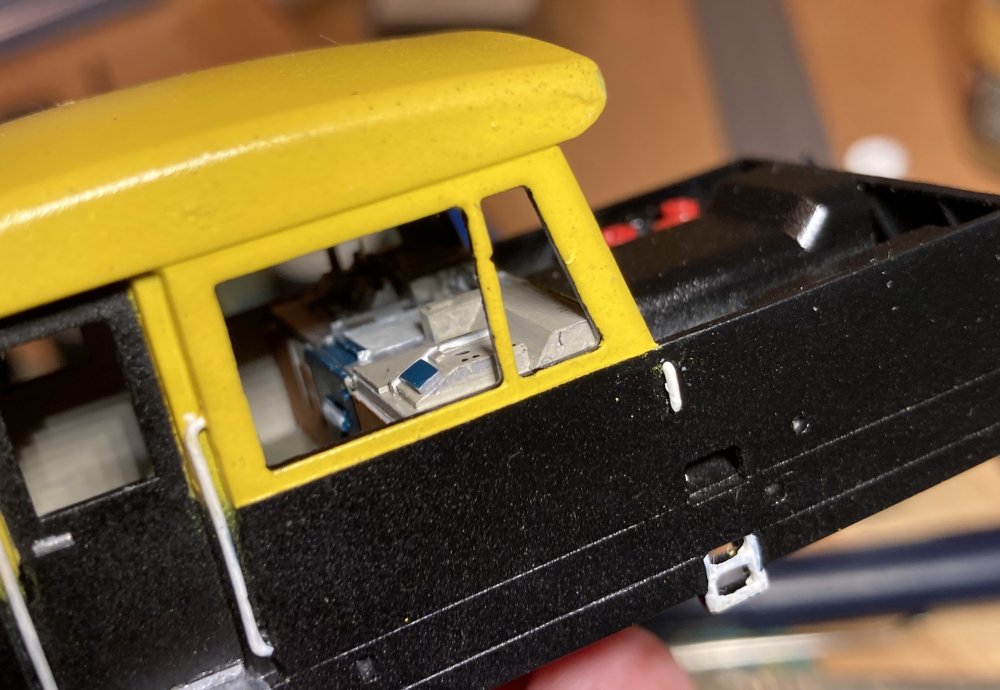 I used cans to paint the model. The yellow areas were masked off and then grey primer sprayed
over the remainder. Leaving the masking in place the top coat of Games Workshop Chaos Black was
added. Once this had dried (thankfully the recent heatwave helped here), the black was masked
off and a yellow acrylic primer from The Army Painter sprayed on. Once this too had dried the
yellow top coat was from a can of Edding acrylic paint found in an art shop. Traffic Yellow if
anyone is interested and a very easy paint to apply. The recording desk had just been
installed at this point.
I used cans to paint the model. The yellow areas were masked off and then grey primer sprayed
over the remainder. Leaving the masking in place the top coat of Games Workshop Chaos Black was
added. Once this had dried (thankfully the recent heatwave helped here), the black was masked
off and a yellow acrylic primer from The Army Painter sprayed on. Once this too had dried the
yellow top coat was from a can of Edding acrylic paint found in an art shop. Traffic Yellow if
anyone is interested and a very easy paint to apply. The recording desk had just been
installed at this point.
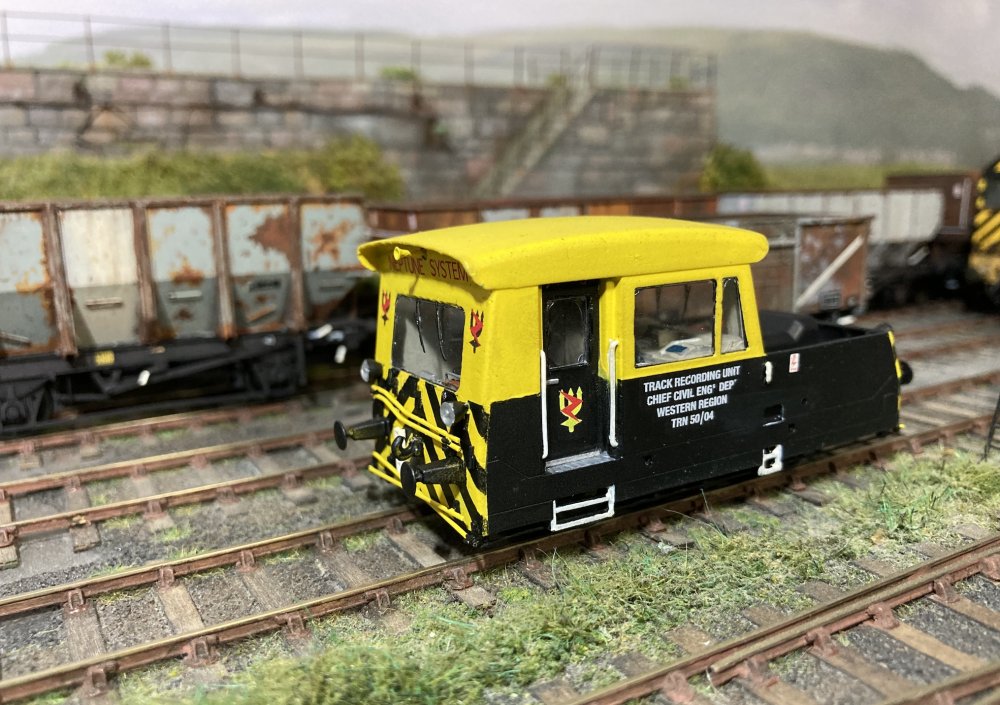
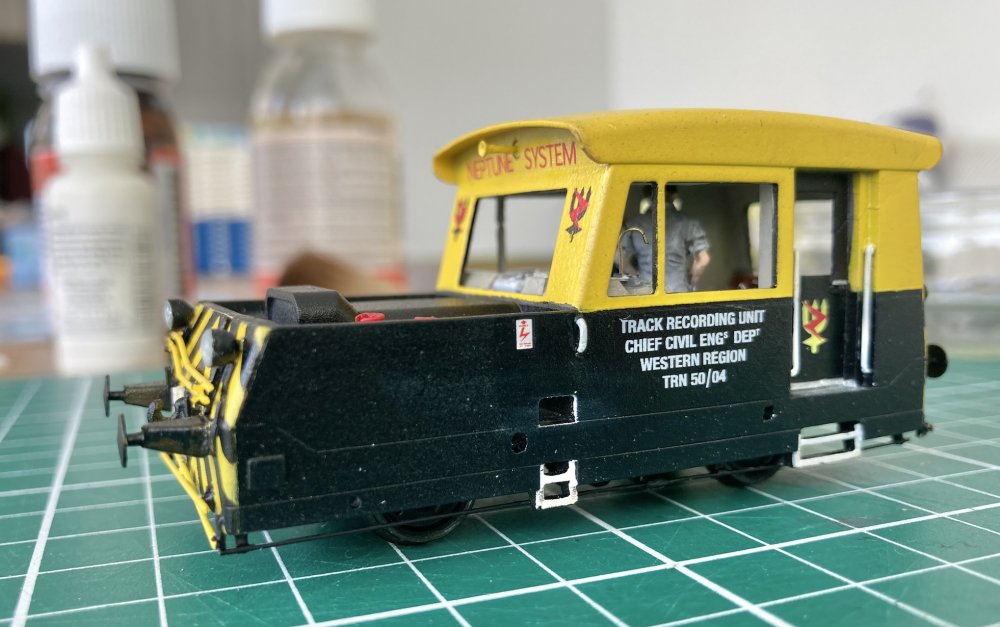 And here were see the unit complete apart from the windows (I should have brushed off the dust
before I did the photo!). The ends were painted overall yellow when the cab was sprayed and then
the hazard stripes masked with 2mm strips of Tamiya tape and again sprayed with Chaos Black
directly onto the yellow.
And here were see the unit complete apart from the windows (I should have brushed off the dust
before I did the photo!). The ends were painted overall yellow when the cab was sprayed and then
the hazard stripes masked with 2mm strips of Tamiya tape and again sprayed with Chaos Black
directly onto the yellow.
 This also shows the new buffers and the quite complex array of
outrigger supports in their travelling position at either end. The spotlights on TRN 50/04 were
each at different heights, just to add to the fun!
This also shows the new buffers and the quite complex array of
outrigger supports in their travelling position at either end. The spotlights on TRN 50/04 were
each at different heights, just to add to the fun!
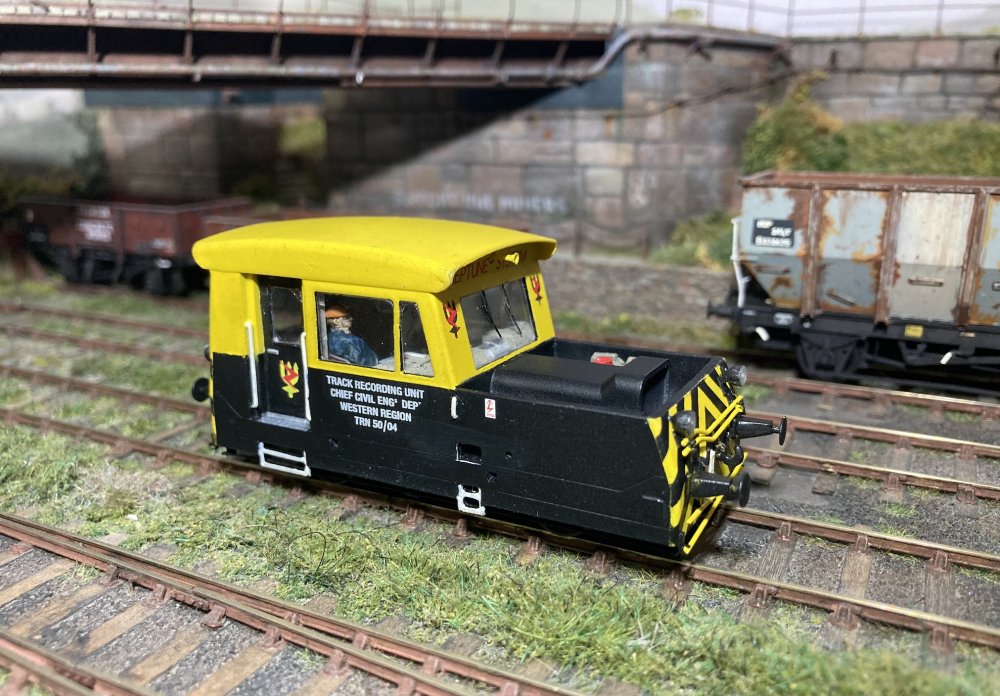 Finally here is a rather cruel enlargement of the tiny TRN 50/04 (also allocated the number
PWM4786, which wasn’t carried at this time, and later DX50010) arriving at Morfa Bank for
stabling after a run around some of the local branches. Note the distinctive seam lines and also
the now fitted windows and wipers. The reduction gearbox works a treat and keeps the speed down
to something suitable for a machine of this nature (although they could move along at 40mph when
not fitted with their outriggers), while the sprung horn blocks means that it picks up well and
can thread the complex paintwork at the yard throat with ease.
Finally here is a rather cruel enlargement of the tiny TRN 50/04 (also allocated the number
PWM4786, which wasn’t carried at this time, and later DX50010) arriving at Morfa Bank for
stabling after a run around some of the local branches. Note the distinctive seam lines and also
the now fitted windows and wipers. The reduction gearbox works a treat and keeps the speed down
to something suitable for a machine of this nature (although they could move along at 40mph when
not fitted with their outriggers), while the sprung horn blocks means that it picks up well and
can thread the complex paintwork at the yard throat with ease.
 Now parked up it will be heading out the next morning for the next campaign. Meanwhile the crew
will have wandered off to their staff coach, DW150316, for a well-earned sleep. That vehicle will
form a future project, with a Hornby donor coach already in stock.
Now parked up it will be heading out the next morning for the next campaign. Meanwhile the crew
will have wandered off to their staff coach, DW150316, for a well-earned sleep. That vehicle will
form a future project, with a Hornby donor coach already in stock.
![]()
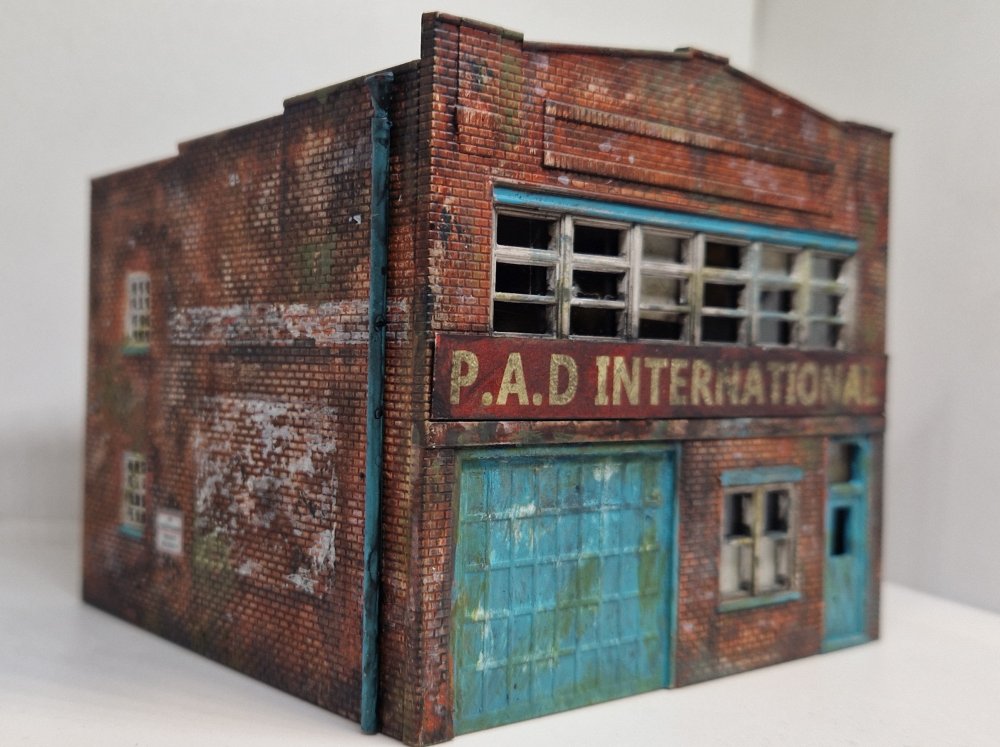 First up this month is a new building by Small Town Rix Models, which is a simple plastic
injection moulded kit. Instead of using red oxide as the base I used white primer instead and
then built up rough washes made from 50% IPA and burnt sienna acrylic art paint. I chisel
brushed this on very rough so it's translucent and patchy, blasted it with a hairdryer, then
applied another 2 coats all the while keeping the windows in white primer. Then a patchy
translucent wash layer of Humbrol 186 (a red / brown colour to add variation to the bricks).
Patchy washes of Tamiya dark grey and black, finished off by rolling a cotton bud to strip
back to the white primer underneath, and IPA in the washes bleaching the tones.
First up this month is a new building by Small Town Rix Models, which is a simple plastic
injection moulded kit. Instead of using red oxide as the base I used white primer instead and
then built up rough washes made from 50% IPA and burnt sienna acrylic art paint. I chisel
brushed this on very rough so it's translucent and patchy, blasted it with a hairdryer, then
applied another 2 coats all the while keeping the windows in white primer. Then a patchy
translucent wash layer of Humbrol 186 (a red / brown colour to add variation to the bricks).
Patchy washes of Tamiya dark grey and black, finished off by rolling a cotton bud to strip
back to the white primer underneath, and IPA in the washes bleaching the tones.
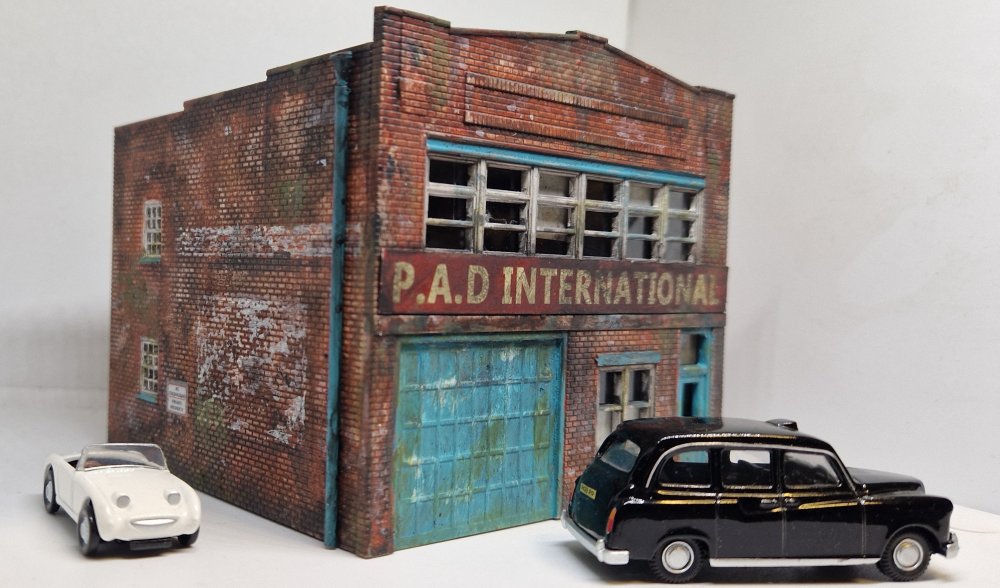 Another picture, this time with vehicles in shot to soak up some of the text. The doors were
painted in two tones of teal for variation, knocked back with an IPA black wash, and the windows
too, making them look dirty. The remnants of an old advertisement on the brickwork is painted
with Vallejo Ral 9002 grey white, and rolled off with a cotton bud for added translucency. The
factory name was drawn on the computer and printed onto glossy paper, then clear celotape
stuck over the top so it could be weathered without the ink running.
Another picture, this time with vehicles in shot to soak up some of the text. The doors were
painted in two tones of teal for variation, knocked back with an IPA black wash, and the windows
too, making them look dirty. The remnants of an old advertisement on the brickwork is painted
with Vallejo Ral 9002 grey white, and rolled off with a cotton bud for added translucency. The
factory name was drawn on the computer and printed onto glossy paper, then clear celotape
stuck over the top so it could be weathered without the ink running.
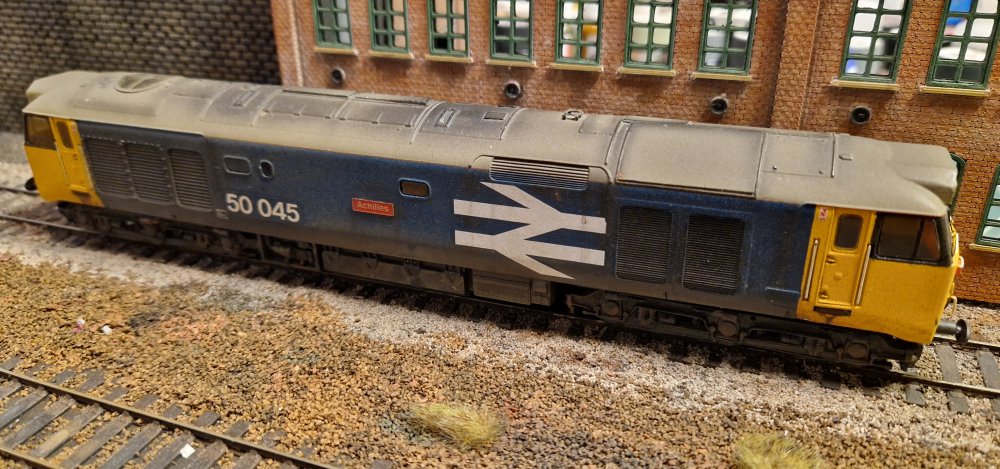 I put this Class 50 together a few years ago from spare parts knocking about. It's a
'roller' non powered loco for double heading, bringing back memories of seeing them after
refurbishment at Doncaster Works. This Lima body is detailed using A1 Models and Shawplan
brass parts to make a rebuilt Class 50 (roof bits, headcode blanking panels, wipers etc),
with new wire hand rails added and flush glazing.
I put this Class 50 together a few years ago from spare parts knocking about. It's a
'roller' non powered loco for double heading, bringing back memories of seeing them after
refurbishment at Doncaster Works. This Lima body is detailed using A1 Models and Shawplan
brass parts to make a rebuilt Class 50 (roof bits, headcode blanking panels, wipers etc),
with new wire hand rails added and flush glazing.
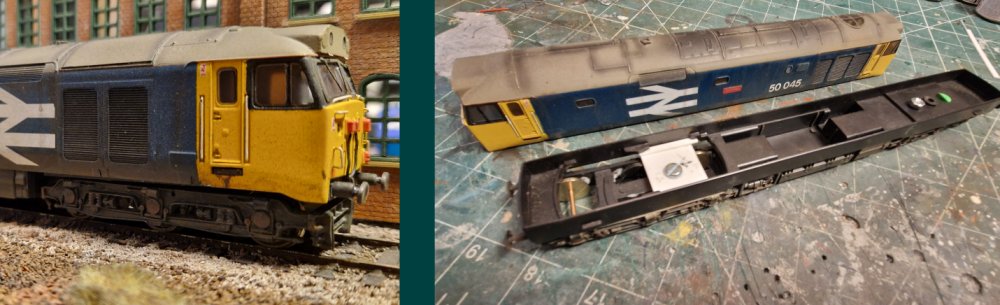 The bogies are from the Dapol Prototype Deltic kit, and DC Concepts 14mm wheels painted Revell 84
leather. The inside base of the Lima chassis was blanked off with styrene, and bolts used to attach
the bogies. The decals are from Railtec and the BR blue was from a custom mixed rattle can, and the
weathering is my usual IPA washes with airbrushing in places. Yes, you can get a nice Hornby or
Accurascale 50, but this is more fun to do! Next up is to make some steps, add couplings and pipes.
The bogies are from the Dapol Prototype Deltic kit, and DC Concepts 14mm wheels painted Revell 84
leather. The inside base of the Lima chassis was blanked off with styrene, and bolts used to attach
the bogies. The decals are from Railtec and the BR blue was from a custom mixed rattle can, and the
weathering is my usual IPA washes with airbrushing in places. Yes, you can get a nice Hornby or
Accurascale 50, but this is more fun to do! Next up is to make some steps, add couplings and pipes.
![]()
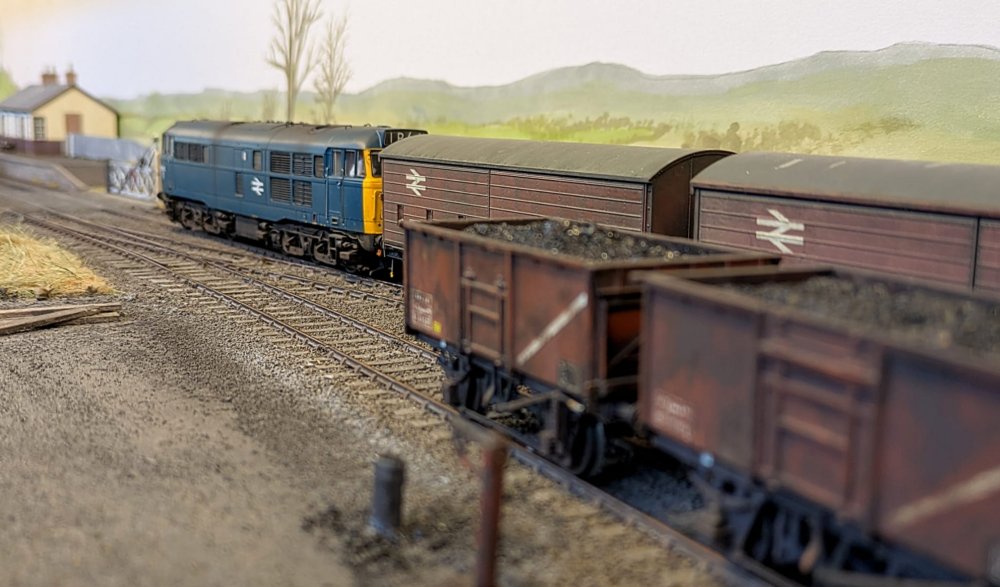 Hartburn appeared at the recent Loughborough show on the 16th & 17th of August, where I took
the opportunity to take a few snaps.
Hartburn appeared at the recent Loughborough show on the 16th & 17th of August, where I took
the opportunity to take a few snaps.
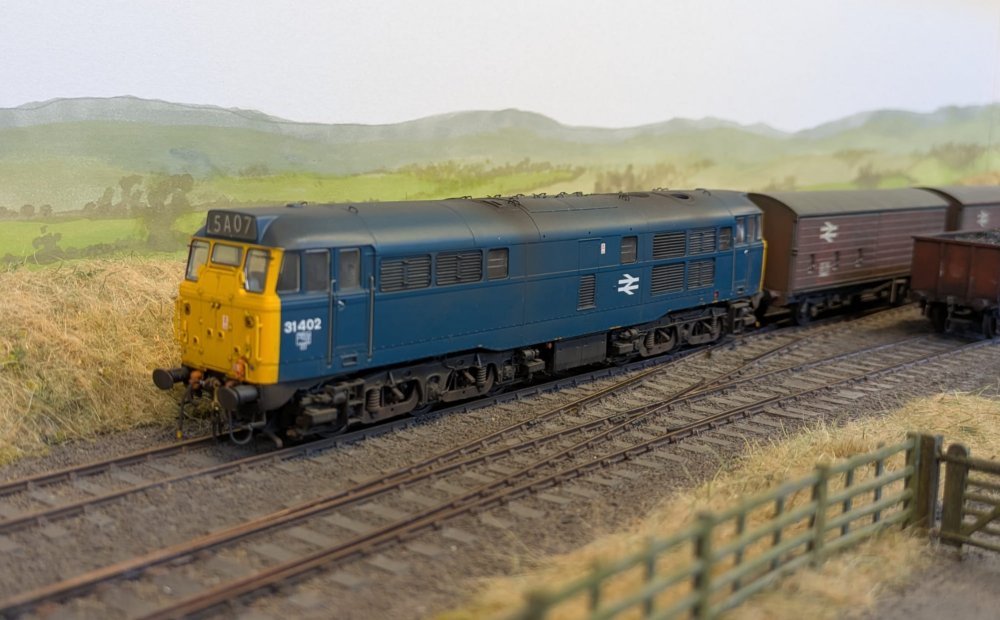 Depicting a 1980s scene, new into my fleet is this Accurascale model of 31402, weathered by
Chris Hopper and hauling a rake of VDAs from the Canada Street fleet.
Depicting a 1980s scene, new into my fleet is this Accurascale model of 31402, weathered by
Chris Hopper and hauling a rake of VDAs from the Canada Street fleet.
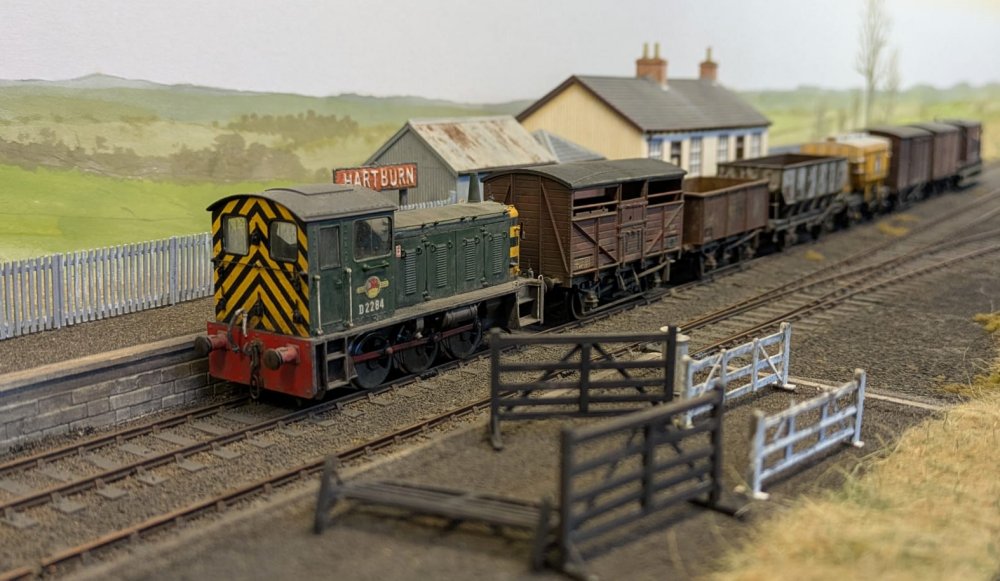 Also from the Canada Street fleet are these wagons and a Class 04 D2284 on a short trip freight.
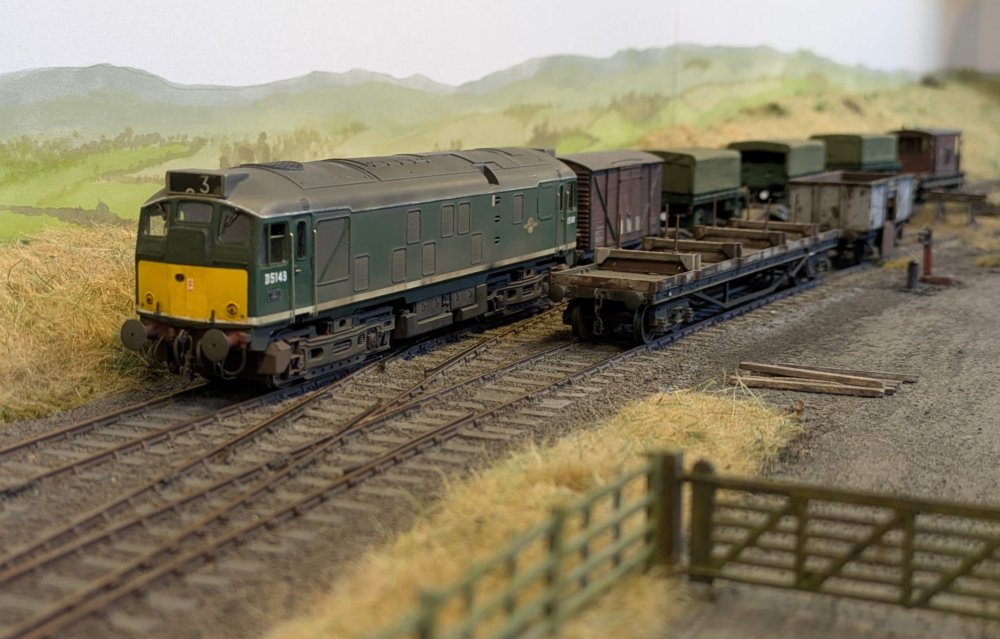 D5149 is captured here with a freight from the nearby MOD depot. Thank you to Carole Johnson
for the loan of the locomotives and rolling stock which were seen on the layout during the weekend.
D5149 is captured here with a freight from the nearby MOD depot. Thank you to Carole Johnson
for the loan of the locomotives and rolling stock which were seen on the layout during the weekend.
![]()
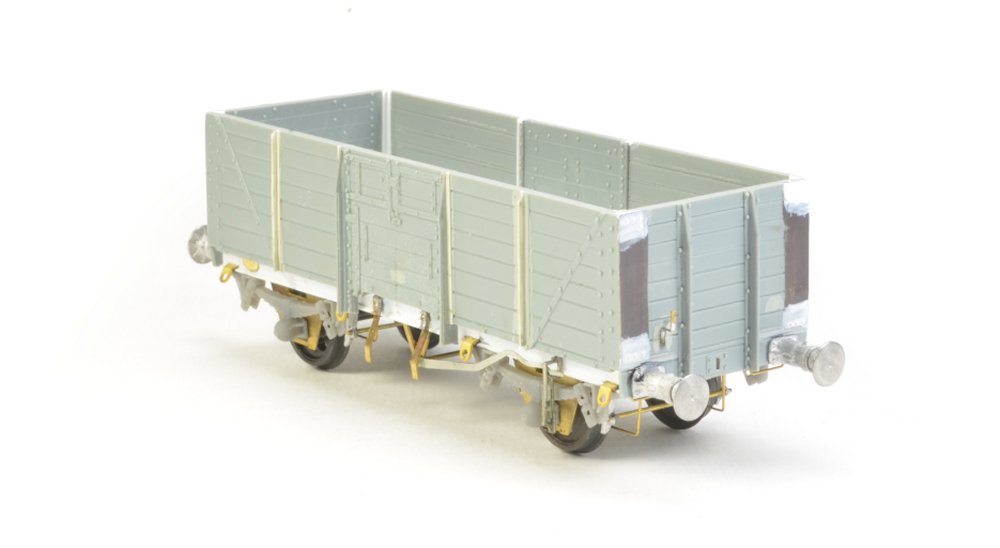 I'll be totally honest and say I was not aware of this wagon prior to seeing a photo in the
Modelling British Railways Engineers Wagons: Modernising the Fleet Part 2 bookazine. This
was another one of those subjects that I have no real need for, but the challenge of
building one outweighed practicality!
I'll be totally honest and say I was not aware of this wagon prior to seeing a photo in the
Modelling British Railways Engineers Wagons: Modernising the Fleet Part 2 bookazine. This
was another one of those subjects that I have no real need for, but the challenge of
building one outweighed practicality!
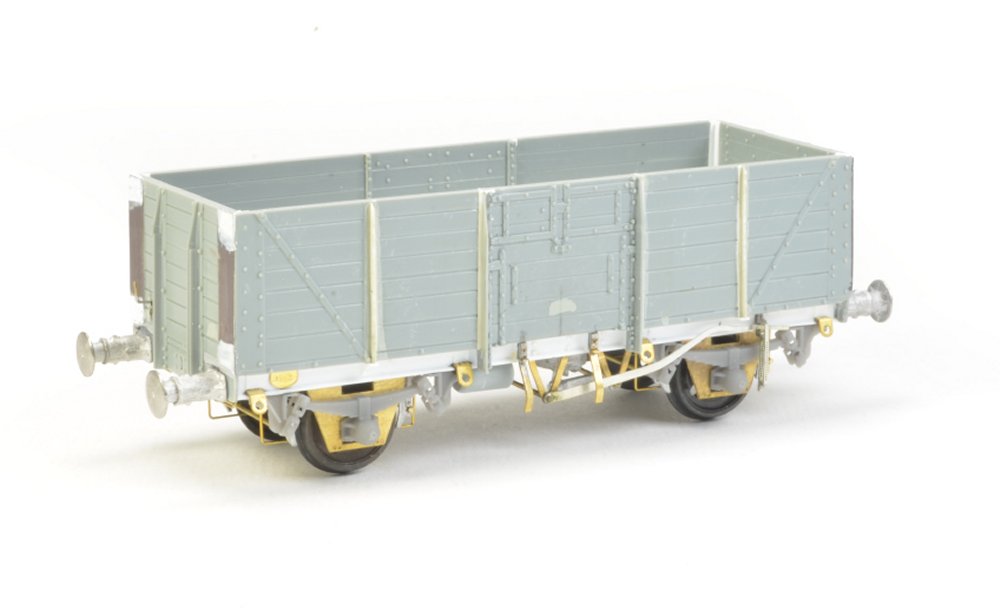 As with the model in the magazine, it's assembled using parts from two different Cambrian
kits - the doors come from the C96 SR Open wagon and the sides and ends are cut down from
the C75 Acid Jar wagon. The rest of the parts are a scratchbuilt or sort of bits and
pieces from the spares box.
As with the model in the magazine, it's assembled using parts from two different Cambrian
kits - the doors come from the C96 SR Open wagon and the sides and ends are cut down from
the C75 Acid Jar wagon. The rest of the parts are a scratchbuilt or sort of bits and
pieces from the spares box.
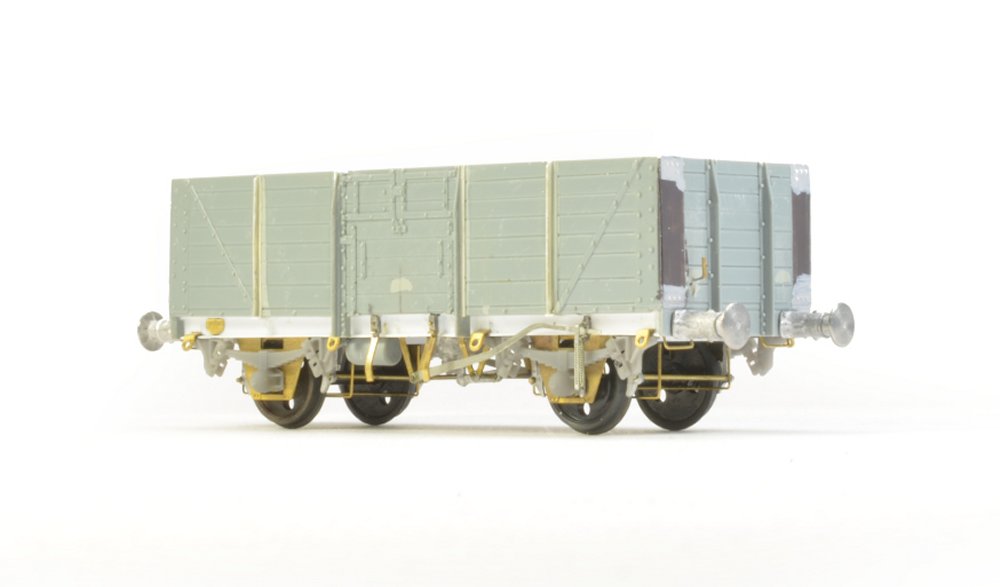 A nice one-off model and certainly something a bit different - it now joins the ever
growing queue at the paint shop.
A nice one-off model and certainly something a bit different - it now joins the ever
growing queue at the paint shop.
![]()
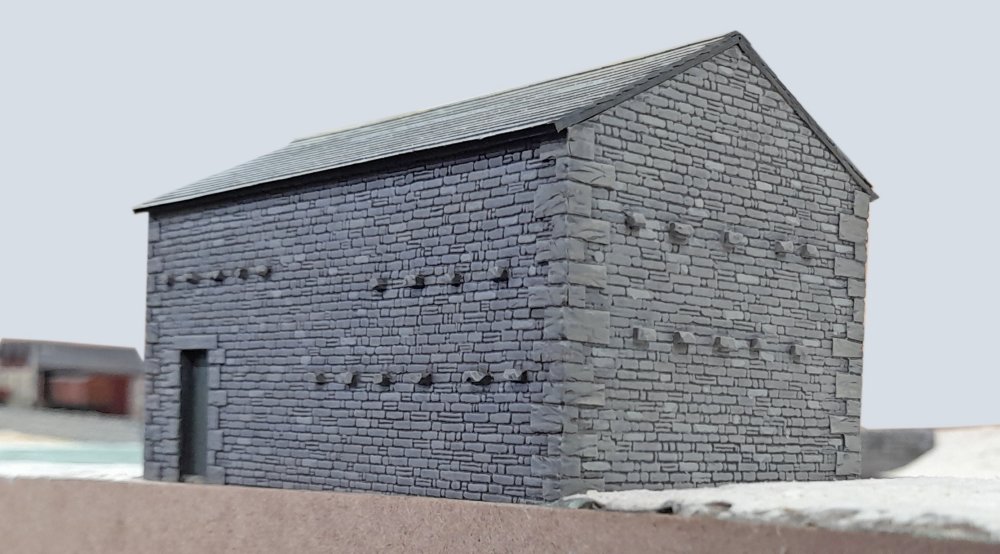
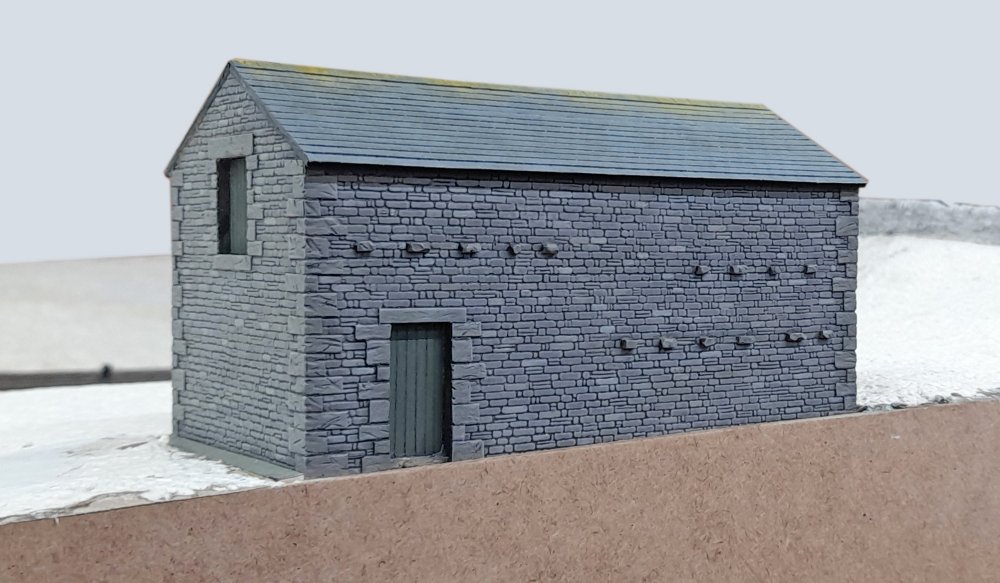 The field barn at Kentside is now completed. Having finished and painted the roof, I felt the
overhangs were too great, so had to make up another one, also with slightly bigger slates cut
from something like 100 gram paper. Like the walls, painted & weathered with Humbrol colours.
Note the faint patches of the yellow Xanthoria lichen extending from the roof line, indicating
that birds regularly perch here – this lichen being encouraged by the nutrients left behind
(will have to attend to this detail at some point). Obviously, I will now need to add some actual birds….
The field barn at Kentside is now completed. Having finished and painted the roof, I felt the
overhangs were too great, so had to make up another one, also with slightly bigger slates cut
from something like 100 gram paper. Like the walls, painted & weathered with Humbrol colours.
Note the faint patches of the yellow Xanthoria lichen extending from the roof line, indicating
that birds regularly perch here – this lichen being encouraged by the nutrients left behind
(will have to attend to this detail at some point). Obviously, I will now need to add some actual birds….
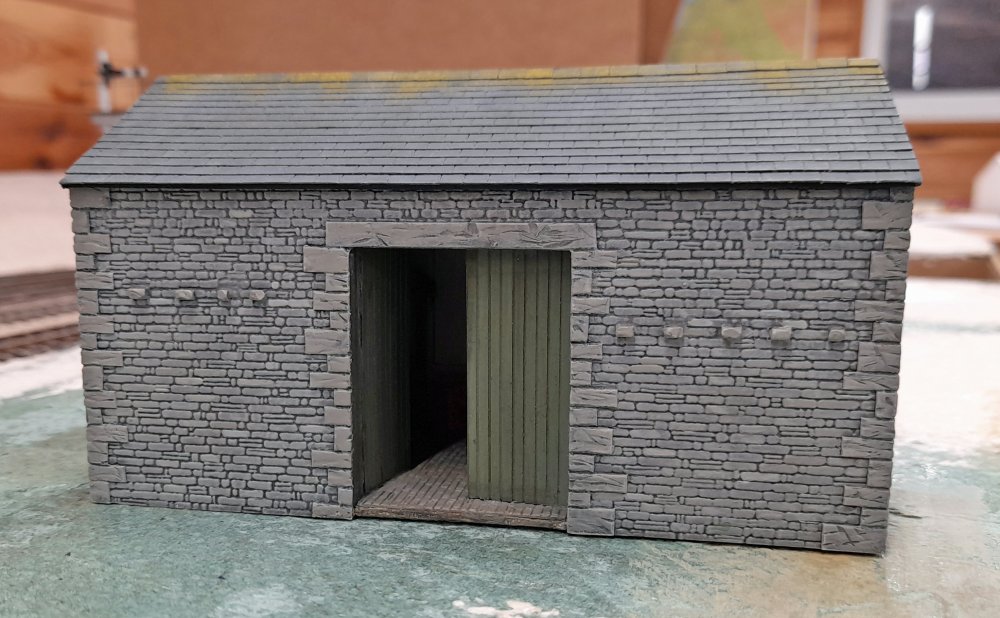 Field barn from the main entrance side – I did do a very basic interior, but not visible in
this shot. I didn’t go overboard as this side won’t be seen anyway, but I may install a farm
figure and dog in the doorway to add a little more interest.
Field barn from the main entrance side – I did do a very basic interior, but not visible in
this shot. I didn’t go overboard as this side won’t be seen anyway, but I may install a farm
figure and dog in the doorway to add a little more interest.
 Field barn again, looking across the layout from the other end. It will be good when the
‘snowscape’ finally turns green!
Field barn again, looking across the layout from the other end. It will be good when the
‘snowscape’ finally turns green!
 Finally – and apologies for a short one this time as the garden has again kept me busy, plus
a couple of operating sessions on the layout. At one of these we had Ian Bowker’s Manning
Wardle, built many moons ago under the MRJ project and still going strong. It’s widely
travelled, having appeared on most of the Rochdale Group’s EM layouts over the years.
Maybe I can borrow it to work in Kentside quarry at some point….
Finally – and apologies for a short one this time as the garden has again kept me busy, plus
a couple of operating sessions on the layout. At one of these we had Ian Bowker’s Manning
Wardle, built many moons ago under the MRJ project and still going strong. It’s widely
travelled, having appeared on most of the Rochdale Group’s EM layouts over the years.
Maybe I can borrow it to work in Kentside quarry at some point….