*********************************************************************************************************************************************
OCTOBER 2024 UPDATE
*********************************************************************************************************************************************
KARL CROWTHER
*********************************************************************************************************************************************
ANDY LEE
*********************************************************************************************************************************************
GREG BROOKES
*********************************************************************************************************************************************
KIER HARDY
*********************************************************************************************************************************************
![]()
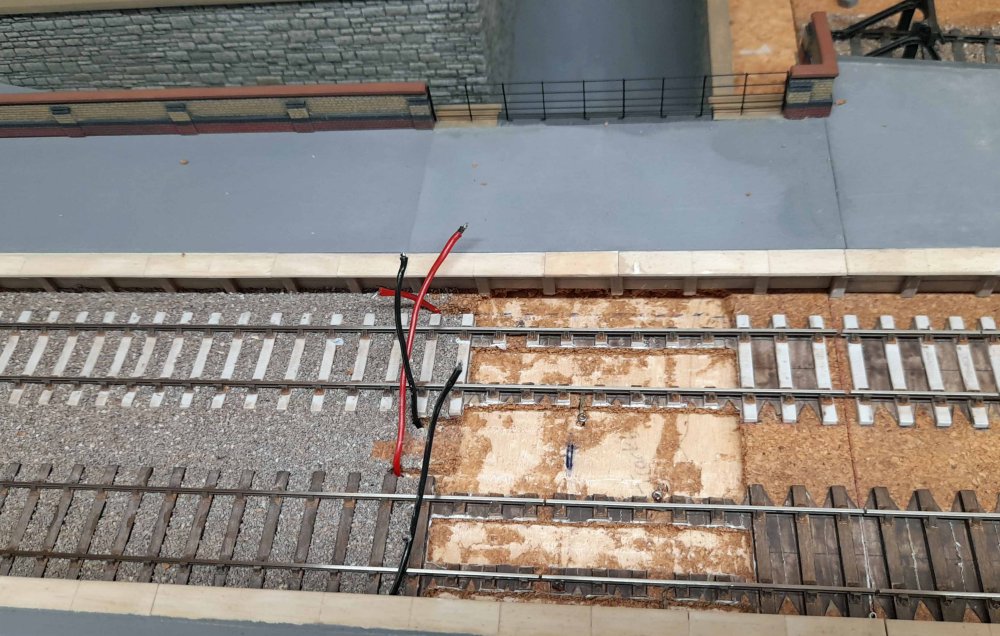 Work has proceeded with further ballasting at the Kentside Station scene (actually now
completed), gradually working along the layout from the quarry. When I got as far as the
underbridge beneath the platforms, a potential problem revealed itself. Being a plate
girder structure, it occurred to me that the rails would most likely be carried across
a steel deck on longitudinal timber baulks – it's something I’d not as yet allowed for! The
solution was not exactly straightforward as there were four track power connections being
fed to the rails at this location, and the wiring runs from these had of necessity to run
alongside the track to ‘solid’ baseboard away from the bridge deck. The first task was to
remove the wires and cut back all parts of sleepers and the cork underlay between and
beyond the chairs, as can be seen here.
Work has proceeded with further ballasting at the Kentside Station scene (actually now
completed), gradually working along the layout from the quarry. When I got as far as the
underbridge beneath the platforms, a potential problem revealed itself. Being a plate
girder structure, it occurred to me that the rails would most likely be carried across
a steel deck on longitudinal timber baulks – it's something I’d not as yet allowed for! The
solution was not exactly straightforward as there were four track power connections being
fed to the rails at this location, and the wiring runs from these had of necessity to run
alongside the track to ‘solid’ baseboard away from the bridge deck. The first task was to
remove the wires and cut back all parts of sleepers and the cork underlay between and
beyond the chairs, as can be seen here.
 Now I’ve re-connected the track feeds via lengths of nickel silver strip which would
eventually be concealed beneath a representation of the bridge deck.
Now I’ve re-connected the track feeds via lengths of nickel silver strip which would
eventually be concealed beneath a representation of the bridge deck.
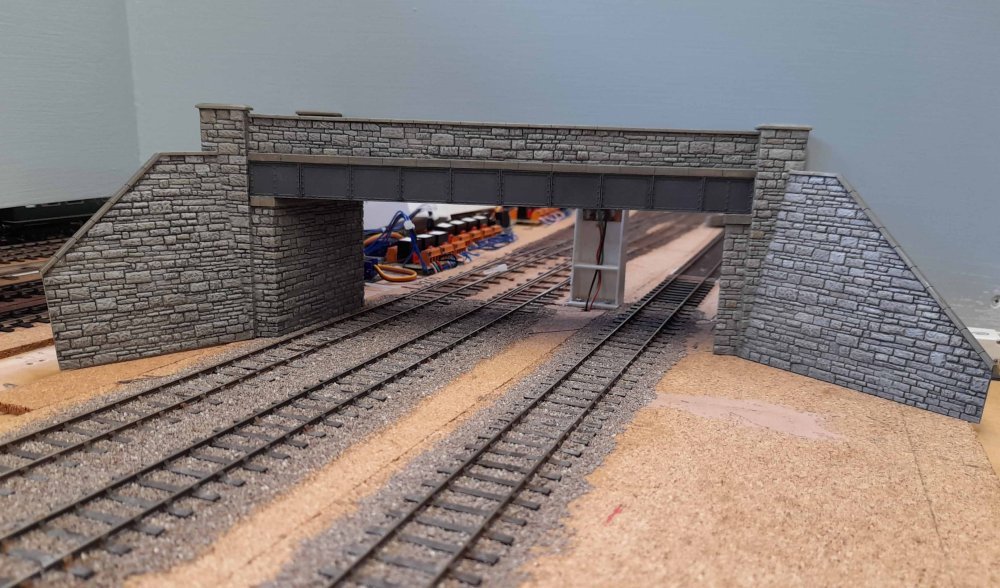
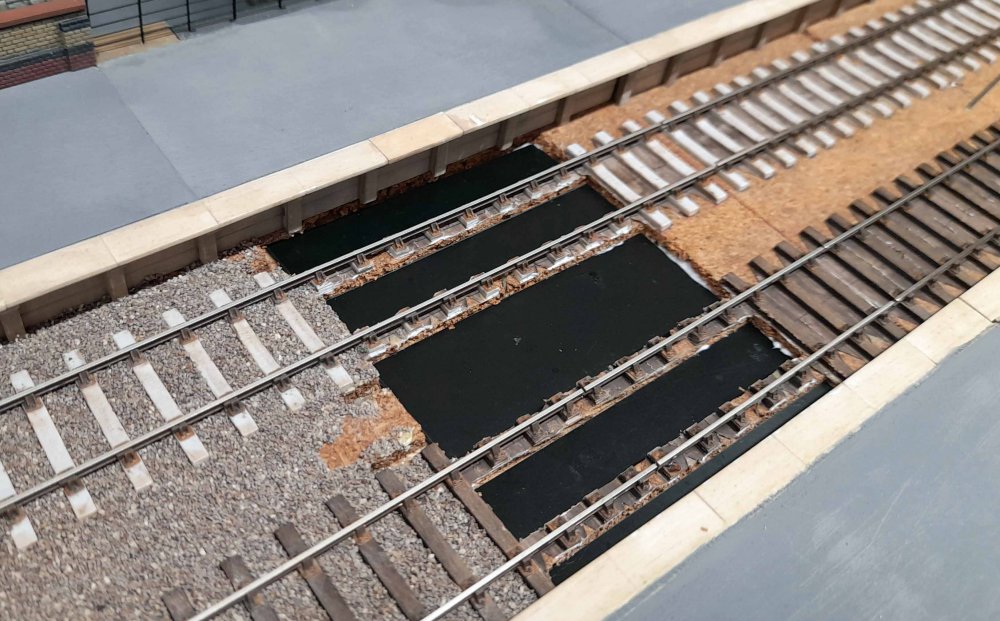 Black Plastikard has now been fitted to form the bridge deck, which still left the task of
representing the timber baulks…..
Black Plastikard has now been fitted to form the bridge deck, which still left the task of
representing the timber baulks…..
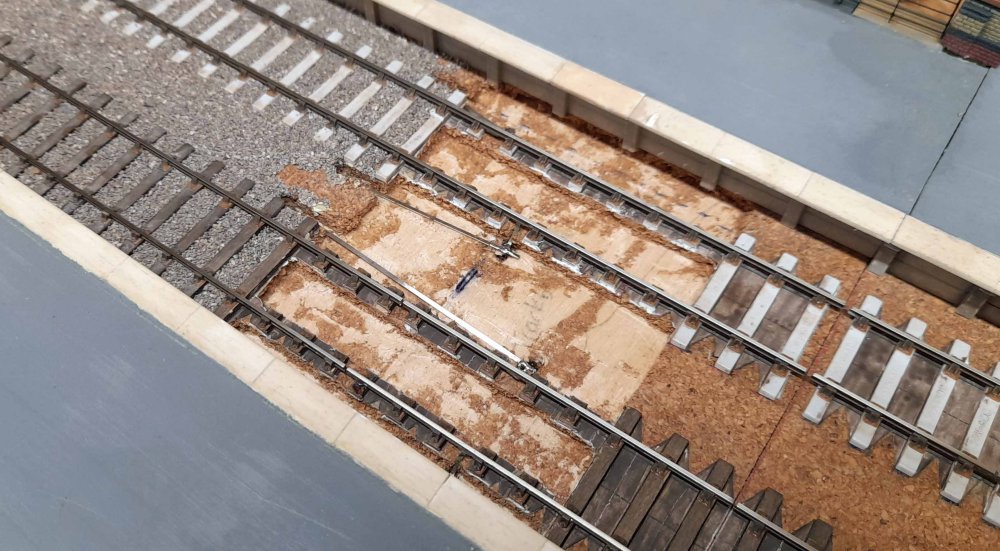
 Next Plastikard strips have been used to represent the sides of the timber baulks and then
Milliput filler was used to fill in the area in between, underneath the rails (as can be seen
on the Up line – the down line, nearest, still needs the filler). Amazingly this worked out
fairly well, and ballasting beyond the bridge could now continue….
Next Plastikard strips have been used to represent the sides of the timber baulks and then
Milliput filler was used to fill in the area in between, underneath the rails (as can be seen
on the Up line – the down line, nearest, still needs the filler). Amazingly this worked out
fairly well, and ballasting beyond the bridge could now continue….
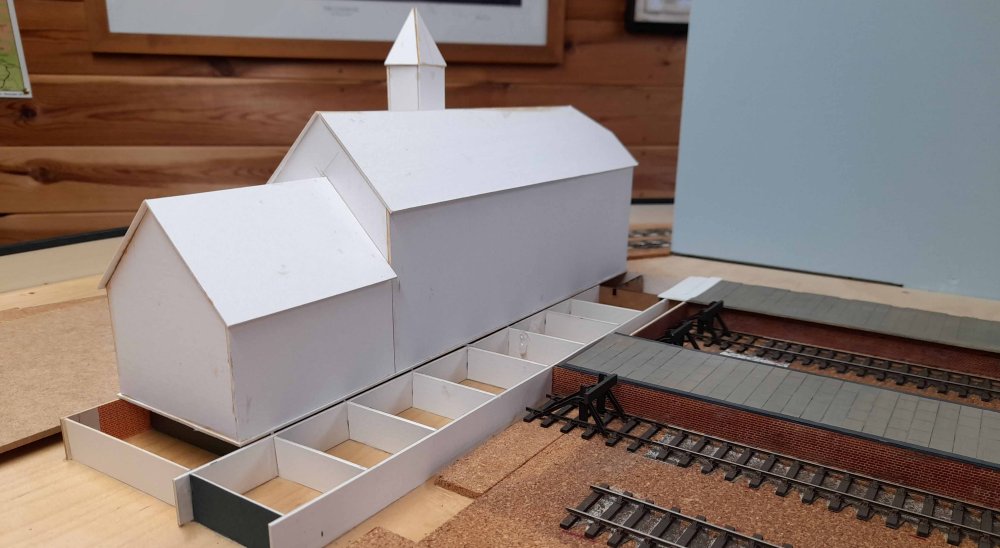
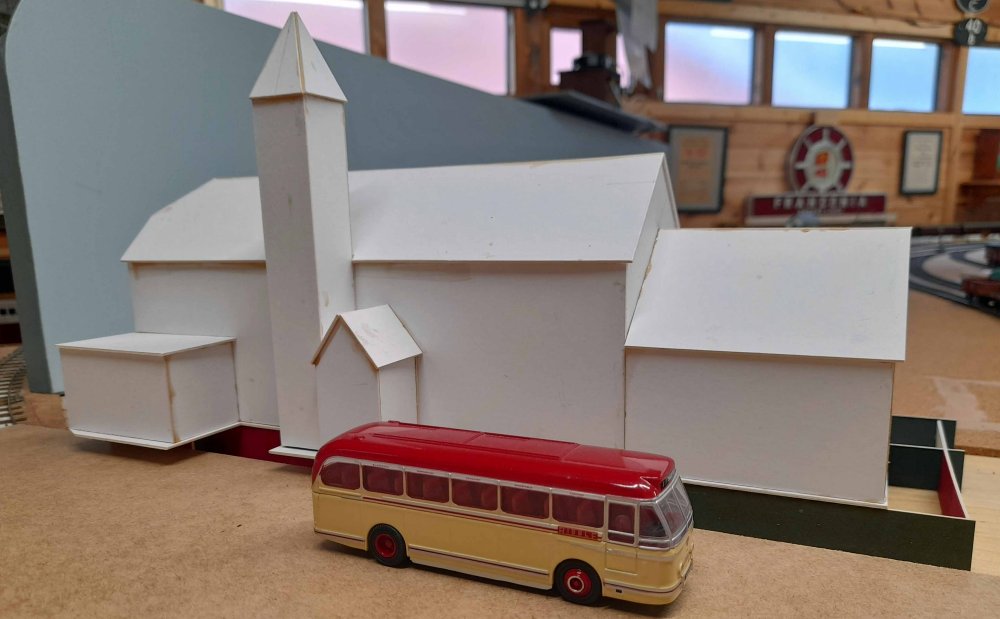 Moving now to the complete opposite end of the layout! I wanted to get the Kendal backscenes
worked up to better define this area and start to get a feel of how the scene might develop.
The backscene itself has been made up from hardboard with 20mm square stripwood bracing along
the edges. Here at Kendal the height was determined by the need for the signaller at that
location to be able to see over it – so lower than I’d have liked, but needs must. To further
enhance the feel of things, a card mock-up of the Kendal station building has also been added.
Visually this seems to have worked out pretty spot on when compared with similar view of
Lakeside (the prototype).
Moving now to the complete opposite end of the layout! I wanted to get the Kendal backscenes
worked up to better define this area and start to get a feel of how the scene might develop.
The backscene itself has been made up from hardboard with 20mm square stripwood bracing along
the edges. Here at Kendal the height was determined by the need for the signaller at that
location to be able to see over it – so lower than I’d have liked, but needs must. To further
enhance the feel of things, a card mock-up of the Kendal station building has also been added.
Visually this seems to have worked out pretty spot on when compared with similar view of
Lakeside (the prototype).
 A view of the Kendal Castle station building from the platform side – the additional
paved area of platform surface is currently being attended to. I may add a removable
extension for the backscene to enhance the view from this direction.
A view of the Kendal Castle station building from the platform side – the additional
paved area of platform surface is currently being attended to. I may add a removable
extension for the backscene to enhance the view from this direction.
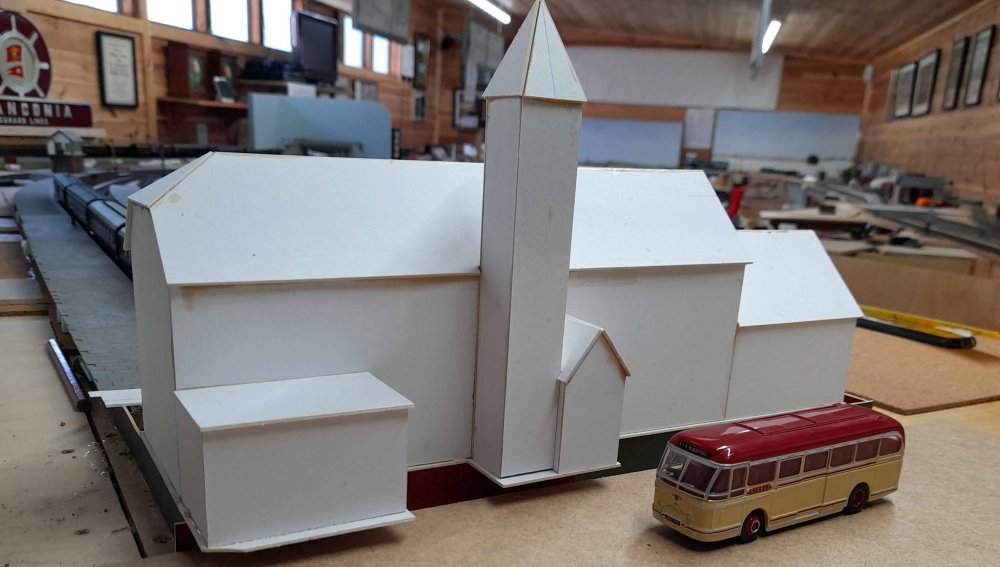 The ‘forecourt’ actually has the Arnside-Kentside main line running beneath it. I think I have
said previously that a removable forecourt section will form part of the scene, to be taken off
the layout when the layout is running.
The ‘forecourt’ actually has the Arnside-Kentside main line running beneath it. I think I have
said previously that a removable forecourt section will form part of the scene, to be taken off
the layout when the layout is running.
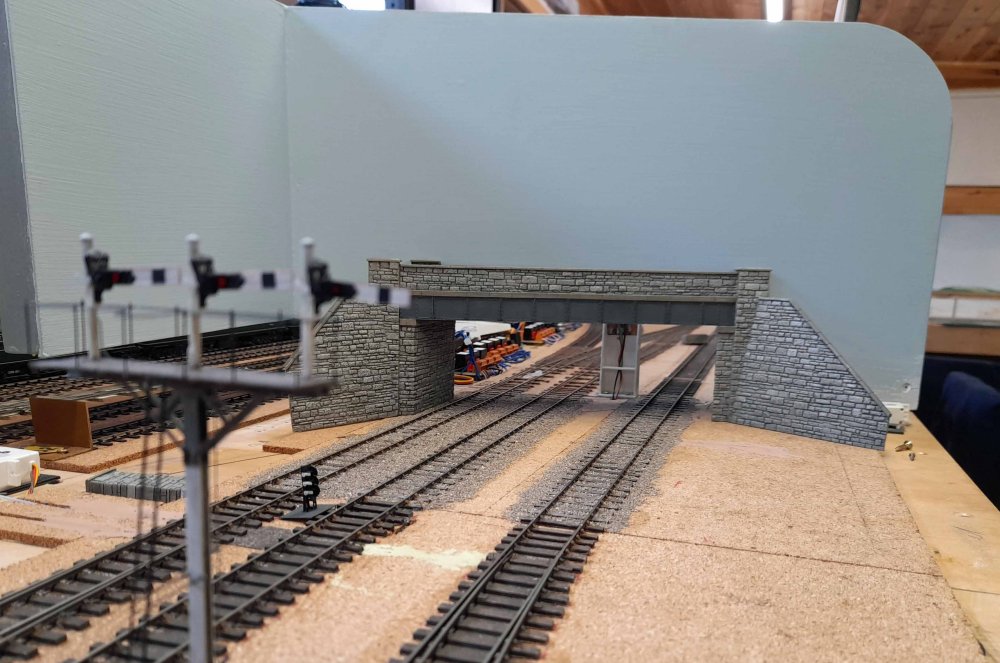 At the opposite end of Kendal Castle station, the backscene is shown in place behind the
overbridge defining the modelled area. The lower cut-away section beyond the bracket signal
is because here the backscene runs above one of the fiddle yard tracks (which will be hidden
beneath the scenery at this point of course).
At the opposite end of Kendal Castle station, the backscene is shown in place behind the
overbridge defining the modelled area. The lower cut-away section beyond the bracket signal
is because here the backscene runs above one of the fiddle yard tracks (which will be hidden
beneath the scenery at this point of course).
 In readiness for fixing the bridge in place, the track here has already been ballasted. Beyond
can be seen the Kendal Down Outer Home signal (lever 1 in the signalbox). Physically of course
it’s way too close – in signalling speak, it’s meant to be 440 yards out from the inner home
signal therefore meaning that the inner home (the 3-arm bracket in the last photo) represents
the clearing point. We all have space constraints to contend with!
In readiness for fixing the bridge in place, the track here has already been ballasted. Beyond
can be seen the Kendal Down Outer Home signal (lever 1 in the signalbox). Physically of course
it’s way too close – in signalling speak, it’s meant to be 440 yards out from the inner home
signal therefore meaning that the inner home (the 3-arm bracket in the last photo) represents
the clearing point. We all have space constraints to contend with!
![]()
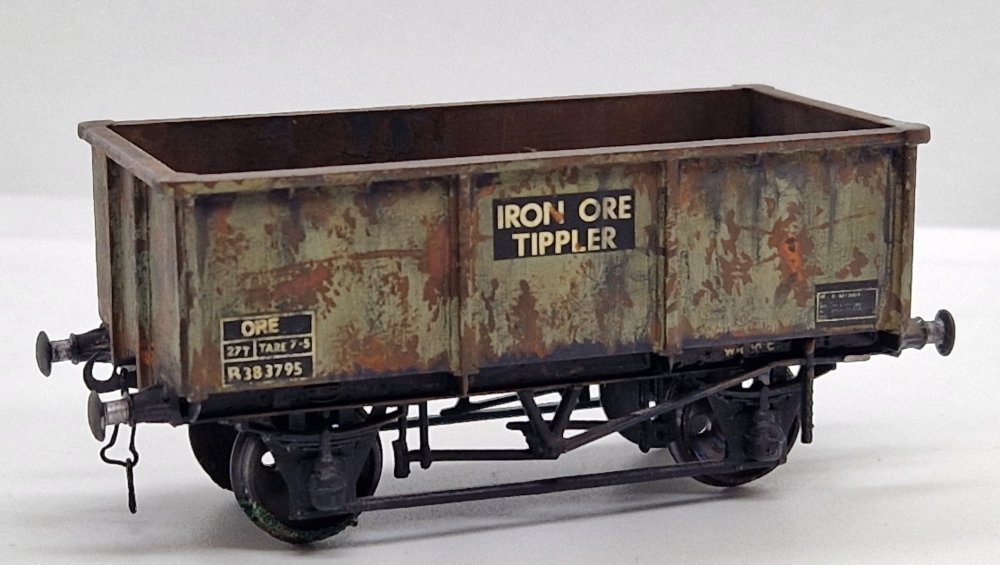 MSO Iron Ore Tipplers - these are kit built and something I've not made before. They all look
very worn, so I went for a hybrid look of some featured on Paul Bartlett's wagon website.
MSO Iron Ore Tipplers - these are kit built and something I've not made before. They all look
very worn, so I went for a hybrid look of some featured on Paul Bartlett's wagon website.
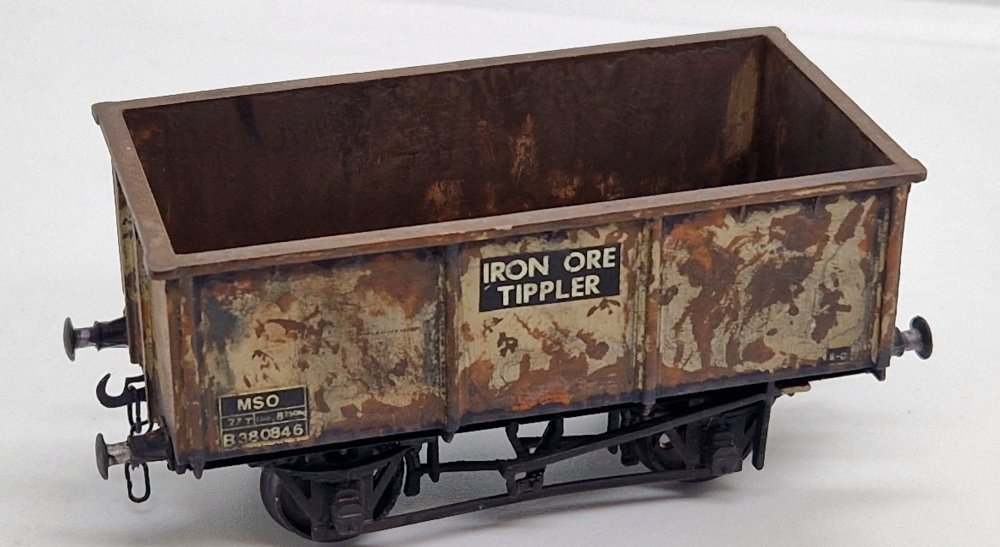 4 tones of rust ( Tamiya, Revell and.Archive X paints) liberally added and a lot
of IPA washes to bleach out the look, plus some grime washes over the frames and body. A
lot of layers to get the inside looking very rusty too. Finished off with Gibson wheels
and Smiths couplings.
4 tones of rust ( Tamiya, Revell and.Archive X paints) liberally added and a lot
of IPA washes to bleach out the look, plus some grime washes over the frames and body. A
lot of layers to get the inside looking very rusty too. Finished off with Gibson wheels
and Smiths couplings.
![]()
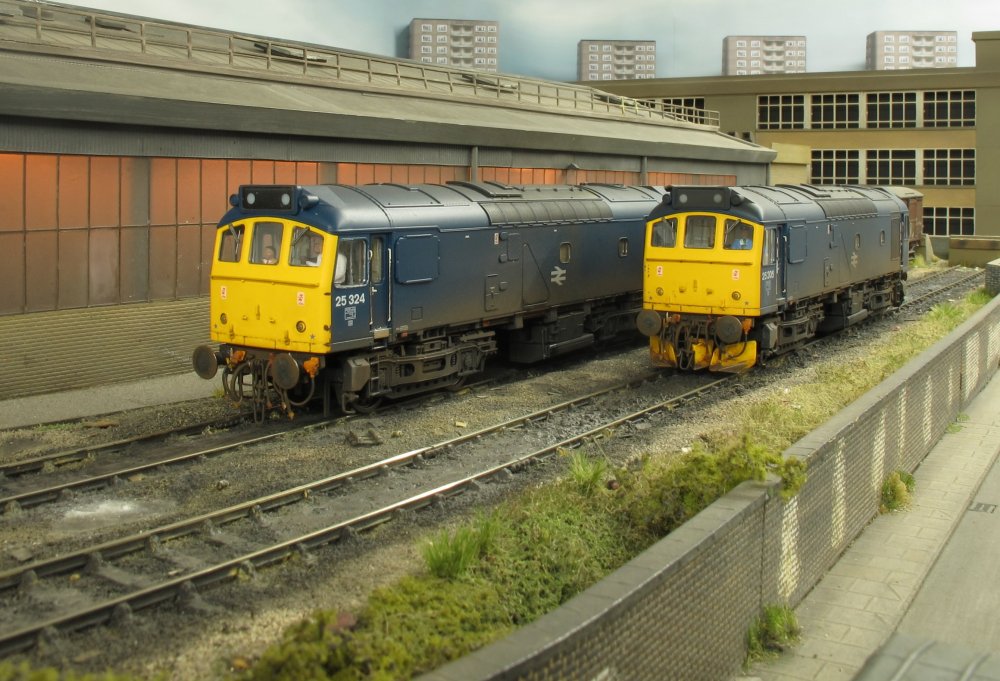 New into the Shenston Road fleet is 25324 and 25205, captured here at Hornsey Road depot.
They are both SLW Class 25 models, renumbered and weathered.
New into the Shenston Road fleet is 25324 and 25205, captured here at Hornsey Road depot.
They are both SLW Class 25 models, renumbered and weathered.
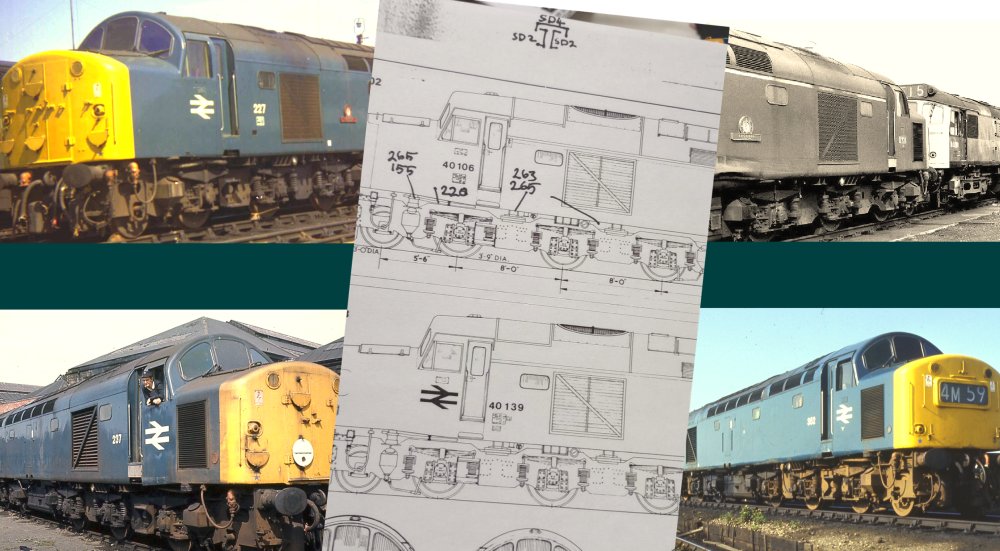 Since my early days of detailing Lima Class 40s, I've always added the lifting lugs and
cosmetic front bogie swivel pads (as well as steam & vacuum pipes where applicable).
Using the same Evergreen styrene section every time, the written numbers on the drawing
refer to each type available in the range.
Since my early days of detailing Lima Class 40s, I've always added the lifting lugs and
cosmetic front bogie swivel pads (as well as steam & vacuum pipes where applicable).
Using the same Evergreen styrene section every time, the written numbers on the drawing
refer to each type available in the range.
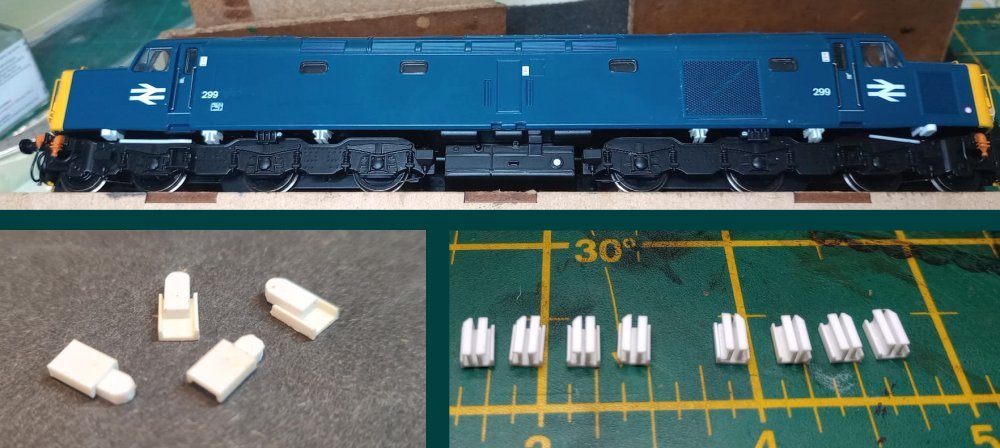 This latest version of the Bachmann Class 40 is seen with the various parts fitted and ready
for painting.
This latest version of the Bachmann Class 40 is seen with the various parts fitted and ready
for painting.
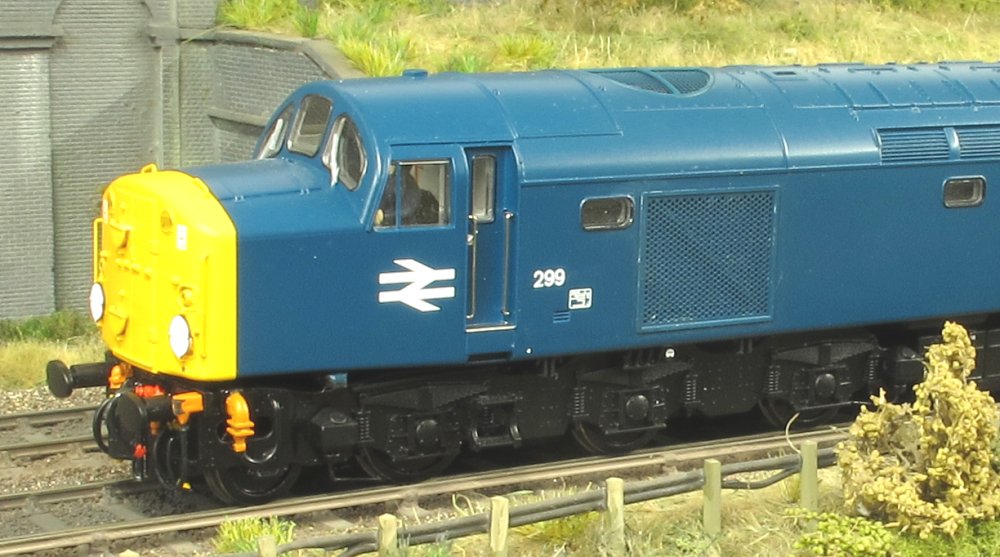 Into service as 299, it will be kept in pristine condition remembering it fresh from Crewe
Works in the early 1970s. The biggest eyesore is the lack of detail on the front jumper
cables (just square boxes), and the oversized jumper cables on the bogie sides.
Into service as 299, it will be kept in pristine condition remembering it fresh from Crewe
Works in the early 1970s. The biggest eyesore is the lack of detail on the front jumper
cables (just square boxes), and the oversized jumper cables on the bogie sides.
![]()
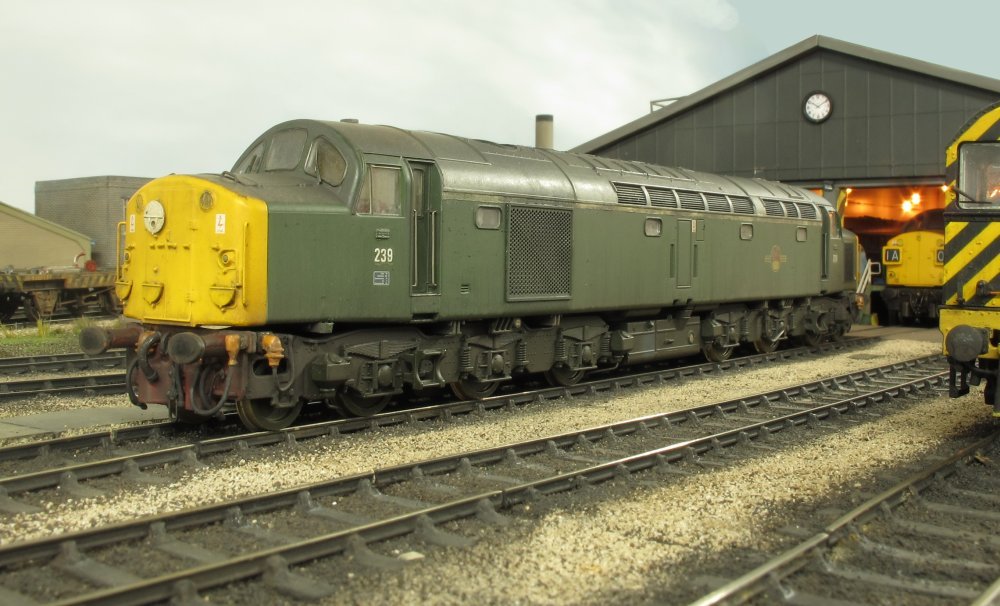
 New into the Hornsey Road fleet is 239, a backdated and detailed Bachmann model
(32-492SF - 40039). A long list of work included reinstatement of the cantrail stripe,
fitting overpainted worksplates, removal of the silver cab kick panels, renumbering,
weathering and a complete remodel of the bufferbeam pipes and jumpers (from not much
more than plastic blobs). I'd echo Greg's comment about the bogie side jumpers -
painting them bogie colour doesn't help much, so once Jonny got wind of this eyesore
he sat down and drew something up on his computer.
New into the Hornsey Road fleet is 239, a backdated and detailed Bachmann model
(32-492SF - 40039). A long list of work included reinstatement of the cantrail stripe,
fitting overpainted worksplates, removal of the silver cab kick panels, renumbering,
weathering and a complete remodel of the bufferbeam pipes and jumpers (from not much
more than plastic blobs). I'd echo Greg's comment about the bogie side jumpers -
painting them bogie colour doesn't help much, so once Jonny got wind of this eyesore
he sat down and drew something up on his computer.
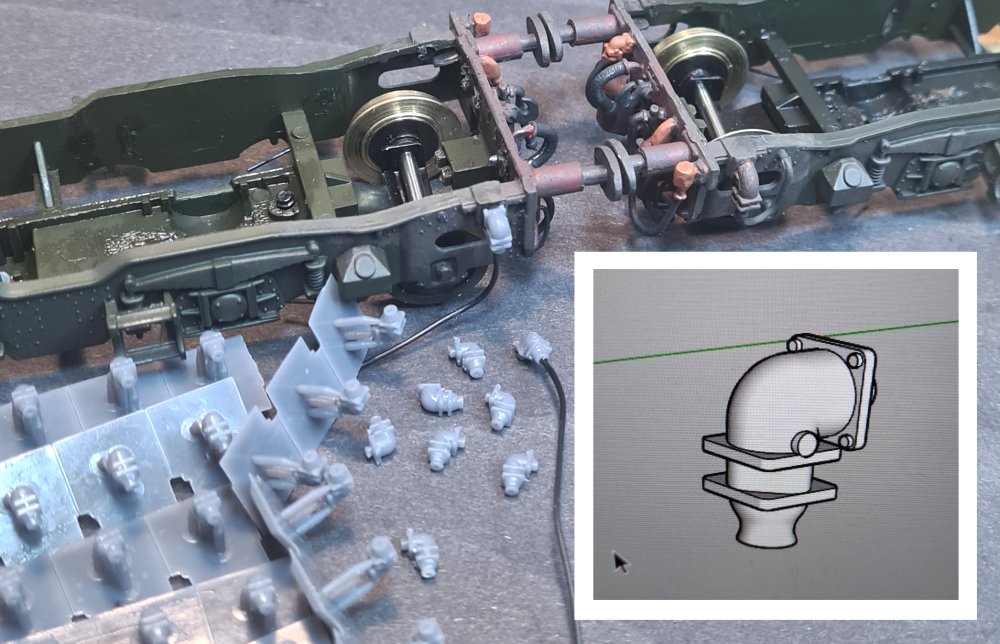 Here's the 3D printed scale version with a small hole at the bottom to glue in some wire.
The bottom bit can also be chopped off to use as a replacement socket on the front of the bogie.
Here's the 3D printed scale version with a small hole at the bottom to glue in some wire.
The bottom bit can also be chopped off to use as a replacement socket on the front of the bogie.
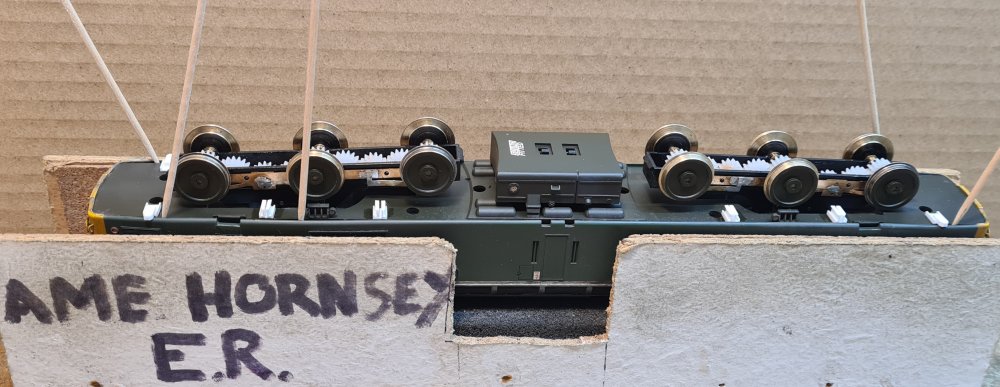 Greg kindly offered me a set of his scratchbuilt details to add to my chassis, as he was
knocking up a few more for his ever growing fleet, so it would be rude to refuse. They fit
nicely in the 'dips' of the bogie sideframe, and have no influence on the articulation.
These parts and all the correct bufferbeam detail for the Class 40 can also be obtained from
West Hill Wagon Works in 3D printed form.
Greg kindly offered me a set of his scratchbuilt details to add to my chassis, as he was
knocking up a few more for his ever growing fleet, so it would be rude to refuse. They fit
nicely in the 'dips' of the bogie sideframe, and have no influence on the articulation.
These parts and all the correct bufferbeam detail for the Class 40 can also be obtained from
West Hill Wagon Works in 3D printed form.
 Now back into service with the additional detail parts fitted.