*********************************************************************************************************************************************
SEPTEMBER 2024 UPDATE
*********************************************************************************************************************************************
This website was created many years ago as a means to record our various EM gauge projects,
which at the time was devoted to British Rail as it was in the 1970s. Since then, the timespan
has overlapped to include the 1960s and the 1980s, but always associated with EM gauge.
There's
the occasional 'breaking the rules' moment, as well as page features on the O gauge
'Blowers Green' and Gauge 1 'Worcester Road' layouts, both available
to view at the bottom of the layouts page.
Is this a rule breaker? The image below shows a scratchbuilt
loco from the '70s period, by George Falkner.........
*********************************************************************************************************************************************
GREG BROOKES
*********************************************************************************************************************************************
Talking of ingot moulds...... Here's a few 4mm scale models of Steelworks ladles,
stands, as well as a few ingot moulds.
ANDY DENNY
*********************************************************************************************************************************************
STEVE CARTER
*********************************************************************************************************************************************
ANDY LEE
*********************************************************************************************************************************************
KIER HARDY
*********************************************************************************************************************************************
MATT OWEN
*********************************************************************************************************************************************

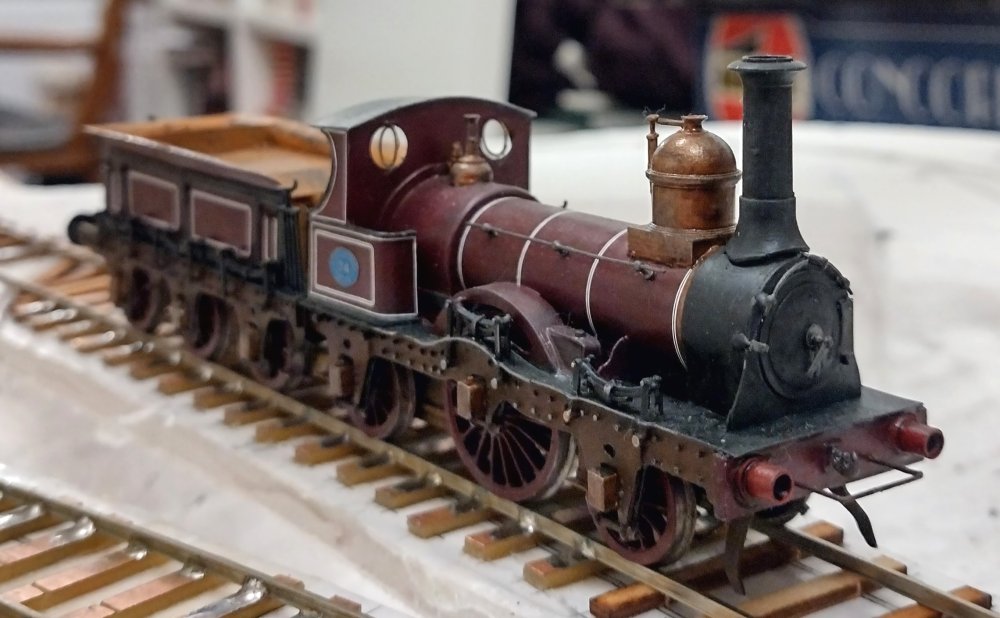 What about the 1870s? George quoted - Although I might be the only person who models the
1870s in EM gauge,
there probably isn't much market for it. Great Eastern Railway #74 post 1870 rebuild. The
model is scratch built in EM and is nearly nearly finished....
What about the 1870s? George quoted - Although I might be the only person who models the
1870s in EM gauge,
there probably isn't much market for it. Great Eastern Railway #74 post 1870 rebuild. The
model is scratch built in EM and is nearly nearly finished....
![]()
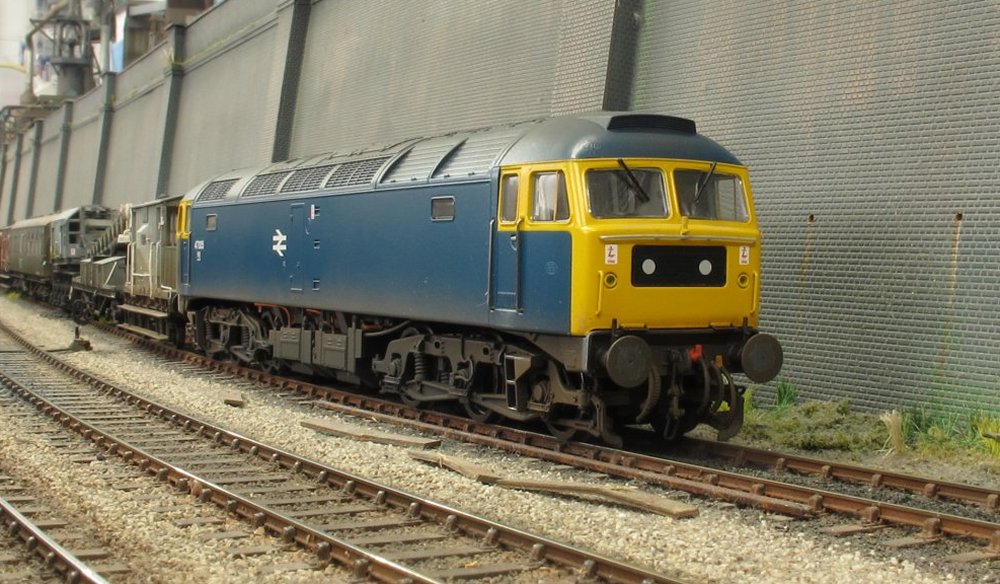
 New into the Shenston Road fleet is 37038, as seen at Hornsey Road depot. A Bachmann
model detailed and weathered from a photograph, including the recently replaced buffer.
The camera picks up on things the eye can't always see, so I'll have to do something
about that crooked cab handrail.
New into the Shenston Road fleet is 37038, as seen at Hornsey Road depot. A Bachmann
model detailed and weathered from a photograph, including the recently replaced buffer.
The camera picks up on things the eye can't always see, so I'll have to do something
about that crooked cab handrail.
 Brush 4 in the loop with a Permanent Way train, formed of a 15t crane and support
vehicles. It's a proper looking original Heljan model, unlike the current revised version!
Brush 4 in the loop with a Permanent Way train, formed of a 15t crane and support
vehicles. It's a proper looking original Heljan model, unlike the current revised version!
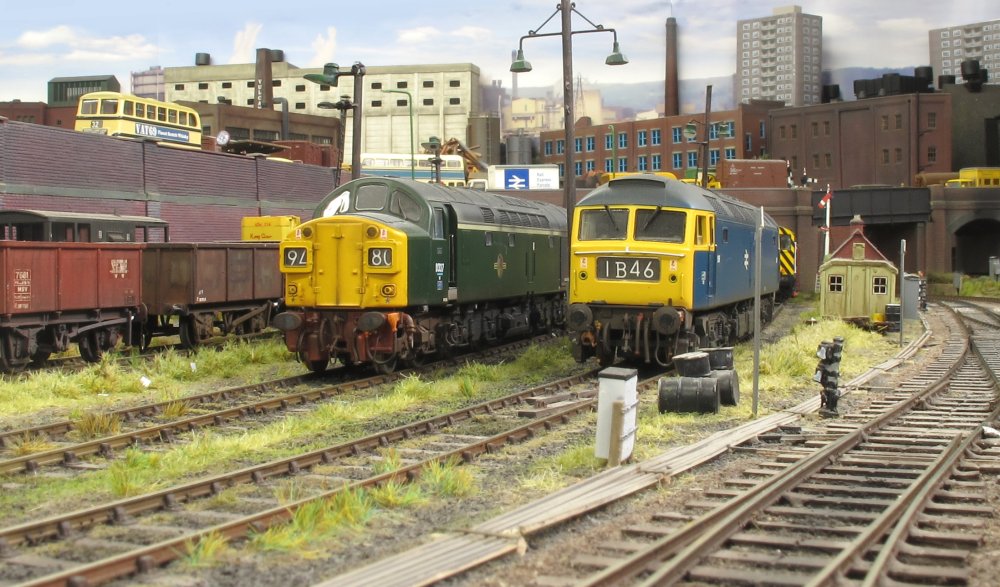 A quiet moment at the station stabling point with a green Class 40 keeping company with
a blue Class 47 and Class 08 shunter.
A quiet moment at the station stabling point with a green Class 40 keeping company with
a blue Class 47 and Class 08 shunter.
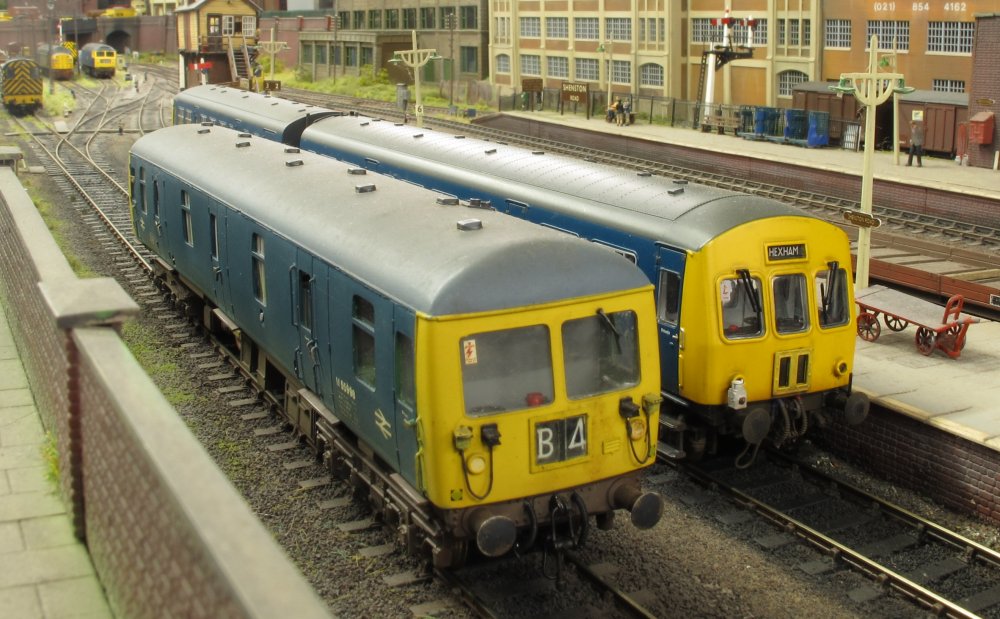 Here we see a DC Kits Cravens Class 129 Diesel Parcels Unit in the yard headshunt, next to
a Class 101 destined for Hexham by the look of it. As a driver it was amusing to wind
the blind to an obscure destination, on a units that had been transferred from other regions!
Here we see a DC Kits Cravens Class 129 Diesel Parcels Unit in the yard headshunt, next to
a Class 101 destined for Hexham by the look of it. As a driver it was amusing to wind
the blind to an obscure destination, on a units that had been transferred from other regions!
 Yorkshire Engine Company 0-6-0 Janus, shunting ex-tippler wagons containing ingot moulds.
![]()
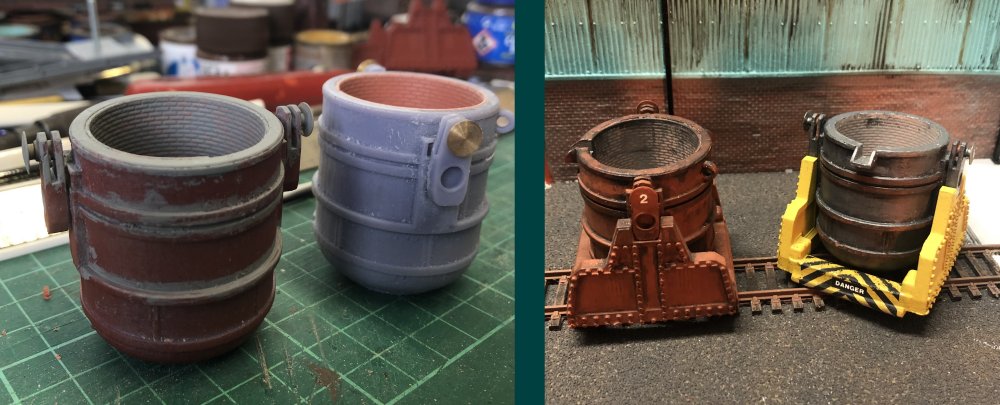 Here's my pair of 3D printed ladles & stands made by Cornwall Custom Designs, who produce
a vast range of laser and rotary engraving products, as well as 3D printed items. I’ve added
trunnions (using A1 brass Oleo buffer heads) and pouring spouts with square plastic
tube, then finished off with embosed brick plastic inside to represent the fire bricks.
Here's my pair of 3D printed ladles & stands made by Cornwall Custom Designs, who produce
a vast range of laser and rotary engraving products, as well as 3D printed items. I’ve added
trunnions (using A1 brass Oleo buffer heads) and pouring spouts with square plastic
tube, then finished off with embosed brick plastic inside to represent the fire bricks.
 These are 3D printed scrap metal ladles designed by Ben Bair and available on
Thingiverse. The grey middle ladle is still work in progress to convert it into a heavy
duty liquid metal ladle. The plastic lid is from the Plastruct 'architectural range'
and available by mail order from EMA Model Supplies Ltd in London.
These are 3D printed scrap metal ladles designed by Ben Bair and available on
Thingiverse. The grey middle ladle is still work in progress to convert it into a heavy
duty liquid metal ladle. The plastic lid is from the Plastruct 'architectural range'
and available by mail order from EMA Model Supplies Ltd in London.
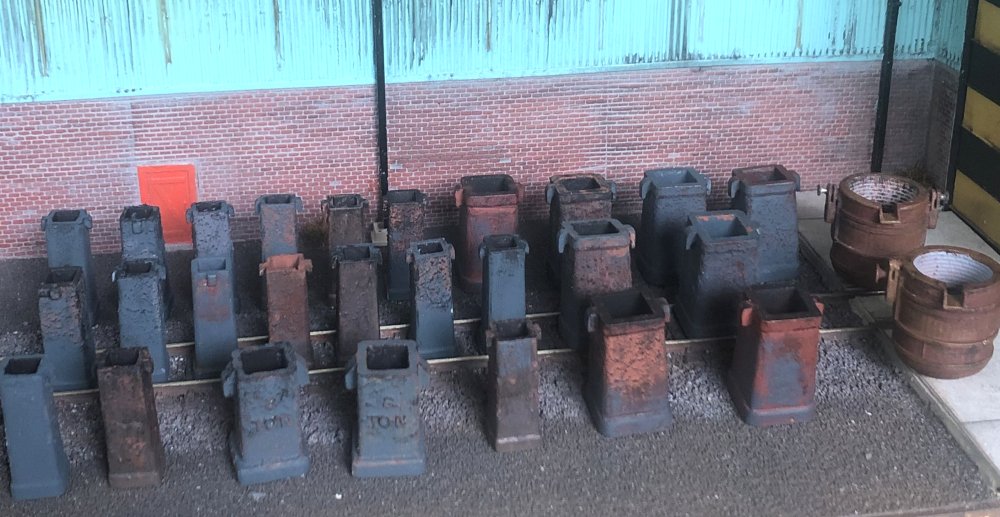 This is some of my vast collection of Ingot moulds. These are mostly RT Models resin
ingots and a couple of my 8 ton scratch built efforts. They have been panted with Citadel
(Warhammer) acrylic 'technical' paint to represent iron / heat scale, and then sprayed
dark grey before painting and dry brushing to give them a well used and battered appearance.
This is some of my vast collection of Ingot moulds. These are mostly RT Models resin
ingots and a couple of my 8 ton scratch built efforts. They have been panted with Citadel
(Warhammer) acrylic 'technical' paint to represent iron / heat scale, and then sprayed
dark grey before painting and dry brushing to give them a well used and battered appearance.
![]()
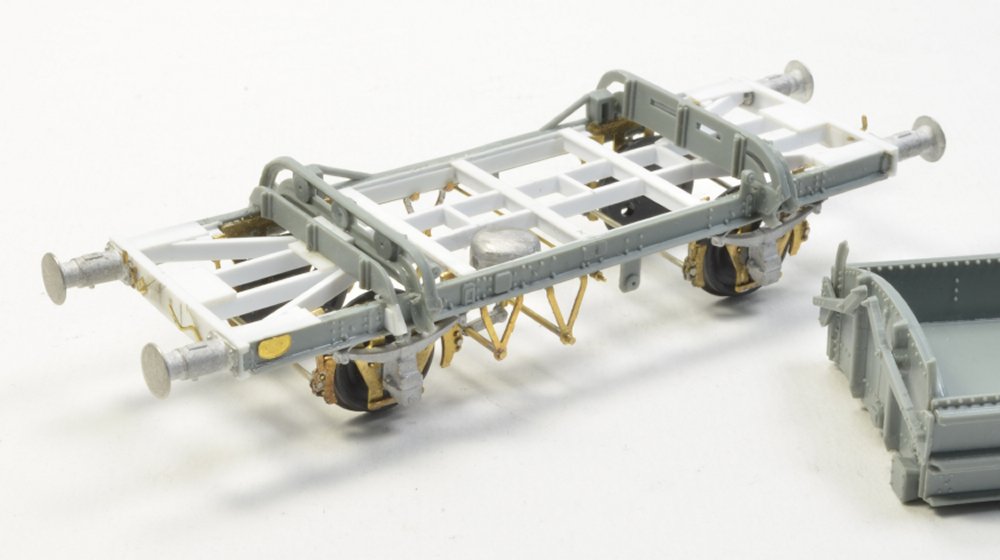
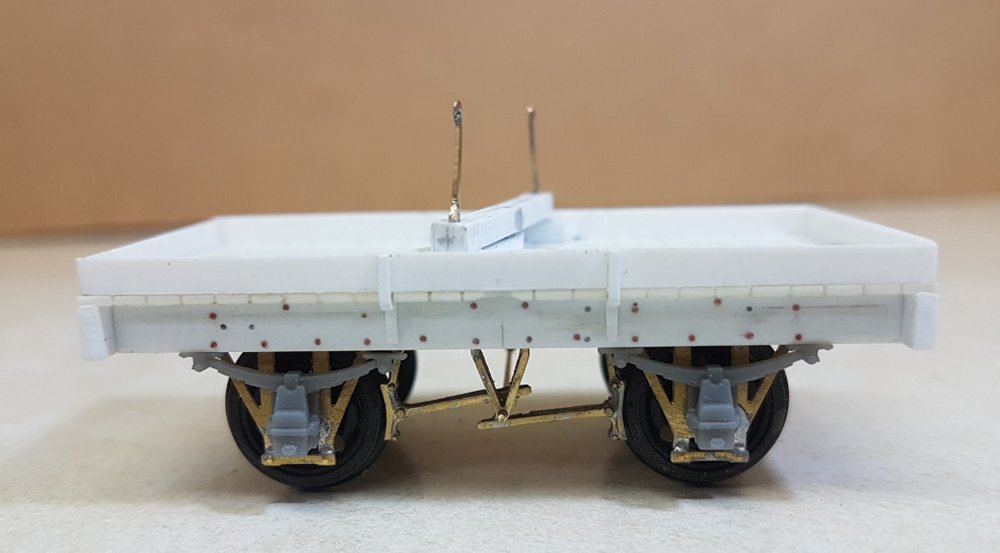 With house moving still on the agenda, a number of items were un-packed to allow some sort of
modelling to take place, and as a result of this the focus of attention has turned towards
creating an LMS D1950 single bolster wagon. A total of 1250 such vehicles were turned out in
three lots by Derby between 1936-39; measuring 15' 6" in length and 8' wide, each came with
a wooden underframe equipped with a 8' wheelbase and single sided unfitted brake gear.
Fortunately such a quest is aided by the existence of reasonable drawings for the vehicles
in both 'The LMS Wagon' by R.J. Essery & K.R. Morgan, and Mr Essery's 'Official Drawings of
LMS Wagons - Volume Two'.
With house moving still on the agenda, a number of items were un-packed to allow some sort of
modelling to take place, and as a result of this the focus of attention has turned towards
creating an LMS D1950 single bolster wagon. A total of 1250 such vehicles were turned out in
three lots by Derby between 1936-39; measuring 15' 6" in length and 8' wide, each came with
a wooden underframe equipped with a 8' wheelbase and single sided unfitted brake gear.
Fortunately such a quest is aided by the existence of reasonable drawings for the vehicles
in both 'The LMS Wagon' by R.J. Essery & K.R. Morgan, and Mr Essery's 'Official Drawings of
LMS Wagons - Volume Two'.
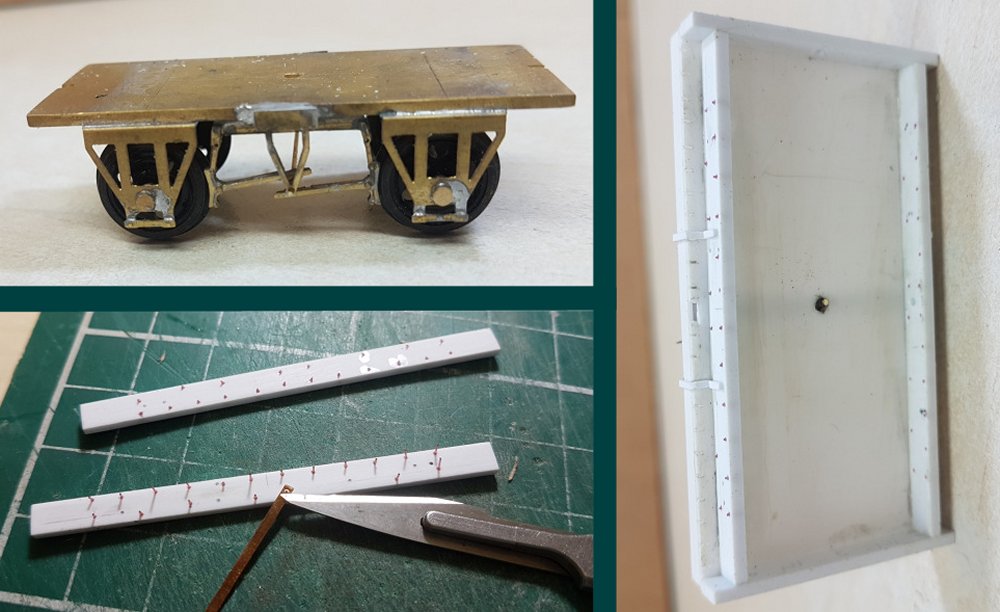 The chassis components comprise of an old MT 223/4 Mainly Trains brass etch for an RCH
equipped vehicle which has had the brake gear modified from a 9' wheelbase to the required
8' whilst the axleboxes & springs are provided by Rumney Models in the form of 3D printed
components numbered PFH.05W (Justin does a variety of such pieces typical of wooden solebar
vehicles with each having the correct style of mounting brackets which differ from those
used on steel underframes). In order to add a little weight I've experimented with the use
of a piece of 1.5mm thick brass sheet for the sub-floor onto which a scratch built body can
be mounted. The wooden solebars have been made by using Evergreen 1.5 x 4mm strip with their
attendant bolt heads achieved by marking out and then drilling through to allow Slaters 10
thou rod to be glued into place. To achieve a consistent look a piece of brass strip was
drilled to create a gauge which can be used in conjunction with a sharp scalpel blade to
trim each head to the same height.
The chassis components comprise of an old MT 223/4 Mainly Trains brass etch for an RCH
equipped vehicle which has had the brake gear modified from a 9' wheelbase to the required
8' whilst the axleboxes & springs are provided by Rumney Models in the form of 3D printed
components numbered PFH.05W (Justin does a variety of such pieces typical of wooden solebar
vehicles with each having the correct style of mounting brackets which differ from those
used on steel underframes). In order to add a little weight I've experimented with the use
of a piece of 1.5mm thick brass sheet for the sub-floor onto which a scratch built body can
be mounted. The wooden solebars have been made by using Evergreen 1.5 x 4mm strip with their
attendant bolt heads achieved by marking out and then drilling through to allow Slaters 10
thou rod to be glued into place. To achieve a consistent look a piece of brass strip was
drilled to create a gauge which can be used in conjunction with a sharp scalpel blade to
trim each head to the same height.
 The bolster has been constructed such that it will swivel in a prototypical fashion and can
be seen mounted on a scratch built 'I girder' affair - unfortunately using a proprietary
Evergreen strip for this is not possible as it makes the bolster sit too high in relation
to the sides and it does not come in the correct width. Another requirement is that the two
side assemblies on which the bolster slides need to be made to the same height as this
bolster support beam so again scratch building is the order of the day.
The bolster has been constructed such that it will swivel in a prototypical fashion and can
be seen mounted on a scratch built 'I girder' affair - unfortunately using a proprietary
Evergreen strip for this is not possible as it makes the bolster sit too high in relation
to the sides and it does not come in the correct width. Another requirement is that the two
side assemblies on which the bolster slides need to be made to the same height as this
bolster support beam so again scratch building is the order of the day.
 The bolster itself used rectangular bolster pins rather than the more usual tapered round
types so the relevant sockets to house them has been achieved by constructing the bolster
from a variety of Evegreen plastic strips. To carry on with the rectangular theme the two
bolster end plates have been made using 5 thou plastic sheet which has been punched through
using a piece of 0.5 x 1mm brass strip, this being the material used for the bolster pins.
These pins have quite a distinctive appearance and as stated have been made from 0.5 x 1mm
brass; firstly an unequal T shape is made by soldering two pieces together after which the
bar element is then cut to shape using a cutter with a sharp blade. The upright between
this and the top of the pin is then filed into a taper shape before a small piece of 1.3mm
OD tube is then soldered into place before finally being filed to the same 0.5mm thickness
as the pin (to make this last step easier, drill a 1.3mm diameter hole in a piece of ply
into which the tube can be inserted and held in place).
The bolster itself used rectangular bolster pins rather than the more usual tapered round
types so the relevant sockets to house them has been achieved by constructing the bolster
from a variety of Evegreen plastic strips. To carry on with the rectangular theme the two
bolster end plates have been made using 5 thou plastic sheet which has been punched through
using a piece of 0.5 x 1mm brass strip, this being the material used for the bolster pins.
These pins have quite a distinctive appearance and as stated have been made from 0.5 x 1mm
brass; firstly an unequal T shape is made by soldering two pieces together after which the
bar element is then cut to shape using a cutter with a sharp blade. The upright between
this and the top of the pin is then filed into a taper shape before a small piece of 1.3mm
OD tube is then soldered into place before finally being filed to the same 0.5mm thickness
as the pin (to make this last step easier, drill a 1.3mm diameter hole in a piece of ply
into which the tube can be inserted and held in place).
![]()
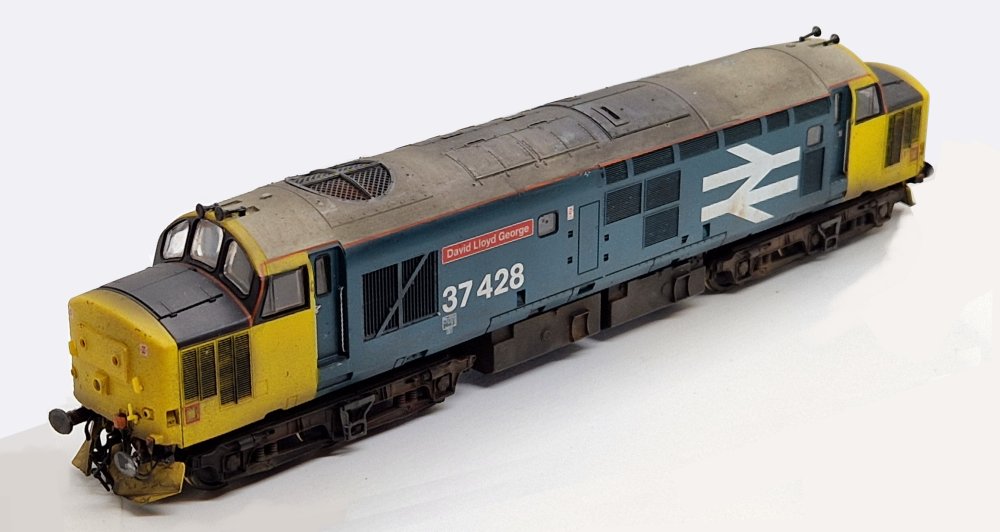 Fresh off the workbench is this Vi-Trains Class 37 - 37428 David Lloyd George.
 A City Classics HO scale kit for use as a blocking building to hide where the edge of the
baseboard goes offscene. It is painted and weathered with the same IPA bleaching techniques
previously described, with a faded and weathered company name on the brickwork from a former
occupier. Next on the list will be windows and downpipes.
A City Classics HO scale kit for use as a blocking building to hide where the edge of the
baseboard goes offscene. It is painted and weathered with the same IPA bleaching techniques
previously described, with a faded and weathered company name on the brickwork from a former
occupier. Next on the list will be windows and downpipes.
 BRCW Lion - Silver Fox resin kit. The body was primed in Supadec white, then a basecoat
of UPol gloss white was used from a rattle can. The UPol is a cream / white with a hint
of grey and gives a good worn base coat to start painting over. The details are all hand
painted with Tamiya, the side stripes masked off individually with Tamiya masking tape.
I'm going to use a Hornby Railroad Class 47 chassis, converted to EM gauge.
BRCW Lion - Silver Fox resin kit. The body was primed in Supadec white, then a basecoat
of UPol gloss white was used from a rattle can. The UPol is a cream / white with a hint
of grey and gives a good worn base coat to start painting over. The details are all hand
painted with Tamiya, the side stripes masked off individually with Tamiya masking tape.
I'm going to use a Hornby Railroad Class 47 chassis, converted to EM gauge.
![]()
 The new scene north of the station has been progressing slowly, with recently added
platform furniture (removable) to include station lamps, GNR style seating / benches,
a flower bed and running in boards. Card mock-ups have been produced to form an idea of
what the finished scene might look like beyond the retaining wall, featuring period
shop fronts with 2 floors of accomodation above.
The new scene north of the station has been progressing slowly, with recently added
platform furniture (removable) to include station lamps, GNR style seating / benches,
a flower bed and running in boards. Card mock-ups have been produced to form an idea of
what the finished scene might look like beyond the retaining wall, featuring period
shop fronts with 2 floors of accomodation above.
 I've never been happy with split-frame model loco's, or those that rely on the
axle bushes for current collection, unless they're fitted with additional electrical
pick-ups. Bachmann have seen the error of their ways and improved the Class 40 with
factory retro-fitted wiper pick-ups. Good control and reliable running has to be top
of the list when it comes to playing trains, so with a poor record of reliability on
the Dapol Class 22 and Class 73, I don't want to take any chances.
I've never been happy with split-frame model loco's, or those that rely on the
axle bushes for current collection, unless they're fitted with additional electrical
pick-ups. Bachmann have seen the error of their ways and improved the Class 40 with
factory retro-fitted wiper pick-ups. Good control and reliable running has to be top
of the list when it comes to playing trains, so with a poor record of reliability on
the Dapol Class 22 and Class 73, I don't want to take any chances.
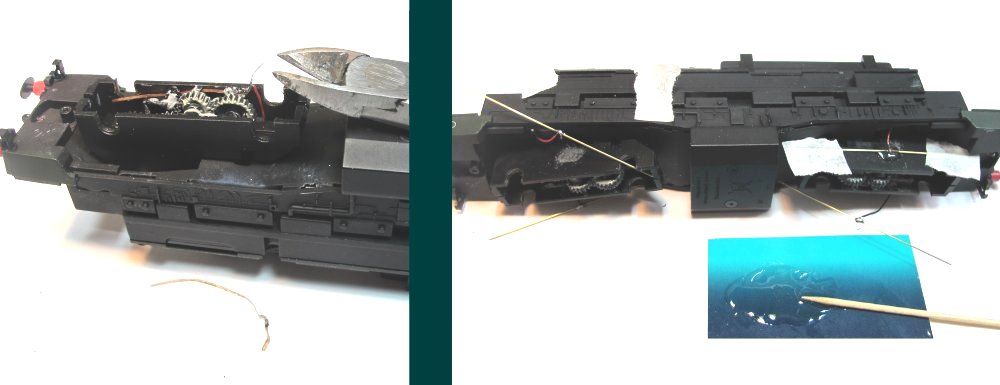 It's a simple enough job to improve on a poor design where a brass strip contacts with
the 'caked in grease axle bush', as well as try to transmit current through a film of
lubricant on the axle (semi-conductive or not). Snip off the wire and discard the brass
strip, then remove the wires from inside the gearbox and re-route them down the outside.
Solder onto new pick-ups, then bond in place with a dab of epoxy resin over a roughed
up section of casing. Make slightly overlength pick-ups and trim to length after setting.
It's a simple enough job to improve on a poor design where a brass strip contacts with
the 'caked in grease axle bush', as well as try to transmit current through a film of
lubricant on the axle (semi-conductive or not). Snip off the wire and discard the brass
strip, then remove the wires from inside the gearbox and re-route them down the outside.
Solder onto new pick-ups, then bond in place with a dab of epoxy resin over a roughed
up section of casing. Make slightly overlength pick-ups and trim to length after setting.
![]()
 I've been working on some Engineering wagons - I've always had a soft spot for the
venerable Cambrian kits and with a bit of care and effort, they can be brought up
to scratch. The first of these is the Mermaid. Originally I'd intended to build it
as it came, however an unfortunate accident when assembling the underframe meant I
had to resort to Plan B. This involved rebuilding practically everything aside from
the kit solebars (there was a fair bit of guesswork involved!).
I've been working on some Engineering wagons - I've always had a soft spot for the
venerable Cambrian kits and with a bit of care and effort, they can be brought up
to scratch. The first of these is the Mermaid. Originally I'd intended to build it
as it came, however an unfortunate accident when assembling the underframe meant I
had to resort to Plan B. This involved rebuilding practically everything aside from
the kit solebars (there was a fair bit of guesswork involved!).
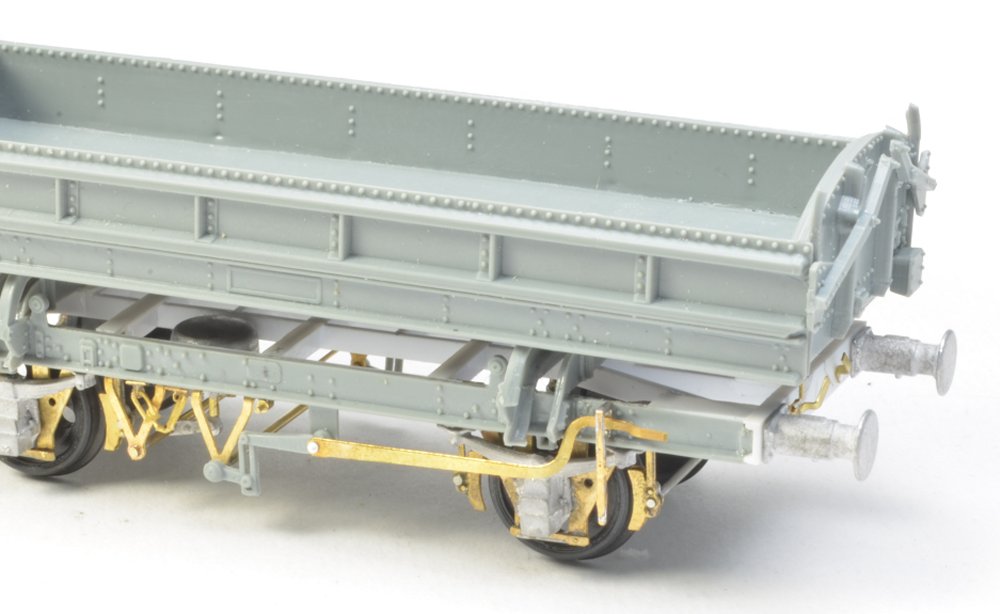 The curved brake lever proved a particular challenge - I used some spare etched levers
and bent them to shape using the plastic parts as rough templates.
The curved brake lever proved a particular challenge - I used some spare etched levers
and bent them to shape using the plastic parts as rough templates.
 There are still some finishing touches to add, including steps (a common theme!) and
end chains - these'll be added before the wagon is painted. Was it worth the effort?
Yes in terms of appearance but I doubt I'll do another!
There are still some finishing touches to add, including steps (a common theme!) and
end chains - these'll be added before the wagon is painted. Was it worth the effort?
Yes in terms of appearance but I doubt I'll do another!
 Next up is the Cambrian Catfish. I built one of these a few years ago and my initial
intention was to repair and refine this. However for a wagon that's renowned for being
flimsy, clearly my building skills a few years ago were more robust than I gave myself
credit for as it refused to be disassembled. Luckily I had a spare kit in my stash to work on.
Next up is the Cambrian Catfish. I built one of these a few years ago and my initial
intention was to repair and refine this. However for a wagon that's renowned for being
flimsy, clearly my building skills a few years ago were more robust than I gave myself
credit for as it refused to be disassembled. Luckily I had a spare kit in my stash to work on.
 Once again, everything that could be replaced has been with parts from a variety of
sources. Why has it only got three buffers? That's all I have and until LMS resumes
trading I won't be able to buy more!
Once again, everything that could be replaced has been with parts from a variety of
sources. Why has it only got three buffers? That's all I have and until LMS resumes
trading I won't be able to buy more!
 Now with all the fiddly bits fitted. The steps were soldered up from scrap etch - far
more robust and better looking that the moulded items.
Now with all the fiddly bits fitted. The steps were soldered up from scrap etch - far
more robust and better looking that the moulded items.