*********************************************************************************************************************************************
JULY 2024 UPDATE
*********************************************************************************************************************************************
ANDY LEE
*********************************************************************************************************************************************
KARL CROWTHER
*********************************************************************************************************************************************
HYWEL THOMAS
*********************************************************************************************************************************************
KIER HARDY
Another side project utilises some redundant Heljan boxes wrapped with printed paper
to represent high rise tower blocks in the far distance.
These 3D designs are available free at
Thingiverse
for you to print yourself, or visit *********************************************************************************************************************************************
*********************************************************************************************************************************************
![]()
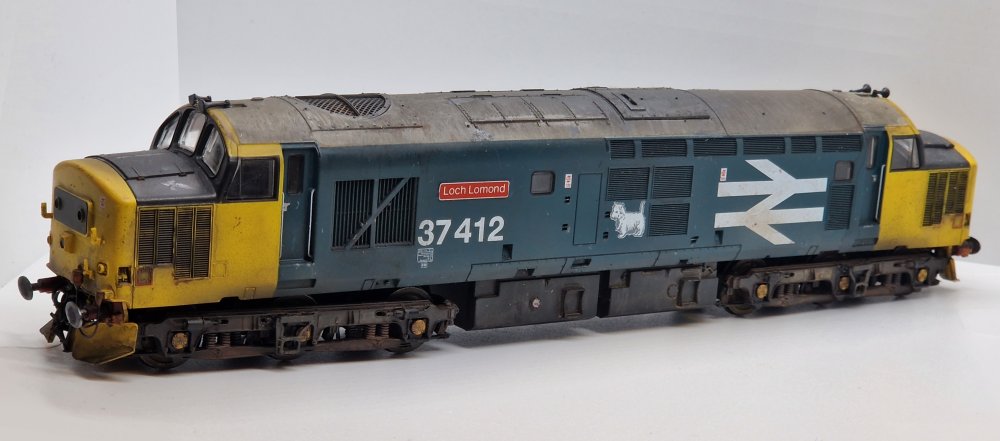 Here is a Vitrains Class 37 I've recently completed - they can be picked up very
reasonably on the secondhand market. Weathering
was carried out with my usual method of IPA washes and the bleaching technique, plus
brush painting dirt layers. I added Heljan Class 47 snowploughs to the back of the
bufferbeams, with pipes and Smiths screwlink couplings. This is the first off the
production line of Class 37s I'm working on, followed by 2 green, 2 blue and 4 large
logo versions from Bachmann, Vitrains and Accurascale.
Here is a Vitrains Class 37 I've recently completed - they can be picked up very
reasonably on the secondhand market. Weathering
was carried out with my usual method of IPA washes and the bleaching technique, plus
brush painting dirt layers. I added Heljan Class 47 snowploughs to the back of the
bufferbeams, with pipes and Smiths screwlink couplings. This is the first off the
production line of Class 37s I'm working on, followed by 2 green, 2 blue and 4 large
logo versions from Bachmann, Vitrains and Accurascale.
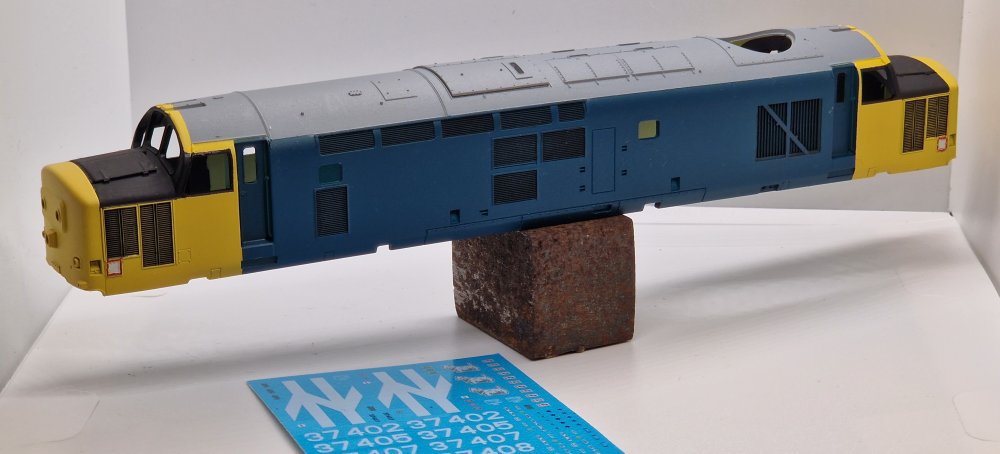 This is a Vitrains Class 37 that was stripped and then primed with Supadec grey. The rail
blue and yellow are from Railmatch enamel rattle cans. The next job is to add the Railtec
decals, and this one will be an Easfield early 37/4. A new roof fan grill from A1 models
is being added, then heavy weathering to match some pics of the prototype.
This is a Vitrains Class 37 that was stripped and then primed with Supadec grey. The rail
blue and yellow are from Railmatch enamel rattle cans. The next job is to add the Railtec
decals, and this one will be an Easfield early 37/4. A new roof fan grill from A1 models
is being added, then heavy weathering to match some pics of the prototype.
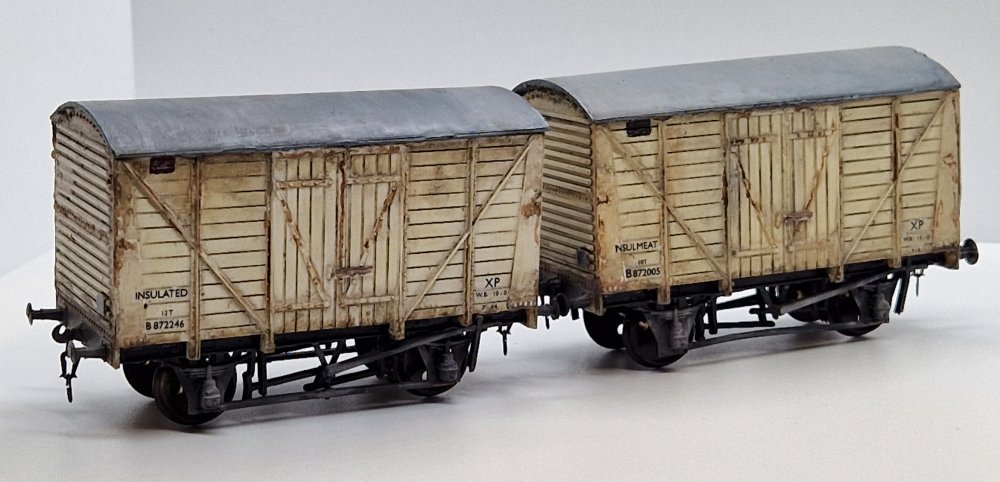 Here are a couple of insulated vans, as I wanted to model a few that are similar to those
on Canada Street. A Cambrian kit with Gibson wheels and decals by Modelmaster. I used
Vallejo Ral 9002 grey white and added a tinge of yellow to it for the basecoat.
Here are a couple of insulated vans, as I wanted to model a few that are similar to those
on Canada Street. A Cambrian kit with Gibson wheels and decals by Modelmaster. I used
Vallejo Ral 9002 grey white and added a tinge of yellow to it for the basecoat.
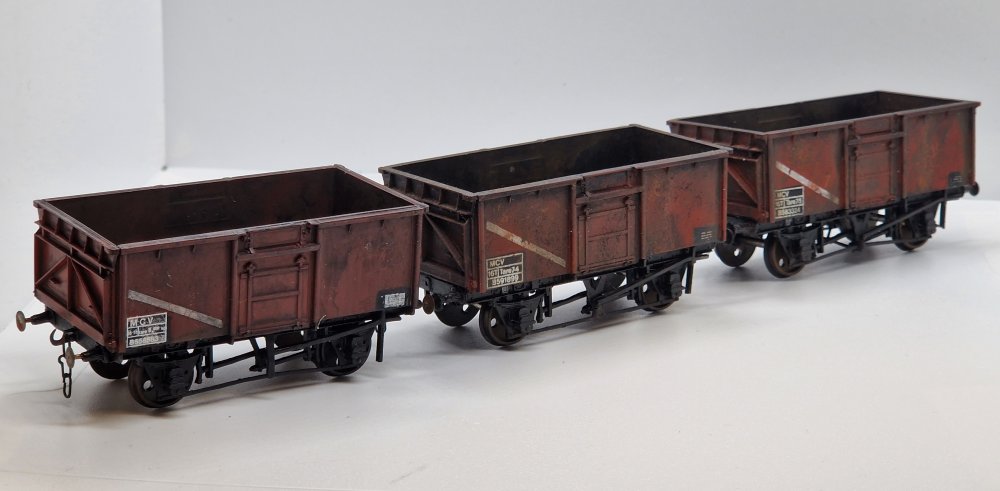 A few more Parkside 16t wagons have joined the fleet, using a red primer from a rattle
can for the basecoat. The decals were from a batch of SMS transfers I had dating back to
1980, so I was amazed they floated off the backing and worked okay after 40+ years.
A few more Parkside 16t wagons have joined the fleet, using a red primer from a rattle
can for the basecoat. The decals were from a batch of SMS transfers I had dating back to
1980, so I was amazed they floated off the backing and worked okay after 40+ years.
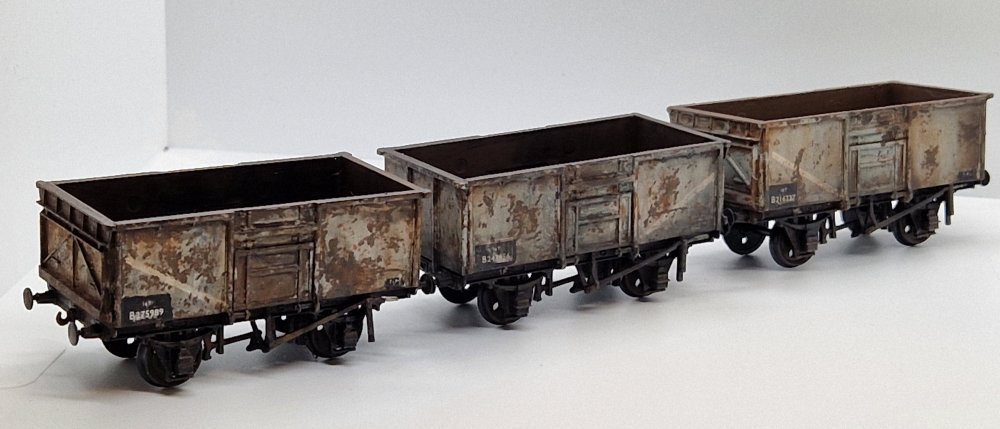 These 16t unfitted wagons are old Airfix kits which had been in a box for many years.
The basecoat is SupaDec primer, which once weathered looks great. I mask off all the
stripes on my 16 tonners with Tamiya masking tape, and used a chisel brush to paint
on Vallejo grey / white Ral 9002.
These 16t unfitted wagons are old Airfix kits which had been in a box for many years.
The basecoat is SupaDec primer, which once weathered looks great. I mask off all the
stripes on my 16 tonners with Tamiya masking tape, and used a chisel brush to paint
on Vallejo grey / white Ral 9002.
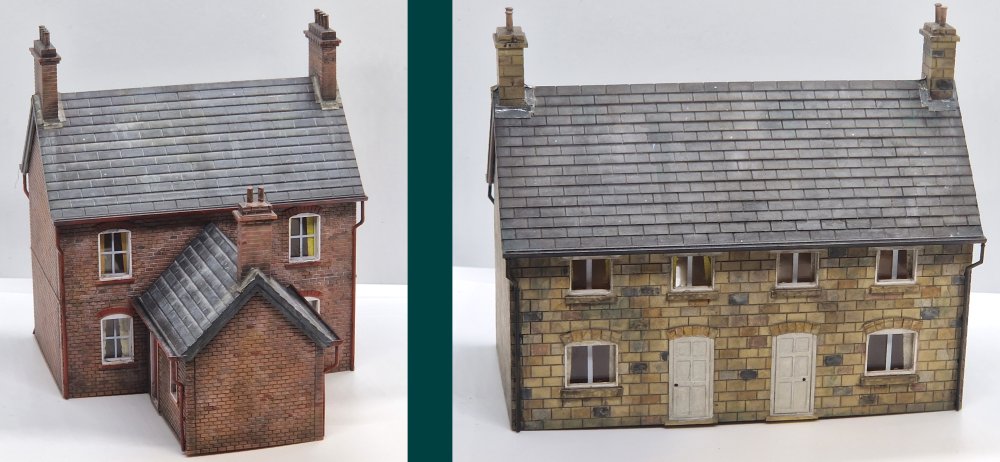 I have also been working on more buildings for the layout, including these 2 'Hachette
Your Model Railway Village' from a series magazines with parts each week to build a
tabletop model railway. The buildings are very well designed and well made to fit
together absolutely seamlessly, and once painted and weathered they look very good.
Using a basecoat of red primer, then layers of washes of different brick shades mixed
up from Tamiya and Vallejo. IPA bleaching is all over this model which desaturates the
colours nicely. The roof is just Tamiya dark grey with two layers of 50% IPA washes,
and all that bleaching is the alcohol doing that...not me! Tamiya masking tape is used
for the curtains and the lead flashing around the chimneys painted with a grey silver
mix. I've added random white spots all over the roofs to represent bird droppings. The
stone cottage is also Hachette and I referenced a lot of houses in Yorkshire to paint
the stonework in 6 different tones, finishing off with a black wash of 70% IPA.
I have also been working on more buildings for the layout, including these 2 'Hachette
Your Model Railway Village' from a series magazines with parts each week to build a
tabletop model railway. The buildings are very well designed and well made to fit
together absolutely seamlessly, and once painted and weathered they look very good.
Using a basecoat of red primer, then layers of washes of different brick shades mixed
up from Tamiya and Vallejo. IPA bleaching is all over this model which desaturates the
colours nicely. The roof is just Tamiya dark grey with two layers of 50% IPA washes,
and all that bleaching is the alcohol doing that...not me! Tamiya masking tape is used
for the curtains and the lead flashing around the chimneys painted with a grey silver
mix. I've added random white spots all over the roofs to represent bird droppings. The
stone cottage is also Hachette and I referenced a lot of houses in Yorkshire to paint
the stonework in 6 different tones, finishing off with a black wash of 70% IPA.
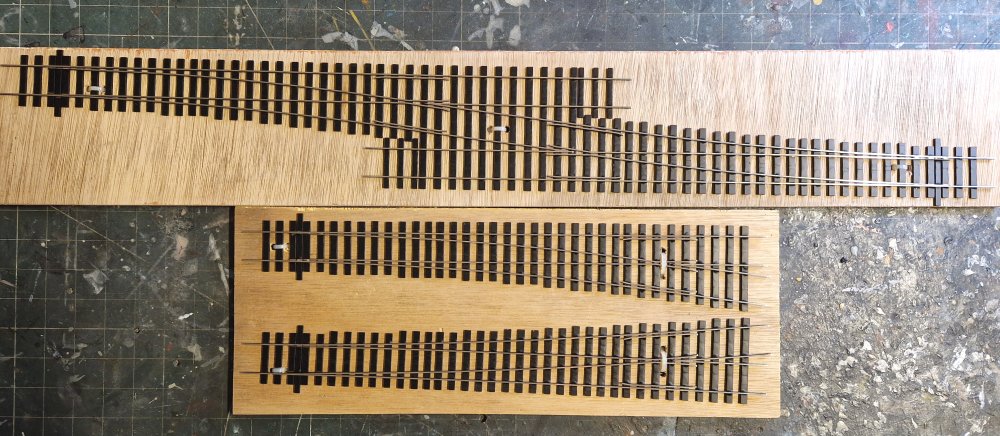 New turnouts for the layout built by Gerry Berry using code 75 bullhead rail. The 1:8b
crossover is very nice at 66cm long, so I'm not building any myself when these are so good.
New turnouts for the layout built by Gerry Berry using code 75 bullhead rail. The 1:8b
crossover is very nice at 66cm long, so I'm not building any myself when these are so good.
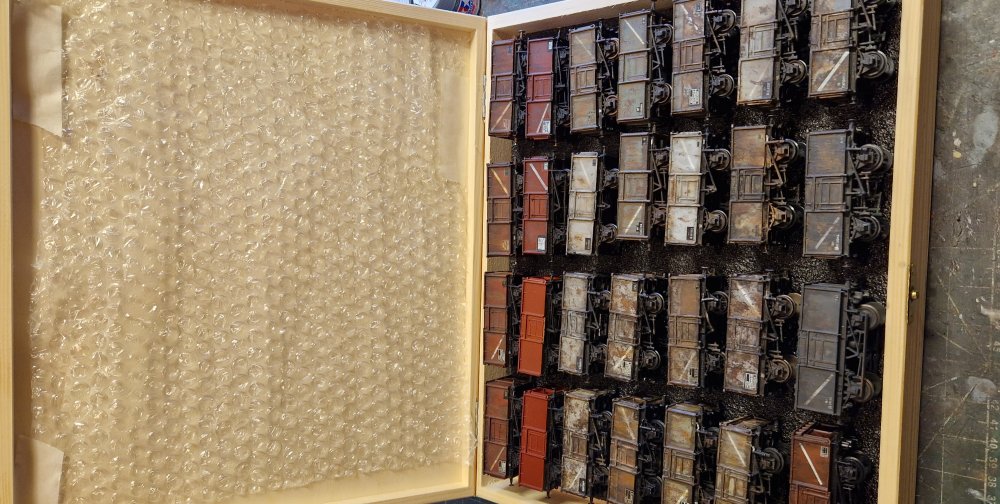 I've have been buying these nice wooden boxes to store wagons in. Everything before was
stored was in shoe boxes getting scratched and buffers broken off after all the work
making them so I bought a bunch of these to store them flat and stop the damage.
Search 'Large shallow pine wooden box with lid & clasp 36 x 30 x 5 cm' available on
Amazon and Ebay.
I've have been buying these nice wooden boxes to store wagons in. Everything before was
stored was in shoe boxes getting scratched and buffers broken off after all the work
making them so I bought a bunch of these to store them flat and stop the damage.
Search 'Large shallow pine wooden box with lid & clasp 36 x 30 x 5 cm' available on
Amazon and Ebay.
![]()
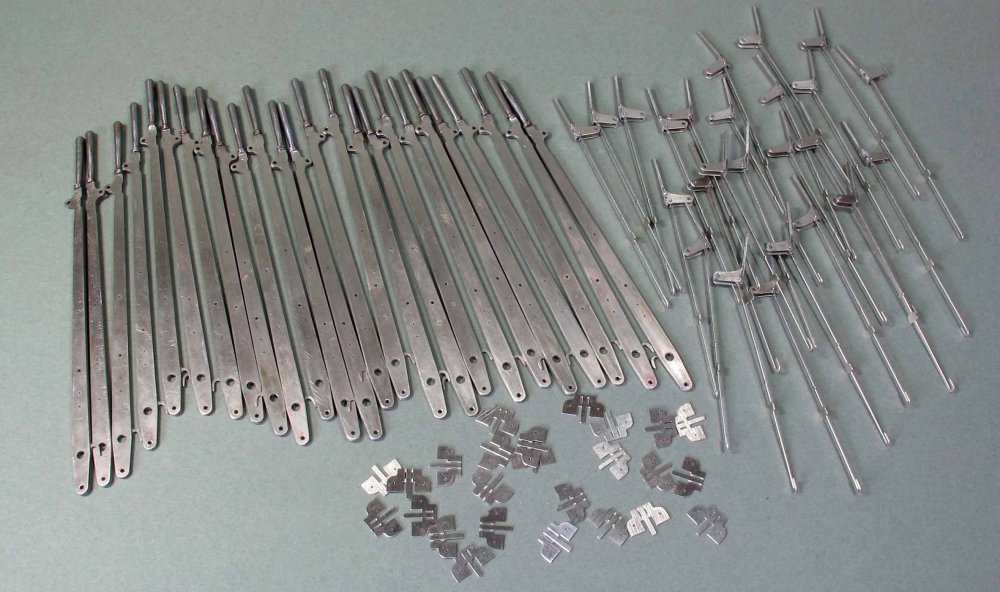 Encouraged by all the interest in the layout�s signalling at Scalefour Crewe, further
progress has been made with the Kentside lever frame. All 25 levers are now
ready for their final assembly.
Encouraged by all the interest in the layout�s signalling at Scalefour Crewe, further
progress has been made with the Kentside lever frame. All 25 levers are now
ready for their final assembly.
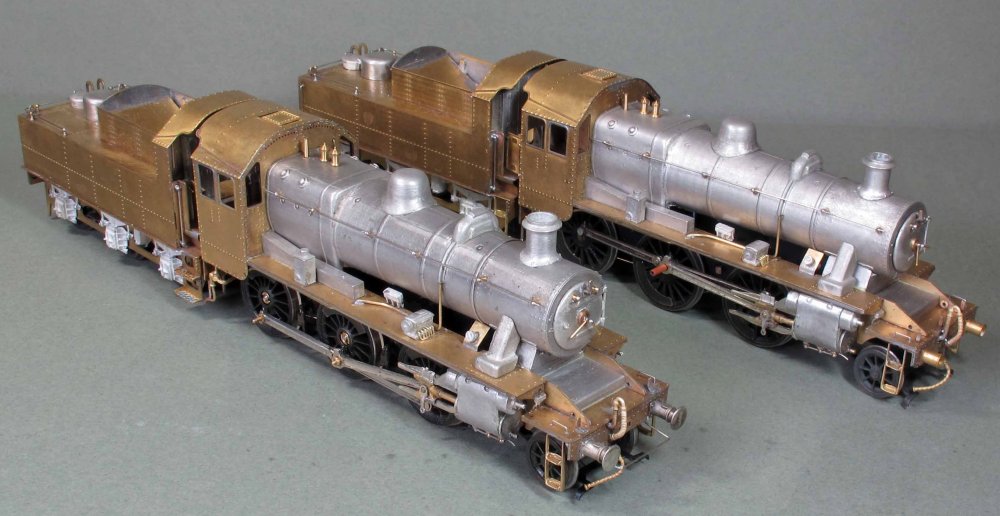
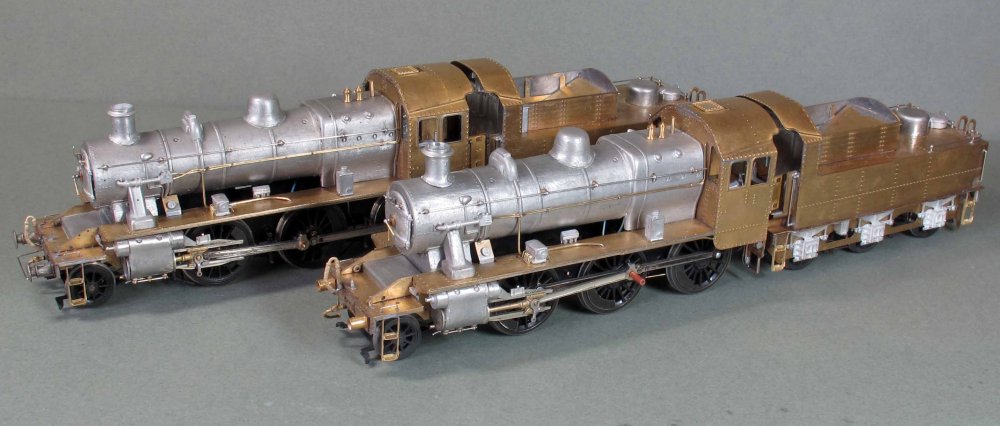 The two Ivatts are progressing, now at the painting stage. Final details added to the
upper parts include the smokebox doors plus various lubricators and their associated
pipework. The two chassis are now running OK, with just the valve gear elements
remaining to install.
The two Ivatts are progressing, now at the painting stage. Final details added to the
upper parts include the smokebox doors plus various lubricators and their associated
pipework. The two chassis are now running OK, with just the valve gear elements
remaining to install.
 I�ve had a bit of a �hiccup� on the CSB-fitted, P4 version. Owing to the mass of the
boiler/smokebox casting, the locos work out front-heavy. Adding lead under the cab roof
and inside where the boiler backhead will go, didn�t fully correct the centre of gravity.
Thus, when running in reverse, the rear wheelset was riding off the rails on curves.
The solution was to convert this loco to compensation. To do this, the rear/driven
axle hornblocks were soldered solid, and a then single beam installed, acting on the
centre and leading wheelset (fortuitously the spring anchor mount holes were in the
exact correct position to mount the beam). This appears to have cured the problem.
I�ve had a bit of a �hiccup� on the CSB-fitted, P4 version. Owing to the mass of the
boiler/smokebox casting, the locos work out front-heavy. Adding lead under the cab roof
and inside where the boiler backhead will go, didn�t fully correct the centre of gravity.
Thus, when running in reverse, the rear wheelset was riding off the rails on curves.
The solution was to convert this loco to compensation. To do this, the rear/driven
axle hornblocks were soldered solid, and a then single beam installed, acting on the
centre and leading wheelset (fortuitously the spring anchor mount holes were in the
exact correct position to mount the beam). This appears to have cured the problem.
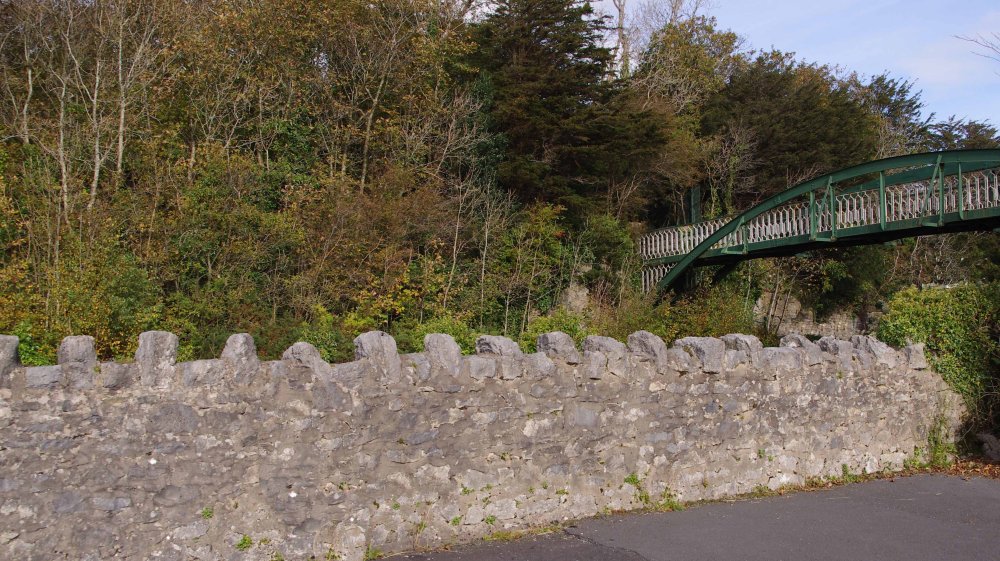 Not much progress on the layout itself this time � gardening and then a bad back getting
in the way! Some thought has been given to how the locally characteristic limestone walling
will be made, which follows the example seen in this image from Grange-over-Sands.
Not much progress on the layout itself this time � gardening and then a bad back getting
in the way! Some thought has been given to how the locally characteristic limestone walling
will be made, which follows the example seen in this image from Grange-over-Sands.
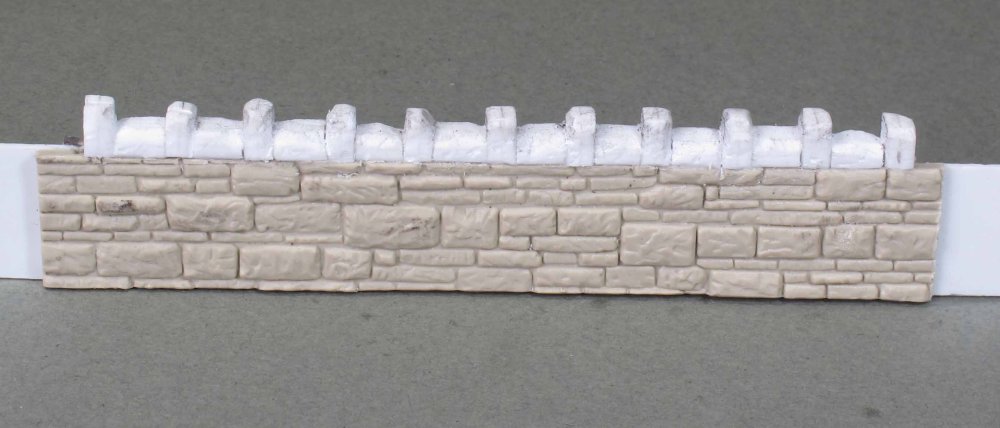 And this is what I�ve come up with � basically the same approach that was followed on
the original Kentside layout, being Wills Coarse Stone (naturally!) topped by individual
�blocks� of plastic. I did wonder about making a master to do some sort of resin casting,
but I think that in the time it would take to develop that approach, I could get the wall
built anyway (though there are several feet of it required!).
And this is what I�ve come up with � basically the same approach that was followed on
the original Kentside layout, being Wills Coarse Stone (naturally!) topped by individual
�blocks� of plastic. I did wonder about making a master to do some sort of resin casting,
but I think that in the time it would take to develop that approach, I could get the wall
built anyway (though there are several feet of it required!).
![]()
 Although not related to the world of EM gauge South Wales, the ongoing
scenic work on the small Bolivian narrow gauge layout might prove of
interest to anyone contemplating a rock face on their layout. There
was not much call for such extravagant modelling on Morfa Bank!
Anyway, here we see the basic structure being formed using 5mm
foamboard. The steps leading down to a planned footbridge are made
from 2mm mounting board.
Although not related to the world of EM gauge South Wales, the ongoing
scenic work on the small Bolivian narrow gauge layout might prove of
interest to anyone contemplating a rock face on their layout. There
was not much call for such extravagant modelling on Morfa Bank!
Anyway, here we see the basic structure being formed using 5mm
foamboard. The steps leading down to a planned footbridge are made
from 2mm mounting board.
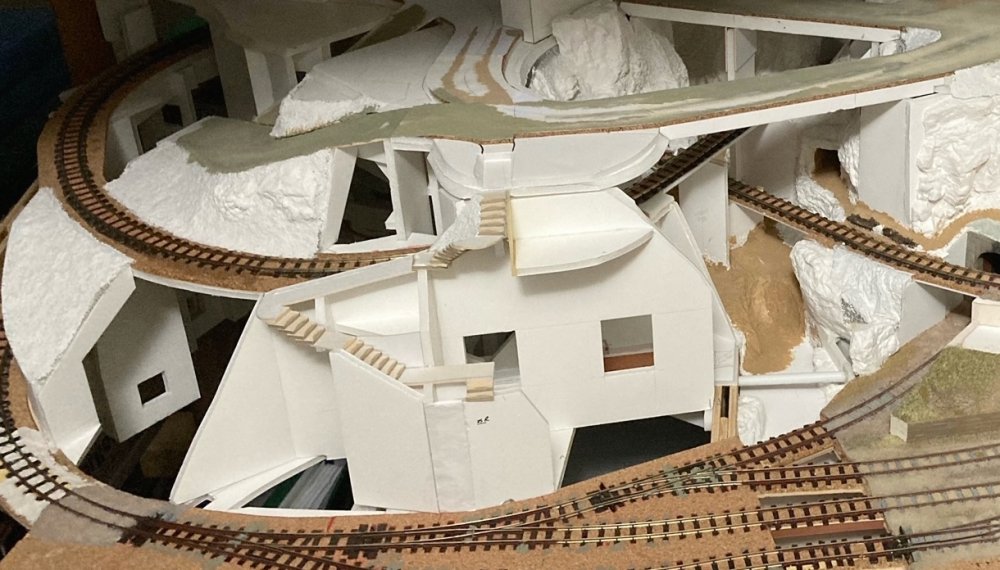
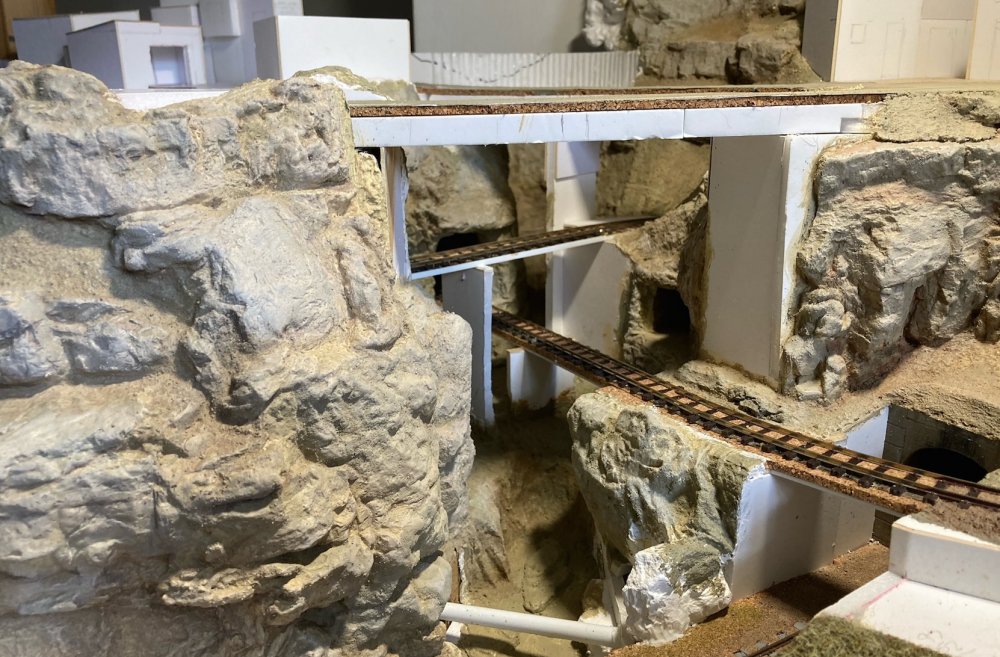
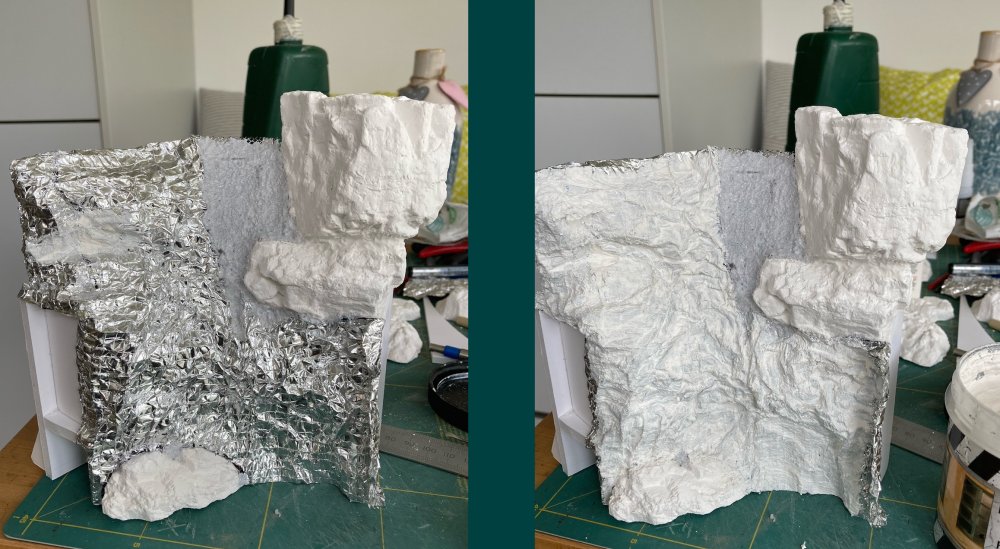 This image shows a part of the sub-structure for the gorge through the
centre of the layout but nicely illustrates the various methods used
to produce the rock faces. On the right we see two moulded rocks from
the excellent Woodland Scenics range of latex moulds. These are
attached to the foamboard using a builder�s grab adhesive. Alongside
is a scree slope produced from aluminium car repair mesh stuck in
place using a hot glue gun. Onto this an artists acrylic course pumice
paste made by Golden is carefully spread. The other surface uses a
scenic foil made by Noch, which comprises two layers of foil with a
cotton mesh between them and is very easy to form into rock shapes.
Once completed a coat of AK Interactive acrylic foam sealer is painted
over the top to blend everything together. Once dry a second coat will
be applied before the module is slid into place in the gorge.
This image shows a part of the sub-structure for the gorge through the
centre of the layout but nicely illustrates the various methods used
to produce the rock faces. On the right we see two moulded rocks from
the excellent Woodland Scenics range of latex moulds. These are
attached to the foamboard using a builder�s grab adhesive. Alongside
is a scree slope produced from aluminium car repair mesh stuck in
place using a hot glue gun. Onto this an artists acrylic course pumice
paste made by Golden is carefully spread. The other surface uses a
scenic foil made by Noch, which comprises two layers of foil with a
cotton mesh between them and is very easy to form into rock shapes.
Once completed a coat of AK Interactive acrylic foam sealer is painted
over the top to blend everything together. Once dry a second coat will
be applied before the module is slid into place in the gorge.
 Moving back to the first scene we see it after application of plaster
rocks, paste covered mesh and the Noch foil (mainly representing the
area cut out to accommodate the railway). The other major component of
the scene is Das clay, which is used to blend some of the disparate
parts together. Once again, it will all be covered in the foam sealer
as a base coat prior to painting.
Moving back to the first scene we see it after application of plaster
rocks, paste covered mesh and the Noch foil (mainly representing the
area cut out to accommodate the railway). The other major component of
the scene is Das clay, which is used to blend some of the disparate
parts together. Once again, it will all be covered in the foam sealer
as a base coat prior to painting.
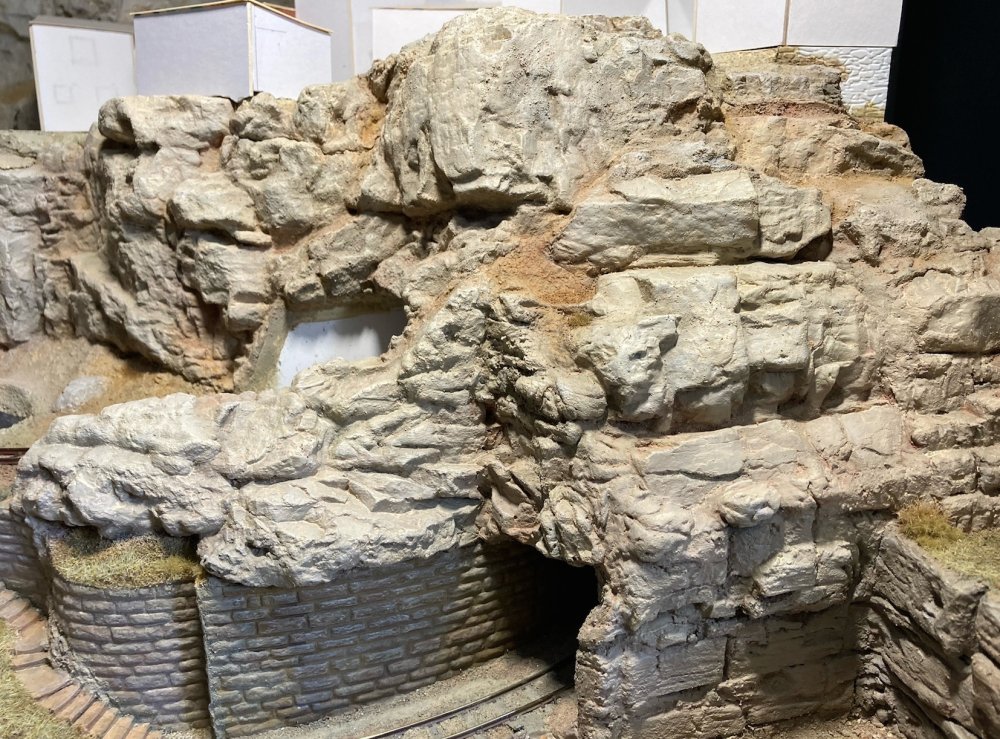
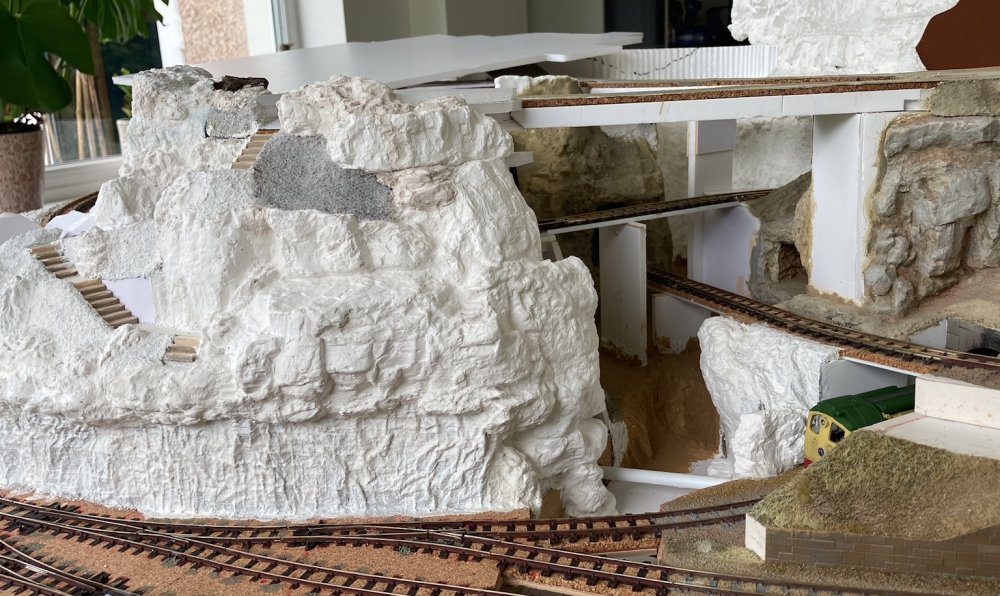 Slightly around the corner we see the now completed area and how it
fits in with the gorge (that winds off beneath the bridges to the back
of the scene). Painting has started on the right had side. Using the
Woodland Scenics rocks along with Das clay can create an almost
infinite variety of combinations from just a few well chosen moulds.
Slightly around the corner we see the now completed area and how it
fits in with the gorge (that winds off beneath the bridges to the back
of the scene). Painting has started on the right had side. Using the
Woodland Scenics rocks along with Das clay can create an almost
infinite variety of combinations from just a few well chosen moulds.
 Looking down into part of the gorge we can see the module described in
picture 2 above, now installed and blended into the previous parts,
plus some paint. Once painted and weathered the different materials
used to create the scene are hard to spot, as it should be.
Looking down into part of the gorge we can see the module described in
picture 2 above, now installed and blended into the previous parts,
plus some paint. Once painted and weathered the different materials
used to create the scene are hard to spot, as it should be.
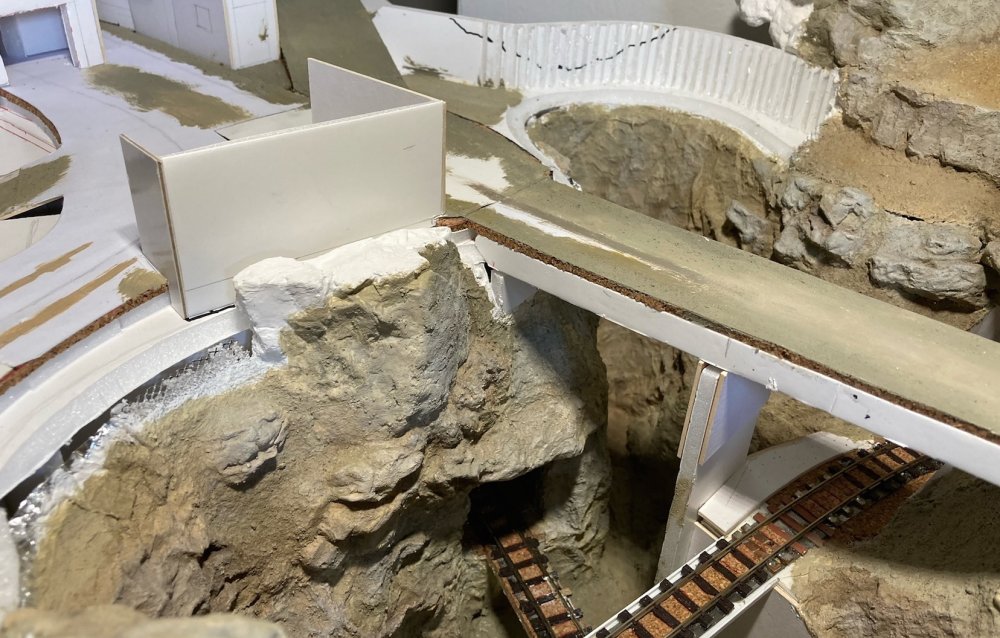
 And now back to the steps and the painting. This, obviously, varies
with where the layout might be set. First up for me was an overall
coat of two acrylic diorama effect pastes wet mixed, one �Dry Ground�
from AK Interactive, the other Vallejo Desert Sand Earth Texture but
mixed with a grey paint. Once that dried it was time for a general dry
brushing of Vallejo Desert Sand acrylic then an overall wash of AK�s
�Light Brown for Desert Yellow� filter enamel followed by their �Brown
Earth Deposit� wash in the shadow areas. This was blended carefully
with thinner before the various rock faces were gradually lightened up
using AK�s �Salt Streaks for Ships� wash from their ship weathering
range. Lastly some Soilworks sienna pigment was lightly brushed over
the scree areas.
And now back to the steps and the painting. This, obviously, varies
with where the layout might be set. First up for me was an overall
coat of two acrylic diorama effect pastes wet mixed, one �Dry Ground�
from AK Interactive, the other Vallejo Desert Sand Earth Texture but
mixed with a grey paint. Once that dried it was time for a general dry
brushing of Vallejo Desert Sand acrylic then an overall wash of AK�s
�Light Brown for Desert Yellow� filter enamel followed by their �Brown
Earth Deposit� wash in the shadow areas. This was blended carefully
with thinner before the various rock faces were gradually lightened up
using AK�s �Salt Streaks for Ships� wash from their ship weathering
range. Lastly some Soilworks sienna pigment was lightly brushed over
the scree areas.
 A similar view to picture 5 but after painting. The little vegetation
that seemed to grow in this area will go on next but not until I�ve
built the various bridges and done more work on the dry river bed at
the base of the gorge.
A similar view to picture 5 but after painting. The little vegetation
that seemed to grow in this area will go on next but not until I�ve
built the various bridges and done more work on the dry river bed at
the base of the gorge.
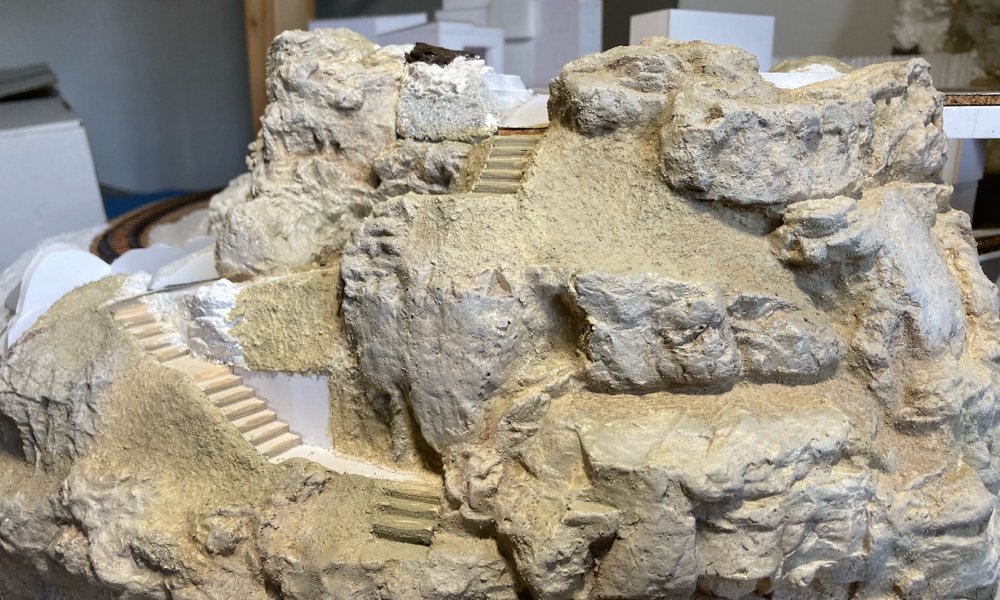
 The last two views, one near the front of the layout where a small
derelict quarry face can be found alongside the tunnel mouth.
The last two views, one near the front of the layout where a small
derelict quarry face can be found alongside the tunnel mouth.
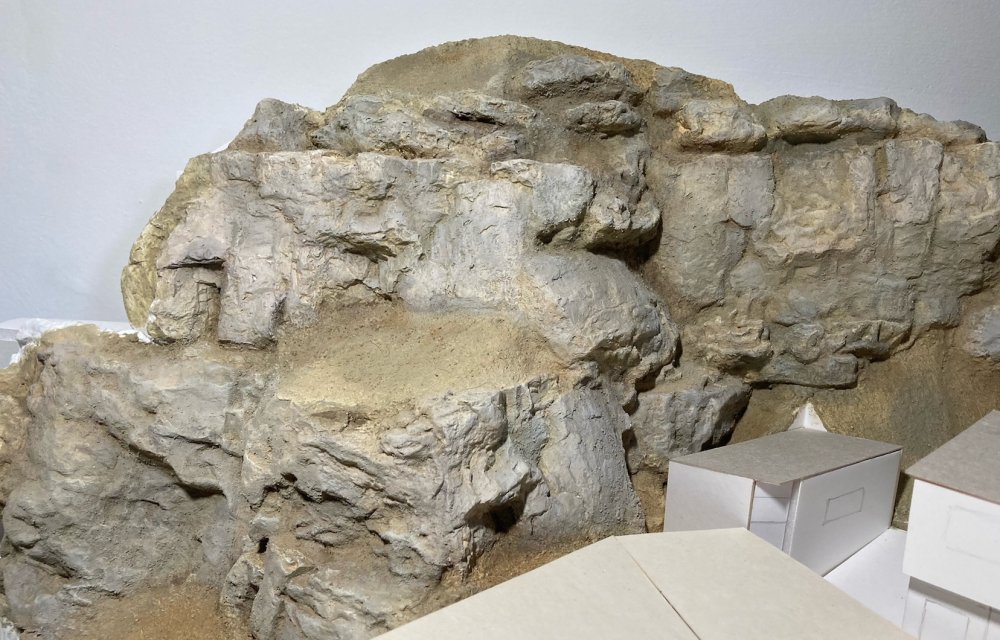 This view is at the back of the layout where the mountains rise
dramatically towards the backscene.
This view is at the back of the layout where the mountains rise
dramatically towards the backscene.
![]()
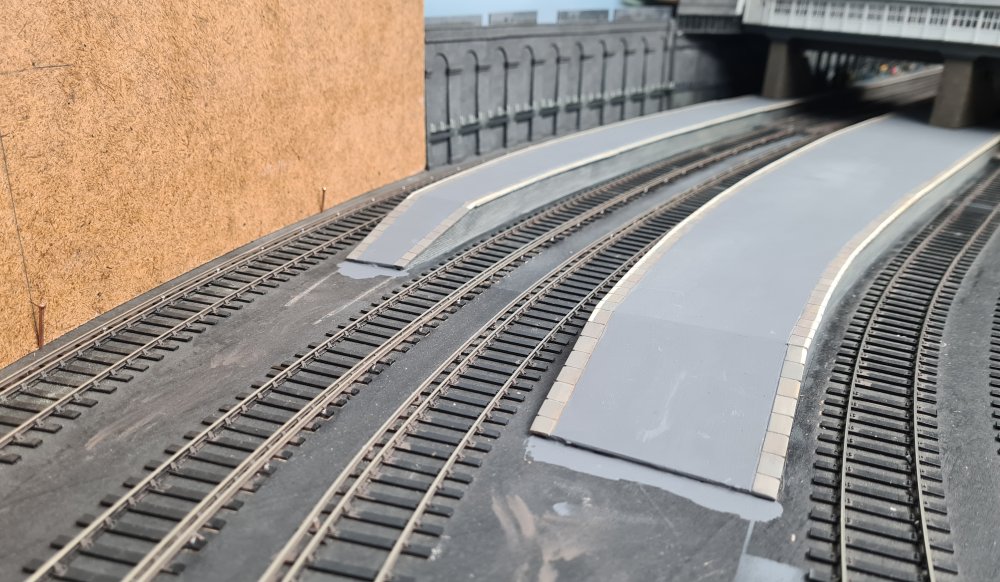 Steady progress is being made on the new scenic area at the north end of the station,
showing the recently laid 3rd rail using Peco Individulay insulated chairs and code
60 flatbottom rail.
Steady progress is being made on the new scenic area at the north end of the station,
showing the recently laid 3rd rail using Peco Individulay insulated chairs and code
60 flatbottom rail.
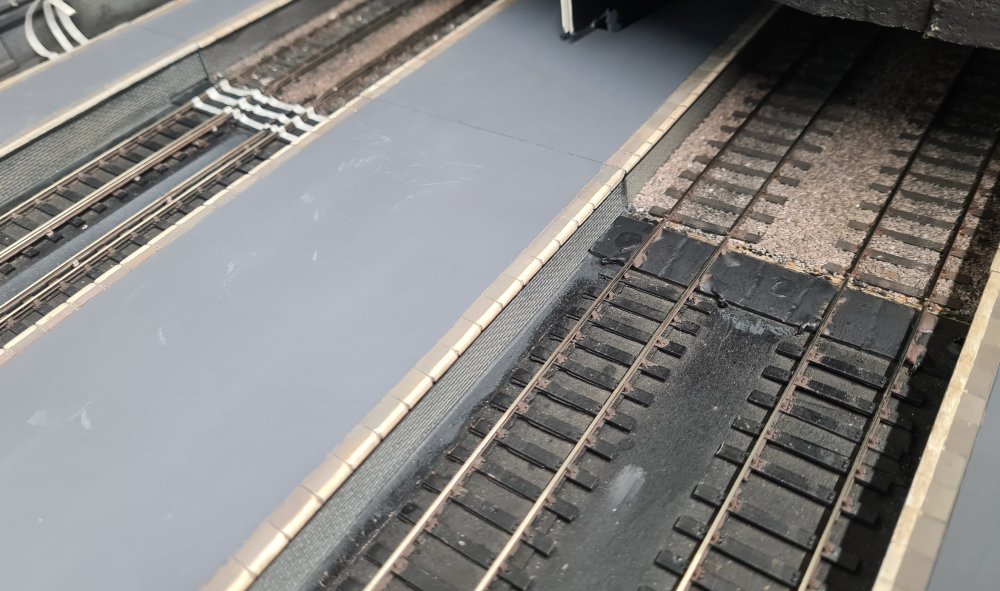 The large slabs of copperclad paxolin are used on most of the off-scene baseboard
joints as a robust method of securing the rails, so rather than disturb them, masking
tape was applied to represent sleepering before ballasting was carried out.
The large slabs of copperclad paxolin are used on most of the off-scene baseboard
joints as a robust method of securing the rails, so rather than disturb them, masking
tape was applied to represent sleepering before ballasting was carried out.
 The end result isn't perfect, but once the ballast was soaked with diluted glue, the
masking tape was peeled off resulting in the scene above, and will be even less
noticeable once the track weathering has been carried out.
The end result isn't perfect, but once the ballast was soaked with diluted glue, the
masking tape was peeled off resulting in the scene above, and will be even less
noticeable once the track weathering has been carried out.
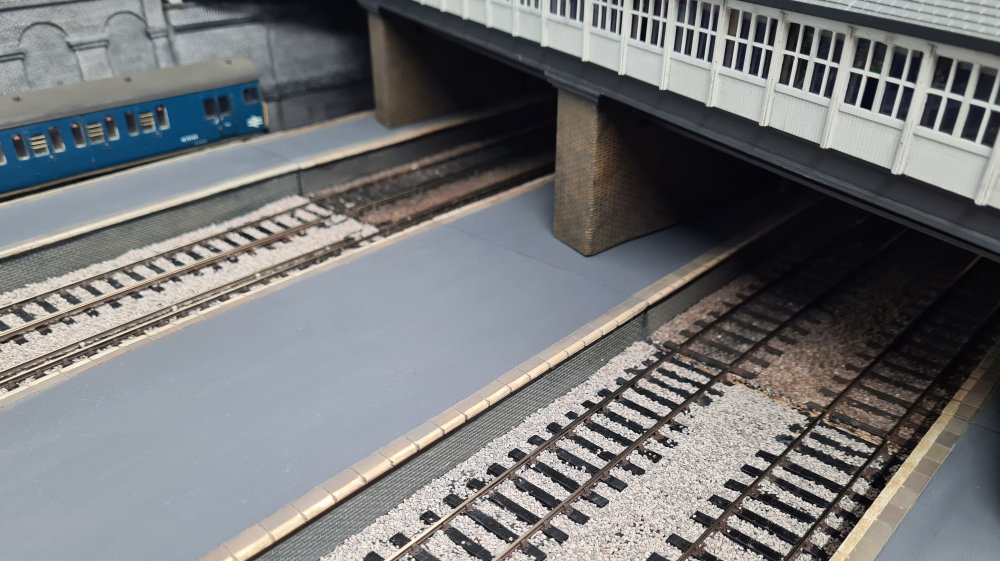
 This will be the new scenic break, consisting of buildings above and to the side of the
railway, cutting the scene before the tracks tighten up on the end curves. The buildings
were scaled from photographs and drawn out on 2mm mounting card, which could be strong
enough to be used structurally with applied embossed brick and other 3D printed detail.
This will be the new scenic break, consisting of buildings above and to the side of the
railway, cutting the scene before the tracks tighten up on the end curves. The buildings
were scaled from photographs and drawn out on 2mm mounting card, which could be strong
enough to be used structurally with applied embossed brick and other 3D printed detail.
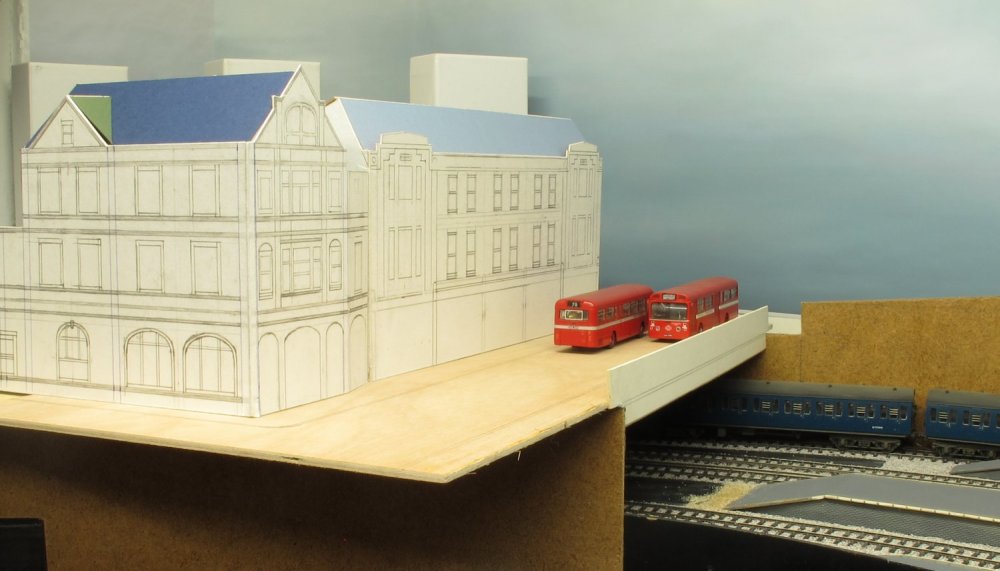
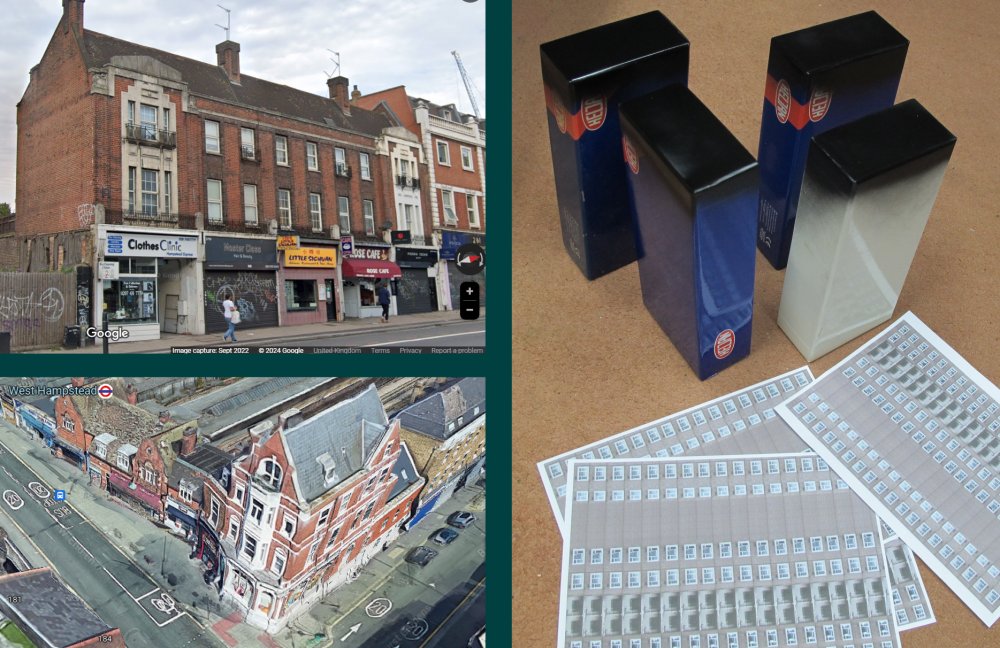 The inspiration for the new scene comes from these 2 buildings which are in the South
and West Hampstead areas of North London. The first is a row of shops built over the railway
on Finchley Road, and the other being a mirror image of the building adjacent to the tube
station on the corner of West End Lane / Broadhurst Gardens.
The inspiration for the new scene comes from these 2 buildings which are in the South
and West Hampstead areas of North London. The first is a row of shops built over the railway
on Finchley Road, and the other being a mirror image of the building adjacent to the tube
station on the corner of West End Lane / Broadhurst Gardens.
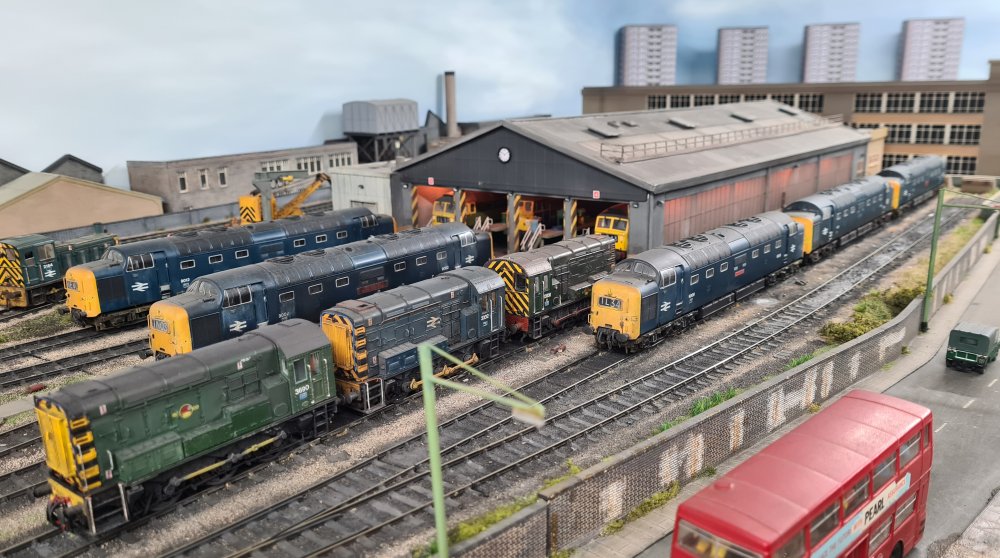 Reflections of Finsbury Park depot with high rise blocks in the background....
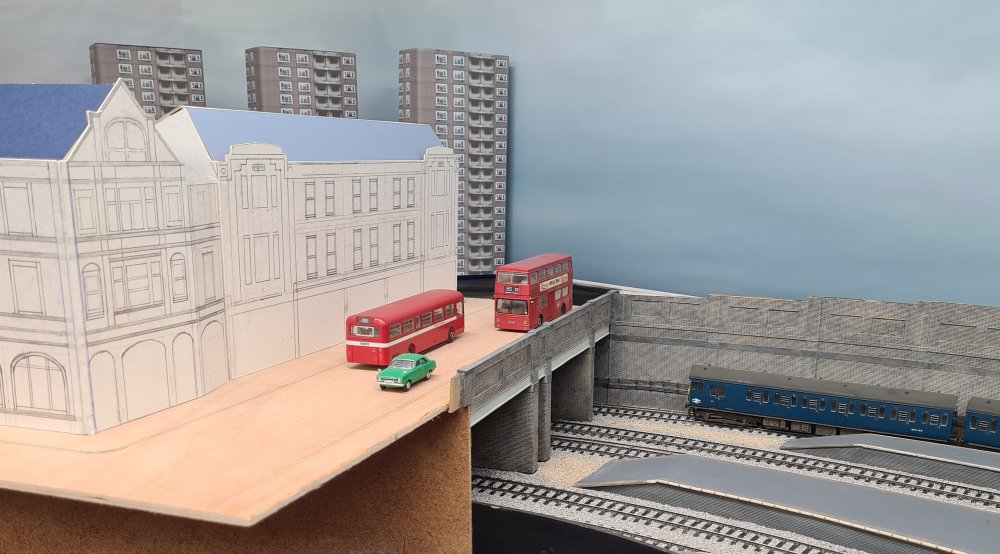 ....whilst filling up the voids at each end of the layout.
 With Jonny's latest 3D printed project, painted, and plonked on the bit of wasteland
next to the bus garage, it's spurred me on to finishing the rear boundary wall running
alongside the footpath, and also to think how this patch of land will be developed. Its
a replica of the station building which was built during the war, serving the Vickers
Supermarine factory at South Marston where Spitfires were made. It is of typical of a
mid-20th century concrete construction and would serve as an office block, guard room
or small workshop as well as a station building.
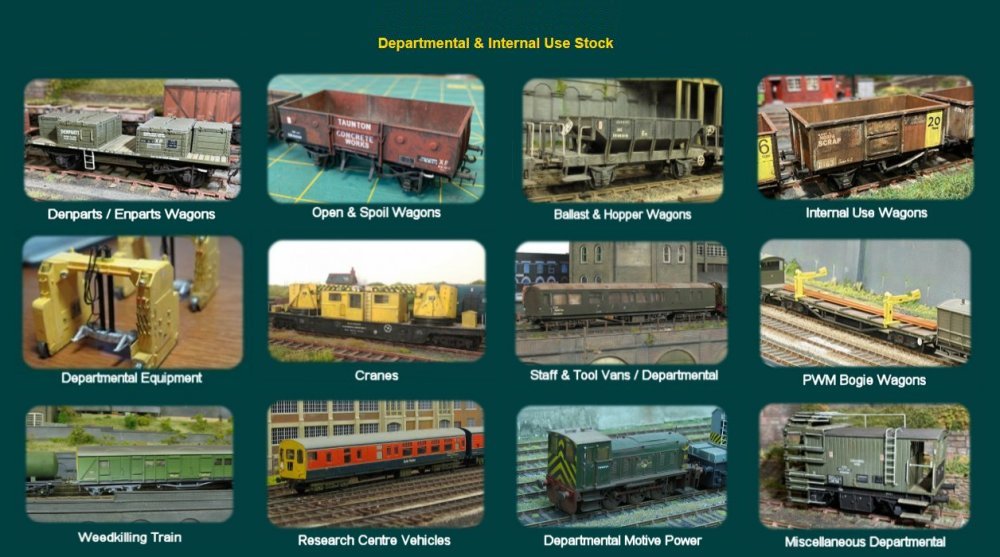
Some of the website gallery pages have been updated to make it easier to find particular items
of rolling stock, captured from past updates. This latest 'refresh'
concentrates on the departmental wagons which have been featured over the years. Please click
on the above image to view the departmental galleries.
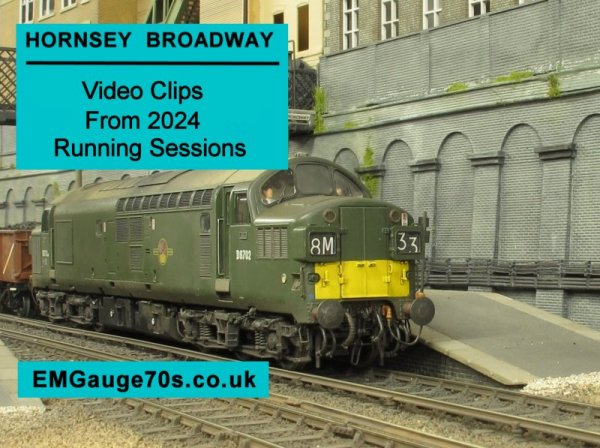
Various video clips from recent running sessions at Hornsey Broadway (2024) have
been uploaded to Youtube. Please click on the above image to view the latest videos.
With Jonny's latest 3D printed project, painted, and plonked on the bit of wasteland
next to the bus garage, it's spurred me on to finishing the rear boundary wall running
alongside the footpath, and also to think how this patch of land will be developed. Its
a replica of the station building which was built during the war, serving the Vickers
Supermarine factory at South Marston where Spitfires were made. It is of typical of a
mid-20th century concrete construction and would serve as an office block, guard room
or small workshop as well as a station building.
Some of the website gallery pages have been updated to make it easier to find particular items
of rolling stock, captured from past updates. This latest 'refresh'
concentrates on the departmental wagons which have been featured over the years. Please click
on the above image to view the departmental galleries.
Various video clips from recent running sessions at Hornsey Broadway (2024) have
been uploaded to Youtube. Please click on the above image to view the latest videos.