*********************************************************************************************************************************************
MAY 2024 UPDATE
*********************************************************************************************************************************************
MIKE WHITCHURCH
*********************************************************************************************************************************************
STEVE CARTER
*********************************************************************************************************************************************
KIER HARDY
*********************************************************************************************************************************************
ANDY LEE
A wash of acrylic red brick colour was applied over the whole surface, then a wash
of Ral 9002 grey-white was run into the brick gaps and randomly wiped off. I use acrylics,
Tamiya and Archive X, which are US Railroad Floquil colours made in the 70s. Archive X
is a British Company, available from Element Games. My washes are made from a mix of 99%
isopropyl alcohol and water in a 1:1 ratio with a dab of whatever colour is needed, which
has an added effect of what I call alcohol bleaching. The isopropyl alcohol will bleach
and desaturate the colour it is painted over. This is an absolutely amazing effect for
weathering anything, and makes anything look like it has been sat out in the sun for 10
years. Just make sure the basecoat is fully dried and cured or it will disolve it - this
technique does not work on enamel paint, only acrylics. Windows were painted and the
whole model weathered to that 70s industrial decay look.
*********************************************************************************************************************************************
KARL CROWTHER
*********************************************************************************************************************************************
*********************************************************************************************************************************************
![]()
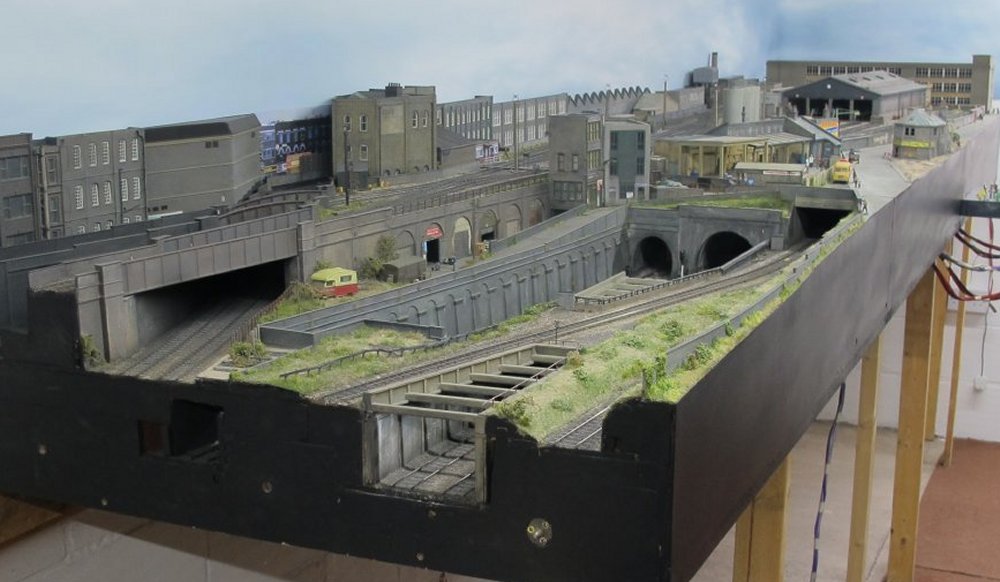
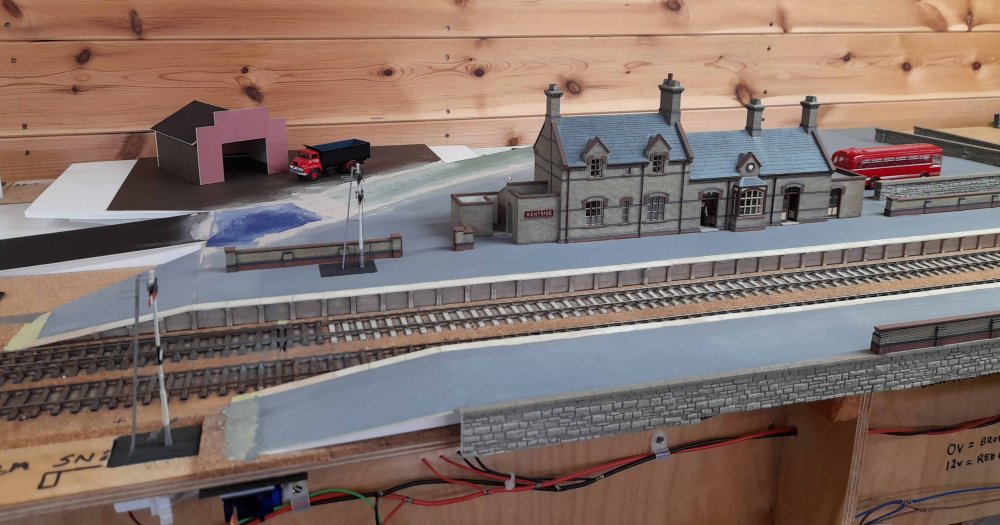
 Previously mentioned work is currently concentrated on the 2 Northern station approach
boards as these have all the new junction pointwork on them. These were removed from
the layout's configuration. One big advantage is that they can be tipped on their
side and worked on more comfortably.
Previously mentioned work is currently concentrated on the 2 Northern station approach
boards as these have all the new junction pointwork on them. These were removed from
the layout's configuration. One big advantage is that they can be tipped on their
side and worked on more comfortably.
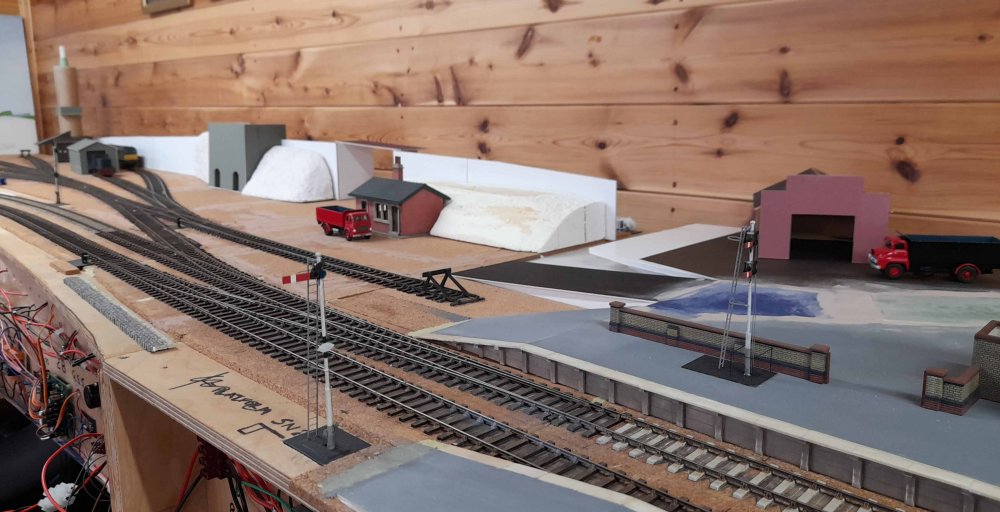
 With the wiring complete, the boards were inserted back into the layout and then playing trains /
test running commenced, and amazingly for me everything worked first time, hereby giving me a
4-track roundy roundy! The next phase will be the building of the goods yards and trackage,
but first the track will have to be ordered.
With the wiring complete, the boards were inserted back into the layout and then playing trains /
test running commenced, and amazingly for me everything worked first time, hereby giving me a
4-track roundy roundy! The next phase will be the building of the goods yards and trackage,
but first the track will have to be ordered.
![]()
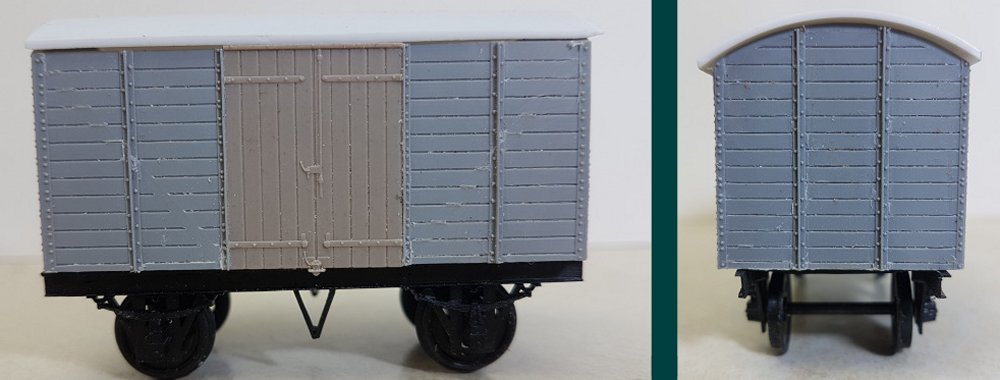
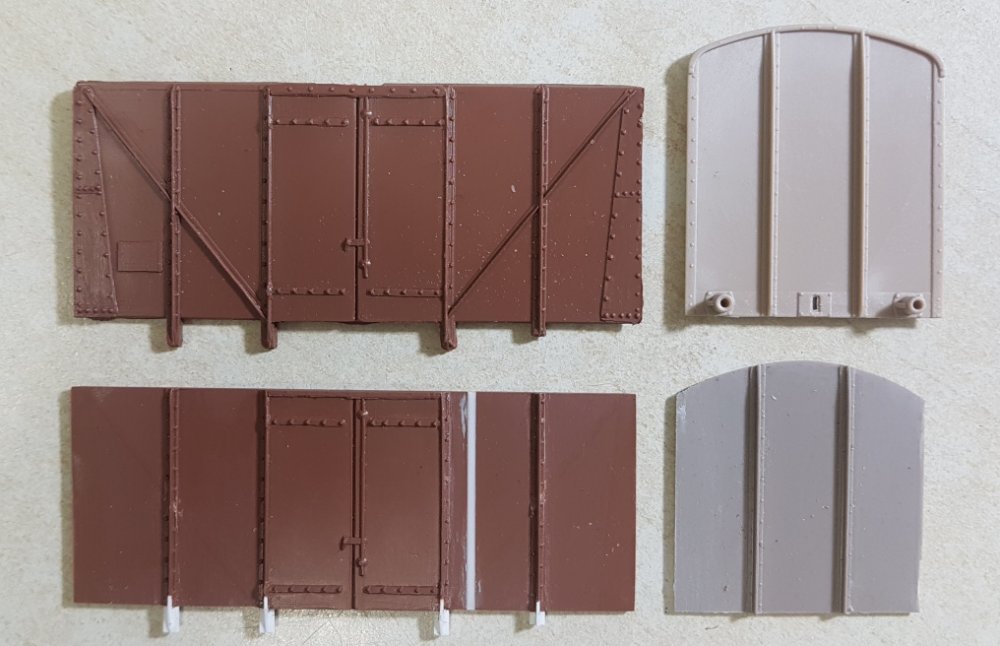 Continuing in the same vein as last month saw another round of mix 'n' matching kit
components to formulate plywood based GWR standard van stock. As before modified plywood
ends have come from the Ratio SR Plywood Van kit (No. 593) whilst the sides this time are
from an old Parkside PC08 kit (which portrays the BR 1/213 plywood van), both of which
can be married together to create one of the 700 GWR V36 or 350 V37 12T vans or their BR
1/203 (100 in total) and 1/205 (230 in total) equivalents. The Parkside sides need the
removal of the wraparound part of the steel corrugated ends along with the diagonal 'L'
sections (these being 'T' section on the GWR types). In checking the position of the
vertical 'T' sections against the GWR van dimensions it became apparent that the right
hand one as moulded is slightly off when compared against the left one (which is
correctly equidistant between the end and door) and so the right hand end was removed,
filed to size and then re-instated using an additional spacer piece to give a matching
spacing. Another slight problem with the Parkside components are misshapen extended
elements of the supports and so these were replaced and built up from a variety of
Evergreen flat strips.
Continuing in the same vein as last month saw another round of mix 'n' matching kit
components to formulate plywood based GWR standard van stock. As before modified plywood
ends have come from the Ratio SR Plywood Van kit (No. 593) whilst the sides this time are
from an old Parkside PC08 kit (which portrays the BR 1/213 plywood van), both of which
can be married together to create one of the 700 GWR V36 or 350 V37 12T vans or their BR
1/203 (100 in total) and 1/205 (230 in total) equivalents. The Parkside sides need the
removal of the wraparound part of the steel corrugated ends along with the diagonal 'L'
sections (these being 'T' section on the GWR types). In checking the position of the
vertical 'T' sections against the GWR van dimensions it became apparent that the right
hand one as moulded is slightly off when compared against the left one (which is
correctly equidistant between the end and door) and so the right hand end was removed,
filed to size and then re-instated using an additional spacer piece to give a matching
spacing. Another slight problem with the Parkside components are misshapen extended
elements of the supports and so these were replaced and built up from a variety of
Evergreen flat strips.
 The Ratio ends have a rather flat rear profile to their headstocks and so were replaced
using Evergreen 264 3.2mm channel. The two protruding ends of the central vertical
stanchions were retained and were filed back to allow the channel to be fitted whilst
its outer stanchions are removed as due to the removal of the side wrap around sections
then new elements are needed to create the corner stanchions.
The Ratio ends have a rather flat rear profile to their headstocks and so were replaced
using Evergreen 264 3.2mm channel. The two protruding ends of the central vertical
stanchions were retained and were filed back to allow the channel to be fitted whilst
its outer stanchions are removed as due to the removal of the side wrap around sections
then new elements are needed to create the corner stanchions.
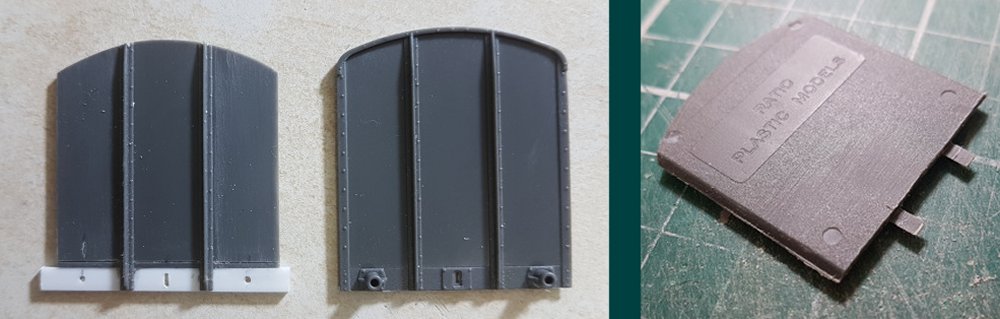
 The sides and ends were joined together and pieces of Evergreen 1.5mm 'L' section
(Part No. 291) were used to form the new corner stanchions. To represent the accompanying
bolts I decided to emboss the sections from the rear and found that by clamping them between
a block and a steel rule I could then use the rule graduations to space them out and in
a relatively straight line.
The sides and ends were joined together and pieces of Evergreen 1.5mm 'L' section
(Part No. 291) were used to form the new corner stanchions. To represent the accompanying
bolts I decided to emboss the sections from the rear and found that by clamping them between
a block and a steel rule I could then use the rule graduations to space them out and in
a relatively straight line.
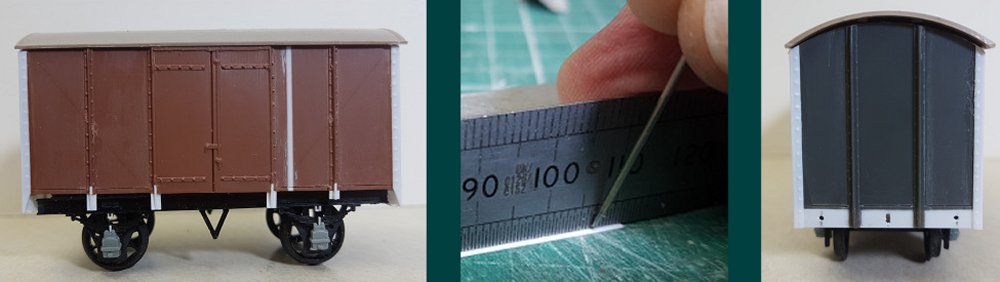
 Another approach has been investigated to see about the viability of creating a GWR V28
planked Shock Van. This time the ends from a Coopercraft GWR V4 Mink van kit (Part No.
1007) have been modified to remove the 'X' cross bracing whilst the sides were split and
the doors removed to be replaced with some gleaned from a Ratio 565 kit covering V23 GWR 12T vans.
Another approach has been investigated to see about the viability of creating a GWR V28
planked Shock Van. This time the ends from a Coopercraft GWR V4 Mink van kit (Part No.
1007) have been modified to remove the 'X' cross bracing whilst the sides were split and
the doors removed to be replaced with some gleaned from a Ratio 565 kit covering V23 GWR 12T vans.
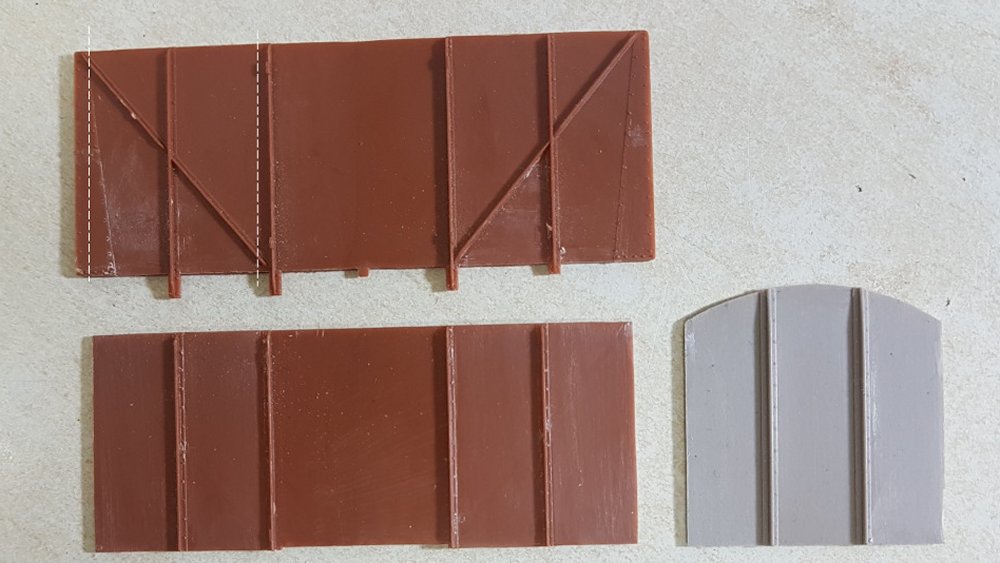 A spin off from using the Coopercraft kit is that it comes with two roof sections (one
wood, one steel) which are the right length for shocvans so as the V28 planked version can
be had by using r-t-r Bachmann if desired (where's the fun in that though!) then a plan
has been devised to create the plywood variant which were built by BR to diagram 1/207.
The ends are once more from the Ratio 593 kit whilst the ply sides are from a Parkside PC08A
kit. Again the wrap around ends / diagonals are filed away but in order for the vertical side
stanchions to be equidistant between the end and door as per the prototypes then further
surgery is needed. The white dotted lines denote roughly were the necessary cuts can be made
and by very carefully filing up to the door surround stanchions they can be disguised when
rejoined together to form the required 16' 6" sides.
A spin off from using the Coopercraft kit is that it comes with two roof sections (one
wood, one steel) which are the right length for shocvans so as the V28 planked version can
be had by using r-t-r Bachmann if desired (where's the fun in that though!) then a plan
has been devised to create the plywood variant which were built by BR to diagram 1/207.
The ends are once more from the Ratio 593 kit whilst the ply sides are from a Parkside PC08A
kit. Again the wrap around ends / diagonals are filed away but in order for the vertical side
stanchions to be equidistant between the end and door as per the prototypes then further
surgery is needed. The white dotted lines denote roughly were the necessary cuts can be made
and by very carefully filing up to the door surround stanchions they can be disguised when
rejoined together to form the required 16' 6" sides.
![]()
 The backscene project has been in the planning stage for the last couple of months. There
have been a few forward steps which have resulted in the final plan, and even more backward
steps finding out what didn't work at all. Inspired by Hywel's Morfa Bank Sidings backscene,
I wanted to create a distant feel to area beyond the locomotive depot - the highest point
on the layout. A start was made on the
clouds which would appear near the top of the backscene. The above image shows a 2 metre
section - just 1/6th of the length of the layout.
The backscene project has been in the planning stage for the last couple of months. There
have been a few forward steps which have resulted in the final plan, and even more backward
steps finding out what didn't work at all. Inspired by Hywel's Morfa Bank Sidings backscene,
I wanted to create a distant feel to area beyond the locomotive depot - the highest point
on the layout. A start was made on the
clouds which would appear near the top of the backscene. The above image shows a 2 metre
section - just 1/6th of the length of the layout.
 For the sake of a few sheets of paper and some cartridge ink on economy mode, I printed
it out full size, with an approximation of how high the horizon should be and where
buildings should sit in relation to the scene. The only glimpse you would get of the
distance would be at the back of the depot, so the rest of the layout would just
be just clouds above the tall buildings which surround the railway. It's
certainly too bright and would need toning down with graduated greys, but it was a start.
For the sake of a few sheets of paper and some cartridge ink on economy mode, I printed
it out full size, with an approximation of how high the horizon should be and where
buildings should sit in relation to the scene. The only glimpse you would get of the
distance would be at the back of the depot, so the rest of the layout would just
be just clouds above the tall buildings which surround the railway. It's
certainly too bright and would need toning down with graduated greys, but it was a start.
 It's a relatively low lying and built up area, so certain structures close to the depot would
need to be printed near 4mm scale size, and they just didn't look right flat. Some low-relief
buildings were knocked together and it looked so much better with a bit of 3D. The horizon
doesn't look too bad if you're standing 6ft tall, but the lower you get, it's begining to
look like you are surrounded by big hills, and most images are going to be taken at near
track level instead from a helicopter, so the horizon and far distance would
only work if the depot was situated on the top of Parliment Hill.
It's a relatively low lying and built up area, so certain structures close to the depot would
need to be printed near 4mm scale size, and they just didn't look right flat. Some low-relief
buildings were knocked together and it looked so much better with a bit of 3D. The horizon
doesn't look too bad if you're standing 6ft tall, but the lower you get, it's begining to
look like you are surrounded by big hills, and most images are going to be taken at near
track level instead from a helicopter, so the horizon and far distance would
only work if the depot was situated on the top of Parliment Hill.
 Nothing ventured, nothing gained, but it's been an interesting project resulting in a
backscene with nothing but sky, and there's little point collecting the clouds and blending
12 metres together when there are some good ready to stick scenes. After much discussion,
an overcast look would suit the location better, rather than the backscene overpowering
the layout. The printed shops are far enough back and tucked between buildings, so once
they're trimmed at the top, they should blend in well with the rest of the scene. Talking
of helicopter views.
Nothing ventured, nothing gained, but it's been an interesting project resulting in a
backscene with nothing but sky, and there's little point collecting the clouds and blending
12 metres together when there are some good ready to stick scenes. After much discussion,
an overcast look would suit the location better, rather than the backscene overpowering
the layout. The printed shops are far enough back and tucked between buildings, so once
they're trimmed at the top, they should blend in well with the rest of the scene. Talking
of helicopter views.
 I decided to use ID Backscenes
overcast range, with 4 different connecting scenes giving a unique and continuous view along
the entire layout.
Model Masters show a good selection of scenes with no stock issues....
I decided to use ID Backscenes
overcast range, with 4 different connecting scenes giving a unique and continuous view along
the entire layout.
Model Masters show a good selection of scenes with no stock issues....
 .... and looking the other way.
 Those chimneys are now crying out for some television aerials.
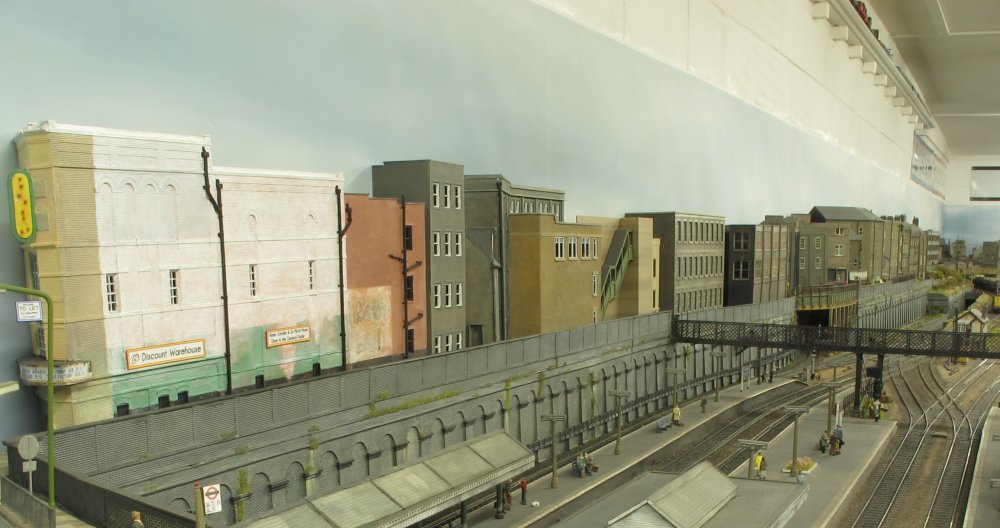
 As well as the modified HO scale low relief buildings (Walthers & DPM), a big gap has
been filled with this northlight factory - a laser cut kit from the
Scale Model Scenery range, clad with South Eastern styrene embossed brick.
All the background buildings are easily removable, so further detailing can be
carried out at the workbench, adding pipes and vents.
As well as the modified HO scale low relief buildings (Walthers & DPM), a big gap has
been filled with this northlight factory - a laser cut kit from the
Scale Model Scenery range, clad with South Eastern styrene embossed brick.
All the background buildings are easily removable, so further detailing can be
carried out at the workbench, adding pipes and vents.
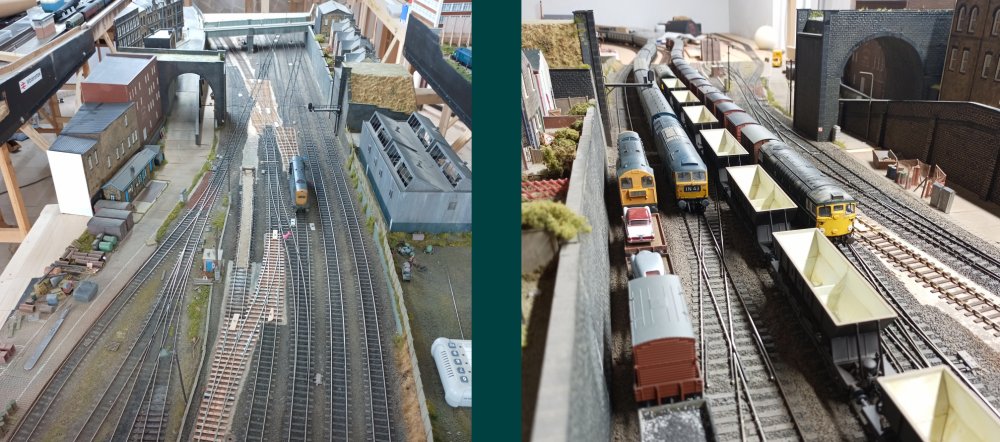
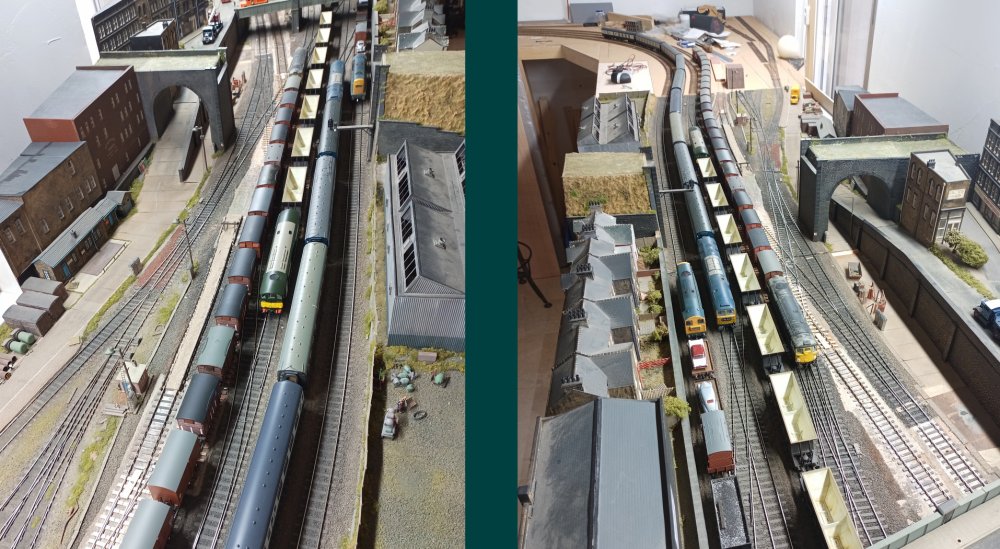
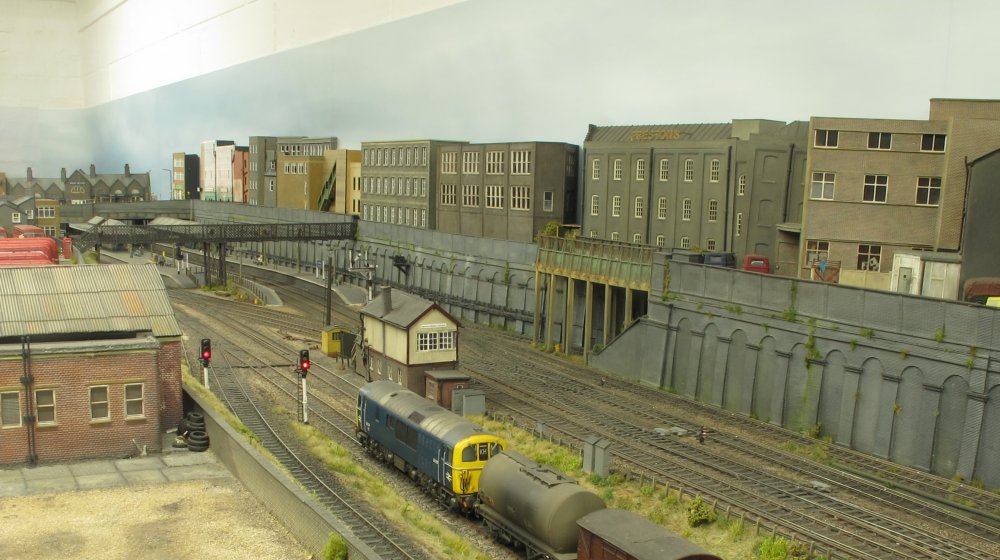
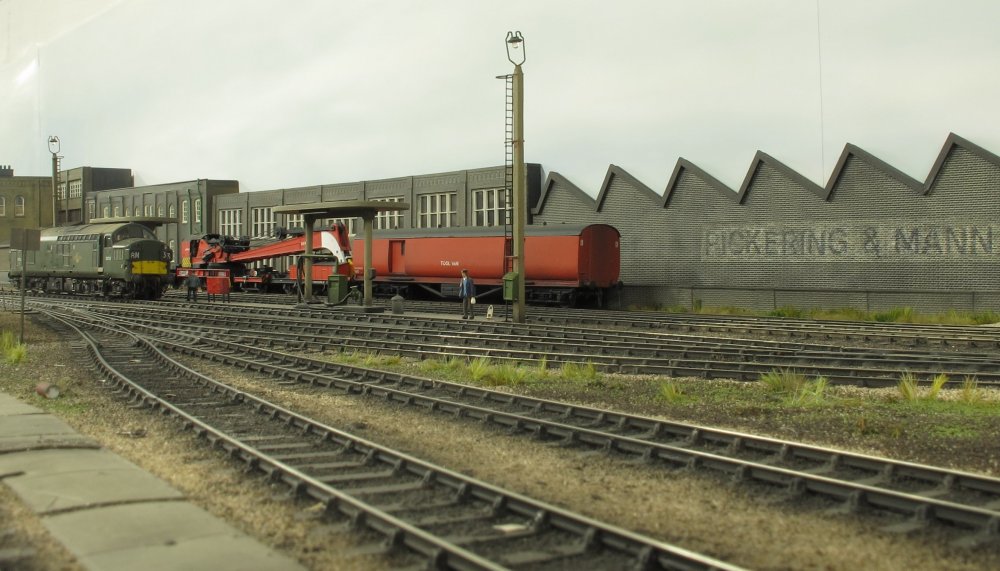
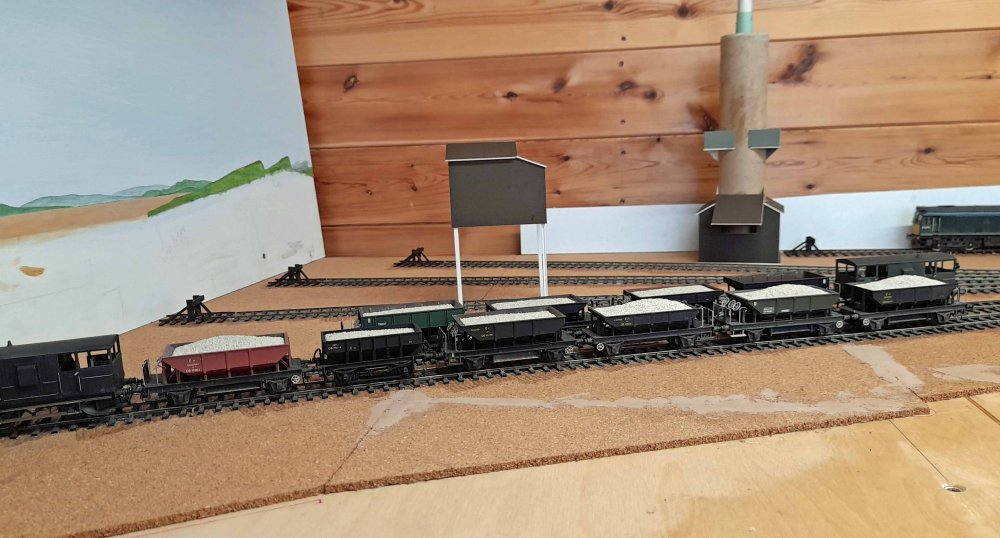
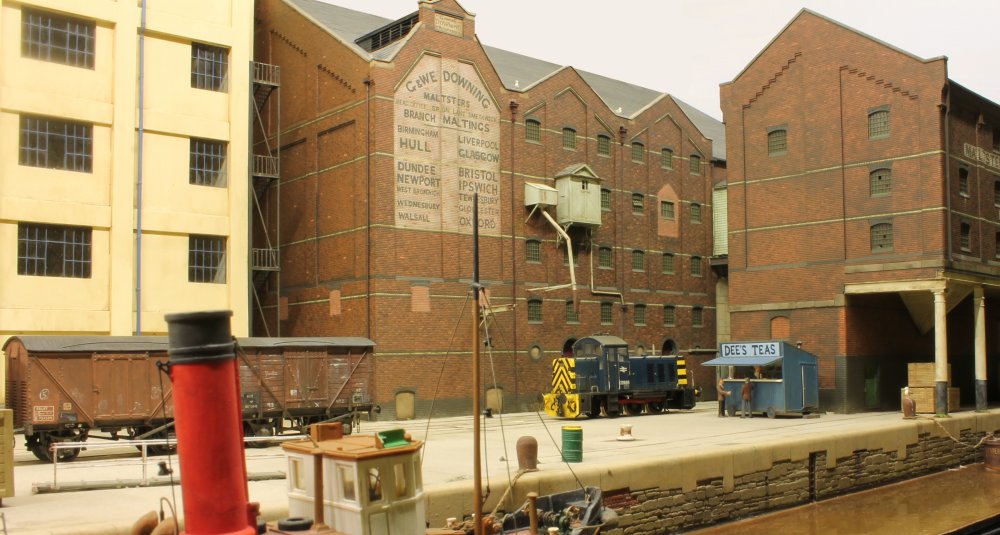
 A few snaps from the album, starting off with a pair of BTH Class 15 loco's with a
rake of ballast hoppers as featured in last month's update page.
A few snaps from the album, starting off with a pair of BTH Class 15 loco's with a
rake of ballast hoppers as featured in last month's update page.
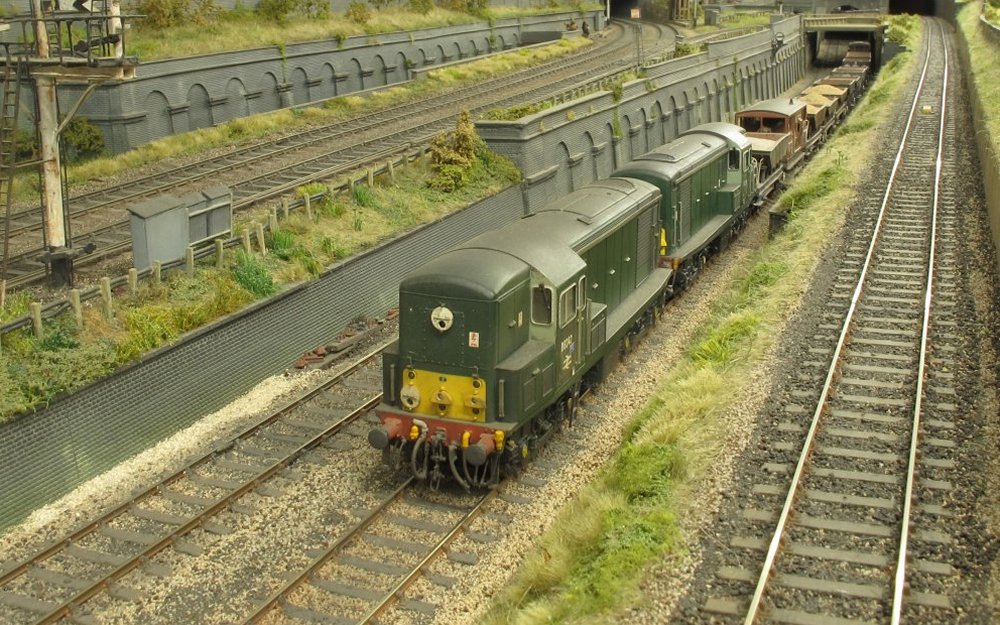
 Class 97 battery electric locomotives (ex-Class 501 EMU) captured on the Down Fast
below the flyover.
Class 97 battery electric locomotives (ex-Class 501 EMU) captured on the Down Fast
below the flyover.
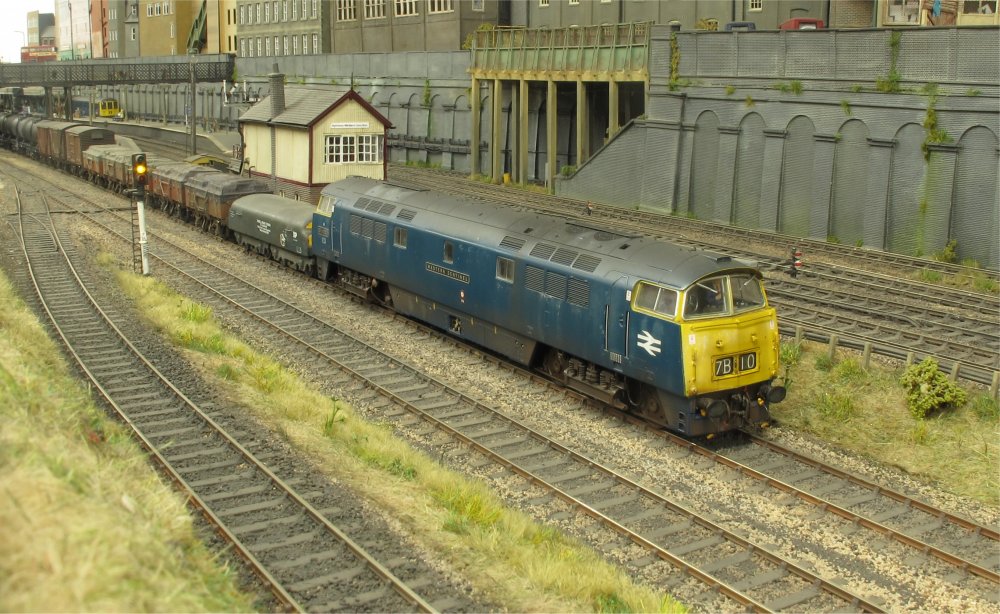 At the head of an inter-regional freight bound for Temple Mills is D1022 Western
Sentinel, a Dapol model from Greg's Shenston Road fleet.
At the head of an inter-regional freight bound for Temple Mills is D1022 Western
Sentinel, a Dapol model from Greg's Shenston Road fleet.
![]()
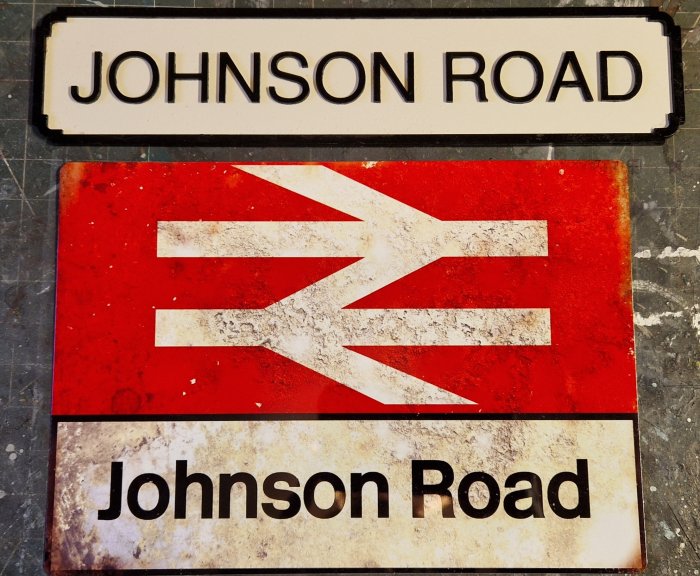 Johnson Road is my tribute to my school friend Pete Johnson, and we were both members of
the Cheadle Hulme School Model Railway Society. I first met Pete in 1979 when I joined
the school, he was an amazing model maker back then and has been a big influence on my
modelmaking ever since. Kier kindly reconnected me with Pete in 2021 via this website
and we spent two years emailing each other back and fourth about locos, wagons, track,
etc in great detail. I've made some signs to make Johnson Road official, both were off
eBay, the Road sign being a laser cut kit assembed and painted up. The BR logo sign
is distressed and weathered.... Pete didn't like anything too new and clean!
Johnson Road is my tribute to my school friend Pete Johnson, and we were both members of
the Cheadle Hulme School Model Railway Society. I first met Pete in 1979 when I joined
the school, he was an amazing model maker back then and has been a big influence on my
modelmaking ever since. Kier kindly reconnected me with Pete in 2021 via this website
and we spent two years emailing each other back and fourth about locos, wagons, track,
etc in great detail. I've made some signs to make Johnson Road official, both were off
eBay, the Road sign being a laser cut kit assembed and painted up. The BR logo sign
is distressed and weathered.... Pete didn't like anything too new and clean!
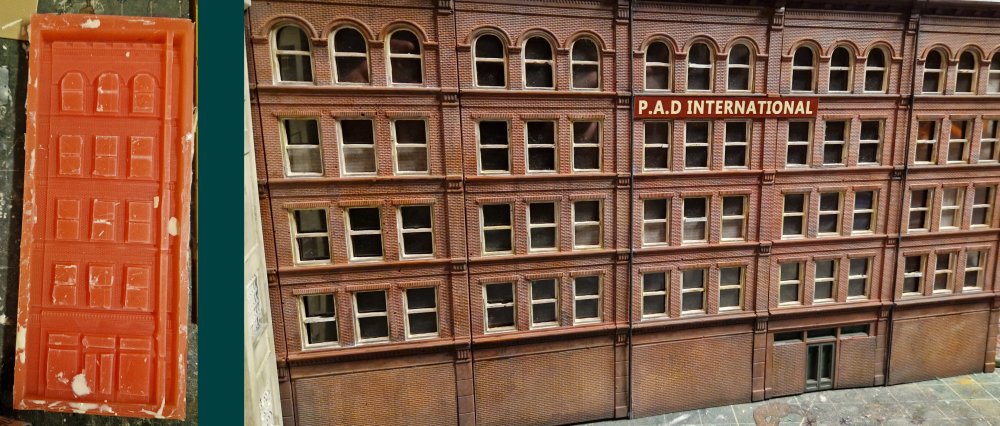 I've made a silicone mould of the facade of a City Classics HO scale brick building,
to make some red brick low relief buildings for the background of a similar style to
some of the buildings on Canada Street. The pieces were made with SG2000 Fast cast
resin, which were then cleaned up and the primed with two different tones of red oxide
car primer (Supadec and Hycote), randomly spraying different tones on different areas.
I've made a silicone mould of the facade of a City Classics HO scale brick building,
to make some red brick low relief buildings for the background of a similar style to
some of the buildings on Canada Street. The pieces were made with SG2000 Fast cast
resin, which were then cleaned up and the primed with two different tones of red oxide
car primer (Supadec and Hycote), randomly spraying different tones on different areas.
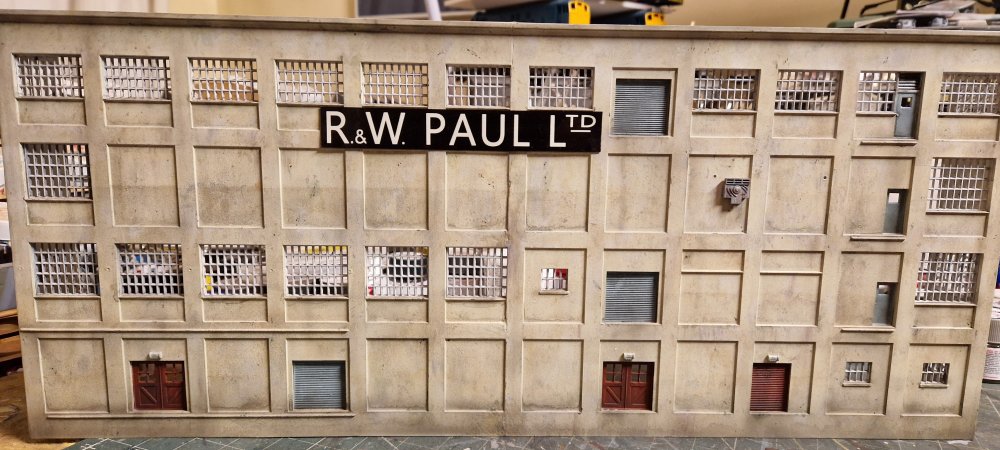 One of the standout buildings on Canada Street is the R&W Paul Ltd feed mill, and having
read the article in Model Railway Journal (and all the articles on this website), I found
a Walthers HO background flour mill kit that had a similar style to it. After hacking and
tweaking the kit I made this homage version. I added layers of Montana Gold Elm over the
the grey primer and printed the sign - it was quicker! It now needs the fire escape,
guttering and additional detailing.
One of the standout buildings on Canada Street is the R&W Paul Ltd feed mill, and having
read the article in Model Railway Journal (and all the articles on this website), I found
a Walthers HO background flour mill kit that had a similar style to it. After hacking and
tweaking the kit I made this homage version. I added layers of Montana Gold Elm over the
the grey primer and printed the sign - it was quicker! It now needs the fire escape,
guttering and additional detailing.
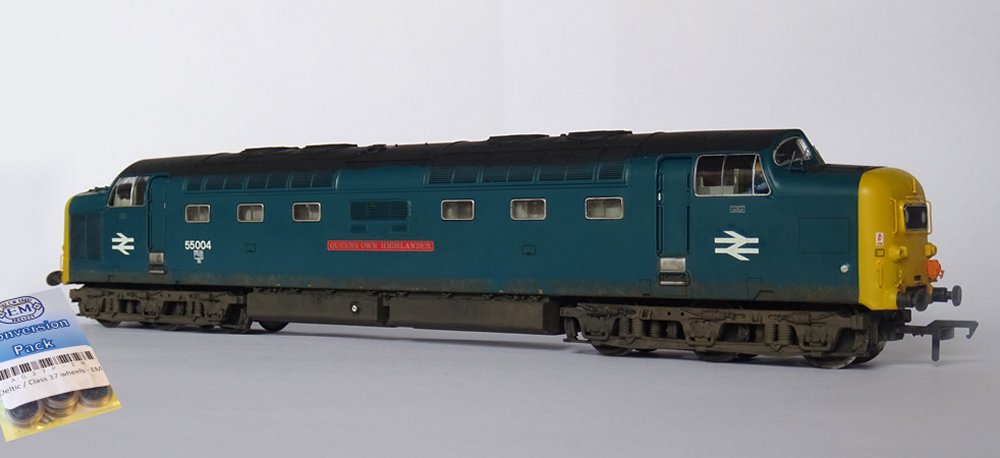 The next loco on my workbench for conversation to EM gauge is a Bachmann class 55 Deltic.
I spent many years chasing up and down the ECML in the late '70s and early '80s, and Pete
very kindly weathered and detailed 55004 for me in 2021, based on images of it during mid
1970s. I have a set of EMGS replacement wheels for it and also need to detail the bufferbeam
It's is one of my most prized model locomotives, after having looked up to Pete's amazing
modelmaking at school with him, so finally having a model by him on my layout completes
the circle from 45 years ago.
The next loco on my workbench for conversation to EM gauge is a Bachmann class 55 Deltic.
I spent many years chasing up and down the ECML in the late '70s and early '80s, and Pete
very kindly weathered and detailed 55004 for me in 2021, based on images of it during mid
1970s. I have a set of EMGS replacement wheels for it and also need to detail the bufferbeam
It's is one of my most prized model locomotives, after having looked up to Pete's amazing
modelmaking at school with him, so finally having a model by him on my layout completes
the circle from 45 years ago.
![]()
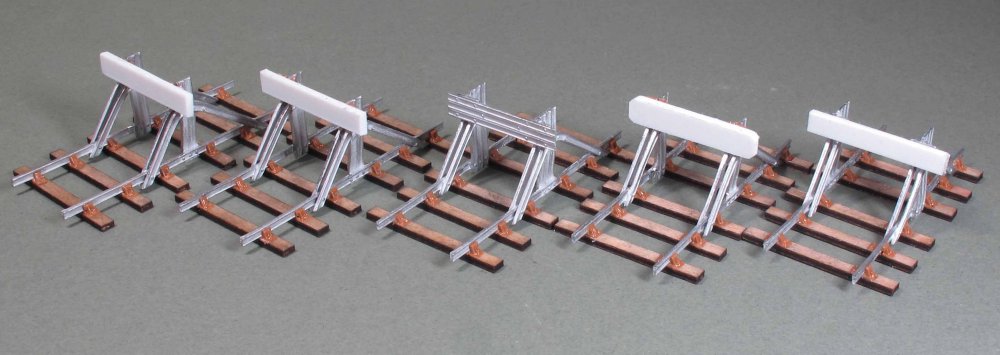
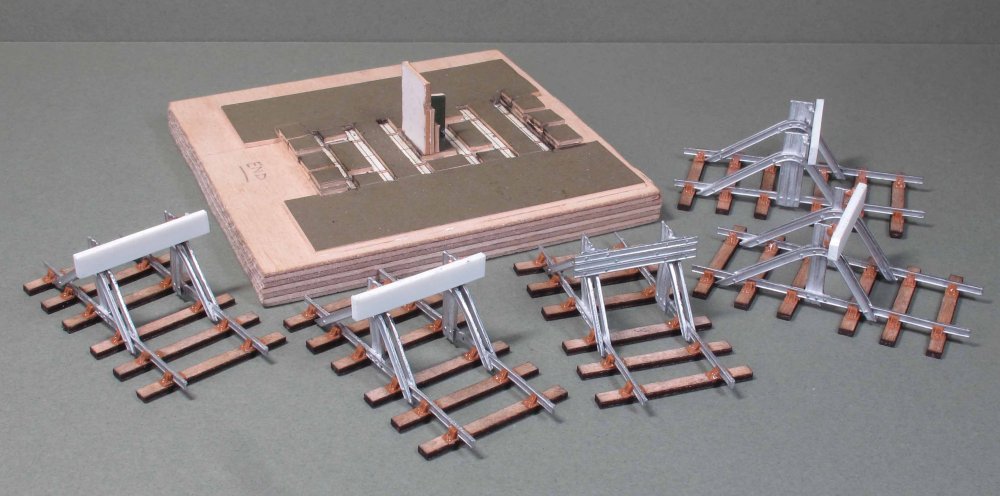 With the quarry track down and wired up, attention turned to providing some buffer
stops. I’m not sure if these would have necessarily been required on an industrial
line, but helpful on the model to stop trains being shunted off the siding end!
Lanarkshire Models LYR pattern buffers form the basis, which were very similar to
the Furness pattern, the main difference being 3 upright rails on the LYR, whereas
the FR only had two. With care, one of the uprights of the casting can be cut away
to represent the Furness variant, though with an assumption the quarry would have
used whatever they could get hold of, a couple remain in LYR configuration just to
give a bit of variety. Behind can be seen the little jig that has been made up to assemble the kits.
With the quarry track down and wired up, attention turned to providing some buffer
stops. I’m not sure if these would have necessarily been required on an industrial
line, but helpful on the model to stop trains being shunted off the siding end!
Lanarkshire Models LYR pattern buffers form the basis, which were very similar to
the Furness pattern, the main difference being 3 upright rails on the LYR, whereas
the FR only had two. With care, one of the uprights of the casting can be cut away
to represent the Furness variant, though with an assumption the quarry would have
used whatever they could get hold of, a couple remain in LYR configuration just to
give a bit of variety. Behind can be seen the little jig that has been made up to assemble the kits.
 A detail view of the completed buffer stops, noting the variation in the beams. The
‘wooden’ ones were made up from styrene strips welded together, while the metal one
is from the kit. Laser-cut sleepers and Exactoscale chairs as per the rest of the layout.
A detail view of the completed buffer stops, noting the variation in the beams. The
‘wooden’ ones were made up from styrene strips welded together, while the metal one
is from the kit. Laser-cut sleepers and Exactoscale chairs as per the rest of the layout.
 Buffer stops now painted, with behind, the track that will sit inside the quarry engine
shed, complete with openings where the inspection pits will be cut into the baseboard.
Buffer stops now painted, with behind, the track that will sit inside the quarry engine
shed, complete with openings where the inspection pits will be cut into the baseboard.
 Overall view of the quarry area with buffer stops now fitted. The loco shed and disused
lime kiln have been joined by a card mock-up of both the Spencer Kiln (based on a
length of 50mm card map tube), plus the loading hopper. This exercise has been useful
in that the proportions of the Spencer Kiln (based on the one that stood at Sandside)
seems just about spot on, whereas the hopper needs to be way bigger. A start has also
been made on plotting out some of the landforms required.
Overall view of the quarry area with buffer stops now fitted. The loco shed and disused
lime kiln have been joined by a card mock-up of both the Spencer Kiln (based on a
length of 50mm card map tube), plus the loading hopper. This exercise has been useful
in that the proportions of the Spencer Kiln (based on the one that stood at Sandside)
seems just about spot on, whereas the hopper needs to be way bigger. A start has also
been made on plotting out some of the landforms required.
 A closer view of the quarry and the Spencer Kiln. On the model – as I believe at Sandside
in the 1960s, this is intended to represent a now out of use feature. On the prototype,
limestone is fed in from the top (with a gantry structure leading from the quarry), with
fuel (coal) coming in from the intermediate platform. The more common arrangement seems
to have been fuel also fed in from a gantry arrangement at that level (as at Sandside).
However, some had a hoist to lift the coal up from ground level, which is what will be
modelled at Kentside (though I have yet to find suitable pictures of such an arrangement!).
Also, some kilns had sidings for loading the burnt lime at both sides, though I’ve found
at least one example (Craven Limeworks, Langcliffe) with just the one siding which is
what I’m doing here to save space (Sandside had two). David Johnson’s “Limestone
Industries of the Yorkshire Dales” has been an invaluable reference work for this
element of the layout, as has of course a good variety of photos and other documents
from the archives of the Cumbrian Railways Association.
A closer view of the quarry and the Spencer Kiln. On the model – as I believe at Sandside
in the 1960s, this is intended to represent a now out of use feature. On the prototype,
limestone is fed in from the top (with a gantry structure leading from the quarry), with
fuel (coal) coming in from the intermediate platform. The more common arrangement seems
to have been fuel also fed in from a gantry arrangement at that level (as at Sandside).
However, some had a hoist to lift the coal up from ground level, which is what will be
modelled at Kentside (though I have yet to find suitable pictures of such an arrangement!).
Also, some kilns had sidings for loading the burnt lime at both sides, though I’ve found
at least one example (Craven Limeworks, Langcliffe) with just the one siding which is
what I’m doing here to save space (Sandside had two). David Johnson’s “Limestone
Industries of the Yorkshire Dales” has been an invaluable reference work for this
element of the layout, as has of course a good variety of photos and other documents
from the archives of the Cumbrian Railways Association.
 Moving nearer to Kentside station, the roadway to the quarry has been put in and behind
this I’d quite like to feature a garage of some sort – hence another card mock-up…
Moving nearer to Kentside station, the roadway to the quarry has been put in and behind
this I’d quite like to feature a garage of some sort – hence another card mock-up…
 Here you can see how the road slopes down to ground level at the quarry entrance, leading
past the weighbridge office, and to the right beyond, the road entrance into the main
quarry, passing beneath a makeshift overbridge. There was a similar arrangement at
Sandside and I have a good photo showing what this looked like, and so will form the
basis of this structure.
Here you can see how the road slopes down to ground level at the quarry entrance, leading
past the weighbridge office, and to the right beyond, the road entrance into the main
quarry, passing beneath a makeshift overbridge. There was a similar arrangement at
Sandside and I have a good photo showing what this looked like, and so will form the
basis of this structure.
 A final view of the quarry at a recent operating session with a rake of ballast hoppers
waiting to be collected – mainly comprising Parkside and Cambrian kits, with the odd
Hornby Trout thrown in.
A final view of the quarry at a recent operating session with a rake of ballast hoppers
waiting to be collected – mainly comprising Parkside and Cambrian kits, with the odd
Hornby Trout thrown in.
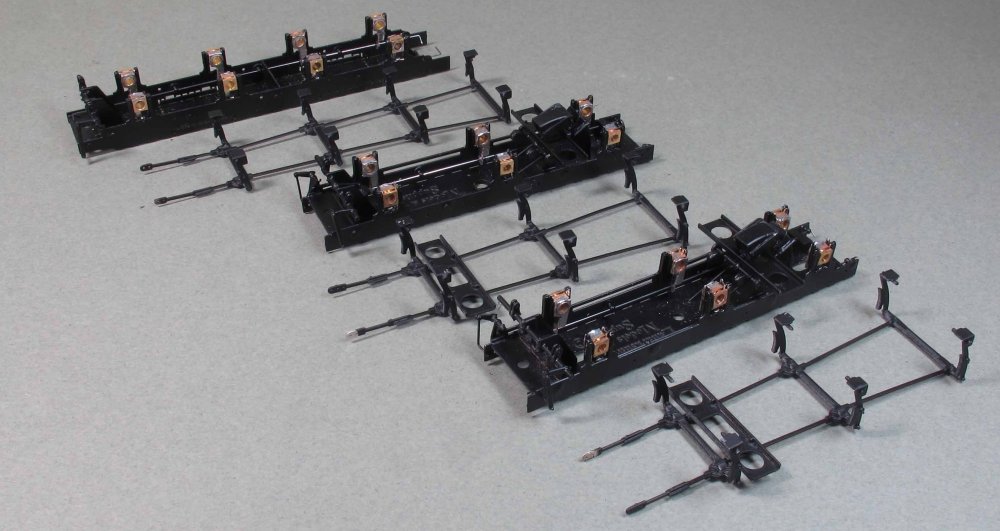 Further progress has been made on the Ivatt Class 2 loco pair – the Lanarkshire Models
tender chassis now complete and painted (plus one from the same source for a WD 2-8-0).
The CSB spring wires can clearly be seen.
Further progress has been made on the Ivatt Class 2 loco pair – the Lanarkshire Models
tender chassis now complete and painted (plus one from the same source for a WD 2-8-0).
The CSB spring wires can clearly be seen.
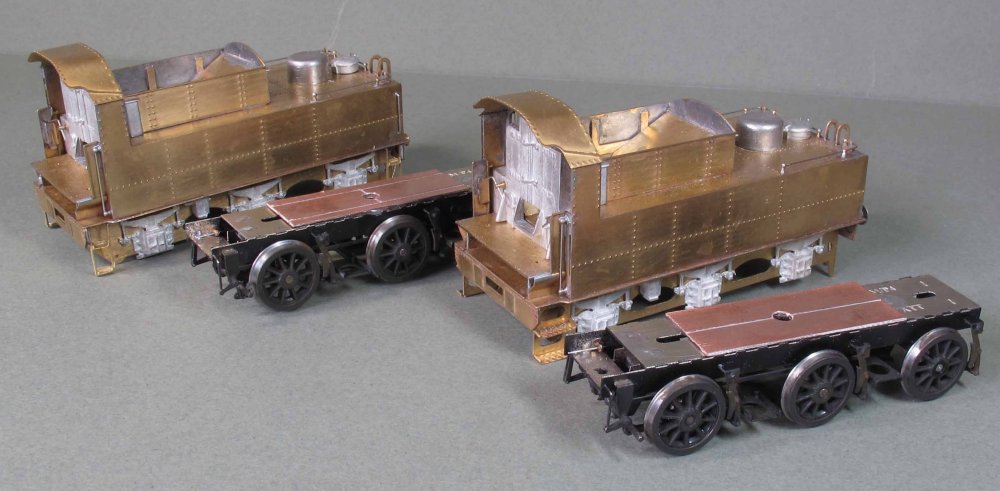 The two completed Ivatt tenders, with their wheeled-up chassis alongside. The gapped
copperclad pieces on top of the chassis are for attaching pickups and various wiring connections.
The two completed Ivatt tenders, with their wheeled-up chassis alongside. The gapped
copperclad pieces on top of the chassis are for attaching pickups and various wiring connections.
 There are some small detail differences between the two tenders – the one on the left has
WR style lamp irons (Masokits) and has the strap type steps (at both ends), rather than
the fabricated version at just the front end of the other version (for the Kentside
Branch’s 46441). A tiny bit of filler needed here and there…..
There are some small detail differences between the two tenders – the one on the left has
WR style lamp irons (Masokits) and has the strap type steps (at both ends), rather than
the fabricated version at just the front end of the other version (for the Kentside
Branch’s 46441). A tiny bit of filler needed here and there…..
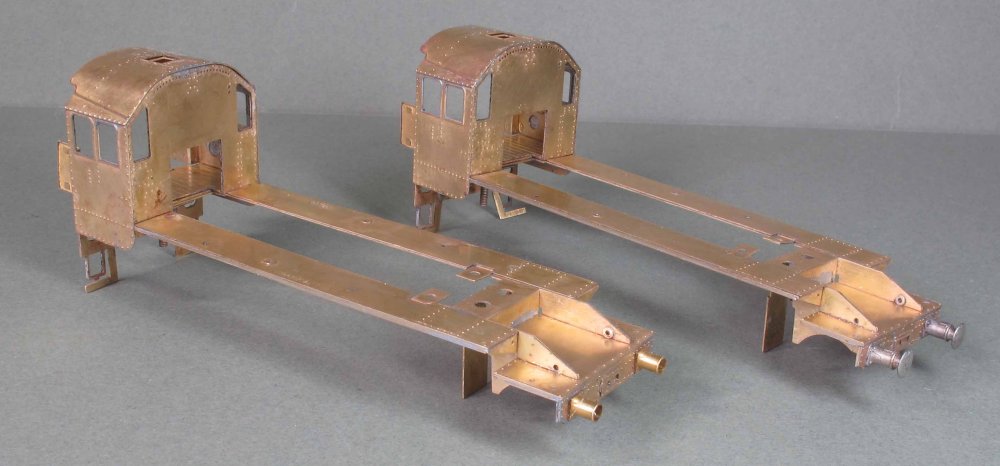 To round off this month, a start has also been made on the two Ivatt loco superstructures.
Getting them to this stage will allow the chassis to be commenced and tested up against
the running plate to check the two parts will fit together correctly.
To round off this month, a start has also been made on the two Ivatt loco superstructures.
Getting them to this stage will allow the chassis to be commenced and tested up against
the running plate to check the two parts will fit together correctly.
![]()
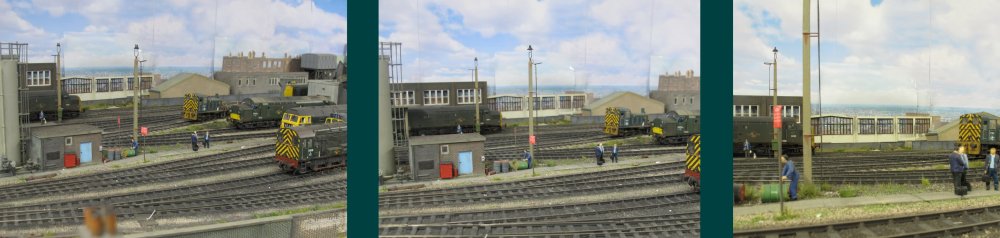
 Canada Street will be appearing at Railex '24 in
Aylesbury on the 25th & 26th of May, it's penultimate outing fulfilling the
previously arranged bookings for the layout.
Canada Street will be appearing at Railex '24 in
Aylesbury on the 25th & 26th of May, it's penultimate outing fulfilling the
previously arranged bookings for the layout.