English Electric type 3 - 6731, a Bachmann model alone at the stabling point.
Having just completed an EM conversion on the Heljan Class 11 shunter, the picture
on the left shows the keep plate held in with 3 screws, and the brake rigging,
hornblock caps and coupling rod removed from one side. The picture on the right shows
my method of pulling the wheels out to a BTB measurement of 16.5mm.
*********************************************************************************************************************************************

STEVE CARTER

The Commer Superpoise build shown last month is now complete with scratch built fuel
tank and battery box added. The spare wheel carried beneath the rear of the vehicle
reuses that from the Classix Austin K2 chassis - originally I had intended to scratch
build this having thought that it was part of the chassis moulding but it is in fact
a separate item lightly glued into position. A sister vehicle has since been constructed
following the same methodology as before.

Next in line to enter the "Frankenlorry" chop shop was this Atlas Editions Atkinson
3-Axle Dropside in Eddie Stobart livery (Part number 4 649 107) which can be had relatively
cheaply.
The chassis / wheels are to be reused in another project but the dropside body
is the same size as the tanker body carried by a Lledo DG176023 (which represents a Leyland
Octopus operated by Alfred Manchester & Sons Ltd). The only real work needed to effect a
replacement is the creation of a plastic sub assembly affixed beneath the dropside body
allowing it to be screwed onto the diecast chassis (it will also be repainted at a later
date to match the existing dark blue livery). The Lledo wheels were also replaced using
EFE types taken from one of their AEC Mammoth vehicles.

The cab comes with a mounted roof box, wing mirrors and radiator grill made from plastic
so all were removed before the Stobart paint scheme was stripped using Acetone. The
mounted roof box would have been used to store weatherproof sheeting to cover loads but
as the cab was intended for a smaller vehicle it was thought superfluous to requirements.
This left four holes in the cab roof which required filling and first thoughts turned to
applying epoxy filler and then sanding it back however an alternative method was devised
involving the use of brass bolts and solder.
First the mazak type material is soft
enough to allow a brass bolt to be screwed firmly into position (ensuring it did not
protrude into the cab space). Applying a soldering iron at the interface between the
bolt and cab roof and adding 145 degree solder to it initially sees the solder take to
the brass but leaving the iron in place and then adding a couple of washes of flux
eventually sees it take to the cab roof as well. After this is done it is a simple
task to crop the bolt and then file the surface flat.
The fettled Atkinson cab married to another Classix Austin K2 chassis with a modified
flatbed body taken from a Base Toys Commer 2 axle flatbed (LC-01). The intention is to
livery this vehicle in the guise of a fictional coal merchant for use in delivering coal
to the population of Sheppycroft.

Having been immersed in the world of trucks for a while I decided to turn my attentions
back to the land of rail, this time in the shape of a GWR Y8 fruit van which was first
introduced in 1980 by Mainline before being taken up by Replica Railways and then Bachmann.
I had previously dallied with a Mainline one in the past but was never happy with it after
stripping its factory applied livery (this was more to do with the method and medium I
used to strip it rather than the quality of the plastic moulding) so left it in a dark
corner never to be seen again. My interest in a Y8 was reignited by a recent purchase
of two undecorated Bachmann examples (33-203) but as is well documented the moulding
suffers from being over wide by approx 2mm. Geoff Kent addressed this issue in Part Two
of his "The 4mm Wagon" series by sawing one in half over its length, removing approx
1mm from each half and then rejoining them and reprofiling the roof but I must admit
this course of action didn't really appeal to me. If the width issue was the only let
down then I may have attempted it but to me the roof profile itself is also wrong being
too flat across its arc whilst the two ventilators look too wide / squat and instead of
being 70mm over its headstocks (17' 6") it is almost 72mm (18').
As a result of these shortcomings I decided to wield the razor saw and remove the
two sides with the intention of marrying them to scratch built ends using a chamfered
joint. When filing such 45 degree chamfers I find it beneficial to first apply a marker
pen (A) which shows you how close you are to the corner edge as you file away the excess.
B shows a side in as removed condition whilst C shows the other side after being dressed;
as well as the chamfer it requires the removal of the roof element and a little of the
excess length can be taken off by removing approx. 0.5mm from each end (prototype images
show a small area of the corner stanchion on view to the side of the grill assemblies so
this was done with great care!).

In "GWR Goods Wagons" by Tourret et al it mentions that the Y8 fruit vans had been based
upon V23 Mink vans which themselves are the subject of the venerable kit offered by Ratio
(Kit No. 565 or PC565 as is now). Having one of these to hand I wondered if the ends could
be used as a shortcut and to my great delight they turned out to be almost a perfect
replacement with the plank spacing matching that of the Bachmann sides (not only that but
the kit also provides the necessary replacement roof and chassis). The 565 kit ends were
carefully filed to ensure no gaps were present between them and the sides before being
joined together. As an aid in carrying out such work I employ a piece of 2" L section
aluminium as it allows both pieces to be manipulated into position and ensures a decent
90 degree corner whilst the internal angle is used when joining the two side / end combinations together.
With all four part of the body attached to each other the corners were then reinforced
by using Evergreen 4.8mm square tube (Part No. 253). These not only prevent the corners
from going out of true but also assists in the positioning of the floor / chassis.

A couple of small issues to address alongside those already mentioned are that the roof
from the Ratio kit needs to be extended by approx 1mm to give a suitable overhang at each
end of the body and that a small step needs to be added just below each left hand door
(presumably to assist staff when loading from rail height rather than at a loading dock).
The inset shows how these were created from a brass T piece and U shape soldered together.
The two hundred Y8 vans built by the GWR were equipped with 1' 81/2" buffers with 2 ribs
and 13" heads which are catered for by Lanarkshire Models B019 types.
Viewers are invited to make their own comparison of the original Bachmann (l) and
modified (r) ends. It is intended for the unmodified van to meet a similar fate in having
its sides removed with a view to creating a BR built Y8. An additional one hundred of these
had been ordered by the GWR (to be numbered 147000-99) but nationalisation saw them built
instead by Swindon works in 1949 as BR Dia 1/231 vans numbered B875200-99. The new vans
shared most of the properties of the GWR Y8s except that the ends and doors were now made
from plywood and buffers were 1' 6" types so a new approach is required!
*********************************************************************************************************************************************

KARL CROWTHER

The quarry track is all now completed and fixed down onto the layout. Before painting
I added cosmetic fishplates and the various ‘half-chairs’ over the locally sited,
riveted sleepers. Getting all of this detail work completed prior to laying seemed
the best way forward, given it’s a bit of a stretch across the baseboards to reach
the formation. The two parallel sidings on the left of the fan are the reception /
departure roads. As it’s worked out, I’m not sure these will be long enough to berth
a complete train, so will give a bit more of a challenge to shunting operations at the quarry!

Another view of the quarry, this time looking towards the station. The short headshunt
gives access for the shunting locos to their intended small engine shed. Building the
track was the easy part – as ever wiring it all up is taking way longer as on the rest of
the layout. The small building at the back of the baseboard is from a previous project
(actually from a foundry yard), but will serve as the quarry’s weighbridge office, and
conveniently will disguise one of the servos! The tracks for the wire
in tube can be seen cut into the cork.

The Sutton’s Locomotive Works Class 25/3 has at last arrived and has already been up to some
running on the layout. I tested the haulage capacity and got to 14 coaches, at which point
I ran out of stock, but it was still pulling with ease - sounds fantastic too!
A crew have since been added.
*********************************************************************************************************************************************

MIKE WHITCHURCH

As Wibdenshaw is a touch fit in the room the individual boards support systems have been
modified so as to give access to the far corners for building work, primarily by adding
extra legs and fitting wheels to them all.

The most useful removable board is this one which allows access out onto the terrace
which is where the messy bits of woodworking are done.

February's project was completing the outer loops at each end of the layout, which was
satisfactorily completed. Not being the worlds greatest tracklayer I make use of any
help I can get, used in conjunction with my home brew track spacing jigs the Stoneybridge
track templates come into their own.

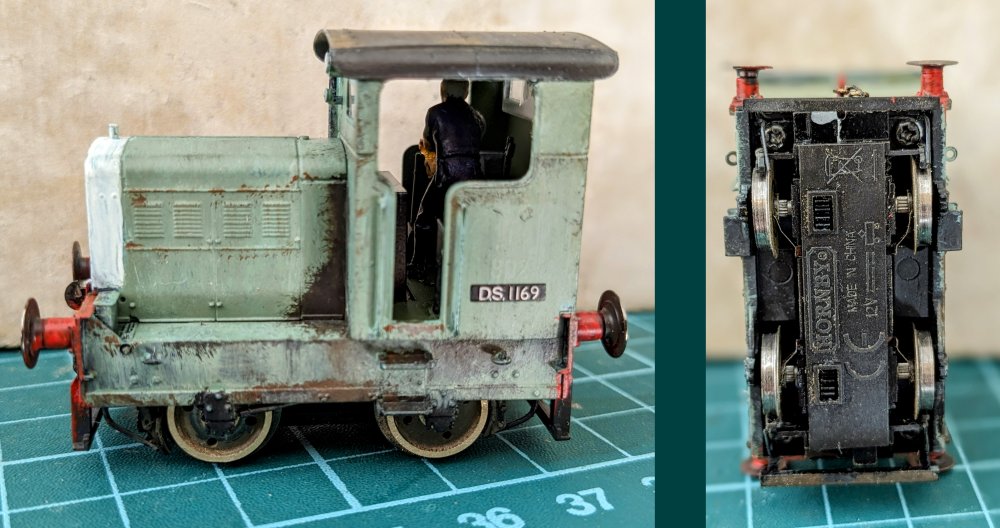
For electrical testing purposes I use the Hornby 48DS, with it's short wheelbase it
shows up any shortcomings in the amps and volts department, and in its alter ego as
DS1169 it is seen here optimistically awaiting completion of the ballast sidings so
it can recreate it's days at Broad Clyst. For laying straight track, locally available
1mm x 17mm aluminium strip works nicely.

The 48DS was converted by the simple expedient of pulling out the existing wheels after
having thinned them down by my no-lathe method, rubbing on abrasive paper.

Also this month, the goods yard exit has been given a coat of looking at, the existing
building had a corner missing to allow for crating up when the layout was on the
exhibition circuit, but as that won't be happening any more it has been filled in, and
as the goods yard will be extended the opportunity has been taken to recast this corner,
into what though is still open to conjecture, but may involve a connection to the new
RM / NCL depot being planned for the area.

This last bout of tracklaying has depleted the stock which I'd accumulated over the
years, so more needs to be sourced, although regrettably not at these prices! Although
all 4 loops are now completed only the inner 2 are usable all the way around, the outer
two need the existing junction rewiring with frog juicers and for those of you paying
attention you may remember I've rebuilt the area by the end of the station into a double
junction to feed the underground storage sidings, so this part needs completely rewiring,
so that should keep me busy until the next update. Apologies if I seem to rambled on a
bit but I've done what I consider is quite a bit of work, and that's without mentioning
the various wagon and loco conversions, I need a lie down!
*********************************************************************************************************************************************

KIER HARDY

D8406 and D8402 head for East London with a rake of mixed spoil wagons.

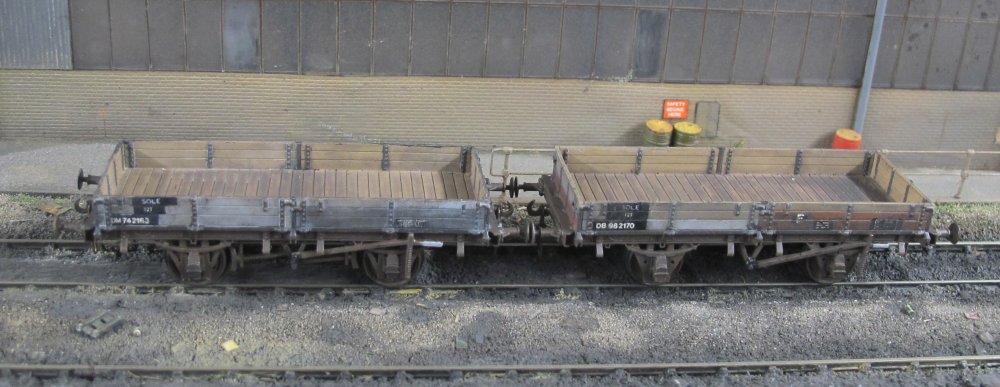
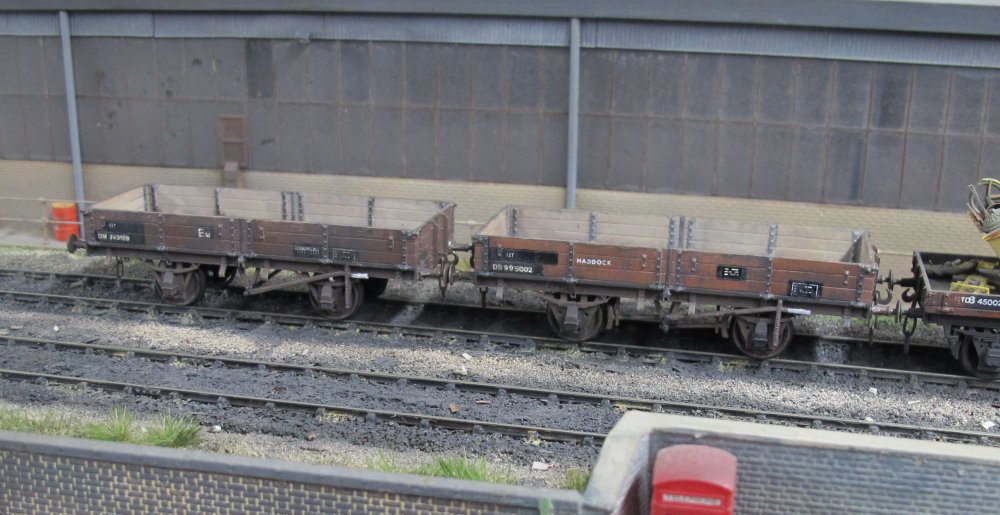
The finished Sole and Haddock 3D printed wagons have now joined the rake.

Ex-LMS Sole DM742163 and a BR Sole DB982170. These were LMS designed Ballast wagons
built in 2 batches of over 3000 wagons. They had drop sides and end doors which could
be lowered within the length of the buffers, so extended loads of rail etc could be
carried across several wagons. This practice was less common as rail lengths increased
and they were generally used for ballast or spoil transport. BR built 500 after
nationalisation with sturdier axleguards and some with plate axleboxes.

Ex-LMS Haddock DM749189 and BR Haddock DB995002. The Haddock shares the same underframe
as the Sole, built by both the LMS and BR. The body is longer than the Sole and has fixed ends.
They were designed for transporting sleepers, with the BR version having different axleguards.

The tail end of the train made up of a mix of Grampus, and other steel /
wooden bodied ex-revenue wagons.

I've reprofiled the wheels on a Heljan / ModelRail Class 11 shunting loco, showing the
finished set ready for re-installing. Please click on the image below to see the video
showing the wheel removal and conversion to EM gauge.


