*********************************************************************************************************************************************
AUGUST 2023 UPDATE
*********************************************************************************************************************************************
KIER HARDY
*********************************************************************************************************************************************
STEVE CARTER
*********************************************************************************************************************************************
MIKE WHITCHURCH
*********************************************************************************************************************************************
JONNY DUFFETT
All my 3D designs are available as a free download at
Thingiverse
for you to print yourself, or alternatively Scale Model Innovations, NIU Models, and
Milepost 128 Models *********************************************************************************************************************************************
GREG BROOKES
*********************************************************************************************************************************************
KARL CROWTHER
*********************************************************************************************************************************************
![]()
 There's not a great deal to report from the work bench this month, but regular running
sessions have brought a variety of visitors. Blue liveried 5837 leads green 5561 with
a rake of loaded 16 ton mineral wagons. Both double motored Lima models from the
Eastwell loco fleet.
There's not a great deal to report from the work bench this month, but regular running
sessions have brought a variety of visitors. Blue liveried 5837 leads green 5561 with
a rake of loaded 16 ton mineral wagons. Both double motored Lima models from the
Eastwell loco fleet.
 A rake of suburban stock heads north whilst Brush 4 number 1628 passes south through the station.
 A 3-car BR Swindon Class 123 working in multiple with a 5-car Trans-Pennine Class 124
heading north, both units built by Paul James from heavily modified Bachmann stock.
A 3-car BR Swindon Class 123 working in multiple with a 5-car Trans-Pennine Class 124
heading north, both units built by Paul James from heavily modified Bachmann stock.
 Another view with the units heading away from the camera. The Class 123s didn't work
with the Class 124s until they were transferred from the Western Region to Hull,
so this pairing is more of a 1980s scenario.
Another view with the units heading away from the camera. The Class 123s didn't work
with the Class 124s until they were transferred from the Western Region to Hull,
so this pairing is more of a 1980s scenario.
 The Class 124 Trans-Pennine unit in platform 3, with the tail end of a
Derby RTC train passing by.
The Class 124 Trans-Pennine unit in platform 3, with the tail end of a
Derby RTC train passing by.
 Greg's D1047 Western Lord pauses in platform 2 at the head of a rake of mark 1 coaching stock.
 A Class 108 and Class 101 passing each other - both visitors from the Shenston Road fleet.
![]()
 A number of pressing projects around the home has seen modelling time curtailed, but in order
to keep momentum going I decided to try a little and often approach. The result of this is a
BR Diagram 1/337 Demountable Tank wagon, one of six such vehicles built at Earlestown for use
by Joseph Crosfield of Warrington for the conveyance of sodium silicate. These followed an
earlier design to Diagram 1/329, the main difference being the later type had a single
loading hatch instead of two along with a nine foot wheelbase against the ten foot type of
the 1/329 variant (the latter further complicated by the fact both 10' RCH and LNER
underframes were used).
A number of pressing projects around the home has seen modelling time curtailed, but in order
to keep momentum going I decided to try a little and often approach. The result of this is a
BR Diagram 1/337 Demountable Tank wagon, one of six such vehicles built at Earlestown for use
by Joseph Crosfield of Warrington for the conveyance of sodium silicate. These followed an
earlier design to Diagram 1/329, the main difference being the later type had a single
loading hatch instead of two along with a nine foot wheelbase against the ten foot type of
the 1/329 variant (the latter further complicated by the fact both 10' RCH and LNER
underframes were used).
 The tank barrel (only 4 foot in diameter) was constructed using rolled plasticard onto which
shaped ends were added. Another consideration for the barrel is that the tank slopes subtly
towards the unloading valve connection and so there is a 0.5mm difference between each end of
the supporting underframe. An Airfix 16T Mineral kit yielded the necessary 9' underframe which
was then extended to cater for the 17' 6" length (the build is in fact a bit of an Airfix
mashup as the loading hatch is from the Prestwin and buffers from their brake van!).
The tank barrel (only 4 foot in diameter) was constructed using rolled plasticard onto which
shaped ends were added. Another consideration for the barrel is that the tank slopes subtly
towards the unloading valve connection and so there is a 0.5mm difference between each end of
the supporting underframe. An Airfix 16T Mineral kit yielded the necessary 9' underframe which
was then extended to cater for the 17' 6" length (the build is in fact a bit of an Airfix
mashup as the loading hatch is from the Prestwin and buffers from their brake van!).
 In use the tanks were helped to remain in place by adjustable shock absorbers and these have
been made from sections of a 2.5mm plastic screw. The four 'wings' on the tank barrel also
helped with alignment and rested on four small supports welded to the bed of the wagon floor
(the wings also acted as anchor points for securing chains which have yet to be made).
In use the tanks were helped to remain in place by adjustable shock absorbers and these have
been made from sections of a 2.5mm plastic screw. The four 'wings' on the tank barrel also
helped with alignment and rested on four small supports welded to the bed of the wagon floor
(the wings also acted as anchor points for securing chains which have yet to be made).
 The tanks were equipped at one end with a set of curiously shaped access steps and these have
proven to be one of the most difficult aspects to model. Initially an all brass method was
tried but the steps themselves followed the curvature of the tank barrel and after a number
of attempts only the hand rail element has been done from brass (the steps will be plasticard
glued to the barrel).
The tanks were equipped at one end with a set of curiously shaped access steps and these have
proven to be one of the most difficult aspects to model. Initially an all brass method was
tried but the steps themselves followed the curvature of the tank barrel and after a number
of attempts only the hand rail element has been done from brass (the steps will be plasticard
glued to the barrel).
 The methodology for constructing the hand rails: (A) a piece of 15mm copper tubing in use as
a former on which 0.8mm brass lace making pins are bent into shape (B) (a suitable hole
drilled in the tube holds the pin in position) which are then filed flat on two sides to
provide the necessary curved flat forms (C).
The methodology for constructing the hand rails: (A) a piece of 15mm copper tubing in use as
a former on which 0.8mm brass lace making pins are bent into shape (B) (a suitable hole
drilled in the tube holds the pin in position) which are then filed flat on two sides to
provide the necessary curved flat forms (C).
![]()
 Whilst waiting for the curved track guides for the spirelix, attention has turned to other
areas of the layout. The station area has been revisited with the platform surfaces being
joined together and spray painted, the white area being left bare as that's where the
station building will be going. Also a start has been made on the road bridge which will
serve as the scenic break.
Whilst waiting for the curved track guides for the spirelix, attention has turned to other
areas of the layout. The station area has been revisited with the platform surfaces being
joined together and spray painted, the white area being left bare as that's where the
station building will be going. Also a start has been made on the road bridge which will
serve as the scenic break.
 This baseboard is now wired up - a simple task as it is only straight track
and well within my capabilities.
This baseboard is now wired up - a simple task as it is only straight track
and well within my capabilities.
 Reginald Perrin has had a good couple of months sales wise, and CJ has sanctioned a
refurbishment of the Sunshine Desserts building. The structure has been squared off as it
now doesn't need to fit in its storage rack, although it has been made removable. Shown
here after recladding.
Reginald Perrin has had a good couple of months sales wise, and CJ has sanctioned a
refurbishment of the Sunshine Desserts building. The structure has been squared off as it
now doesn't need to fit in its storage rack, although it has been made removable. Shown
here after recladding.
 The basic Arkitex core was retained, with refurbishment extending to renewing the
brickwork, with the addition of various bits of plastic section to slightly alter its
appearance. Inset shows the original configuration when constructed back in 1998.
The basic Arkitex core was retained, with refurbishment extending to renewing the
brickwork, with the addition of various bits of plastic section to slightly alter its
appearance. Inset shows the original configuration when constructed back in 1998.
![]()
 The Steelman locomotive was designed to haul heavy trains in Steelworks and Quarries, and had
a 650hp Rolls Royce engine. The model was drawn from a set of original plans obtained by Paul
James. The model is 3D printed with a non motorised chassis, handrails are soldered from wire.
The Steelman locomotive was designed to haul heavy trains in Steelworks and Quarries, and had
a 650hp Rolls Royce engine. The model was drawn from a set of original plans obtained by Paul
James. The model is 3D printed with a non motorised chassis, handrails are soldered from wire.
 Great Mountain 0-6-0. Built by Avonside in 1902 for the Llanelly and Mynydd Mawr Railway.
Great Mountain is the English translation of Mynydd Mawr. In 1923 the railway was absorbed
into the GWR and the loco became GWR No.944. It was sold into private use in 1929, becoming
Hatfield No.4 working at Hatfield main colliery in Yorkshire until the 1960s. The loco had
different chimneys and safety valves at various times. This is designed to drop onto a either
a Dapol RTR chassis, and both the older and newer Hornby chassis. Prints for Great Mountain
and Hatfield No 4 versions are available and can accomodate either chassis.
Great Mountain 0-6-0. Built by Avonside in 1902 for the Llanelly and Mynydd Mawr Railway.
Great Mountain is the English translation of Mynydd Mawr. In 1923 the railway was absorbed
into the GWR and the loco became GWR No.944. It was sold into private use in 1929, becoming
Hatfield No.4 working at Hatfield main colliery in Yorkshire until the 1960s. The loco had
different chimneys and safety valves at various times. This is designed to drop onto a either
a Dapol RTR chassis, and both the older and newer Hornby chassis. Prints for Great Mountain
and Hatfield No 4 versions are available and can accomodate either chassis.
 Ex-LMS Gannet ballast hopper. Built in 1931 they had side operated central opening doors.
Some were branded as Trout and lasted well into the 1970s.
Ex-LMS Gannet ballast hopper. Built in 1931 they had side operated central opening doors.
Some were branded as Trout and lasted well into the 1970s.
 Here's the BR version of the Gannet dia 1/581. The hopper is of welded construction with
slightly altered end slopes and end supports.
Here's the BR version of the Gannet dia 1/581. The hopper is of welded construction with
slightly altered end slopes and end supports.
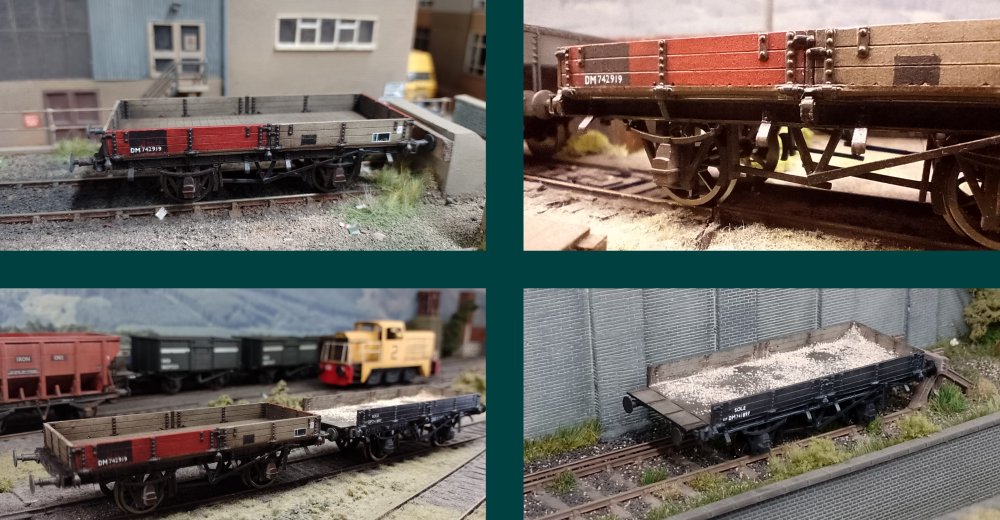 Here are photos of the Sole wagons. These were LMS designed Ballast wagons built in 2 batches
of over 3000 wagons. They had drop sides and end doors which could be lowered within the
length of the buffers so extended loads of rail etc could be carried across several wagons.
This practice was less common as rail lengths increased and they was generally used for
ballast or spoil transport. BR built 500 after nationalisation with sturdier W irons and
some with plate axleboxes. I've done LMS and BR versions and variants with dropped end doors.
Transfers for early BR era have been specially produced by Cambridge Custom Transfers for
Sole, Haddock and Gannets.
Here are photos of the Sole wagons. These were LMS designed Ballast wagons built in 2 batches
of over 3000 wagons. They had drop sides and end doors which could be lowered within the
length of the buffers so extended loads of rail etc could be carried across several wagons.
This practice was less common as rail lengths increased and they was generally used for
ballast or spoil transport. BR built 500 after nationalisation with sturdier W irons and
some with plate axleboxes. I've done LMS and BR versions and variants with dropped end doors.
Transfers for early BR era have been specially produced by Cambridge Custom Transfers for
Sole, Haddock and Gannets.
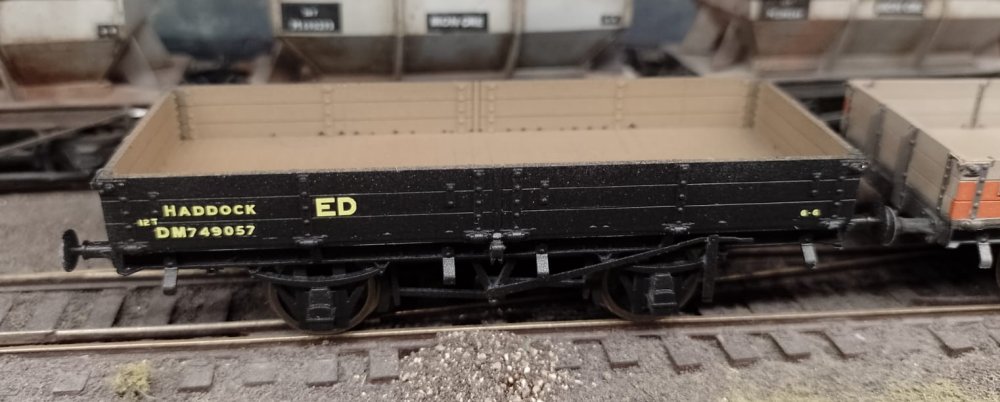 The Haddock shares the same underframe as the Sole, built by both the LMS and BR. The body
is longer than the Sole and has fixed ends. They were designed for transporting sleepers,
with the BR version having different axleguards.
The Haddock shares the same underframe as the Sole, built by both the LMS and BR. The body
is longer than the Sole and has fixed ends. They were designed for transporting sleepers,
with the BR version having different axleguards.
 ..... and finally, Andy Denny says - here's my attempt at Jonny Duffett’s 3D Panzer wagons.
They were printed by my friend Paul Owen and painted and weathered by myself. I used 2mm
square brass to represent the internal frame that supports the hot ingots. I think I’ve
captured the well used and battered look of the prototypes.
..... and finally, Andy Denny says - here's my attempt at Jonny Duffett’s 3D Panzer wagons.
They were printed by my friend Paul Owen and painted and weathered by myself. I used 2mm
square brass to represent the internal frame that supports the hot ingots. I think I’ve
captured the well used and battered look of the prototypes.
![]()
 The Derby RTC Tribometer Train is seen here behind Metro-Vick S15705, on running tests at
Hornsey Broadway. There's still some underframe / Taperlite suspension work required on the
COV AB van RDB999900 which was situated between Laboratory 11 and the Auto Trailer, housing
the instrumentation and hydraulic packs.
The Derby RTC Tribometer Train is seen here behind Metro-Vick S15705, on running tests at
Hornsey Broadway. There's still some underframe / Taperlite suspension work required on the
COV AB van RDB999900 which was situated between Laboratory 11 and the Auto Trailer, housing
the instrumentation and hydraulic packs.
 Laboratory 11 (RDB975046) is produced by Bachmann in this livery and just required a change
of wheels and couplings.
Laboratory 11 (RDB975046) is produced by Bachmann in this livery and just required a change
of wheels and couplings.
 RTC Auto Trailer QXX RDB975076 is a repainted Bachmann mark 1 BSK with a '12A' driving cab
conversion kit
RTC Auto Trailer QXX RDB975076 is a repainted Bachmann mark 1 BSK with a '12A' driving cab
conversion kit
(available here).
 The Tribometer Train is also depicted in a earlier guise with a bauxite liveried ZXR RDB999900
sandwiched between Lab 11 and the Auto Trailer, hauled by modified Clayton 8598.
The Tribometer Train is also depicted in a earlier guise with a bauxite liveried ZXR RDB999900
sandwiched between Lab 11 and the Auto Trailer, hauled by modified Clayton 8598.
 Meanwhile back on the layout, a start has been made to get the semaphore signals working. Kier
has designed a base for the signals, which accomodate the servo motors for both single and double
options, with Jonny drawing and printing the bases as shown. The servo operating arms will be
shortened to fit within the confines of the rectangular hole in the baseboard, with the operating
wires going up through the base via the formed slots.
Meanwhile back on the layout, a start has been made to get the semaphore signals working. Kier
has designed a base for the signals, which accomodate the servo motors for both single and double
options, with Jonny drawing and printing the bases as shown. The servo operating arms will be
shortened to fit within the confines of the rectangular hole in the baseboard, with the operating
wires going up through the base via the formed slots.
 Due to the limited access under the layout at the ends of the loops, this design will allow
setting up and calibration of the complete signal assembly at the work bench, so they can be
installed and plugged in without having to work from underneath.
Due to the limited access under the layout at the ends of the loops, this design will allow
setting up and calibration of the complete signal assembly at the work bench, so they can be
installed and plugged in without having to work from underneath.
![]()
 Progress has been slow on the layout these past few months – mainly due to the gardening
season! A couple of running sessions were held during the late spring and this first
photo shows the layout all set up and ready for action for one of them.
Progress has been slow on the layout these past few months – mainly due to the gardening
season! A couple of running sessions were held during the late spring and this first
photo shows the layout all set up and ready for action for one of them.
 Here we see the loco & DMU storage area with various items of motive power awaiting their
turn. In reality, if trains are set up in the main storage roads, it’s been found that the
locos here around the turntable are rarely called upon, but they’re there just in case.
Here we see the loco & DMU storage area with various items of motive power awaiting their
turn. In reality, if trains are set up in the main storage roads, it’s been found that the
locos here around the turntable are rarely called upon, but they’re there just in case.
 This final view along the layout from the Kendal signalling position. Note the temporary
Metcalf signal box in position on the end of platform 1 – the ‘proper’ one will be that
from Lakeside. The turntable still awaits motorising etc. The only drawback of doing the
running sessions is the interruption to work on the layout, track cleaning, tidying the shed, etc.
This final view along the layout from the Kendal signalling position. Note the temporary
Metcalf signal box in position on the end of platform 1 – the ‘proper’ one will be that
from Lakeside. The turntable still awaits motorising etc. The only drawback of doing the
running sessions is the interruption to work on the layout, track cleaning, tidying the shed, etc.
 A recent addition to the loco fleet is Patriot 45543 'Home Guard'. Entirely appropriate
for the layout, it was one of a small number of the class still remaining in service when
it was allocated to Green Ayre from 5th May 1962 when it spent the next month working on
the Leeds - Morecambe & Carnforth diagrams, finally being withdrawn from Carnforth on 2nd
June ’62. The model was converted to EM using Alan Gibson wheels, with most of the
original valve gear but replacement coupling rods (Lanarkshire Models & Supplies). It
also has a CSB tender chassis from the same source. All I’ve done to the bodywork is to
fit the AWS conduit along the L/H valance and add a crew (Modelu). The cab side screens
were missing on this second hand model and I still have to work out how to model them.
A recent addition to the loco fleet is Patriot 45543 'Home Guard'. Entirely appropriate
for the layout, it was one of a small number of the class still remaining in service when
it was allocated to Green Ayre from 5th May 1962 when it spent the next month working on
the Leeds - Morecambe & Carnforth diagrams, finally being withdrawn from Carnforth on 2nd
June ’62. The model was converted to EM using Alan Gibson wheels, with most of the
original valve gear but replacement coupling rods (Lanarkshire Models & Supplies). It
also has a CSB tender chassis from the same source. All I’ve done to the bodywork is to
fit the AWS conduit along the L/H valance and add a crew (Modelu). The cab side screens
were missing on this second hand model and I still have to work out how to model them.
 I managed to re-use the original keeper plate by cutting it down the centre and adding
in a spacer piece. This meant that brakes (and the original pickups) would then line up
with the EM wheelsets.
I managed to re-use the original keeper plate by cutting it down the centre and adding
in a spacer piece. This meant that brakes (and the original pickups) would then line up
with the EM wheelsets.
 Home Guard from beneath where you can see the plastic strip spacer used to widen the
keeper plate. Cosmetic overlays of the same material have been used to widen the chassis,
while the bogie is a Comet part. A friend of mine has had issues with final drive gears
splitting when used on EM conversions. I realised it would be possible to fit Home Guard
with a High Level High-flier gearbox and one of their 1320 coreless motors, in fact
without any modification at all to the original chassis. As such it’s a superb runner
and probably a route I’ll be taking on other conversions where feasible. It just now
needs the sound sorting out, and of course some suitable weathering (and those side screens!).
Home Guard from beneath where you can see the plastic strip spacer used to widen the
keeper plate. Cosmetic overlays of the same material have been used to widen the chassis,
while the bogie is a Comet part. A friend of mine has had issues with final drive gears
splitting when used on EM conversions. I realised it would be possible to fit Home Guard
with a High Level High-flier gearbox and one of their 1320 coreless motors, in fact
without any modification at all to the original chassis. As such it’s a superb runner
and probably a route I’ll be taking on other conversions where feasible. It just now
needs the sound sorting out, and of course some suitable weathering (and those side screens!).
 A further project on the go has been this pair of 8Fs, built using the Comet kit (which
is based around a Hornby body moulding), combined with the Brassmasters detailing
components. This last includes riveted overlays for the running plates, plus various
other bits and bobs. However, the curved portion of the running plate ahead of the
smokebox front is not included by Brassmasters, so I made this up from some 5-thou brass
sheet. Subtle differences between the locos – on the left, an early one with the curved
reversing rod – straight type on the one on the right, which also has the revised front lamp
iron positions introduced in response to electrification. This is the one for Kentside where
it will be deployed on the quarry workings.
A further project on the go has been this pair of 8Fs, built using the Comet kit (which
is based around a Hornby body moulding), combined with the Brassmasters detailing
components. This last includes riveted overlays for the running plates, plus various
other bits and bobs. However, the curved portion of the running plate ahead of the
smokebox front is not included by Brassmasters, so I made this up from some 5-thou brass
sheet. Subtle differences between the locos – on the left, an early one with the curved
reversing rod – straight type on the one on the right, which also has the revised front lamp
iron positions introduced in response to electrification. This is the one for Kentside where
it will be deployed on the quarry workings.
 Here we see the chassis parts for one of the 8Fs – pure Comet, including their sprung
hornblock system, which I find works very reliably. I’ve done several 8Fs now and have
found it prudent to slightly widen the cylinder and motion bracket positions.
Here we see the chassis parts for one of the 8Fs – pure Comet, including their sprung
hornblock system, which I find works very reliably. I’ve done several 8Fs now and have
found it prudent to slightly widen the cylinder and motion bracket positions.
 Kentside’s future 48519 now painted. The transfers came from Railtec, including the 3D
printed rivets deployed on the front running plate. Having carefully formed this curved
portion from 5-thou brass sheet I wasn’t going to risk ruining it by trying to emboss
some rivets into it – the Railtec product came on the market at the perfect time and
makes an ideal solution.
Kentside’s future 48519 now painted. The transfers came from Railtec, including the 3D
printed rivets deployed on the front running plate. Having carefully formed this curved
portion from 5-thou brass sheet I wasn’t going to risk ruining it by trying to emboss
some rivets into it – the Railtec product came on the market at the perfect time and
makes an ideal solution.
 Remember it’s expoEM Summer 2023 this month in Wakefield.
Hope to see some of you there!