*********************************************************************************************************************************************
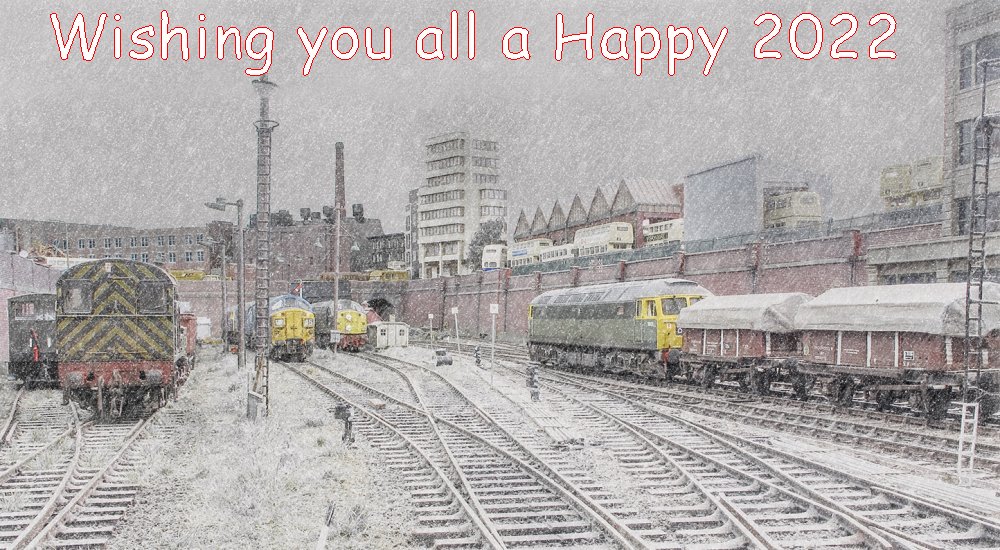
A Brush 4 heads north through Shenston Road with Shockhood wagons in tow. A digitally enhanced
image by Andy York, taken during a recent photo-shoot of the layout for an article in BRM, which
should be on the newsagent's shelf by now.
*********************************************************************************************************************************************

HYWEL THOMAS
After finishing the complicated WR S&T inspection saloon I felt a return to more familiar
wagon territory was needed. Having sat on the to-do list for some time I decided to make a
start on a pair of WR Denpart wagons. A small fleet of these worked from Swindon to the
larger WR depots carrying diesel parts including DMU engines and gearboxes. Built on former
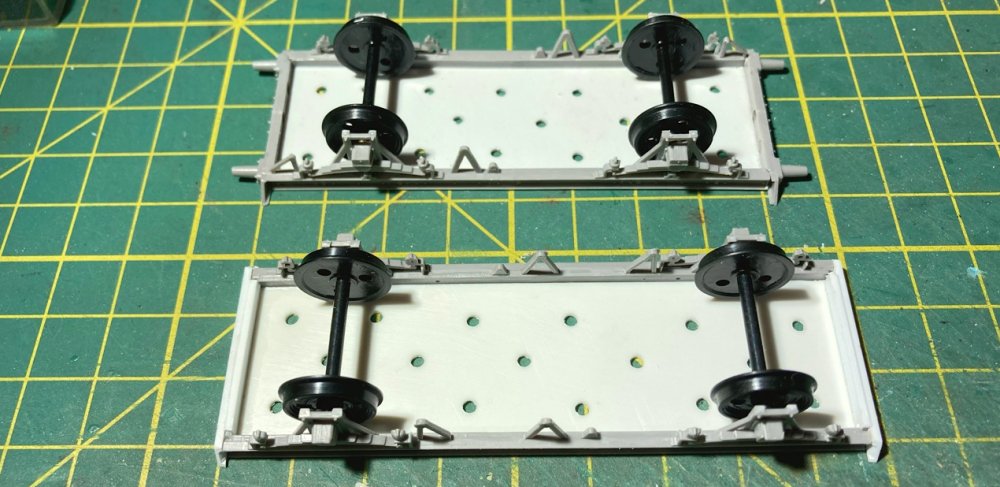
horse box underframes between 1958-62 (plus a later replacement) a pair of Parkside chassis
were bought from Peco. The new bases were drilled to allow the solvent to flow when the
planked floor is added on top.

The two I chose were DW150199, a former GWR N13 horse box and the 1969 replacement for a
damaged wagon, DW150409, an ex-LNE diagram 5 horse box. After assembling the two Parkside
chassis I realised that the LNER example should have a two-foot longer wheelbase than the
kit. Oops! So it was out with the razor saw and plastic strip.

Here we see the completed LNER chassis with the extra 8mm section added, the modified
brakegear and the access ladder. The low side rails have also been fitted all round. Both
are fitted with 14mm coach wheels.
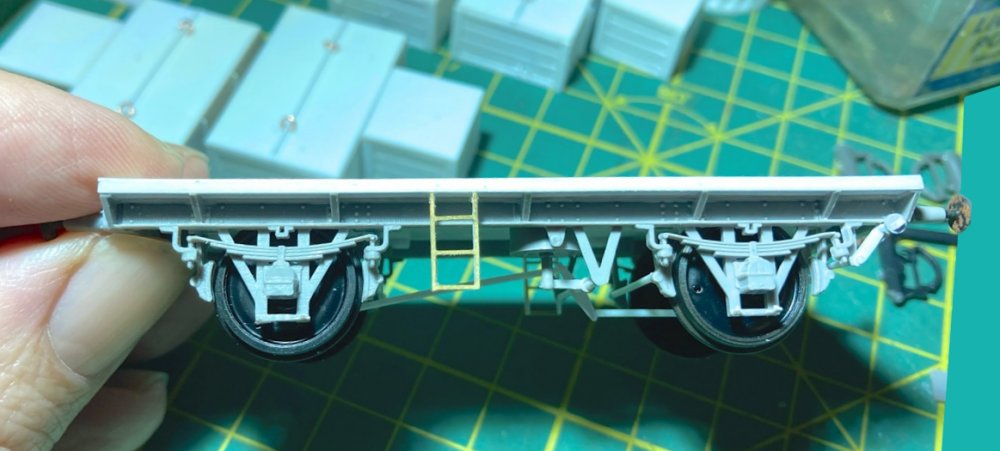
And here is the other underframe for DW150199. Much shorter that the other wagon, this was
assembled straight from the Parkside parts with, once again, a new floor and side rails. In
the background can be seen the eight large boxes for the wagons.
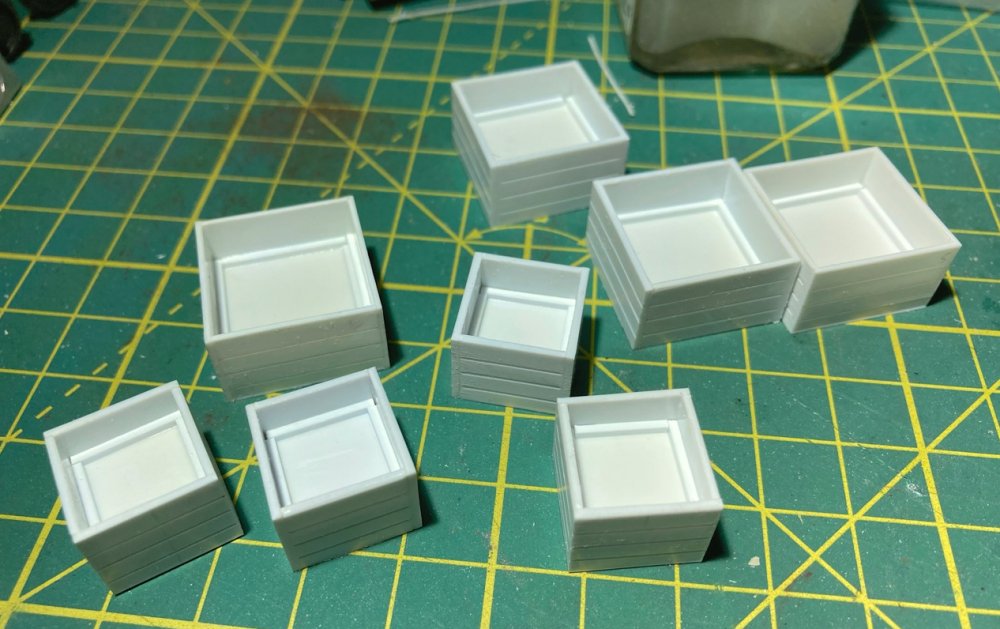
The boxes varied between the various builds and in earlier days some carried different types
so ideally work from photos of the correct wagon. In fact when these simple plastic sheet boxes
were started I had based the width on a view I had from the mid 1960s looking down on a wagon,
only realising later that the larger boxes by the 1970s were the full width of the wagon. Out
with the plastic sheet once again! Beneath the false floor in each box is loose ‘liquid lead’
to add much needed weight.
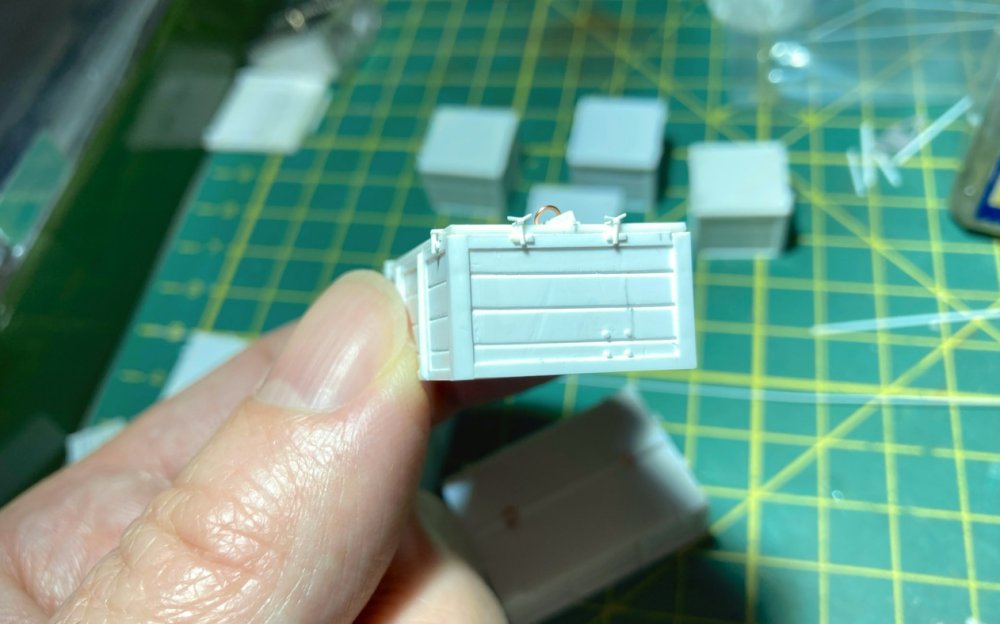
With the boxes completed except for the numerous rivets I fitted the two lifting brackets on the
lids of the two large boxes and the screw down shackles. The brackets were brass wire and the
shackles plastic strip, bent to shape once dry. Fiddly but worth the effort.
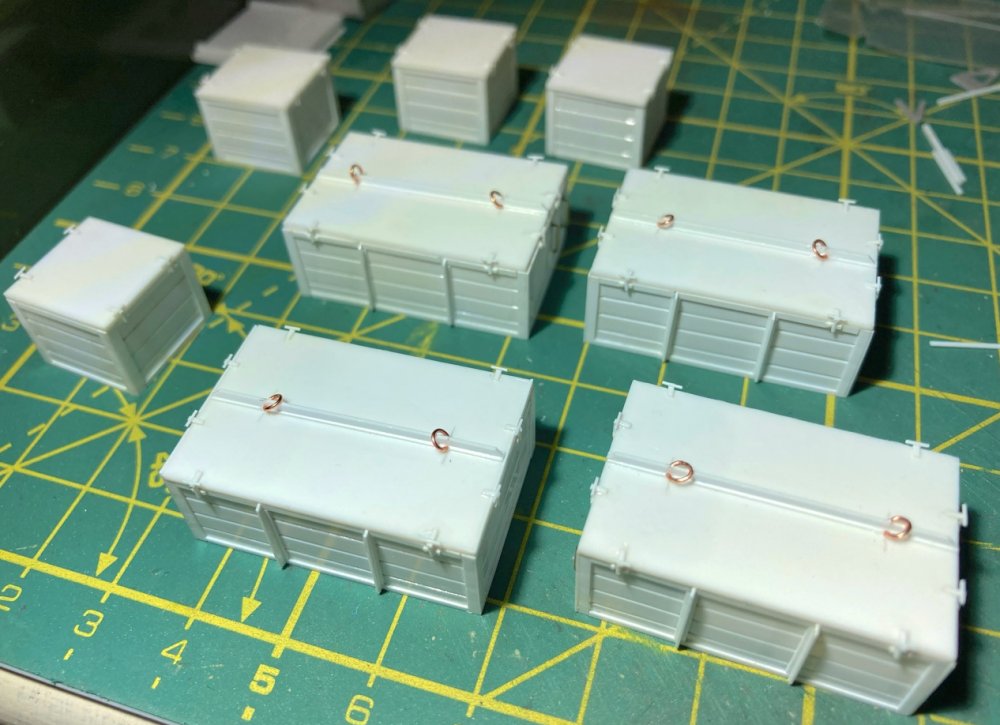
Here we see all the boxes (with the additional width on the larger versions) awaiting the rather
tedious addition of countless numbers of rivets!

And a test fit of the four boxes on the LNER chassis (although the side with the handrail should
be above the steps – thankfully nothing was glued down!). Spotted in the photo was the dent in the
chassis, which was soon fixed.
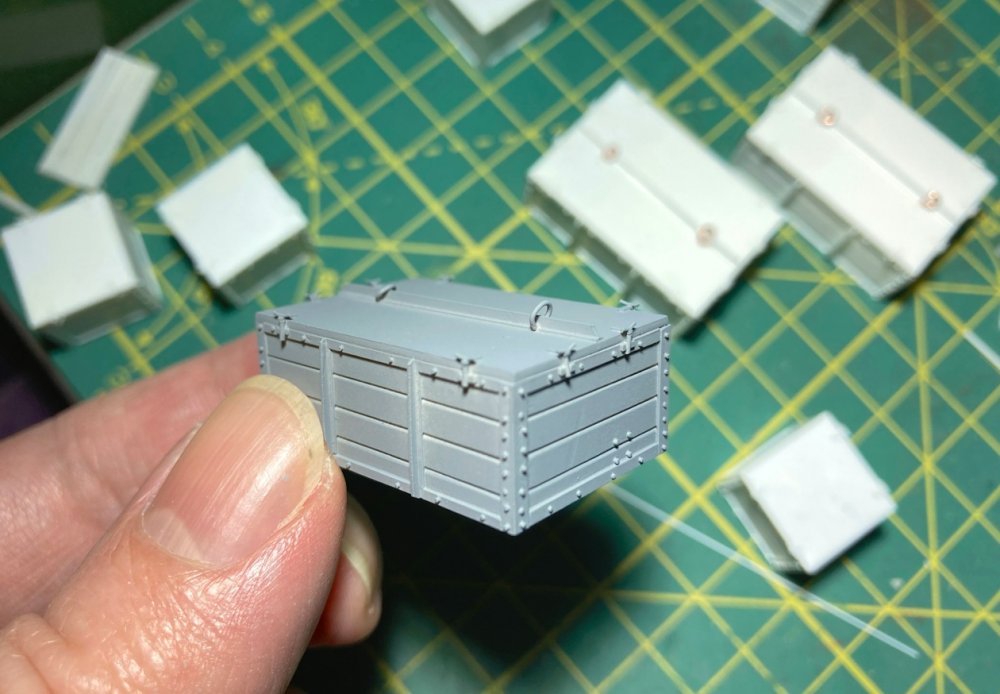
After adding over 700 rivets individually to the eight boxes the primer stage was a welcome relief!
But it was worth it as the rivets were a distinctive feature of the real boxes. In fact several of
the wagons I found at Woodhams had their boxes already burnt leaving only the frames and rivets.
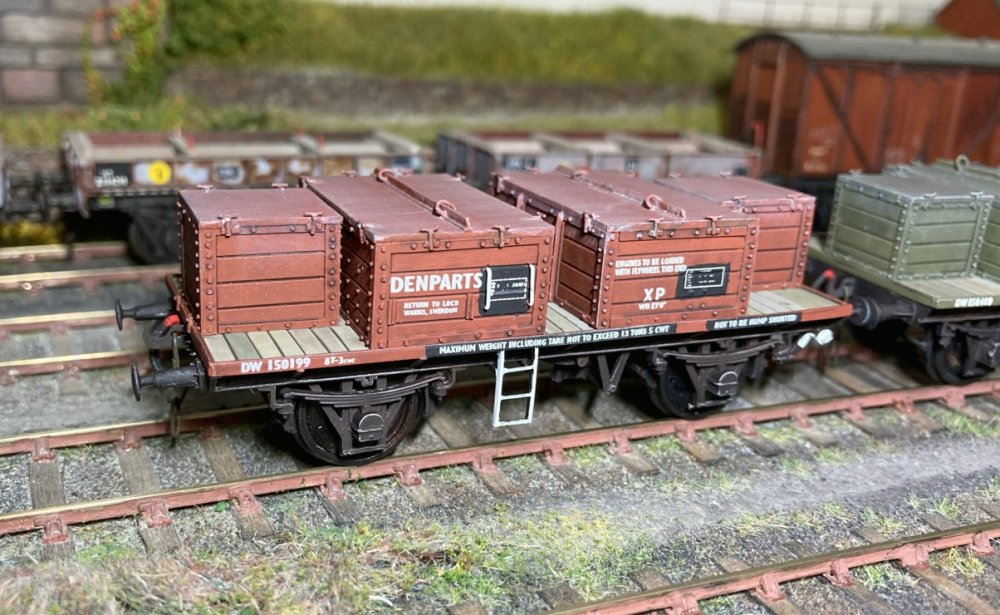
One was painted in olive green, the other in freight brown (I debated using gulf red but when I
found it the wagon was sat next to a steel Highfit and both were definitely the same colour).
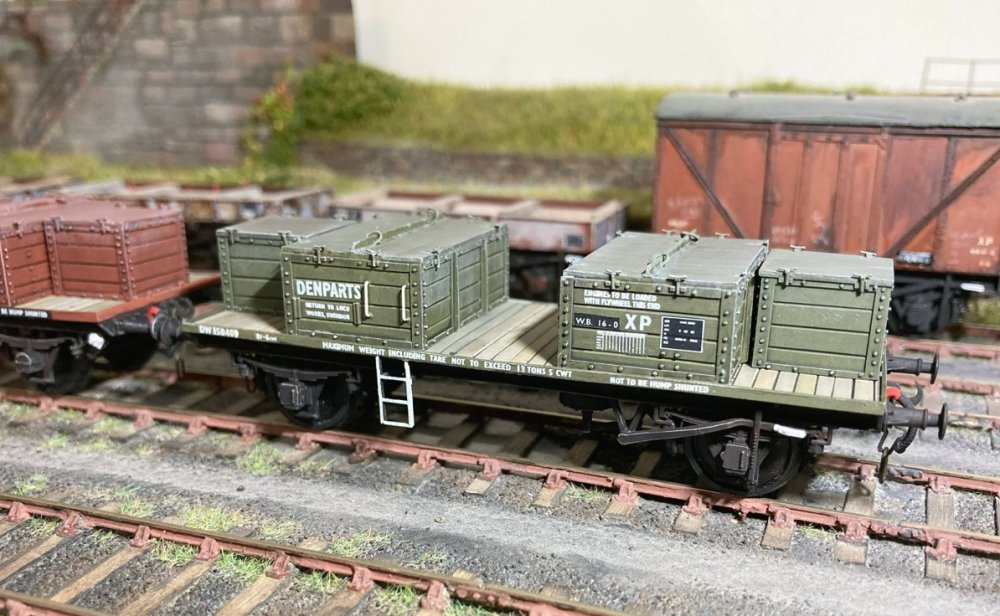
After applying the numerous lettering panels and a coat of varnish we see both wagons on
their first visit to the yard.

The next project was another Woodhams find that’s been waiting in the wings for 35 years – an
ex-LMS brake van converted to a gauging van for the LMR and later transferred to the WR. I already
had an unused Bachmann brake van of the correct type in stock. It was an extensive conversion so it
was time to build up the stocks of Evergreen strip and out with the razor saw.
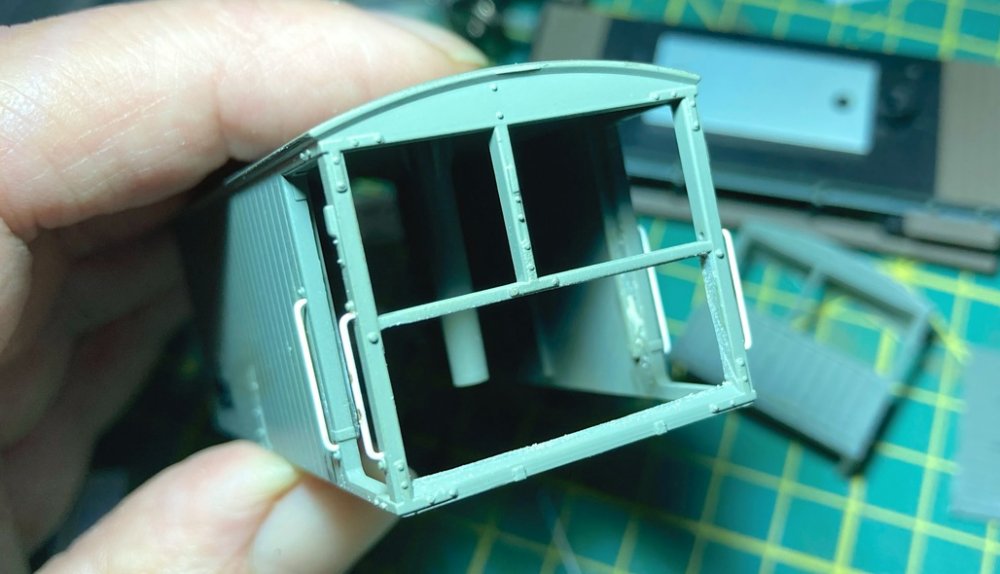
The original planked end had been removed and replaced with a sheet of ply. When this was done I
can’t say but it was quite distinctive so I decided to include it. This is the end after sawing out
the existing panel and prior to putting in the new one.

The extensive modification to the Bachmann original are now apparent. The roof has been sanded
smooth and shortened along with the removal of one verandah and most of the steps. In the foreground
is the first part of the gauging frame. With no plans to work from I used various photos and placed
the pieces in relation to the known dimensions of the van body.
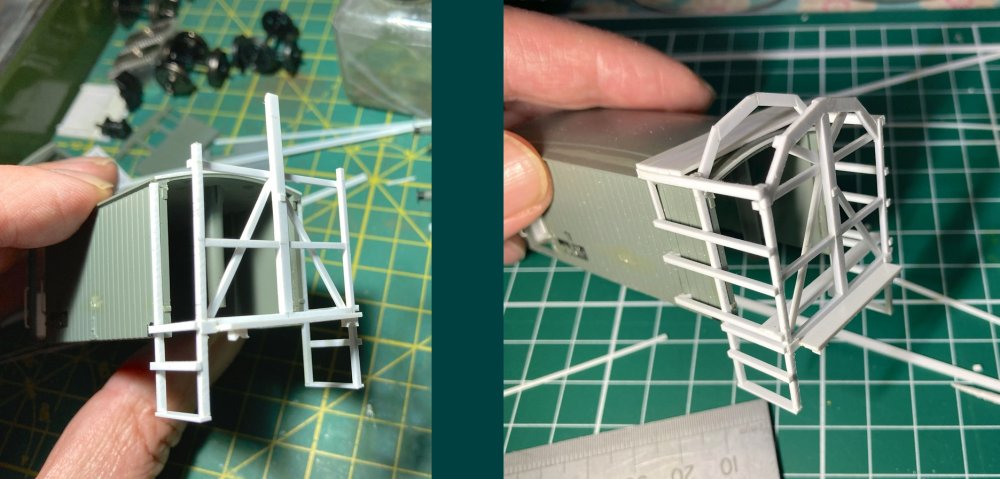
The frame is gradually growing and is now attached to the van body with plenty of fiddly work
with the plastic strip to follow. The end of the van has been left off to provide better access
to the frame, which made assembly slightly easier. By now the basic shape can be clearly seen. The
roof walkway provided access for opening the ‘spines’ that were used to measure the gauge.
No lasers in those days!
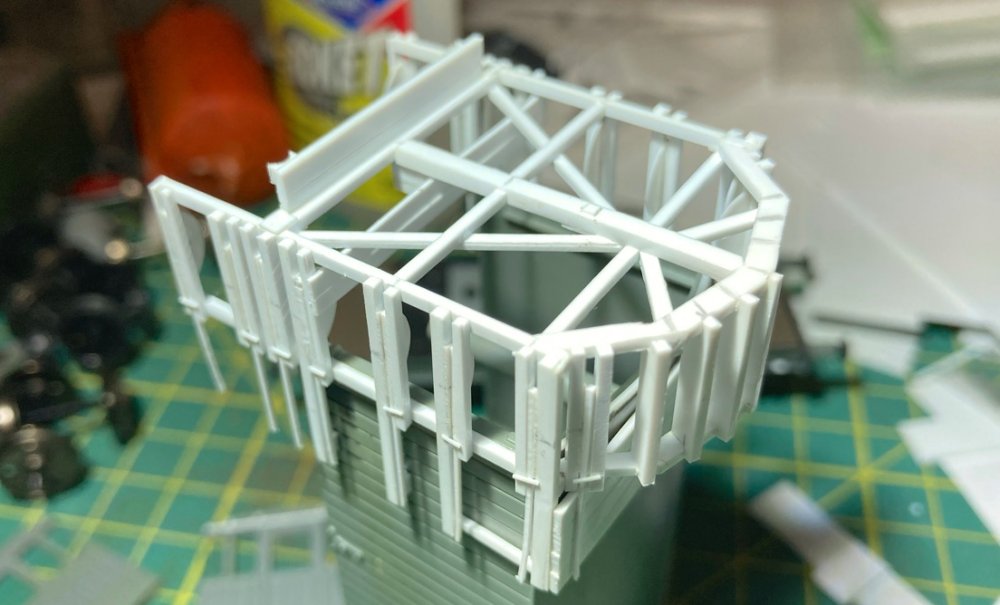
The new end is getting close to completion now, thank goodness. Visible here are the tapered
spines, which hinge in the centre of the frame, held closed by the folding clips. The
measurements were recorded using the half-moon boards just visible behind each bracket. The
small planked walkway provides staff access to the three measuring spines on the sides.
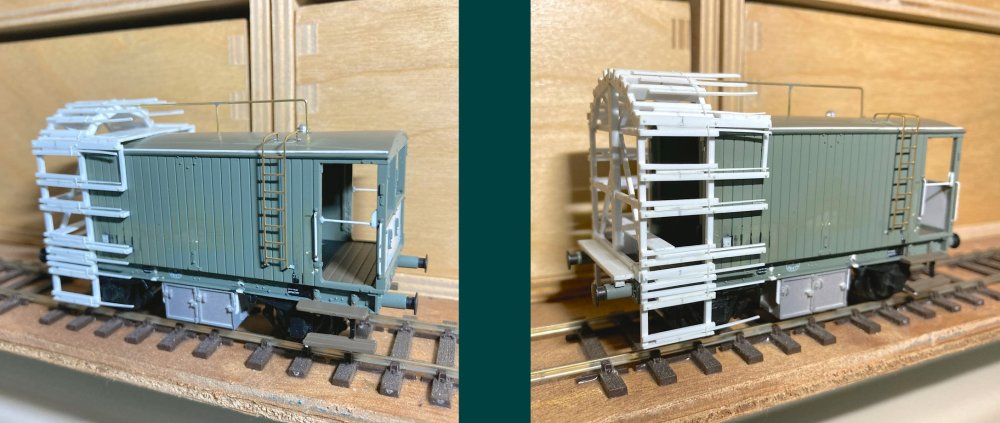
And here is the completed van before painting to show the extent of the modifications. In
addition to the complex measuring frame are three battery boxes (two this side, one on the
other), the roof access ladder and the handrail along the centre line leading to the roof
walkway. The van ends will be fitted after painting.
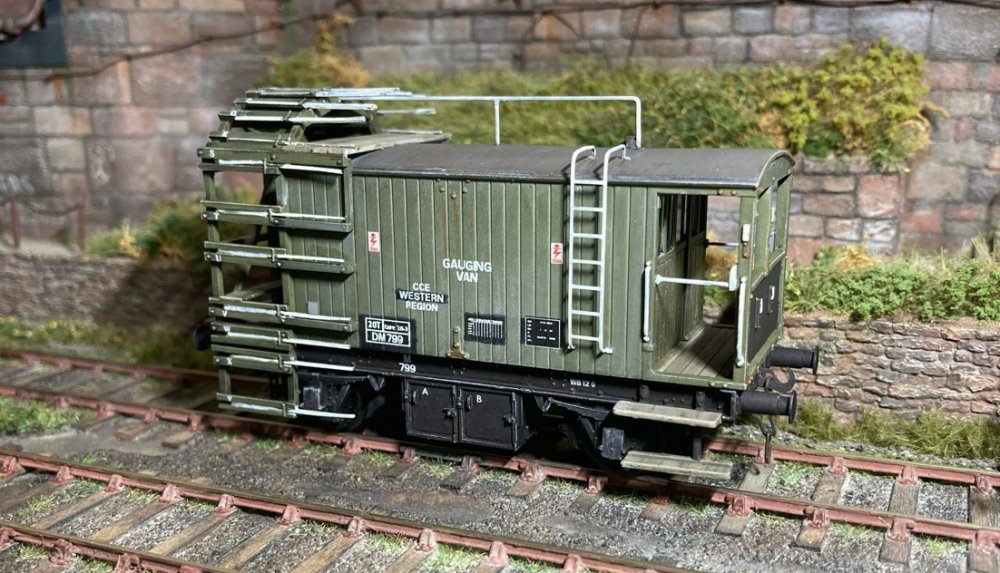
After painting in olive green and adding the various lettering and branding (including the
individually identified spines!) the van was finally complete.

It will make a most unusual addition to the Morfa Bank fleet. I now need to restock on the Evergreen strip.
*********************************************************************************************************************************************

PAUL JAMES

The inset shows the progress that was made back in the Autumn, with the end curves completed
and the bridge section in place. A 4ft long intermediate baseboard takes the layout as far
as the recently acquired traverser which can be seen on the right.

This intermediate baseboard will have scenery towards the near edge featuring the industrial
line with a few sidings to shunt wagons, separated by a low relief set of buildings with the
BR branch line and other hidden storage sidings served by the traverser.
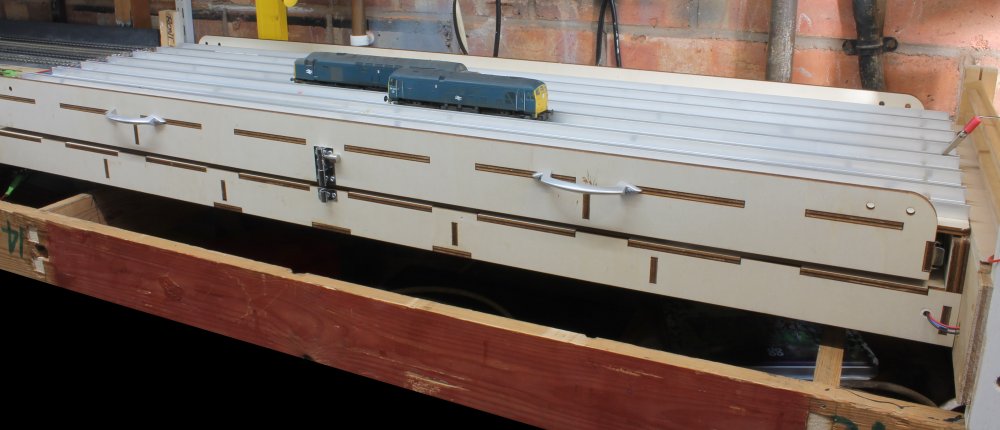
The traverser itself is built from a
Grainge & Hodder laser-cut kits 1200mm X 400mm utilising aluminium angle for the tracks, so
that it can be locked in place and also be used as a stock box with a foam cushioned lid. The
wiring at present is temporary and eventually the BR branch line will continue around to the
other end of the main scenic baseboards.
*********************************************************************************************************************************************

STEVE CARTER

The LMS D1940 brake van has received concerted attention in a bid to get it more or less
complete before the Christmas break. The vehicle is now substantially complete with footboards,
buffers and hand rails added. The brake assembly provided in the kit proved to be a little
flimsy so new equipment has been fabricated which then made adding the two linking rods
easier and more robust.
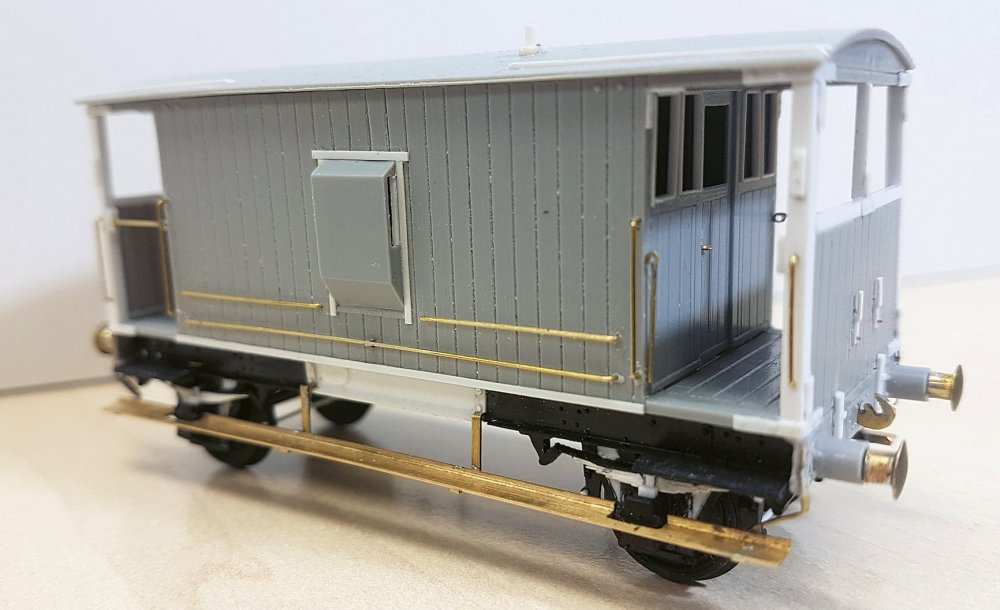
On this diagram the two outer footboard stanchions are attached to the headstocks which made
for interesting times when adding them to ensure they were as vertical / even as possible.
Side lamp irons have yet to be added but essentially it is ready for glazing and painting.
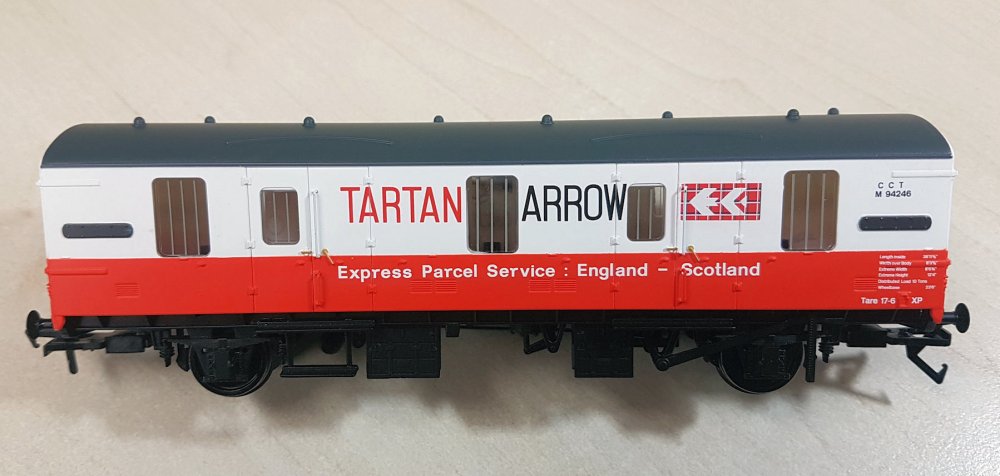
Inspired by Kier's judicious use of a razor saw in his Class 125 DMU builds, I have re-visited
a project from earlier days to try and create the prototype BR Mk1 CCT No. E94100 (Dia 815
built Doncaster 1955). My first attempt using Lima CCTs with all their limitations fell by the
wayside with the advent of the more realistic Invicta Rail / Bachmann offerings and so a
cheap(ish) 'Tartan Arrow' liveried model has eventually been sourced.
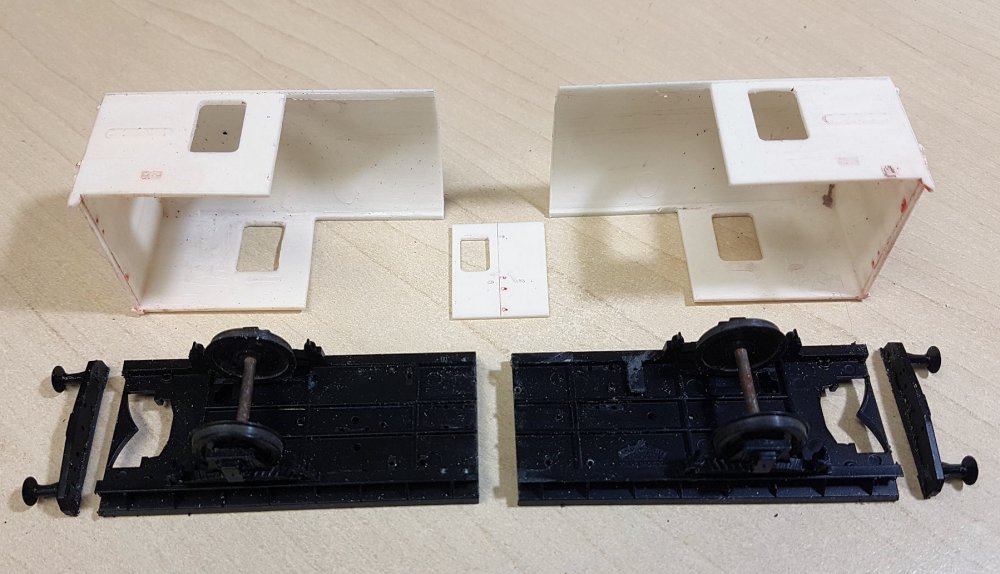
The prototype differed from a standard CCT in that it had a 20' wheelbase and measured 30' 6"
over headstocks rather than the 23' 6" wheelbase and 37' length of Dia 816 vehicles. The
prototype also came with only one set of side doors and was used as the basis for thirty
Dia 1/291 14T motor car vans built at Lancing for use on continental ferry services. After
careful consideration as to the best use of the saw, eight sections were created ready for reassembly.
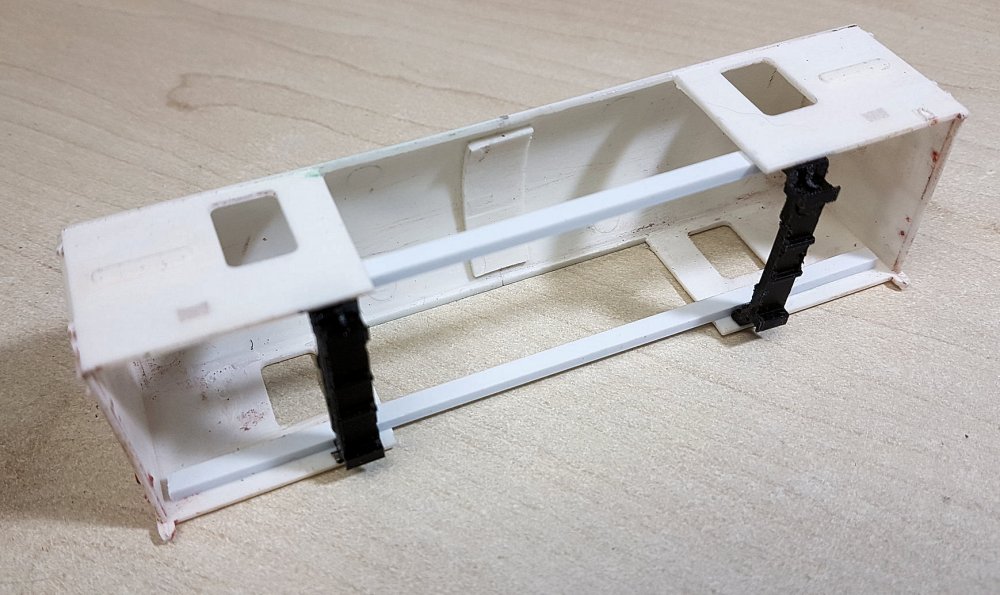
The two end sections were joined at the roof with 3 x 2mm sections added to the bottom edges
onto which the chassis could rest. To ensure these were applied evenly, two scrap sections of
the original chassis were temporarily glued into place and then removed immediately after the
side members were installed.

Conveniently the Bachmann body side is 1mm thick thus allowing pieces of 40 thou plasticard to
be added to give the central door opening. Another slight detail difference was that E94100 had
one set of twin vents to either side of the window rather than the more convoluted Single -
Double - Double - Single arrangement. Each vent measures approx 3.5 x 2.2mm and to make life a
little easier it was decided to cut one long slot first.
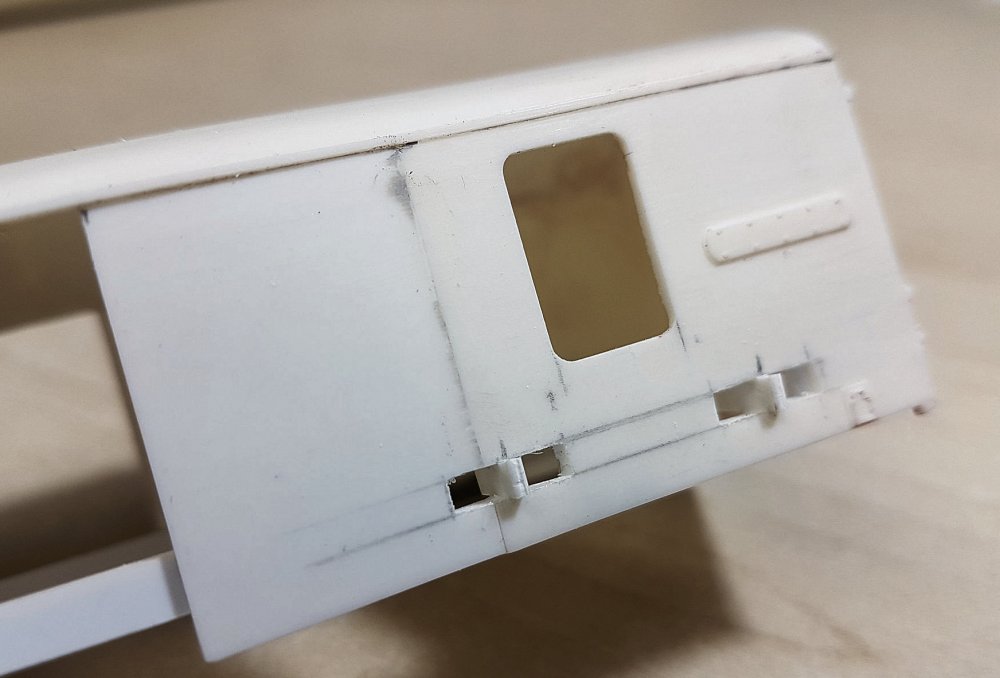
Into these slots were added central dividers which could then be filed back. Another small point
of difference is that there were no side straps for the end door hinges so these have been removed
(this trait was also shared by the prototype GUV W86500).
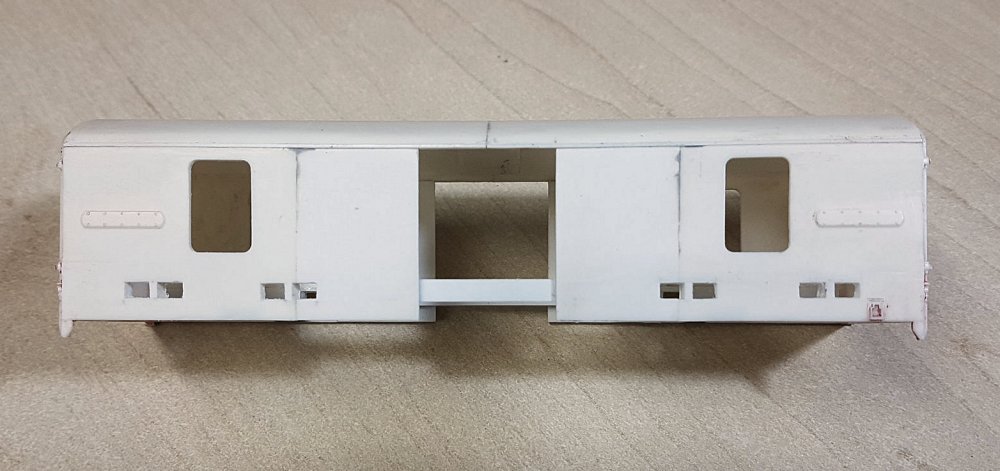
The eight vent housings ready to accept their new grills.
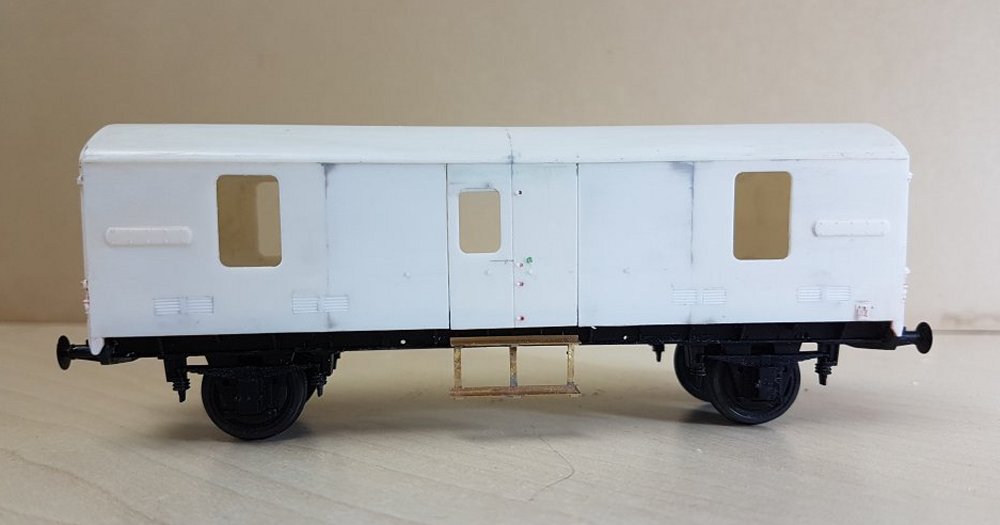
New grills were fabricated by scoring thirty thou plasticard with a saw before being cut and filed
into the correct size. The central doors were reinstated and the first set of step boards
manufactured from brass section and installed.
*********************************************************************************************************************************************

GREG BROOKES
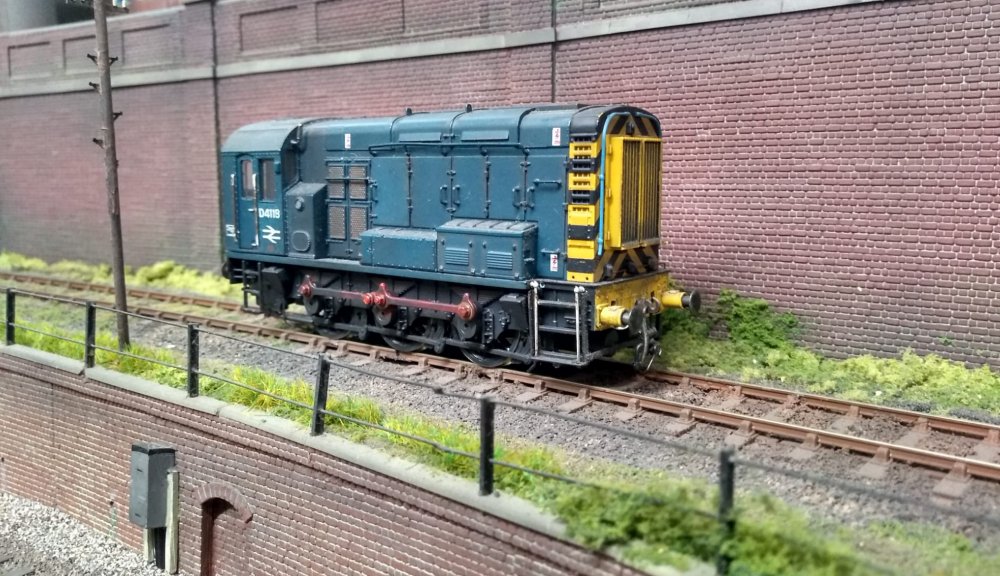
Whilst out and about in the Shenston Road area, I took a few snaps including this shot
of D4118 heading along the steel works branch line.
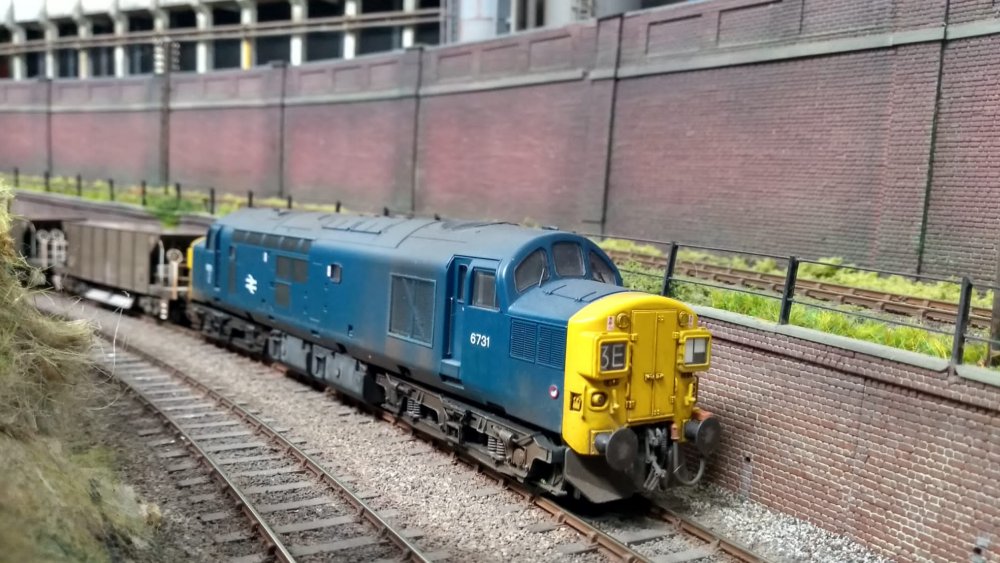
English Electric type 3 - 6731 heading south on the main line passing the gas works with a rake
of bogie ballast hoppers.
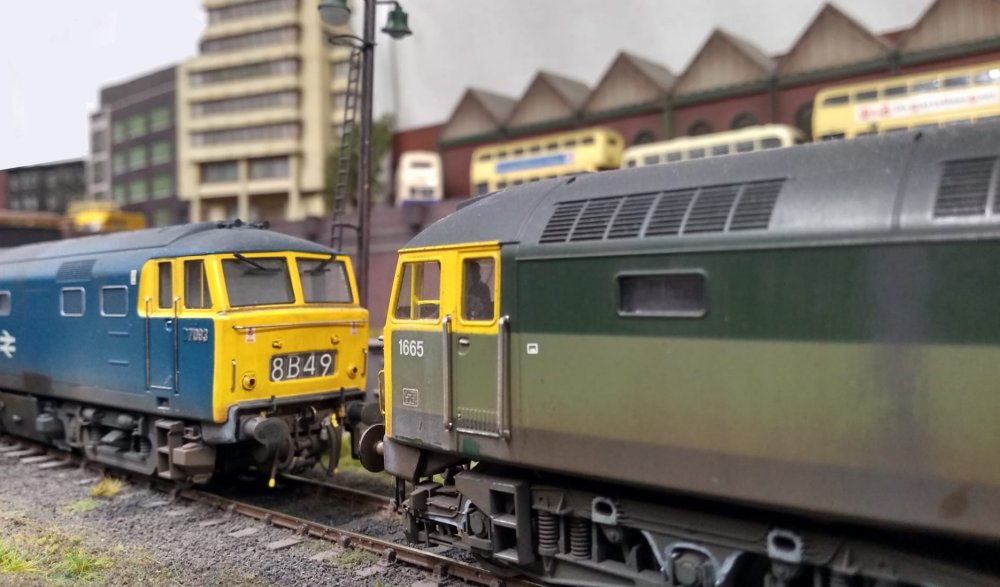
A quick stop at the stabling point finds Hymek 7093 with Brush 4 number 1665 Titan.

Progress so far on the four BR diagram 1/167 33ton Iron Ore hoppers, 3D printed wagons with
additional fitted detail shown here ready for the weathering stage. As always free downloads
can be found on
Thingiverse by Iron Mink.

February 2022 edition of BRM featuring Shenston Road.
*********************************************************************************************************************************************

KARL CROWTHER
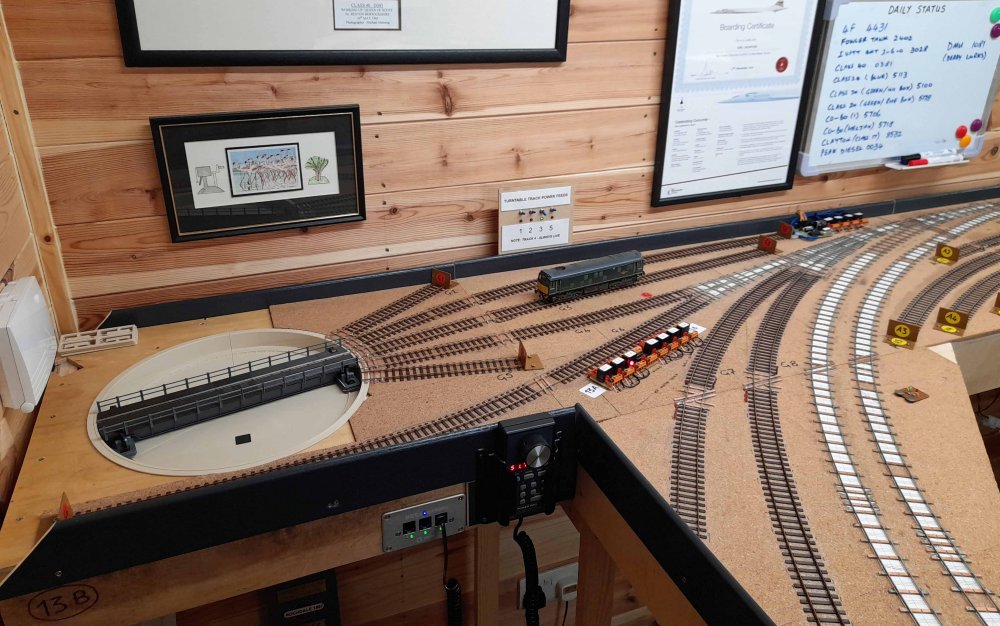
Firstly, Happy New Year to one and all! Secondly, apologies for lack of an update last month,
as there was little tangible evidence to show. However, there was a ‘major event’ in the form
of our EMGS Area Group visiting to operate the layout for the very first time over two nights
in late November. Generally it all worked well, the main thing to come out of it was a need to
revise the way the timetable info is presented to the operators, something I’ve been working on
since then. Immediately after that visit, work started on connecting up all of the wiring to
the fiddle yard turntable area, which is now completed and operational. As with the rest of
the FY, tracks are only powered up when that route is selected. The little switch panel at the
rear is accordingly to feed the dead end sidings leading off the turntable (i.e. roads G1, G2,
G3 & G5). Road G4 is permanently live as it will not normally have a loco parked on it, whilst
power to the DMU storage roads (G6-8) is fed via the relevant pointwork.

Another view of the turntable area from within the Kendal operating position – the bank of 8
relays are feeding power to the various storage roads as previously described. Somehow I need
to find space for more relays to work the signals and maybe eventually the TT will be motorised……..
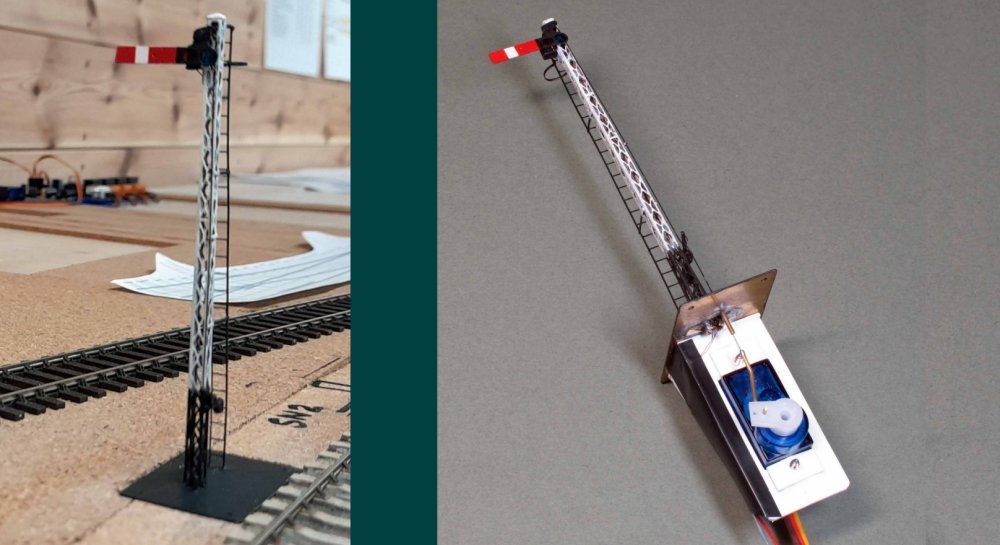
Having the layout now generally operable, the next task to be addressed is the signalling,
dealing firstly with Kentside station. This is the Up Home signal – the Furness used quite a
number of lattice posts, originally with lower quadrant arms, later many being upgraded to
LMS/BR UQ type. As the signal box will be at the opposite end of the platforms, I reckon this
signal would have been track-circuited, so a ‘diamond’ needs to be affixed to it (and it is
illuminated, though wasn’t powered up in the photo!).
Kentside Up Home signal on the workbench showing servo mount etc. The signals are being
built using a combination of MSE/Wizard and Mike Clark Masokits parts (plus Modelu lamps as these
come ready hollowed out to more easily fit the LEDs). The servo mounts are simply knocked up
from offcuts of 40-thou Plastikard.
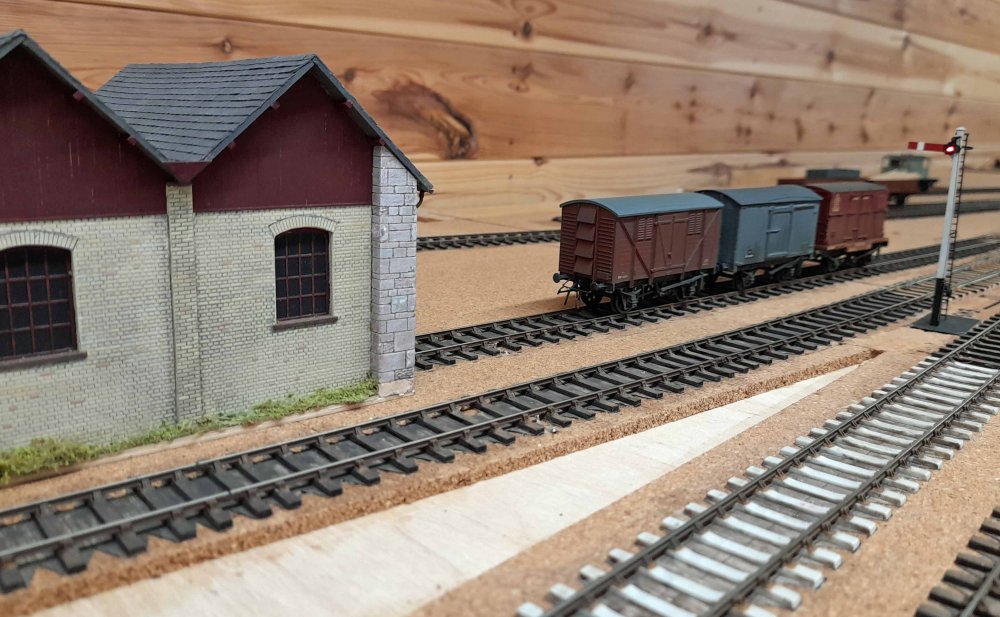
The signal shown here is the Kentside Up Platform Starter – for the wooden posts I’m using the
Mike Clark etched variety as they are hollow inside so it’s possible to arrange for the LED
wiring to pass down through them. No track circuit here as it’s directly opposite the signal box!
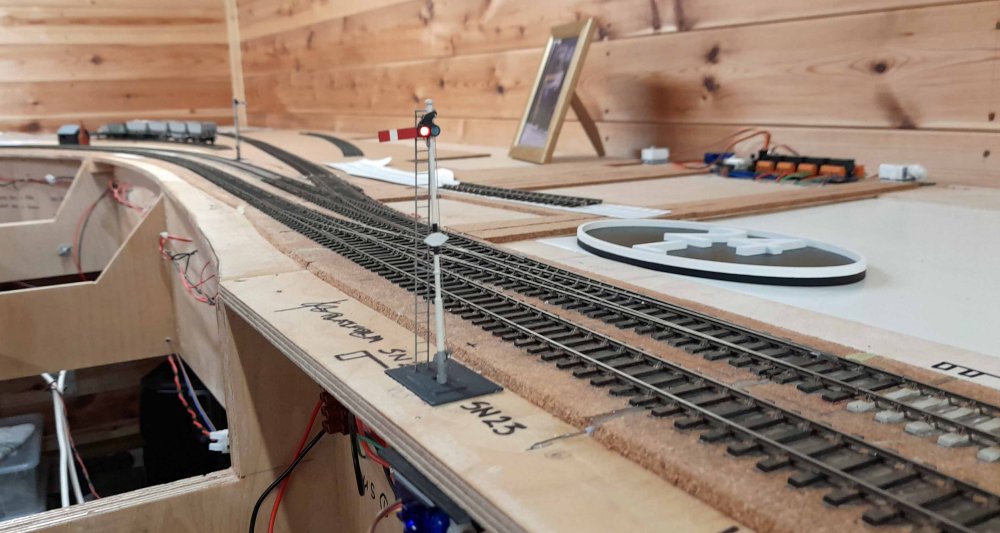
This signal is the Kentside Down Platform Starter – in fact it’s the very same one that was used
on the original Kentside layout. Really, I don’t think it should be track circuited, so that
diamond will probably need to go.

Here are some of the remaining signals for Kentside Station. On the left is the Up Section Signal,
which will be a lattice post/LQ type. Next is a round post type which has two small arms
controlling moves in the Down direction from the Up Platform Road – basically associated with
working the quarry. As this will be sited on the platform it’s quite short and has no balance
weights fitted as these would be below platform level. Next is a wood post type with single arm
which will be the Down Section Signal, whilst the final one (to the right) is also a wood post
type and has both a stop and a distant arm. These represent both the Heversham Junction Up
Section Signal and the Kentside Up Distant respectively. Finally, not started yet are a couple
of bracket signals, thought I think I’ve prepared the correct quantity of arms……
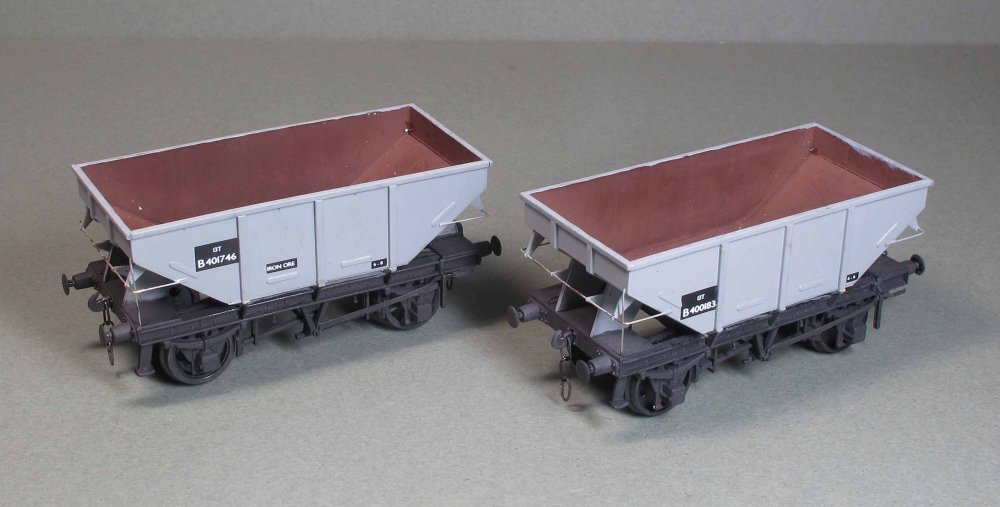
Understandably, work on rolling stock has taken a bit of a back seat of late, though I have
built a couple of the new Parkside/Peco 13T hoppers, which make up into very nice models – they
just now need weathering and once that’s done they will form part of a coke train formation.
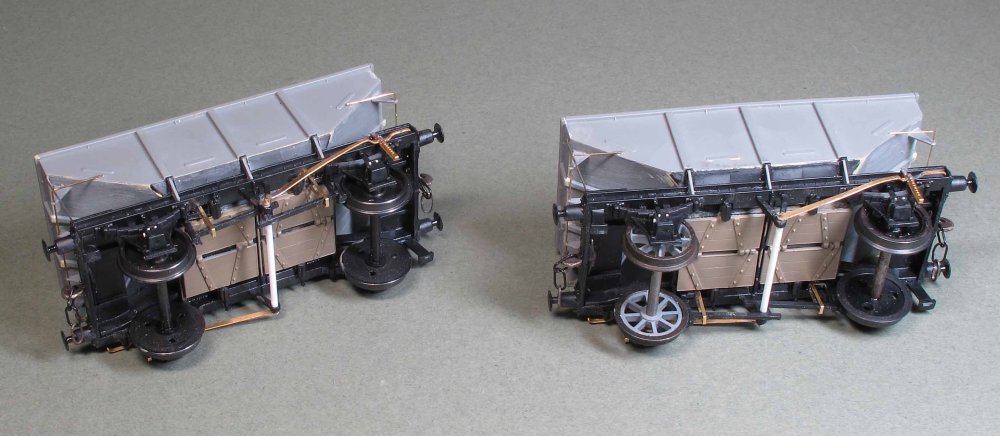
The hoppers were built pretty much as intended though I did replace the brake levers and safety
loops with etched parts, plus I used thinner wire (0.3mm) for the handrails than that supplied
in the kit. The bottom doors are a nicely moulded feature. The only thing I felt that may have
been overlooked is any form of relief detail on the axlebox fronts, so I added bolt head detail
from little cubes of Plastikard, which you can see here.
*********************************************************************************************************************************************

PETE JOHNSON
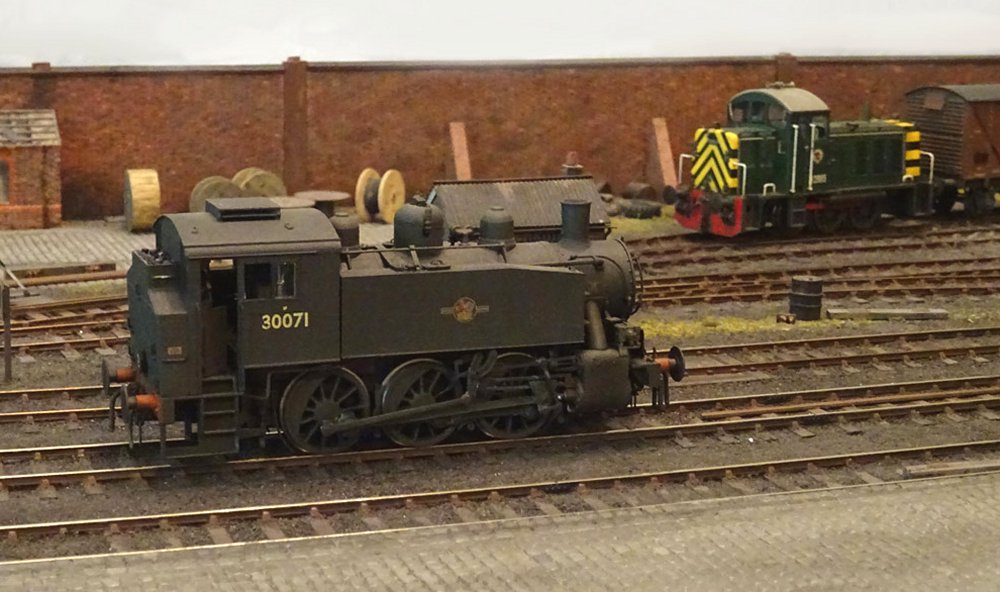
The final series of pictures from the layout photo session begin with late 1962 in
Southampton Docks, and the changing of the guard. Newly arrived Ruston & Hornsby 0-6-0DE
D2985 is at work in the background whilst the type it has arrived to replace stands in front.

The former Southern Railway USA tanks had been bought as war surplus in 1947 and went on to
have a 20 year working life, mostly with the Southern Region of BR.
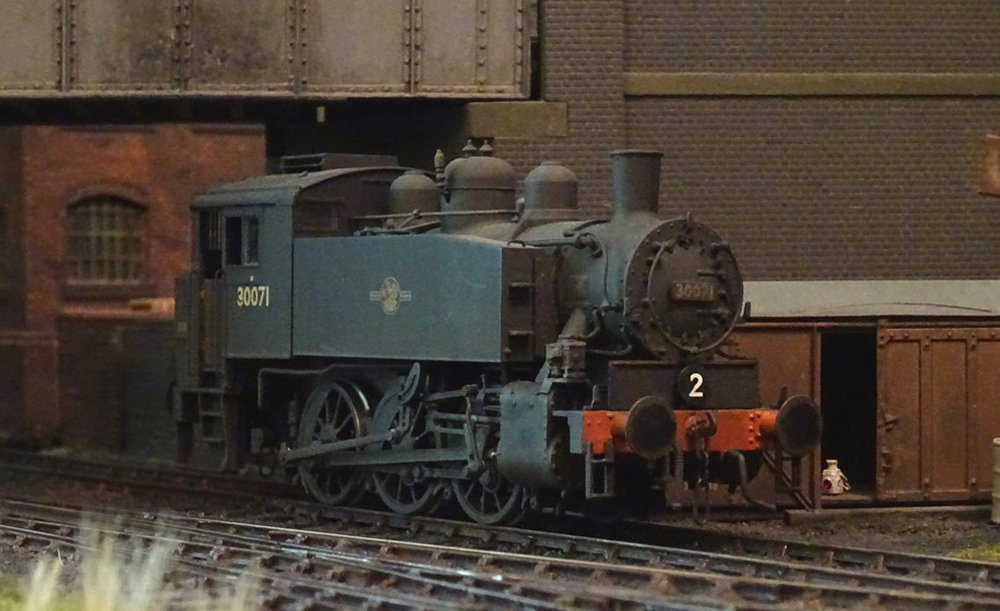
30071 stands by in the headshunt in case the new diesel plays up. The target number 2
displayed on the lamp bracket assisted with task allocation between the multiple shunters
in use around the docks.
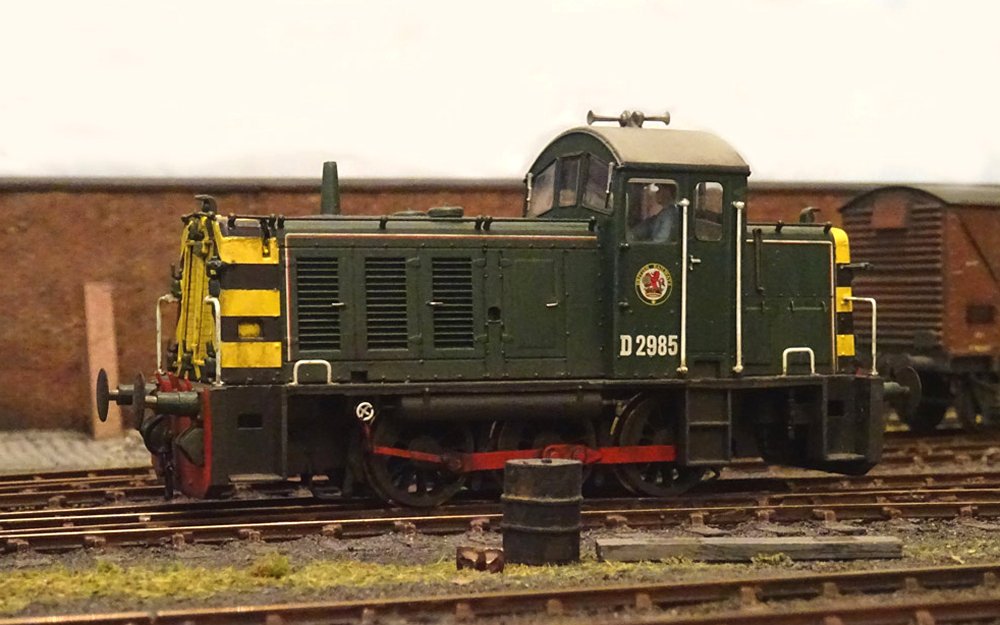
D2985 was the first of the 14 examples. Rustons delivered the entire fleet of what would later
be TOPS Class 07 during 1962, they remained in use around Southampton until the second half of
the 1970s when the move to containerisation made them redundant. Several were sold to industrial
users and have now been preserved, D2985 included.
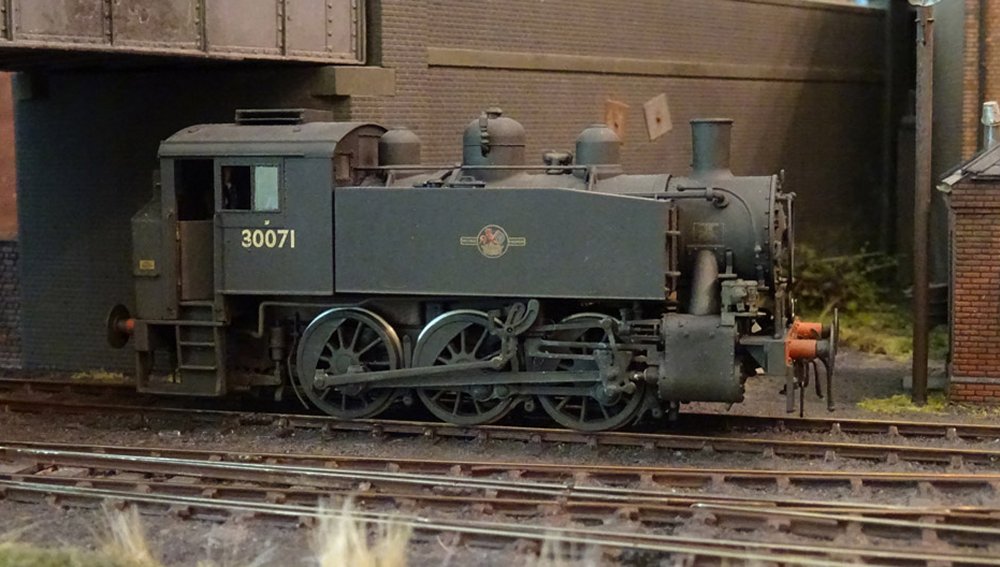
A broadside portrait shows the powerful appearance of the USA class. Originally built in 1943 for
use in liberated Europe by the allied forces, many saw little use during the war and gave the
Southern the chance to get useful locomotives in virtually new condition. 30071 was to be moved to
Newport, South Wales, and scrapped during early 1968.
A return to Ipswich in 1970 finds Class 03 2135 arriving at the exchange sidings from the dock branch.
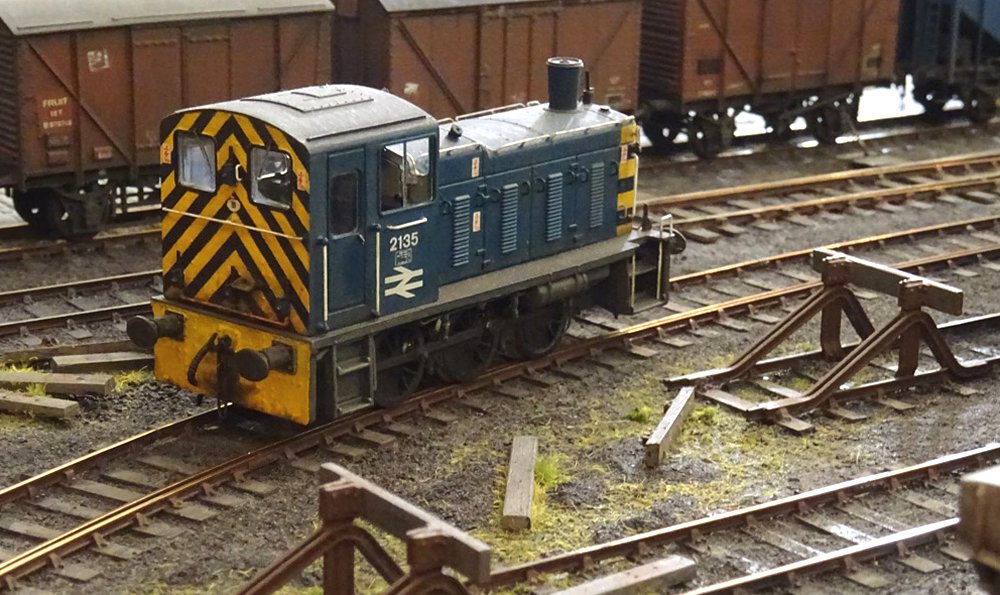
The loco eases around the 2 chain radius, assisted by the check rail on the inside of the curve.
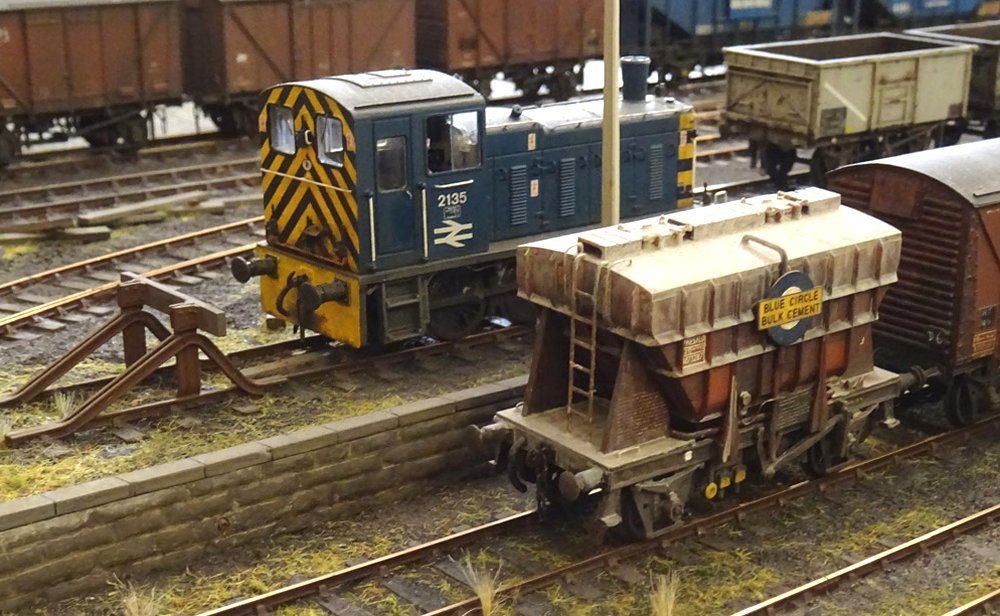
2135 is pictured resting in the high level sidings, with a Blue Circle Presflo wagon standing
amongst the weeds on the lower tracks.
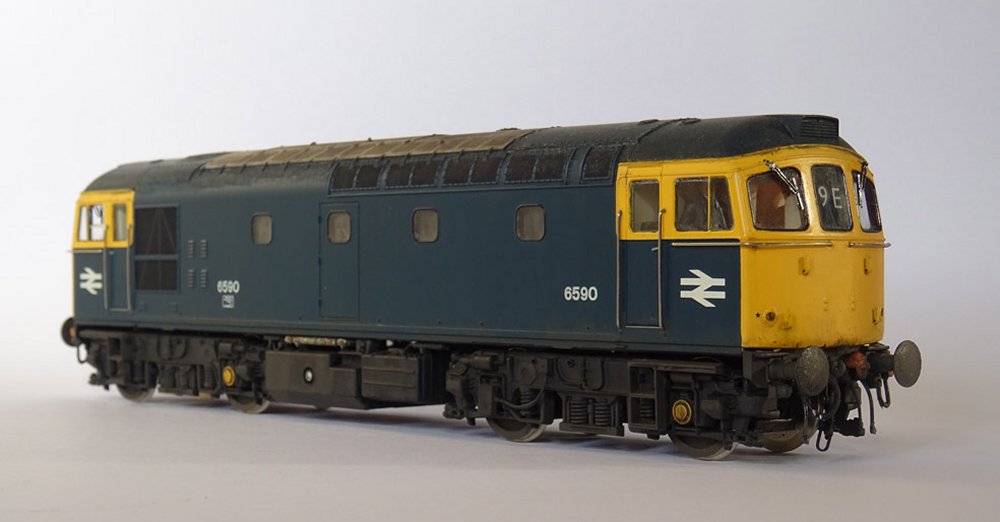
Continuing a Southern theme, Class 33/2 6590 has been completed. The loco is lightly weathered
as it might have appeared after a works visit for alterations to the engine exhaust system that
it made during 1968.
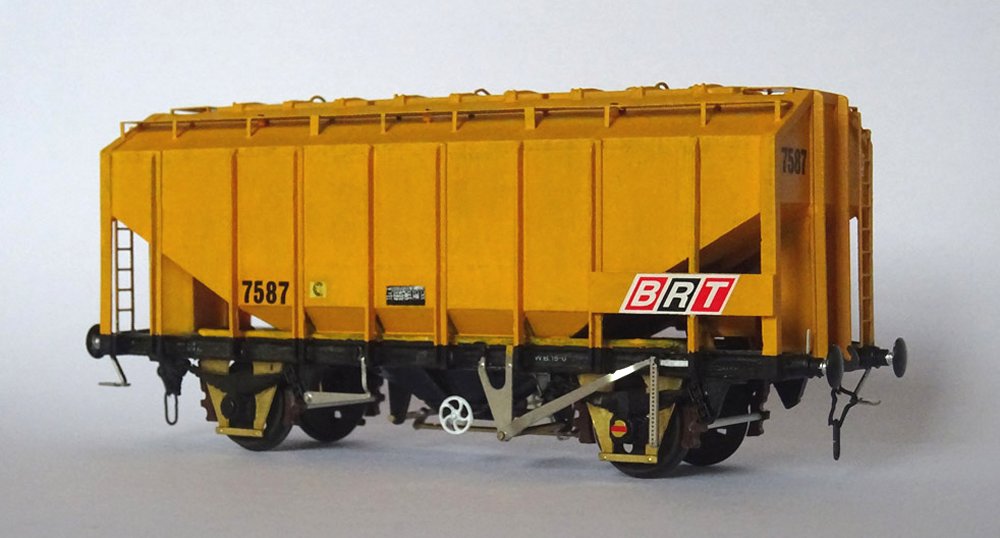
The colourful yellow 35t BRT grain hopper is shown ready for weathering.

The hopper is for use in the late-1970s when wash-downs had ceased, only the cleaned patches
around the fleet numbers reveal the true colours.
*********************************************************************************************************************************************

KIER HARDY

Jonny's printer continues to provide some much needed, and some not so much needed items
from time to time. I've managed to fly tip one of the pianos in the verge along Coronation Way,
with the other one dropped off outside the Rag & Bone man's gates on Hornsey Road. I once
encountered an abandoned piano on the 'long route' home from school back in the mid 1970s,
and after a few weeks it had been reduced to nothing but an iron frame and a pile of firewood
by various passers by. It wasn't long before I'd borrowed my dad's cutters and gone back
there to snip off the high tensile steel wire for further use!
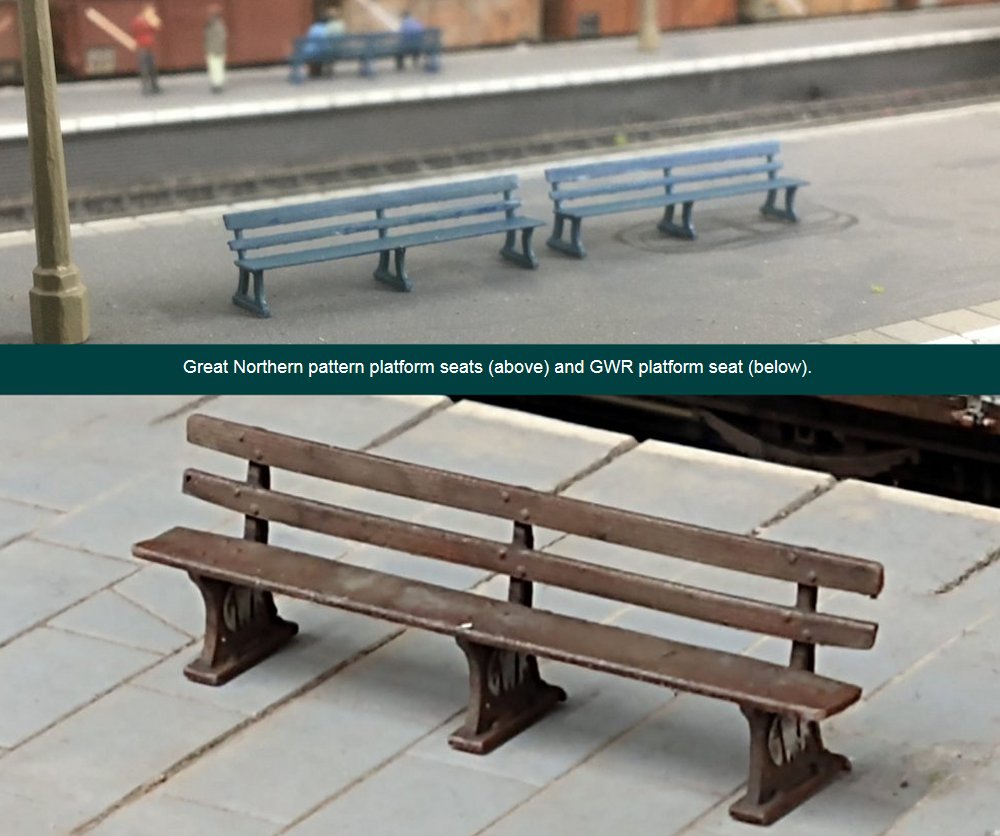
In the 'much needed' category are these platform seats - GNR pattern for Hornsey Bdy
station, featuring the distinctive webbed castings, as well as another design of some GWR
pattern seats for Shenston Road.
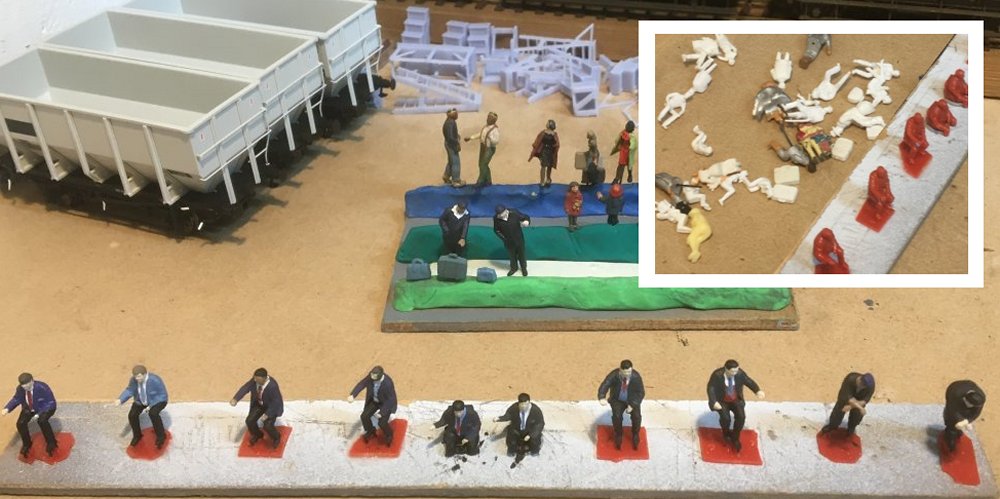
With the arrival of the seats, I spent a couple of days painting some figures to go on them, as
well as a few Modelu drivers for Paul's Eastwell fleet of locomotives. Other figures are a
mix of Preiser, Airfix, and some white metal figures found in the bottom of the box. In the
background is a trio of Accurascale 24.5 ton hoppers in the works for fitting of couplings
and some weathering, as well as a few benches, steps and trestles also from Jonny's printer.
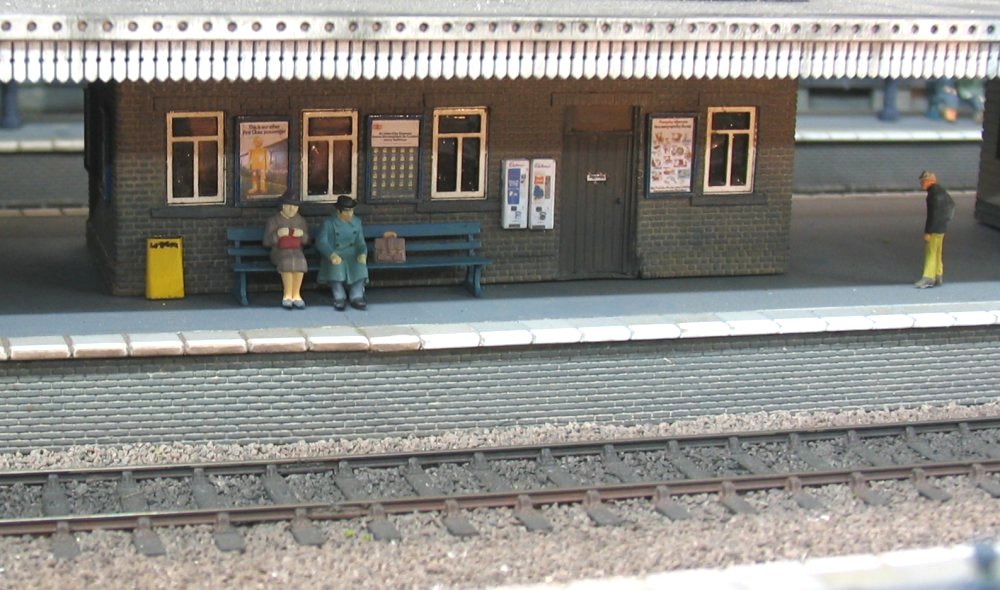
Waiting for the Kings Cross train on platform 4.

During December the work bench has been tidied up with a lot of detail parts finished and
planted on the layout. This pair of Oxford Diecast vehicles (Morris J4 van & Ford Escort mk1)
have been hanging around in pieces for many a month, so the holiday period gave me the chance
to customise them a little by adding people, wing mirrors, wipers & tax discs, numberplates
and a couple of coats of matt varnish.
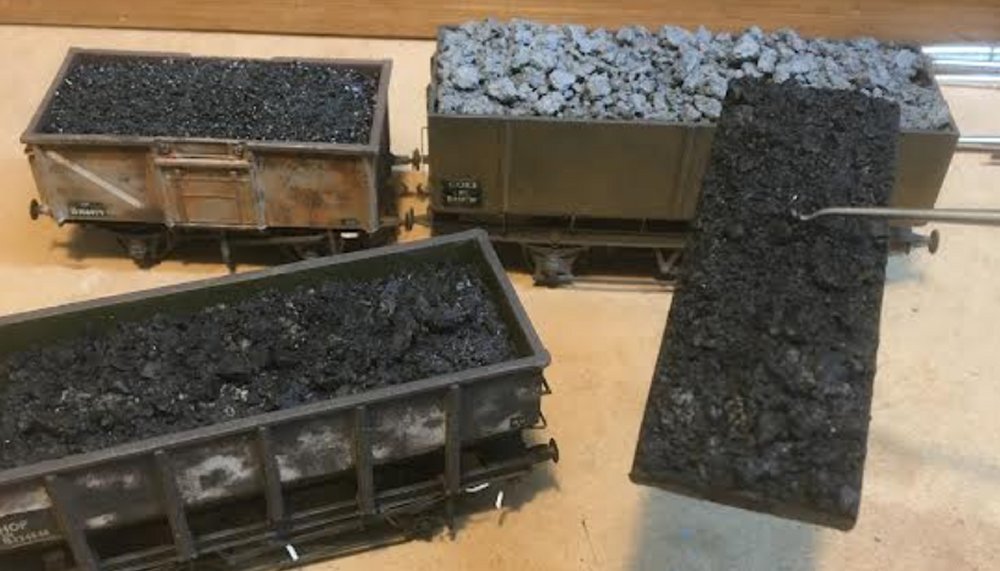
I've made up some removable loads for the HUO hopper wagons, utilising the hook and loop method
as seen on some of the Morfa Bank Sidings wagons by Hywel Thomas. The central loop is just
visible on the nearest wagon.
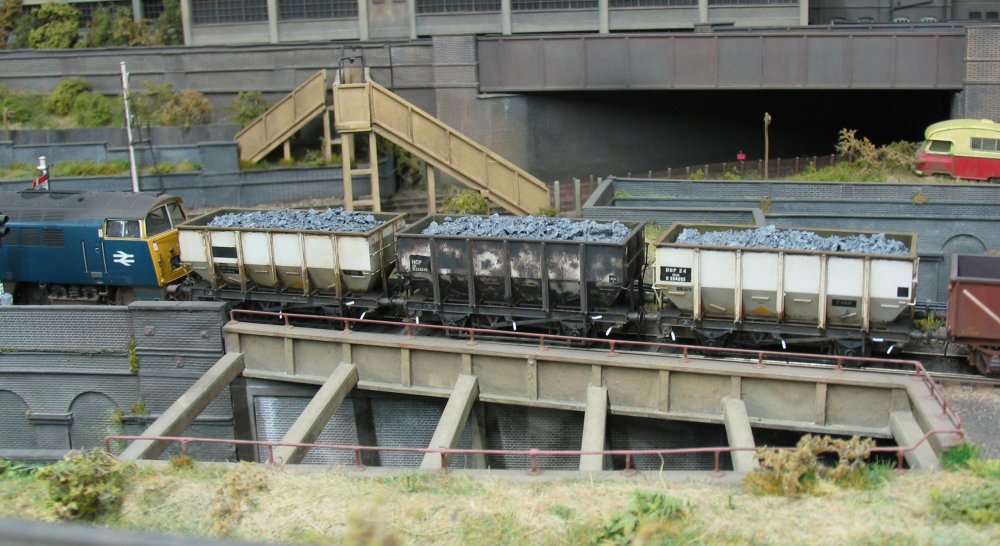
Seen here with the coke loads fitted, running either individually empty or full, or added to
the Coke hopper train for a bit of variety. The loads could do with another wash to get them
looking like the other coke loads. Footbridge noted as needing attention.

Something unrelated to the model world is this snippet of information which some of you
may find interesting, relating to a Top Link driver for the LNER and British Railways
who worked out of Kings Cross. This information was uncovered recently and relates to
my wife Sara's Grandfather - Driver Charles Kirton who retired in 1967. Please click
on the above image to read more.

Finally for this month is a video selection of all the rolling stock on the layout filmed
during December 2021, bar a couple of snowploughs and a handful of locomotives that
remained on shed. Please click on the image to view the videos.
*********************************************************************************************************************************************


