*****************************************************************************************************************************************************************
SEPTEMBER 2018 UPDATE
*****************************************************************************************************************************************************************
PAUL JAMES Converting the Hattons Andrew Barclay 0-4-0ST, to EM using the original wheelsets
*****************************************************************************************************************************************************************
HYWEL THOMAS *****************************************************************************************************************************************************************
KIER HARDY *****************************************************************************************************************************************************************
*****************************************************************************************************************************************************************
OCTOBER 2018 UPDATE
*****************************************************************************************************************************************************************
KARL CROWTHER *****************************************************************************************************************************************************************
PETE JOHNSON *****************************************************************************************************************************************************************
HYWEL THOMAS *****************************************************************************************************************************************************************
NOVEMBER 2018 UPDATE
*****************************************************************************************************************************************************************
PAUL JAMES *****************************************************************************************************************************************************************
KIER HARDY *****************************************************************************************************************************************************************
KEITH TRUEMAN *****************************************************************************************************************************************************************
PETE JOHNSON *****************************************************************************************************************************************************************
DECEMBER 2018 UPDATE
*****************************************************************************************************************************************************************
HYWEL THOMAS *****************************************************************************************************************************************************************
KIER HARDY *****************************************************************************************************************************************************************
PETE JOHNSON *****************************************************************************************************************************************************************
STEVE HARROD *****************************************************************************************************************************************************************
![]()
 I have always had a soft spot of shunters, steam or diesel, so I had to get one of the
Hattons Andrew Barclay 0-4-0ST when it appeared. Having for some time now been
converting my loco fleet to EM using the original wheelsets, the Hattons Andrew Barclay
0-4-0ST would present a new challenge, with very fine tolerances to be found behind the
valve gear, and with the running plate. This would mean the as supplied wheelsets could
not be just opened out to EM gauge and refitted back into the chassis. A few measurements
with a vernier soon confirmed that more a more drastic solution than just thinning down
the flange of the wheel, which usually works, was going to be needed. It became obvious
that that the wheels would need to be thinned down a lot on the front face as well. Here
my skills on an old but servicable Unimat lathe would not be sufficient, so I handed the
wheels to Kier, along with some crucial total wheel thickness measurements, so that he
could thin down the face of the wheels whilst still incorporating the rim.
I have always had a soft spot of shunters, steam or diesel, so I had to get one of the
Hattons Andrew Barclay 0-4-0ST when it appeared. Having for some time now been
converting my loco fleet to EM using the original wheelsets, the Hattons Andrew Barclay
0-4-0ST would present a new challenge, with very fine tolerances to be found behind the
valve gear, and with the running plate. This would mean the as supplied wheelsets could
not be just opened out to EM gauge and refitted back into the chassis. A few measurements
with a vernier soon confirmed that more a more drastic solution than just thinning down
the flange of the wheel, which usually works, was going to be needed. It became obvious
that that the wheels would need to be thinned down a lot on the front face as well. Here
my skills on an old but servicable Unimat lathe would not be sufficient, so I handed the
wheels to Kier, along with some crucial total wheel thickness measurements, so that he
could thin down the face of the wheels whilst still incorporating the rim.
 Andrew Barclay wheelsets modified - With the wheels returned, the one obvious
result of turning down the face of the wheels, was the loss of such detail as the
balance weight, and the crankpin boss, which would have to be replicated. In the
above photo, the LH wheel is as returned and the RH wheel shows my additions
in the shape of thin plasticard cut out to represent the balance weight, and a
Romford crankpin washer, modified to fit the Bachmann crankpin. The latter is
probably a little overscale, but is hidden by the coupling rods, so cannot be seen.
The wheels were refitted to the chassis, and with a little tweaking, mainly with
the number of washers needed to stop any sideways movement of the wheels, especially
behind the cylinders. After the first test run had proved successful, it was time to
add the detail to the wheels superglued in position, a coat of etch primer and red
paint finished the wheels.
Andrew Barclay wheelsets modified - With the wheels returned, the one obvious
result of turning down the face of the wheels, was the loss of such detail as the
balance weight, and the crankpin boss, which would have to be replicated. In the
above photo, the LH wheel is as returned and the RH wheel shows my additions
in the shape of thin plasticard cut out to represent the balance weight, and a
Romford crankpin washer, modified to fit the Bachmann crankpin. The latter is
probably a little overscale, but is hidden by the coupling rods, so cannot be seen.
The wheels were refitted to the chassis, and with a little tweaking, mainly with
the number of washers needed to stop any sideways movement of the wheels, especially
behind the cylinders. After the first test run had proved successful, it was time to
add the detail to the wheels superglued in position, a coat of etch primer and red
paint finished the wheels.
 Little Barford with modified wheelsets - The test running proved
reasonably successfull, with the loco reasonably happy running on most of the track.
It soon became obvious that it was very sensitive to irregulaities in gauge width.
Little Barford with modified wheelsets - The test running proved
reasonably successfull, with the loco reasonably happy running on most of the track.
It soon became obvious that it was very sensitive to irregulaities in gauge width.
 The photo showing how fine the tolerences are regarding the overall width of a wheelset
sitting on a length of C&L EM gauge track.
The photo showing how fine the tolerences are regarding the overall width of a wheelset
sitting on a length of C&L EM gauge track.
 Test running also showed up the fact that the pickup had to be adjusted very carefully
so as to get the best electrical continuity, without damaging the soft metal wheels.
As there is not a lot of room for the wheels to fit inside the running plate of the
loco, getting the right number/thickness of any washers used to limit sideplay in
the axles is also crucial.
Test running also showed up the fact that the pickup had to be adjusted very carefully
so as to get the best electrical continuity, without damaging the soft metal wheels.
As there is not a lot of room for the wheels to fit inside the running plate of the
loco, getting the right number/thickness of any washers used to limit sideplay in
the axles is also crucial.
 The wheelsets were then put back into the chassis, and the loco run on a test rig to
check all was OK. In the photo below, some of the brakegear detail has yet to be
added, and will be once I am happy the loco is running well. The loco comes with a
set of 3 link couplings, which fit into a small hole in the buffer beam. They are
a strange set up, as they have one long "U" shaped link fitted by a pin to the
coupling hook, with two very small round links to make up the three links. These
round links are very small, and would not couple up to hook. I snipped the two
round links off, and replaced them with a pair of Smiths links, the end one being
a magnetic one. The loco will loose its Little Barford name in favour of some etch
plates from Narrow Planet, along with some etched worksplates. The wasp striped
will be left on, although modified at the front of the loco, to only cover the
saddle tank front. All in all an interesting project, which I feel has been a
success, and has pursuaded my that a 2nd loco should be added to my eclectic loco
collection. My thanks to Kier for his help in turning down the wheels.
The wheelsets were then put back into the chassis, and the loco run on a test rig to
check all was OK. In the photo below, some of the brakegear detail has yet to be
added, and will be once I am happy the loco is running well. The loco comes with a
set of 3 link couplings, which fit into a small hole in the buffer beam. They are
a strange set up, as they have one long "U" shaped link fitted by a pin to the
coupling hook, with two very small round links to make up the three links. These
round links are very small, and would not couple up to hook. I snipped the two
round links off, and replaced them with a pair of Smiths links, the end one being
a magnetic one. The loco will loose its Little Barford name in favour of some etch
plates from Narrow Planet, along with some etched worksplates. The wasp striped
will be left on, although modified at the front of the loco, to only cover the
saddle tank front. All in all an interesting project, which I feel has been a
success, and has pursuaded my that a 2nd loco should be added to my eclectic loco
collection. My thanks to Kier for his help in turning down the wheels.
 Now here's a selection of pictures I took of my Heljan Westerns at Hornsey Broadway.
It's good to get them out and run them once in a while. Originally from Greg's
Shenston Road fleet, they were transferred to the Eastwell fleet when the Dapol
model was released. D1046 Western Marquis in maroon with small yellow panels.
Now here's a selection of pictures I took of my Heljan Westerns at Hornsey Broadway.
It's good to get them out and run them once in a while. Originally from Greg's
Shenston Road fleet, they were transferred to the Eastwell fleet when the Dapol
model was released. D1046 Western Marquis in maroon with small yellow panels.
 In blue with small yellow panels is D1043 Western Duke.
 A side on view of D1015 Western Champion. Most of the detail and weathering was
carried out by Greg when they were in his fleet.
A side on view of D1015 Western Champion. Most of the detail and weathering was
carried out by Greg when they were in his fleet.
 D1012 Western Firebrand in maroon with full yellow ends.
 D1023 Western Fusilier, carrying a Western Finale Railtour headboard (which ran on
the 12th of February 1977).
D1023 Western Fusilier, carrying a Western Finale Railtour headboard (which ran on
the 12th of February 1977).
![]()
 I needed a phone box and have always rather liked the ancient Peco offering. The
interior is typical of the 1930s so I felt an update was needed. Here we see the
newly built payphone and dialling code lists. It’s now been fitted into the
slightly tweaked Peco box, fitted with a new base to fit the sloping site.
I needed a phone box and have always rather liked the ancient Peco offering. The
interior is typical of the 1930s so I felt an update was needed. Here we see the
newly built payphone and dialling code lists. It’s now been fitted into the
slightly tweaked Peco box, fitted with a new base to fit the sloping site.
 And the box in place…and waiting to be vandalised. After all, this is 1972!
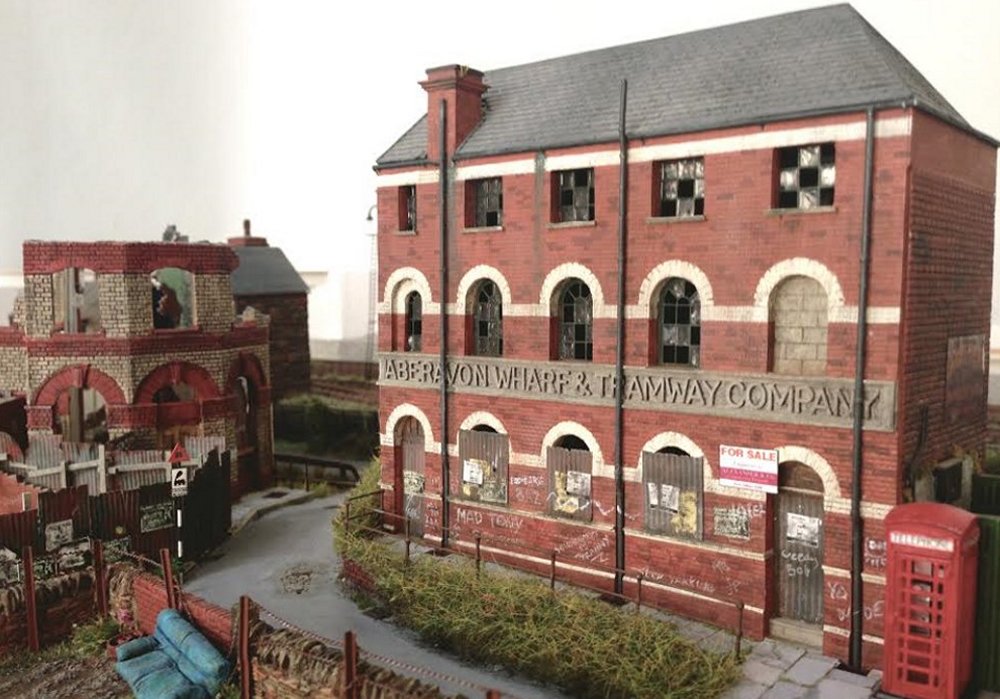 A wider view of the box sat outside the old AW&T offices. Not the place to be
looking for a telephone box after dark.
A wider view of the box sat outside the old AW&T offices. Not the place to be
looking for a telephone box after dark.
 And a view from the other direction. You can just see the start of work along the
back scene in the far distance, which has been the main focus this month.
And a view from the other direction. You can just see the start of work along the
back scene in the far distance, which has been the main focus this month.
 As mentioned the main work has centred on the rear of the BR yard. It has all been
built in white foam board so photos have not proved easy but this view shows the
basic idea – derelict embankments leading to long removed riverside coal tips.
As mentioned the main work has centred on the rear of the BR yard. It has all been
built in white foam board so photos have not proved easy but this view shows the
basic idea – derelict embankments leading to long removed riverside coal tips.
 The row of buildings, a survivor from Morfa Bank 1, has now been repainted to
better suit the colouring of masonry in Port Talbot. The Yorkshire diesel awaits
its next duty.
The row of buildings, a survivor from Morfa Bank 1, has now been repainted to
better suit the colouring of masonry in Port Talbot. The Yorkshire diesel awaits
its next duty.
 A higher view that again shows work progressing in the distance. The foreground area
is almost complete now with just a bit more painting to go.
A higher view that again shows work progressing in the distance. The foreground area
is almost complete now with just a bit more painting to go.
![]()
 This garage will join the car lot on a spare bit of ground at the front of the layout.
The shell has been made from 4mm compressed hardboard on a plywood base (off-cuts)
with embossed styrene overlays to
prevent any future warping. The windows came out of a Hornby terraced house kit,
chopped and inserted.
This garage will join the car lot on a spare bit of ground at the front of the layout.
The shell has been made from 4mm compressed hardboard on a plywood base (off-cuts)
with embossed styrene overlays to
prevent any future warping. The windows came out of a Hornby terraced house kit,
chopped and inserted.
 The interior being fitted out with 4-poster lifts made from brass tube and etched
chequer plate decks. Leaving the back wall off for the time being makes it easier
to access and decorate.
The interior being fitted out with 4-poster lifts made from brass tube and etched
chequer plate decks. Leaving the back wall off for the time being makes it easier
to access and decorate.
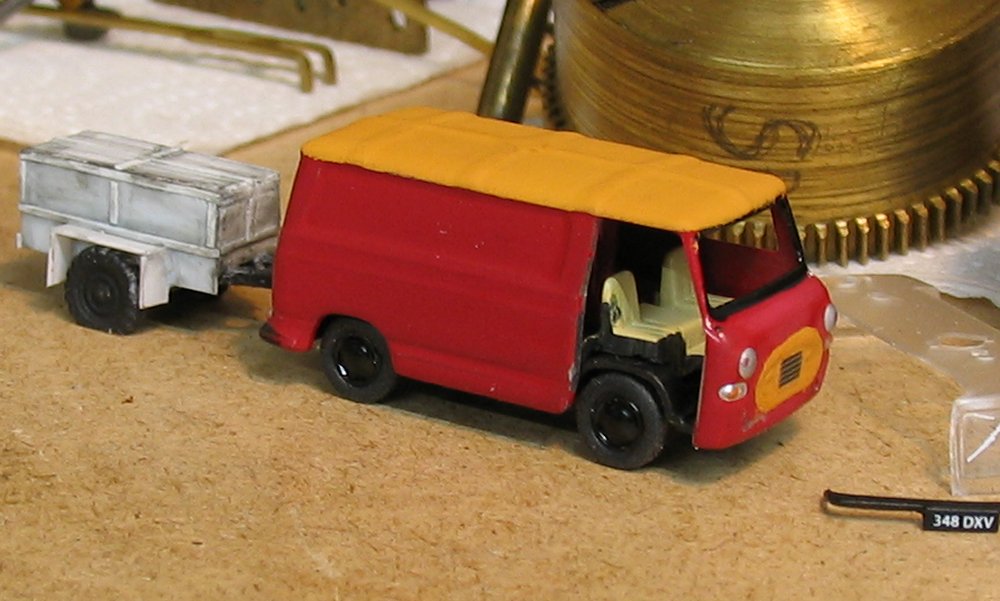 Oxford Diecast have released a model of a J4 van, which were badged with either BMC,
Austin and Morris during their production throughout the 1960s and into the early 1970s.
The door has been ground out with a disc cutter, ready for a sliding door to be
positioned open. The trailer tent is modified from the JB Models plastic kit.
Oxford Diecast have released a model of a J4 van, which were badged with either BMC,
Austin and Morris during their production throughout the 1960s and into the early 1970s.
The door has been ground out with a disc cutter, ready for a sliding door to be
positioned open. The trailer tent is modified from the JB Models plastic kit.
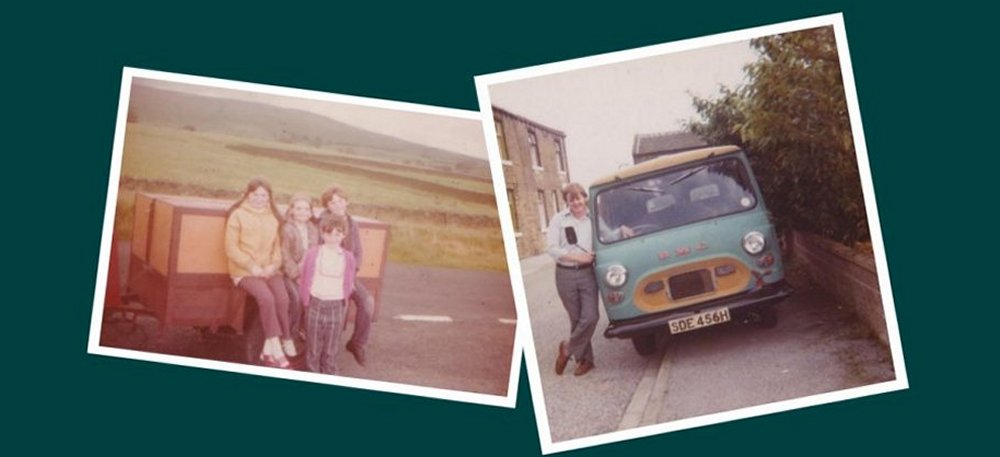 SDE 456H - a BMC baged J4, was supplied new in 1970 from Fred Rees Garage in Haverfordwest,
fitted with a B series 1622cc petrol engine, sporting an all-over red paint job and
often being mistaken for a postal van. Before its 2nd
birthday, it had acquired a new tangerine and tourqoise livery, with the exception of
the doors which remained red. It was often to be seen towing a trailer tent on holiday
excursions as seen above in 1972. Yours truly is seen standing by the van 10 years from new.
SDE 456H - a BMC baged J4, was supplied new in 1970 from Fred Rees Garage in Haverfordwest,
fitted with a B series 1622cc petrol engine, sporting an all-over red paint job and
often being mistaken for a postal van. Before its 2nd
birthday, it had acquired a new tangerine and tourqoise livery, with the exception of
the doors which remained red. It was often to be seen towing a trailer tent on holiday
excursions as seen above in 1972. Yours truly is seen standing by the van 10 years from new.
 Showing progress at the garage after painting the brickwork, constructing petrol pumps,
and fitting signage. The J4 van is almost finished showing it in its early '70s guise,
without the red oxide patch paint on the front end!
Showing progress at the garage after painting the brickwork, constructing petrol pumps,
and fitting signage. The J4 van is almost finished showing it in its early '70s guise,
without the red oxide patch paint on the front end!
 "And a couple of squirts of Redex please".
 To finish off here's a few snaps taken by Paul, left-over from our spotting trips
as featured last month. BTH type 1 8224 and D8242 head a mixed freight towards East London.
To finish off here's a few snaps taken by Paul, left-over from our spotting trips
as featured last month. BTH type 1 8224 and D8242 head a mixed freight towards East London.
 A 1960 BR Swindon built class 03 shunter number 2164 allocated to Stratford, is seen
shunting tank wagons for the locomotive depot.
A 1960 BR Swindon built class 03 shunter number 2164 allocated to Stratford, is seen
shunting tank wagons for the locomotive depot.
 Western Region class 128 PMV (Heljan) with tail load is a recent addition to Greg's Shenston Road
fleet, as are the next 2 images.
Western Region class 128 PMV (Heljan) with tail load is a recent addition to Greg's Shenston Road
fleet, as are the next 2 images.
 English Electric type 4 228 Samaria (Bachmann) at the head of a coke train.
 In mid-1970s guise, 27047 tugs the Inspection Saloon around North London, an SLW model
with a Bachmann Saloon.
In mid-1970s guise, 27047 tugs the Inspection Saloon around North London, an SLW model
with a Bachmann Saloon.
 The latest Model Railway Jornal (issue 265) takes us backstage, with an article
on the storage boards and their role in keeping the trains running for almost 25 years of
reliable tail-chasing service for Holmeworth, Wibdenshaw, and Hornsey Broadway.
The latest Model Railway Jornal (issue 265) takes us backstage, with an article
on the storage boards and their role in keeping the trains running for almost 25 years of
reliable tail-chasing service for Holmeworth, Wibdenshaw, and Hornsey Broadway.
![]()
 Not much to report with the layout over recent months – largely because it’s just about
completed! You may have seen Hebble Vale in the September & October issues of BRM and
there will be a chance to see the layout at the Wigan Show this month (6th/7th October
2018). I recently discovered a likely reason why the Class 03 shunters were used on
these sorts of duties in this area, rather than the more powerful Class 08. Namely,
it appears to have been the 03's (slightly) higher top speed.
Not much to report with the layout over recent months – largely because it’s just about
completed! You may have seen Hebble Vale in the September & October issues of BRM and
there will be a chance to see the layout at the Wigan Show this month (6th/7th October
2018). I recently discovered a likely reason why the Class 03 shunters were used on
these sorts of duties in this area, rather than the more powerful Class 08. Namely,
it appears to have been the 03's (slightly) higher top speed.
 A sight unlikely to be seen again on the layout – heavy duty traction in the form of a
pair of Healey Mills stablemates! 40197 was a renumber/weather job of a Bachmann model
for a fellow member of the CFPS (40195 being my own upgrade of a Lima bodyshell with
one of the original Bachmann mechanisms). It was quite a revelation to see the pair
together as despite all my work on the Lima one, the current Bachmann model really
captures the ‘essence’ of the class. One thing that stands out a mile on 40195 is
the lack of recess on the radiator grille, something I may try and sort out at some point.
A sight unlikely to be seen again on the layout – heavy duty traction in the form of a
pair of Healey Mills stablemates! 40197 was a renumber/weather job of a Bachmann model
for a fellow member of the CFPS (40195 being my own upgrade of a Lima bodyshell with
one of the original Bachmann mechanisms). It was quite a revelation to see the pair
together as despite all my work on the Lima one, the current Bachmann model really
captures the ‘essence’ of the class. One thing that stands out a mile on 40195 is
the lack of recess on the radiator grille, something I may try and sort out at some point.
 And finally, a view of the layout sans trains, illustrating some of the vegetation and
lineside clutter that is helping to make the layout look that bit more complete.
And finally, a view of the layout sans trains, illustrating some of the vegetation and
lineside clutter that is helping to make the layout look that bit more complete.
![]()
 To ease back into model-making after a summer break what could be better than a
Parkside / Peco kit?! This Dia 1/217 ‘Vanwide’ is being made to replace a rarely used
Airfix Meat Van in the fleet. The wheelsets and couplings have been re-cycled, with
MJT W-irons, wire grab handles, buffers, and rainstrip detail added. The plan is to
model the Vanwide preserved by the team at Moreton-on-Lugg in its earlier years….
To ease back into model-making after a summer break what could be better than a
Parkside / Peco kit?! This Dia 1/217 ‘Vanwide’ is being made to replace a rarely used
Airfix Meat Van in the fleet. The wheelsets and couplings have been re-cycled, with
MJT W-irons, wire grab handles, buffers, and rainstrip detail added. The plan is to
model the Vanwide preserved by the team at Moreton-on-Lugg in its earlier years….
![]()
 This month has seen the retaining wall at the rear of the main yard gradually developing
from a few pieces of foam board into something resembling what I’m after. It will replicate
raised, but disused, coal tip approach lines common at several of the South Wales ports.
This month has seen the retaining wall at the rear of the main yard gradually developing
from a few pieces of foam board into something resembling what I’m after. It will replicate
raised, but disused, coal tip approach lines common at several of the South Wales ports.
 Onto the basic foam board structure a thin layer of rolled out DAS modeling clay was laid
onto a bed of PVA glue. Crushed aluminium foil was then pressed into the surface as an
initial aid to texturing the clay. The walls at the front are made from the excellent
Preiser moulded sections. At this point a start had been made drawing on the large
dressed stones. The steps beyond curve behind the abandoned pier and out of sight,
adding a nice sense of mystery – where do they go?
Onto the basic foam board structure a thin layer of rolled out DAS modeling clay was laid
onto a bed of PVA glue. Crushed aluminium foil was then pressed into the surface as an
initial aid to texturing the clay. The walls at the front are made from the excellent
Preiser moulded sections. At this point a start had been made drawing on the large
dressed stones. The steps beyond curve behind the abandoned pier and out of sight,
adding a nice sense of mystery – where do they go?
 The wax scraper in use gradually adding some depth to the stonework. This is the
single abandoned pier near the backscene. The dust is frequently brushed off using
an old toothbrush, preferably in a well ventilated area and not over your best furniture.
The wax scraper in use gradually adding some depth to the stonework. This is the
single abandoned pier near the backscene. The dust is frequently brushed off using
an old toothbrush, preferably in a well ventilated area and not over your best furniture.
 Progress on the steps section. It’s starting to come together. The steps were from a
set of some unknown American mouldings, intended for internal stairways but after some
filing and scraping they were fine for representing worn stonework. Also visible is
the car repair mesh that forms the base for the scenery.
Progress on the steps section. It’s starting to come together. The steps were from a
set of some unknown American mouldings, intended for internal stairways but after some
filing and scraping they were fine for representing worn stonework. Also visible is
the car repair mesh that forms the base for the scenery.
 The same section after the stonework had been finished and a first spray of primer.
 Here’s a view looking along the length of the new section with the next piece to be
tackled pretty much complete abutting it. The main yard is unchanged from Morfa Bank
1 – the weeds and puddles have been there for close on 20 years now!
Here’s a view looking along the length of the new section with the next piece to be
tackled pretty much complete abutting it. The main yard is unchanged from Morfa Bank
1 – the weeds and puddles have been there for close on 20 years now!
 And now on to the painting. A palette of seven colours was used, frequently mixed
together, to start the process. A lot of weathering and toning down was still to
come at that point - it looks a bit garish to start.
And now on to the painting. A palette of seven colours was used, frequently mixed
together, to start the process. A lot of weathering and toning down was still to
come at that point - it looks a bit garish to start.
 A wash of the darker brown over the entire structure blended everything together.
Further washes defined the joint lines. The fencing rails have also now been added.
These are American made laser cut items intended for 1/72 ship models fitted with
0.3mm rails – rather like threading a needle a few dozen times. The rails on the
steps were soldered up from wire to match.
A wash of the darker brown over the entire structure blended everything together.
Further washes defined the joint lines. The fencing rails have also now been added.
These are American made laser cut items intended for 1/72 ship models fitted with
0.3mm rails – rather like threading a needle a few dozen times. The rails on the
steps were soldered up from wire to match.
 Finally the colour was lightened using various weathering powders and some ground
earth from the garden to tone everything down. This provided an impression of distance,
specifically to avoid overpowering the similarly coloured stonework along the front of the layout.
Finally the colour was lightened using various weathering powders and some ground
earth from the garden to tone everything down. This provided an impression of distance,
specifically to avoid overpowering the similarly coloured stonework along the front of the layout.
 Now added are the blue engineering brick supports for the bridge girders. Still to
come – vegetation, rust and damp stains, further tones on the path and also old
ballast on the long disused upper level.
Now added are the blue engineering brick supports for the bridge girders. Still to
come – vegetation, rust and damp stains, further tones on the path and also old
ballast on the long disused upper level.
 Almost finished with the first bits of vegetation glued down. This comes from a wide
variety of sources and once mixed up gives a good impression of the amazing textures
and colours that are such a feature of these untended corners of the railway world.
Almost finished with the first bits of vegetation glued down. This comes from a wide
variety of sources and once mixed up gives a good impression of the amazing textures
and colours that are such a feature of these untended corners of the railway world.
![]()
 Coleorton No2 was the brainchild of Alan Browning, who designed the layout back in
the early 1980s as his own layout for his house. It was designed to run his collection
of industrial steam locos based on a fictional colliery to be found in the Coalville
area, and comprises of a very run down single platform station and small colliery.
Coleorton No2 was the brainchild of Alan Browning, who designed the layout back in
the early 1980s as his own layout for his house. It was designed to run his collection
of industrial steam locos based on a fictional colliery to be found in the Coalville
area, and comprises of a very run down single platform station and small colliery.
 Being designed to fit one of the rooms in his house, it consisted of four baseboards
with a total length of 16 feet, meaning only short trains can be accepted in the
station although the colliery can lose over 70 coal wagons.
Being designed to fit one of the rooms in his house, it consisted of four baseboards
with a total length of 16 feet, meaning only short trains can be accepted in the
station although the colliery can lose over 70 coal wagons.
 Sadly Alan died in 1987
and the layout was taken on by a small group of friends, with the intention of completing
the model to an exhibition standard. This was achieved to a degree, and the layout was
exhibited a couple of times beset with problems. Without its guiding light, it
eventually went into storage at various locations for the intermediate years.
Sadly Alan died in 1987
and the layout was taken on by a small group of friends, with the intention of completing
the model to an exhibition standard. This was achieved to a degree, and the layout was
exhibited a couple of times beset with problems. Without its guiding light, it
eventually went into storage at various locations for the intermediate years.
 Alan taught me a lot about modelling, and building chassis and gearboxes, and I remember
the sessions down the pub during the initial design and building stages of Coleorton No2
with fondness.
Alan taught me a lot about modelling, and building chassis and gearboxes, and I remember
the sessions down the pub during the initial design and building stages of Coleorton No2
with fondness.
 As with all things in storage taking up space, it came to my attention in early 2018
that Coleorton No2 was going to be disposed of, so being a well known hoarder, how could
I resist?.
As with all things in storage taking up space, it came to my attention in early 2018
that Coleorton No2 was going to be disposed of, so being a well known hoarder, how could
I resist?.
 I had known Alan Browning back in the
late 1970s, when I became a member of the Ilford & West Essex MRC, EM section, and got
to know him well during the times exhibiting the EM gauge layout Eastwell #1. He also became a
great influence in the design and building of the offshoot layout Mini Eastwell #2, which
later morphed into The Eastwell Ironstone Company #3 (sadly after Alans time).
I had known Alan Browning back in the
late 1970s, when I became a member of the Ilford & West Essex MRC, EM section, and got
to know him well during the times exhibiting the EM gauge layout Eastwell #1. He also became a
great influence in the design and building of the offshoot layout Mini Eastwell #2, which
later morphed into The Eastwell Ironstone Company #3 (sadly after Alans time).
 As a 16ft layout would just fit snugly into my garage, I decided to take on and finish
the layout in memory of Alan, and so in late September 2018 the layout moved to Hereford.
I hope to be able to finish the layout and take it out on the exhibition circuit, but that
will not be for a few years yet, as the layouts electrics need an overhaul and some of
the buildings could do with a makeover, having suffered during their period in store.
As a 16ft layout would just fit snugly into my garage, I decided to take on and finish
the layout in memory of Alan, and so in late September 2018 the layout moved to Hereford.
I hope to be able to finish the layout and take it out on the exhibition circuit, but that
will not be for a few years yet, as the layouts electrics need an overhaul and some of
the buildings could do with a makeover, having suffered during their period in store.
 More on this layout, the Eastwell and Mini Eastwell layouts and their histories /
development can be found at the following link. http://www.ambisengineering.co.uk/eastwell/eastwell_index.htm
More on this layout, the Eastwell and Mini Eastwell layouts and their histories /
development can be found at the following link. http://www.ambisengineering.co.uk/eastwell/eastwell_index.htm

![]()
 With over 500 Brush type 4 locomotives built at BR Crewe Works and at Brush Engineering
in Loughborough during the 1960s, it's no surprise to see a large contingent of them
at Hornsey Road Depot. This aerial view captured by Paul shows several examples awaiting
their next turn of duty. Of course it's not always this busy with class 47s, so this
months focus is on a few examples from the Hornsey, Shenston & Eastwell fleets.
With over 500 Brush type 4 locomotives built at BR Crewe Works and at Brush Engineering
in Loughborough during the 1960s, it's no surprise to see a large contingent of them
at Hornsey Road Depot. This aerial view captured by Paul shows several examples awaiting
their next turn of duty. Of course it's not always this busy with class 47s, so this
months focus is on a few examples from the Hornsey, Shenston & Eastwell fleets.
 D1100 (Holbeck allocated), 1510 (Finsbury Park) & 1628 (Stoke Division) are seen stabled
alongside the depot building.
D1100 (Holbeck allocated), 1510 (Finsbury Park) & 1628 (Stoke Division) are seen stabled
alongside the depot building.
 Dual braked, Spanner boiler & ETH fitted 1510 keeps the resident shunter & match wagon company.
 Catching a glimpse of identical loco 1516, featured before from the Eastwell fleet.
 A closer look at Hornsey regular 1932, joined by a pairing from Shenston Road by Greg
of 1655 & 1518, alongside 1516.
A closer look at Hornsey regular 1932, joined by a pairing from Shenston Road by Greg
of 1655 & 1518, alongside 1516.
 1655 stretching its legs with a rake of mark 1 coaching stock.
 1518 at the head of a rake of mark 2a coaching stock.
 1516 hauling empty MGR hopper wagons back to the midlands. Further examples to depict
freight only examples are already in the pipeline, as a 47/3 would look better on the front!
1516 hauling empty MGR hopper wagons back to the midlands. Further examples to depict
freight only examples are already in the pipeline, as a 47/3 would look better on the front!
 1957 is the latest example from Greg. We've standardised on the Heljan model, mainly
because it looks like a Brush 4, and the model's
1957 is the latest example from Greg. We've standardised on the Heljan model, mainly
because it looks like a Brush 4, and the model's
1A1-1A1 wheel arrangement is more
powerful and surefooted than a rigid all-wheel drive bogie found on some other models.
 And now a few more images taken at the lineside by Paul. Here's a class 501 EMU on
a service to Broad Street.
And now a few more images taken at the lineside by Paul. Here's a class 501 EMU on
a service to Broad Street.
 This and the following few images feature stock from the Shenston Road fleet, starting off
with this detailed and weathered Heljan model of a Midland based class 128 DPU.
This and the following few images feature stock from the Shenston Road fleet, starting off
with this detailed and weathered Heljan model of a Midland based class 128 DPU.
 English Electric type 3 number 6776 is a recent addition to the fleet (Bachmann).
 Also by Bachmann, Peak number 27 hauling HAA hopper wagons.
 More Heljan locos in the form of BRCW type 3 number 6529....
 .... and 6529 resting on shed alongside 6999.
 D2994 was the last class 07 loco in green livery. Another Heljan model with the existing
wheels spread out to EM gauge.
D2994 was the last class 07 loco in green livery. Another Heljan model with the existing
wheels spread out to EM gauge.
 Away from Hornsey now, and a recent trip to Shenston Road I found this battery electric
pairing a long way from home!
Away from Hornsey now, and a recent trip to Shenston Road I found this battery electric
pairing a long way from home!
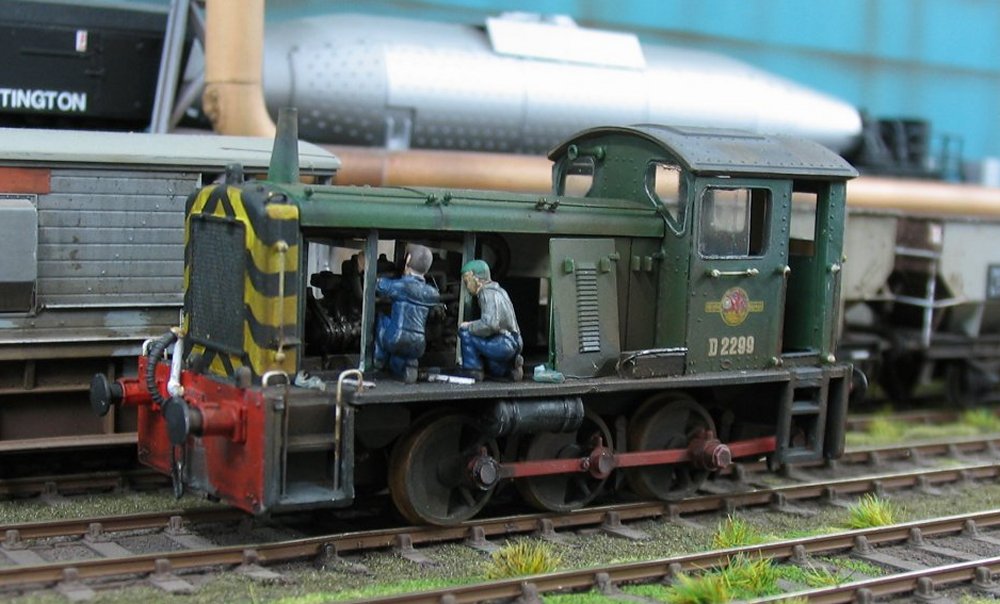 Here's a couple of cameo locomotives made up from redundant Airfix / Dapol class 04
Drewery shunter kits. Firstly D2299 by Greg....
Here's a couple of cameo locomotives made up from redundant Airfix / Dapol class 04
Drewery shunter kits. Firstly D2299 by Greg....
 .... and here's Jonny Duffett's contribution to the scrap line.
![]()
 A lone Grampus sits in the siding at Lesney Park. This is a detailed and weathered Dapol model.
 Class 31 number 31014 is probably my favourite loco from the fleet. The work in
converting this Lima bodied model with at least separate wire handgrabs for which about
82 holes were drilled, together with shawplan glazing and etched fan / grille detailing
fitted, certainly makes for a decent model. The loco has a Hornby Railroad motor bogie
in place of the pancake type, and the original wheel sets have been reinstated after
reprofiling their flanges. Another favourite of mine is Heljan class 33/2 6591 emerging
from the branch portal with a few repaired brake vans ex workshops, which are all
basically out of the box / detailed items from the Bachmann range.
Class 31 number 31014 is probably my favourite loco from the fleet. The work in
converting this Lima bodied model with at least separate wire handgrabs for which about
82 holes were drilled, together with shawplan glazing and etched fan / grille detailing
fitted, certainly makes for a decent model. The loco has a Hornby Railroad motor bogie
in place of the pancake type, and the original wheel sets have been reinstated after
reprofiling their flanges. Another favourite of mine is Heljan class 33/2 6591 emerging
from the branch portal with a few repaired brake vans ex workshops, which are all
basically out of the box / detailed items from the Bachmann range.
 I thought I'd present this time, a simple b&w photo showing BTH type 1 number 8236 resting
between trip duties on Lesney Park (Heljan class 15 model).
I thought I'd present this time, a simple b&w photo showing BTH type 1 number 8236 resting
between trip duties on Lesney Park (Heljan class 15 model).
 8236 is seen again, this time collecting loaded 12t vans from the furniture factory sidings
in the absence of the regular class 08, and later waiting at the Home Signal on a trip
working with a Lowmac in tow.
8236 is seen again, this time collecting loaded 12t vans from the furniture factory sidings
in the absence of the regular class 08, and later waiting at the Home Signal on a trip
working with a Lowmac in tow.
![]()
 Last month’s tinkering with a wagon kit lead to me getting back to some I had started a
while ago but never finished building – BR Dia 1/146 unfitted 21 ton coal hopper is pictured
now complete and ready for paint.
Last month’s tinkering with a wagon kit lead to me getting back to some I had started a
while ago but never finished building – BR Dia 1/146 unfitted 21 ton coal hopper is pictured
now complete and ready for paint.
 The excellent Parkside kits of the type allow several mix-and-match variations – This one
has been finished as the vacuum braked version of the original welded pattern, still
covered by the same BR diagram number. To create room for the vacuum cylinder the end
support design was changed to that also used in the rebuild programme of the 1970s.
The excellent Parkside kits of the type allow several mix-and-match variations – This one
has been finished as the vacuum braked version of the original welded pattern, still
covered by the same BR diagram number. To create room for the vacuum cylinder the end
support design was changed to that also used in the rebuild programme of the 1970s.
 The third example is of the rebuilt type, originally covered by Dia 1/147. This wagon
is the hand brake only ‘HTO’ version - having provided the vacuum brake parts for the
previous model. The simpler bodywork design used on the rebuilds is evident.
The third example is of the rebuilt type, originally covered by Dia 1/147. This wagon
is the hand brake only ‘HTO’ version - having provided the vacuum brake parts for the
previous model. The simpler bodywork design used on the rebuilds is evident.
 And this is the vacuum brake version, coded ‘HTV’ – wagons of all these variations were
still in daily use supplying the Wapping Wharf coal depot in Bristol at the dawn of the
1980s when it provided the inspiration for my first EM gauge exchange sidings layout.
And this is the vacuum brake version, coded ‘HTV’ – wagons of all these variations were
still in daily use supplying the Wapping Wharf coal depot in Bristol at the dawn of the
1980s when it provided the inspiration for my first EM gauge exchange sidings layout.
 The completed group of hoppers await painting…..
 Just getting started to follow the coal hoppers are a small group of Coke hoppers, made
using the old Three Aitch kit. These are having the ends modified to portray the Dia 1/151
variant which BR built in greater numbers than any other version. To do this, the coke
raves have been cut away and replaced by three pieces of 1mm plasticard which are then
blended with the lower panels to produce the one-piece metal end of this version.
Just getting started to follow the coal hoppers are a small group of Coke hoppers, made
using the old Three Aitch kit. These are having the ends modified to portray the Dia 1/151
variant which BR built in greater numbers than any other version. To do this, the coke
raves have been cut away and replaced by three pieces of 1mm plasticard which are then
blended with the lower panels to produce the one-piece metal end of this version.
 The final BR version, Dia 1/152, did away with the coke raves entirely and was a huge
steel bath tub on wheels! A model of this type is nearing completion using the Ian
Macdonald etched brass kit. This kit is extremely well thought out, with many clever
features to assist accurate alignment of the parts during soldering – these are
accompanied by very detailed build instructions which include the real-world pit falls
that can trap the first time builder of any kit.
The final BR version, Dia 1/152, did away with the coke raves entirely and was a huge
steel bath tub on wheels! A model of this type is nearing completion using the Ian
Macdonald etched brass kit. This kit is extremely well thought out, with many clever
features to assist accurate alignment of the parts during soldering – these are
accompanied by very detailed build instructions which include the real-world pit falls
that can trap the first time builder of any kit.
![]()
 The rear of the main yard was built in two pieces – the join is just past the large
rear wall. The back walls are Das clay, the front small walls are Preiser moulded
plastic. As you can see it’s not blended into the main board yet but soon will be.
There will also be more vegetation on the top level.
The rear of the main yard was built in two pieces – the join is just past the large
rear wall. The back walls are Das clay, the front small walls are Preiser moulded
plastic. As you can see it’s not blended into the main board yet but soon will be.
There will also be more vegetation on the top level.
 Looking the other way and we can see the buffer stops – almost finished Lanarkshire
Model Supplies items and next on the list for completing with some serious overgrowth.
The abandoned bridge has had the first layer of plastic added with plenty of rivets
to come and a safety fence.
Looking the other way and we can see the buffer stops – almost finished Lanarkshire
Model Supplies items and next on the list for completing with some serious overgrowth.
The abandoned bridge has had the first layer of plastic added with plenty of rivets
to come and a safety fence.
 Here’s the other half of the yard rear section, also removable. The hut is complete
(a modified Ratio yard office) but still to be painted and weathered. A recent toy
fair purchase (the fruit van) awaits weathering too!
Here’s the other half of the yard rear section, also removable. The hut is complete
(a modified Ratio yard office) but still to be painted and weathered. A recent toy
fair purchase (the fruit van) awaits weathering too!
 Looking the other way. The join between the two back sections is hidden by the bushes.
The office is still removable for painting and finishing. Note the siding with the
washed out ballast in the foreground – and the still to be painted replacement brakes
on the near fruit van!
Looking the other way. The join between the two back sections is hidden by the bushes.
The office is still removable for painting and finishing. Note the siding with the
washed out ballast in the foreground – and the still to be painted replacement brakes
on the near fruit van!
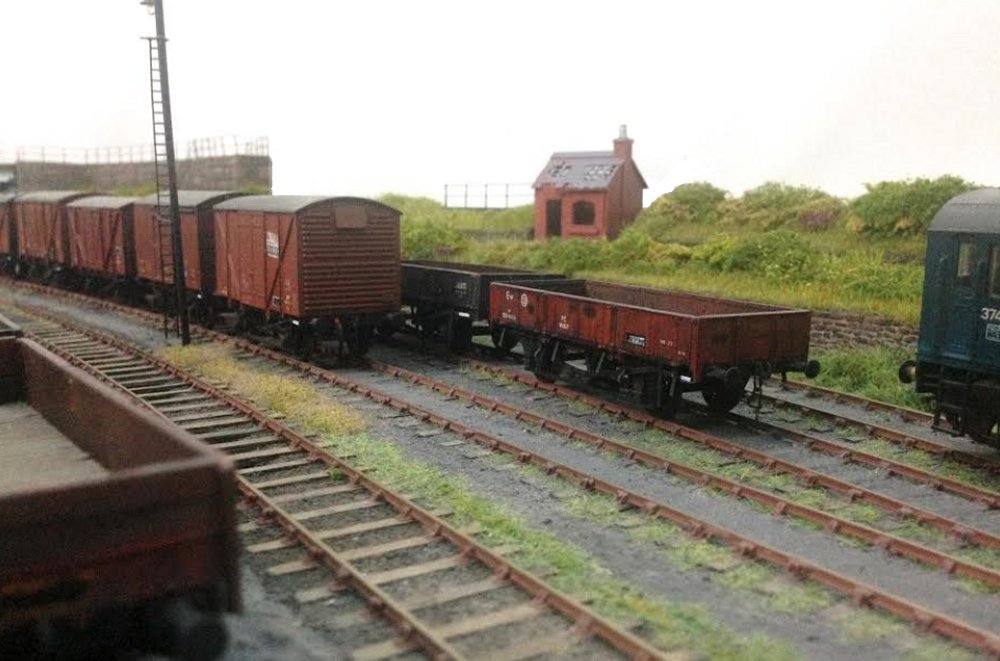
 This shows how the new rear section fits in with the original yard office where
3746 awaits a crew.
This shows how the new rear section fits in with the original yard office where
3746 awaits a crew.
 A slightly different angle with both of the new rear sections visible, both blending
in nicely with the yard itself, unchanged from Morfa Bank 1.
A slightly different angle with both of the new rear sections visible, both blending
in nicely with the yard itself, unchanged from Morfa Bank 1.
 3746 has moved off for a spot of shunting revealing the yard office and lamp store.
Discussions continue inside the building, hopefully not too long or that mug of
tea will be cold. New retaining walls have yet to be made for the area to the rear.
3746 has moved off for a spot of shunting revealing the yard office and lamp store.
Discussions continue inside the building, hopefully not too long or that mug of
tea will be cold. New retaining walls have yet to be made for the area to the rear.
 And here we can see how the new walls look from the front of the layout, framed
between the old AW&T office and the part demolished building to the left. The line
to the spoil tip crosses the road in the middle distance.
And here we can see how the new walls look from the front of the layout, framed
between the old AW&T office and the part demolished building to the left. The line
to the spoil tip crosses the road in the middle distance.
 And finally the experimental one-off Palvan is now finished and sits on the spoil tip
line, probably awaiting a visit from a C&W inspector.
And finally the experimental one-off Palvan is now finished and sits on the spoil tip
line, probably awaiting a visit from a C&W inspector.
 The van was converted from a
Tube wagon and lasted until 1976 but remained a one-off. It will be in a small pool
of Palvans carrying pallets of chemical drums from a factory on the dock. The van is
scratchbuilt on a Parkside chassis.
The van was converted from a
Tube wagon and lasted until 1976 but remained a one-off. It will be in a small pool
of Palvans carrying pallets of chemical drums from a factory on the dock. The van is
scratchbuilt on a Parkside chassis.
 The van is completed now - rather a pain doing the lettering as I couldn’t find much
to fit and had to do a lot with individual letters, which isn’t fun with such tiny
letters.
The van is completed now - rather a pain doing the lettering as I couldn’t find much
to fit and had to do a lot with individual letters, which isn’t fun with such tiny
letters.
 As seen after weathering..... Trouble is that means I now have
to build a couple of Izal Palvans and a few others, including at least one Heinz van.
As seen after weathering..... Trouble is that means I now have
to build a couple of Izal Palvans and a few others, including at least one Heinz van.
![]()
 Bringing a splash of colour to the North London suburbs is a train of Carflats heading
north with a cargo of Ford Cortinas, fresh from the factory at Dagenham.
Bringing a splash of colour to the North London suburbs is a train of Carflats heading
north with a cargo of Ford Cortinas, fresh from the factory at Dagenham.
 The Oxford Carflats had run for a season empty, but now the ex-LMS 57ft version is loaded
with 3 cars. The rake has now grown with the addition of some 63ft ex-mark 1 versions.
The Oxford Carflats had run for a season empty, but now the ex-LMS 57ft version is loaded
with 3 cars. The rake has now grown with the addition of some 63ft ex-mark 1 versions.
 To avoid any problems with the bogie aspect of the Bachmann Carflat, the blue Motorail
versions have been repainted bauxite, seeing as it's a simple job and they needed to be
stripped down anyway for modifications and proper couplings.
To avoid any problems with the bogie aspect of the Bachmann Carflat, the blue Motorail
versions have been repainted bauxite, seeing as it's a simple job and they needed to be
stripped down anyway for modifications and proper couplings.
 Careful masking of the printed detail such as No Loose Shunting (on the ends and sides)
has saved a lot of time, and once weathered it's difficult to make out the background
colour of the lettering. The number panels required attention with new Pressfix transfers.
Careful masking of the printed detail such as No Loose Shunting (on the ends and sides)
has saved a lot of time, and once weathered it's difficult to make out the background
colour of the lettering. The number panels required attention with new Pressfix transfers.
 In 1970 the Ford Cortina mark 2 was coming to the end of production at Dagenham, and
making way for the mark 3.
In 1970 the Ford Cortina mark 2 was coming to the end of production at Dagenham, and
making way for the mark 3.
 The vehicles are mainly from the Oxford Diecast range, with a few Hornby Skale versions
added, and mostly picked up over a long period of time at Swapmeets and online. All have
a matt varnish finish and are secured to the deck with a small dab of neat PVA.
The vehicles are mainly from the Oxford Diecast range, with a few Hornby Skale versions
added, and mostly picked up over a long period of time at Swapmeets and online. All have
a matt varnish finish and are secured to the deck with a small dab of neat PVA.
 With the order fulfilled, there's just 2 empty spaces on the last wagon in the rake.
Ideally the rear number plate areas should be painted body colour? But for now just
blacking them out will do.
With the order fulfilled, there's just 2 empty spaces on the last wagon in the rake.
Ideally the rear number plate areas should be painted body colour? But for now just
blacking them out will do.
 Derby's Test Train passes by with Clayton 8598 in charge, which is a TechCad model
finshed by Greg for Shenston Road with some Bachmann coaches in tow. This and the
following snaps were taken by Paul at Hornsey Broadway one Saturday afternoon.
Derby's Test Train passes by with Clayton 8598 in charge, which is a TechCad model
finshed by Greg for Shenston Road with some Bachmann coaches in tow. This and the
following snaps were taken by Paul at Hornsey Broadway one Saturday afternoon.
 Now a trio from the Eastwell fleet, starting with Brush type 2 5561, a Lima loco
fitted with double motored Hornby Railroad bogies.
Now a trio from the Eastwell fleet, starting with Brush type 2 5561, a Lima loco
fitted with double motored Hornby Railroad bogies.
 Dapol class 73 model E6044, which made an appearance at the recent Tolworth exhibition
on Canada Street.
Dapol class 73 model E6044, which made an appearance at the recent Tolworth exhibition
on Canada Street.
 Also seen treading the boards was D2988, shown here during a quieter moment on
Hornsey Road depot.
Also seen treading the boards was D2988, shown here during a quieter moment on
Hornsey Road depot.
 A snap shot of the depot building. A clock and some road numbers wouldn't go amiss.
 2164 ticks over on the stores road, getting ready to shunt some wagons around the depot.
 Also regularly seen with the Derby Test Train in Greg's MetroVick Co-Bo
![]()
 The final exhibition outing for the layout in 2018 took it to Tolworth for the Hampton
Court Model Railway Club show. The visit to Southern Region territory gave an excuse
to run the new Heljan Class 07 ‘D2985’ in an early to mid-1960s Southampton sequence.
The final exhibition outing for the layout in 2018 took it to Tolworth for the Hampton
Court Model Railway Club show. The visit to Southern Region territory gave an excuse
to run the new Heljan Class 07 ‘D2985’ in an early to mid-1960s Southampton sequence.
 Another relatively new loco getting a run out was Class 03 ‘2135’, depicting the early
1970s as it shunts on the dockside. It was good to meet up with friends old and new
during the very enjoyable weekend.
Another relatively new loco getting a run out was Class 03 ‘2135’, depicting the early
1970s as it shunts on the dockside. It was good to meet up with friends old and new
during the very enjoyable weekend.
 Back on the hobby bench the five Coke hoppers have now joined the queue for paint. A
typical Dia 1/151 wagon, modified to have the solid ends, is pictured.
Back on the hobby bench the five Coke hoppers have now joined the queue for paint. A
typical Dia 1/151 wagon, modified to have the solid ends, is pictured.
 The final batch of hoppers with side raves had a vacuum pipe added, and sources differ
as to whether this was to Dia 1/152 or still 1/151 despite the change. The pipe has
been added to the 3H kit using brass wire, and will cause this wagon to carry bauxite
livery rather than the more usual grey.
The final batch of hoppers with side raves had a vacuum pipe added, and sources differ
as to whether this was to Dia 1/152 or still 1/151 despite the change. The pipe has
been added to the 3H kit using brass wire, and will cause this wagon to carry bauxite
livery rather than the more usual grey.
 The brass kit of the Dia 1/152 solid side unfitted version completes the group.
 Running the layout in an early 70s sequence showed a shortage of brake vans to suit –
so an old second-hand kit was fetched from the cupboard – and found to actually
contain two partly built brakes. I must have first built an example of this kit over
40 years ago, and still enjoy the process today – to judge by the box art the kit
itself may have waited several decades to be put together!
Running the layout in an early 70s sequence showed a shortage of brake vans to suit –
so an old second-hand kit was fetched from the cupboard – and found to actually
contain two partly built brakes. I must have first built an example of this kit over
40 years ago, and still enjoy the process today – to judge by the box art the kit
itself may have waited several decades to be put together!
![]()
 It's been a few months since the last N.A Works update. The reason for this is that over
the summer I have been building my 1/32nd scale D600 Active (which is now awaiting the
return of warmer weather next year so I can prime, paint & weather), so I have now
dropped back onto working on items for Newton Abbot works dump. D600 is pictured here
on my gauge 1 Worcester Road depot layout.
It's been a few months since the last N.A Works update. The reason for this is that over
the summer I have been building my 1/32nd scale D600 Active (which is now awaiting the
return of warmer weather next year so I can prime, paint & weather), so I have now
dropped back onto working on items for Newton Abbot works dump. D600 is pictured here
on my gauge 1 Worcester Road depot layout.
 First up has been some work on the 4mm scale Bachmann steam heat pipes. I do like their representation
of this however I feel the pipe is a bit thin, so some spare guitar wire came in perfect
for this alteration. I added an open/close handle and connection ports at the base of the pipe.
First up has been some work on the 4mm scale Bachmann steam heat pipes. I do like their representation
of this however I feel the pipe is a bit thin, so some spare guitar wire came in perfect
for this alteration. I added an open/close handle and connection ports at the base of the pipe.
 I have been working on D851 Temeraire, other work has seen me busy with a small pointed
modelling chisel which is perfect for detailing the areas on the locomotive bodyside
where the prestolith has dropped away from the steel structure, this means digging
into the plastic bodyside to produce a small depth and a rough surface that can then be
painted in a shade of rust. I have also added the appropriate head codes that D851 was
wearing when put into store at 83A in April 1971. I used a head code sheet from Fox,
however I put it through a photocopy machine to give me the effect of the correct surface
of the real headcode blinds. Numbers and arrows come from my usual source the HMRS pressfix
sheet. I note from the image I still have to paint in the fire/pull area white.
I have been working on D851 Temeraire, other work has seen me busy with a small pointed
modelling chisel which is perfect for detailing the areas on the locomotive bodyside
where the prestolith has dropped away from the steel structure, this means digging
into the plastic bodyside to produce a small depth and a rough surface that can then be
painted in a shade of rust. I have also added the appropriate head codes that D851 was
wearing when put into store at 83A in April 1971. I used a head code sheet from Fox,
however I put it through a photocopy machine to give me the effect of the correct surface
of the real headcode blinds. Numbers and arrows come from my usual source the HMRS pressfix
sheet. I note from the image I still have to paint in the fire/pull area white.
 Both cab interiors have been painted, just awaiting a Modelu driver and this can then be
re-installed into the body.
Both cab interiors have been painted, just awaiting a Modelu driver and this can then be
re-installed into the body.
 D847 Strongbow is almost completed (awaiting D851 to be finished) so that they can both
receive their final weathering using the airbrush. Again numbers and arrows from HMRS,
and using the same bodyside technique as on D851 for showing areas where the prestolith
has dropped out. One side of D847s bodyside shows the side scrap damage it received.
It's incredible that Strongbow was laid aside at NA dump in March 1971 and then called
to Swindon for overhaul, however the decision was taken to scrap the loco instead.
D847 Strongbow is almost completed (awaiting D851 to be finished) so that they can both
receive their final weathering using the airbrush. Again numbers and arrows from HMRS,
and using the same bodyside technique as on D851 for showing areas where the prestolith
has dropped out. One side of D847s bodyside shows the side scrap damage it received.
It's incredible that Strongbow was laid aside at NA dump in March 1971 and then called
to Swindon for overhaul, however the decision was taken to scrap the loco instead.
 The SR concrete store hut has received some paint (at last). I have only got to paint the
front doors to complete followed by a light weathering. I have also started painting the
fuel pump which was situated between the 2 access doors at the works. As can be seen in
the May update page, this is scratch built using brass rod and plasticard. I have also
made the 2 pipes and the connectors at the end these will be added once painting and
weathering is complete.
The SR concrete store hut has received some paint (at last). I have only got to paint the
front doors to complete followed by a light weathering. I have also started painting the
fuel pump which was situated between the 2 access doors at the works. As can be seen in
the May update page, this is scratch built using brass rod and plasticard. I have also
made the 2 pipes and the connectors at the end these will be added once painting and
weathering is complete.
 OK not Diesel Hydraulic, and it would be stretching the imagination to find one on the NA
dump, however after my love of Warships, Westerns, Hymeks etc are the D400ers (Class 50s
in new money). I do remember these arriving on the Western Region back in 72/73 (400,401,
402,403,404,405) and by the summer timetable of May 74 had entered squadron service, so I
could not resist back dating one to how I saw them in 1974 which at the same time gave me
my first opportunity of modelling a loco with TOPS numbers. 50037 was selected in its 1974
guise. The characteristics of a D400er (as we always called them even after they had been
TOPS numbered) was their distinctive engine note and their front end styling, however I
feel Hornby had not got this front end styling correct so using a window etch from Extreme
Etchings and some Milliput filler went about correcting this, First I profiled the top of
the nose cone to a curving arch, then using the etched windows stuck them with the distinct
angle lean that matched the curvature of the top of the nose cone. I have added other items
from the superb Extreme Etchings range for the Class 50, including Windscreen wipers,
exhaust ports, fan mesh & fan, builders and leasing plates the rest was scratch built which
included the brake pulleys & chains, lifting eyes, baffle shields in the cab behind both
driver and secondman, I made some window beading for 2 of the engine room windows as Hornby
had failed to show this on the windows that were on refurbishment changed to grills. I
removed the hand rails from the front ends and added smaller gauge wire for new hand rails
and also added the hand rail to the headcode boxes. I also took the opportunity to remove
Hornby’s moveable bodyside grills, I changed these to a casting I had made for me by Rob
Mabbett. Pipes were added to the backs of the air cylinders.
OK not Diesel Hydraulic, and it would be stretching the imagination to find one on the NA
dump, however after my love of Warships, Westerns, Hymeks etc are the D400ers (Class 50s
in new money). I do remember these arriving on the Western Region back in 72/73 (400,401,
402,403,404,405) and by the summer timetable of May 74 had entered squadron service, so I
could not resist back dating one to how I saw them in 1974 which at the same time gave me
my first opportunity of modelling a loco with TOPS numbers. 50037 was selected in its 1974
guise. The characteristics of a D400er (as we always called them even after they had been
TOPS numbered) was their distinctive engine note and their front end styling, however I
feel Hornby had not got this front end styling correct so using a window etch from Extreme
Etchings and some Milliput filler went about correcting this, First I profiled the top of
the nose cone to a curving arch, then using the etched windows stuck them with the distinct
angle lean that matched the curvature of the top of the nose cone. I have added other items
from the superb Extreme Etchings range for the Class 50, including Windscreen wipers,
exhaust ports, fan mesh & fan, builders and leasing plates the rest was scratch built which
included the brake pulleys & chains, lifting eyes, baffle shields in the cab behind both
driver and secondman, I made some window beading for 2 of the engine room windows as Hornby
had failed to show this on the windows that were on refurbishment changed to grills. I
removed the hand rails from the front ends and added smaller gauge wire for new hand rails
and also added the hand rail to the headcode boxes. I also took the opportunity to remove
Hornby’s moveable bodyside grills, I changed these to a casting I had made for me by Rob
Mabbett. Pipes were added to the backs of the air cylinders.
 Laserglaze windows are fitted and were as you might expect drop in, so to keep them in place
I used PVA glue watered down using capillary action around the window for the glue to run. I
also have an image in my collection of 46006 in May 77 dumped in the Newton Abbot works
storage roads, so could a 400er also have been stored there aswell? My modelling licence says
so! This isn't my image (copyright unknown but will be pleased to credit / remove), and shows
46006 on the NA dump in May 77, and also shows the area I am modelling.
Laserglaze windows are fitted and were as you might expect drop in, so to keep them in place
I used PVA glue watered down using capillary action around the window for the glue to run. I
also have an image in my collection of 46006 in May 77 dumped in the Newton Abbot works
storage roads, so could a 400er also have been stored there aswell? My modelling licence says
so! This isn't my image (copyright unknown but will be pleased to credit / remove), and shows
46006 on the NA dump in May 77, and also shows the area I am modelling.