
*********************************************************************************************************************************************
OCTOBER 2026 UPDATE
*********************************************************************************************************************************************
GREG BROOKES
*********************************************************************************************************************************************
TIM SHACKLETON
*********************************************************************************************************************************************
MIKE WHITCHURCH
*********************************************************************************************************************************************
KIER HARDY
*********************************************************************************************************************************************
ANDY LEE
*********************************************************************************************************************************************
KARL CROWTHER
*********************************************************************************************************************************************

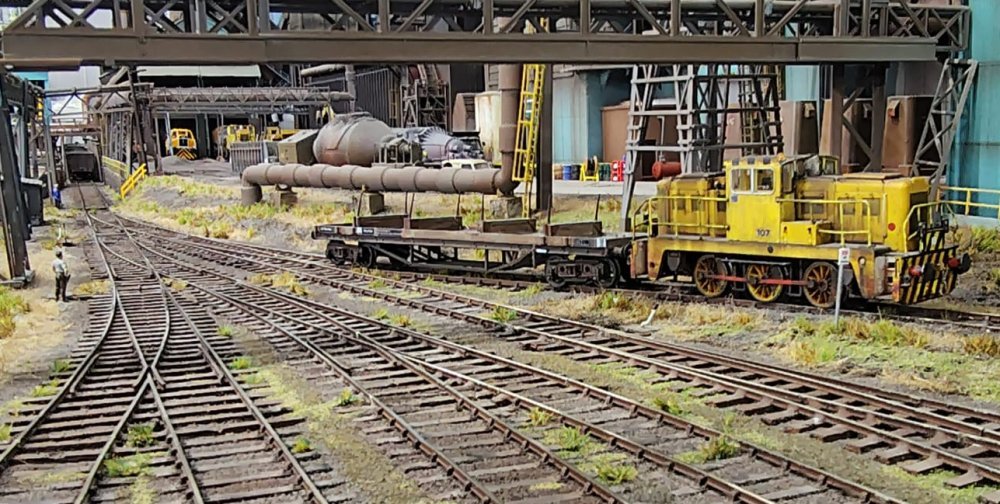 Recent work on the layout has concentrated on commissioning the pointwork at the north end
of the steelworks exchange sidings. Although the SEEP point motors had been in place for
many years, I had never got around to wiring them up to a control panel.
Recent work on the layout has concentrated on commissioning the pointwork at the north end
of the steelworks exchange sidings. Although the SEEP point motors had been in place for
many years, I had never got around to wiring them up to a control panel.
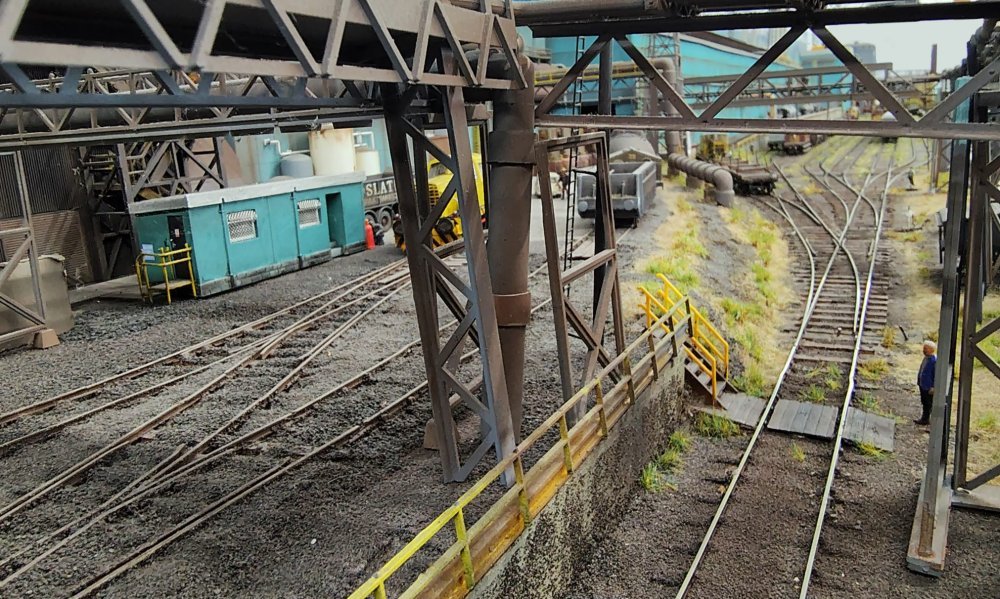 With the help from Jonny Duffett, the point motors have now been wired up and are controlled
from a panel in the operating well at the other end of the layout. Now that all the sidings
are fully operational, it's brought about a new aspect to operating the layout, instead of
just filling the roads with rolling stock projects fresh from the workbench.
With the help from Jonny Duffett, the point motors have now been wired up and are controlled
from a panel in the operating well at the other end of the layout. Now that all the sidings
are fully operational, it's brought about a new aspect to operating the layout, instead of
just filling the roads with rolling stock projects fresh from the workbench.
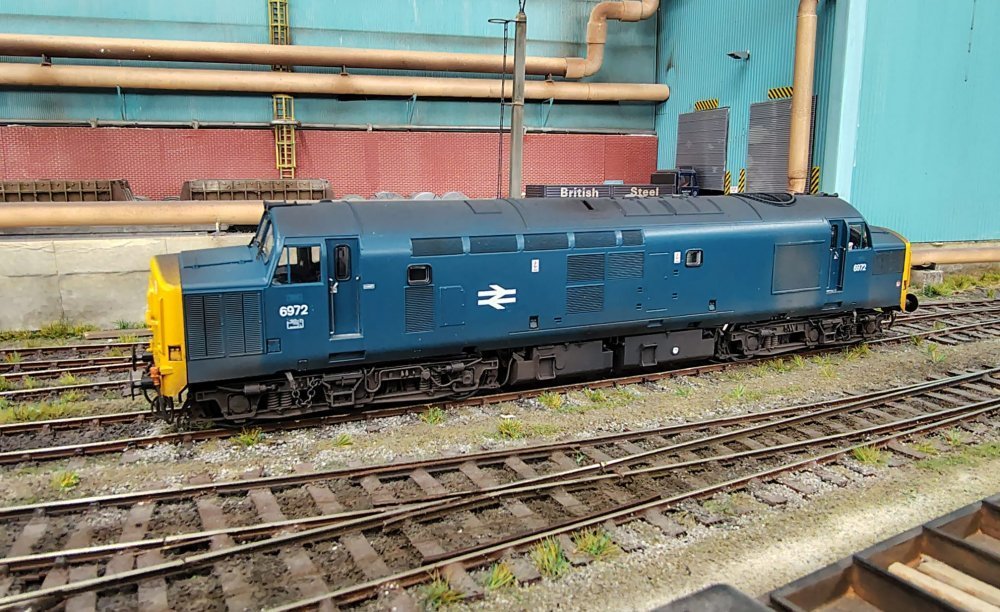 Here's a trio of Cardiff Canton allocated English Electric type 3 locomotives, firstly idling
away in the steelworks exchange sidings is a Bachmann spinny fan version now numbered 6972....
Here's a trio of Cardiff Canton allocated English Electric type 3 locomotives, firstly idling
away in the steelworks exchange sidings is a Bachmann spinny fan version now numbered 6972....
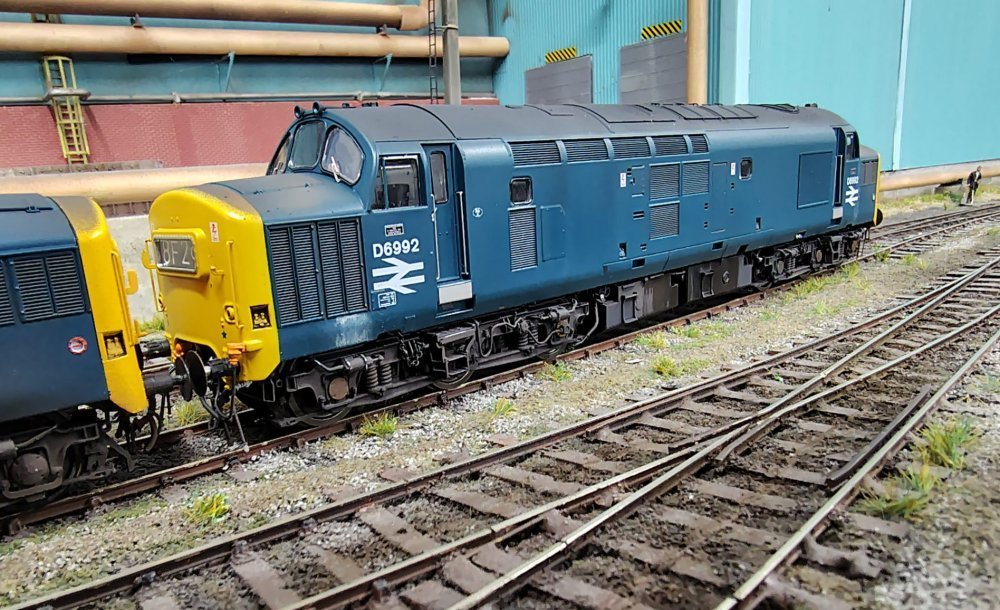 ... and getting ready to depart the yard double heading is Accurascale model D6992.
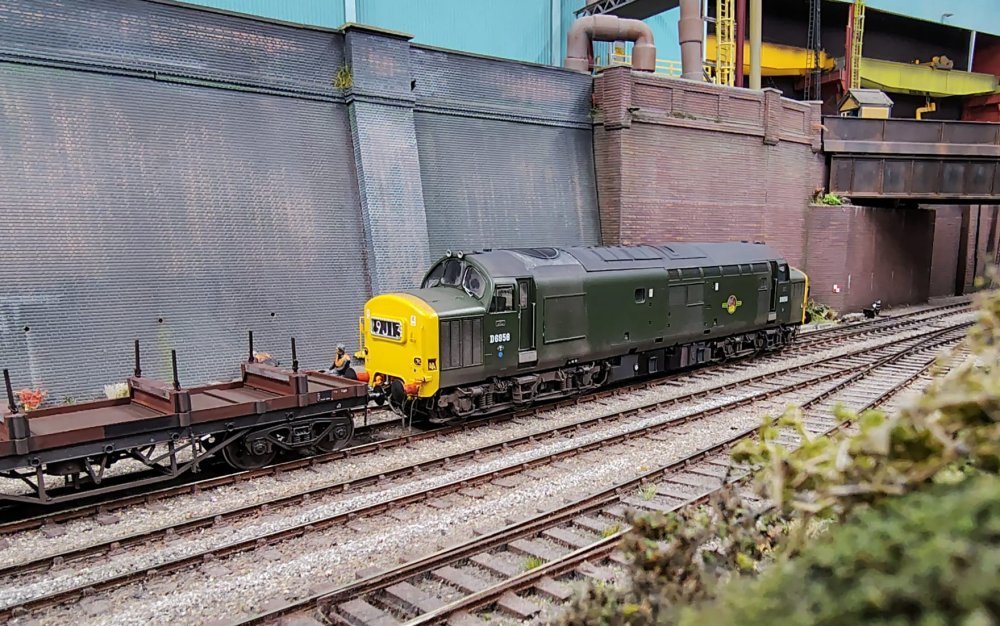 On the main line just south of the goods loops is another Accurascale model depicting D6956
in green livery with a rake of Bogie Bolster E wagons.
On the main line just south of the goods loops is another Accurascale model depicting D6956
in green livery with a rake of Bogie Bolster E wagons.
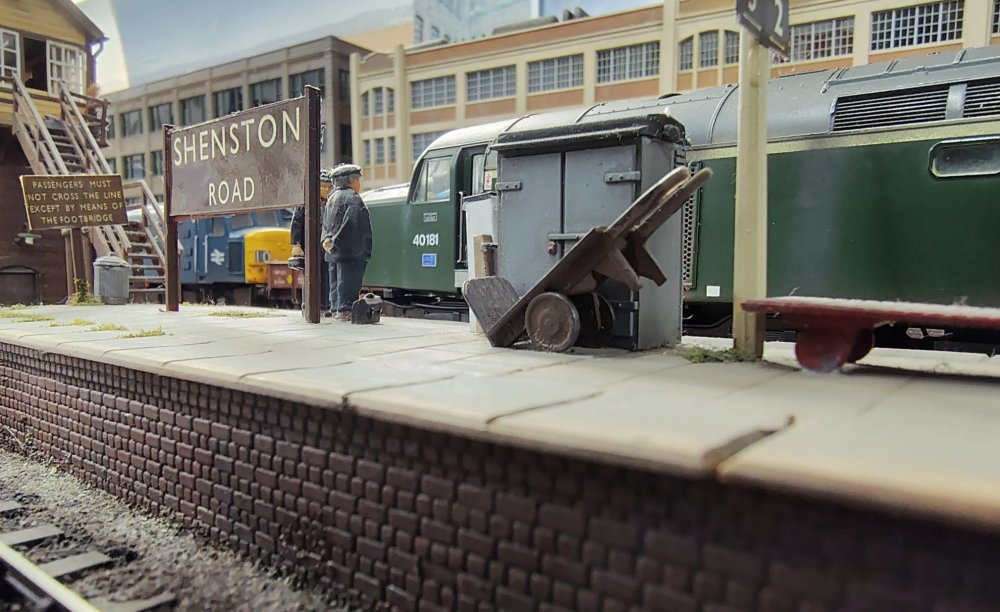 Over at the station a crew change is taking place. A driver and secondman get ready to
take over 40181 with a northbound service.
Over at the station a crew change is taking place. A driver and secondman get ready to
take over 40181 with a northbound service.
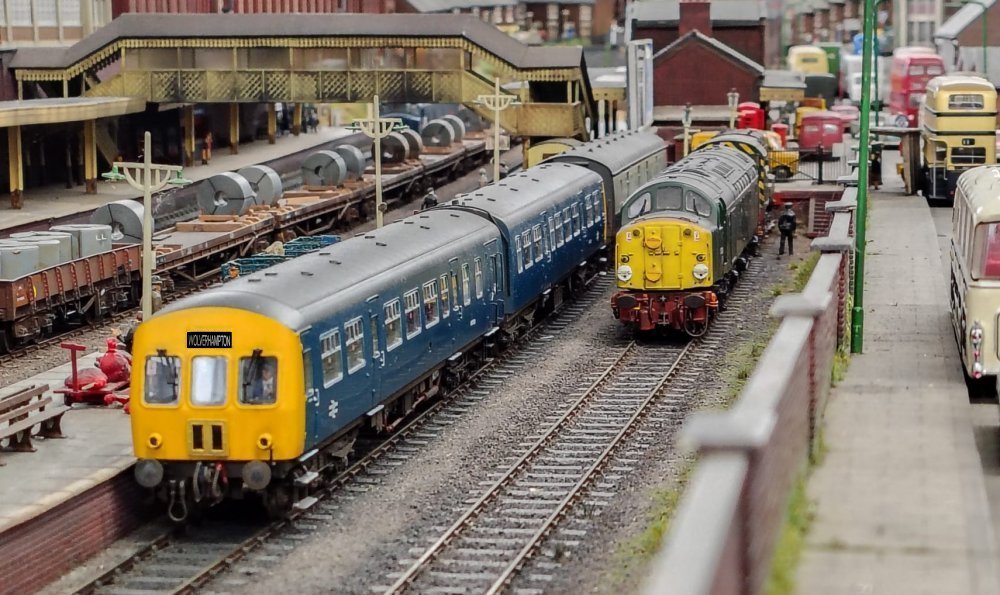 A 2-car Class 101 waits in the bay platform ready for departure to Wolverhampton, whilst
Class 40 number 236 whistles away in the yard headshunt.
A 2-car Class 101 waits in the bay platform ready for departure to Wolverhampton, whilst
Class 40 number 236 whistles away in the yard headshunt.
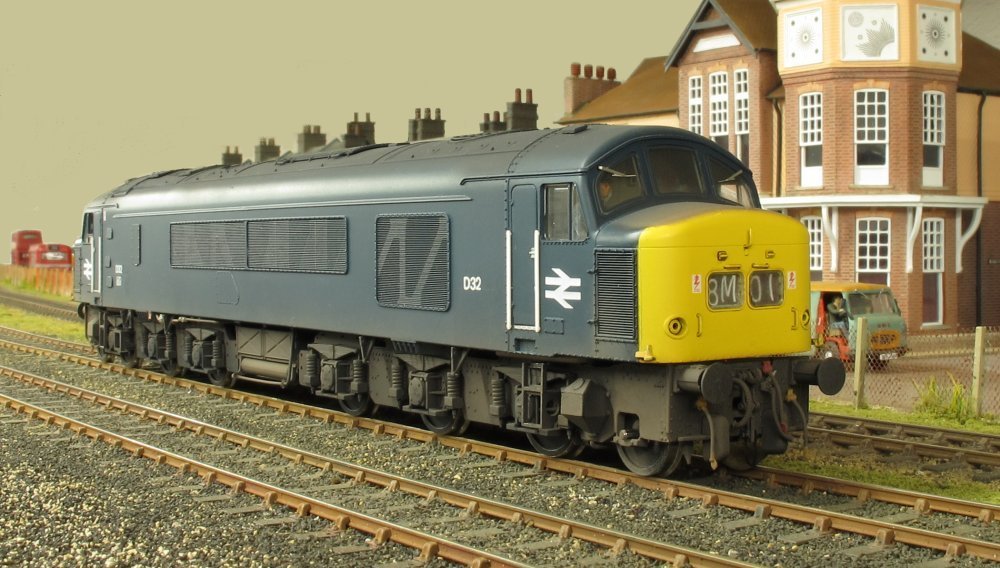 New into the fleet are a pair of Heljan Class 45 Peaks - D32 is captured at Ferry Road....
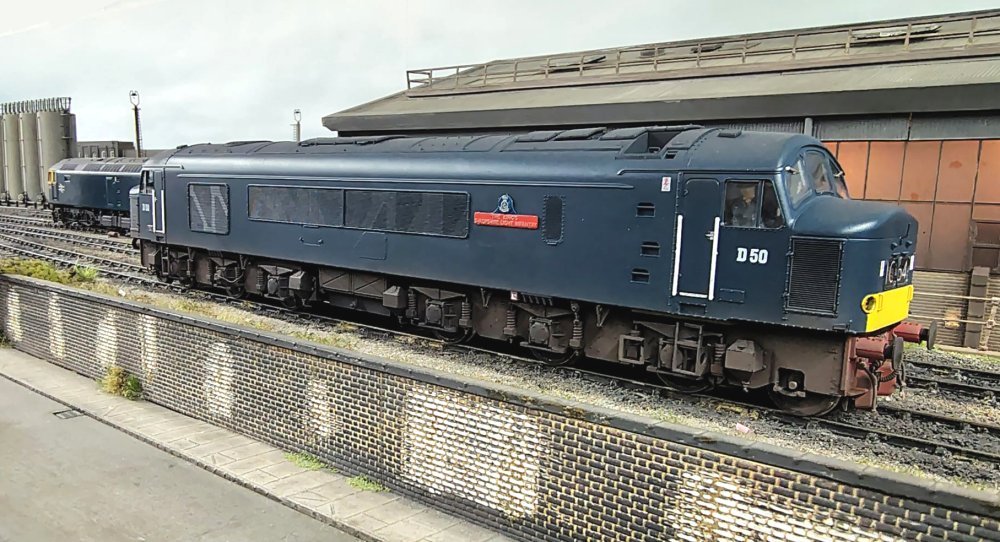 ... and D50 The Kings Shropshire Light Infantry is seen at Hornsey Road depot.

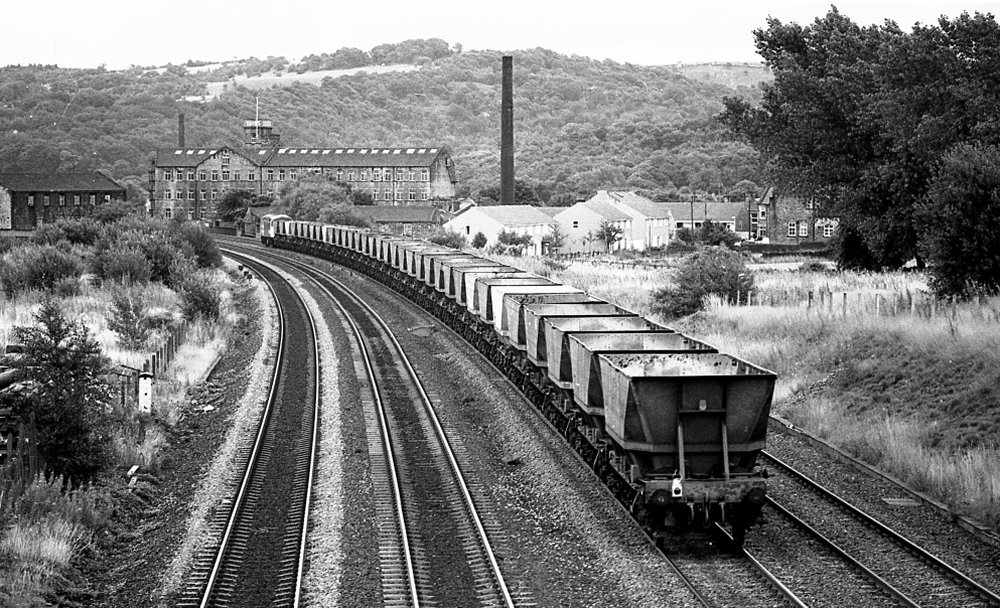 In the summer of 1982, a large-logo class 56 runs through Mirfield on the Calder Valley
main line with a rake of 34 empty HAAs returning from Fiddlers Ferry to one of the Yorkshire
pits. Most still have the original bodywork, all apparently now minus the internal bracing
that quickly succumbed to damage. A few are new-build wagons in the later style with
reinforcement along the top edge.
In the summer of 1982, a large-logo class 56 runs through Mirfield on the Calder Valley
main line with a rake of 34 empty HAAs returning from Fiddlers Ferry to one of the Yorkshire
pits. Most still have the original bodywork, all apparently now minus the internal bracing
that quickly succumbed to damage. A few are new-build wagons in the later style with
reinforcement along the top edge.
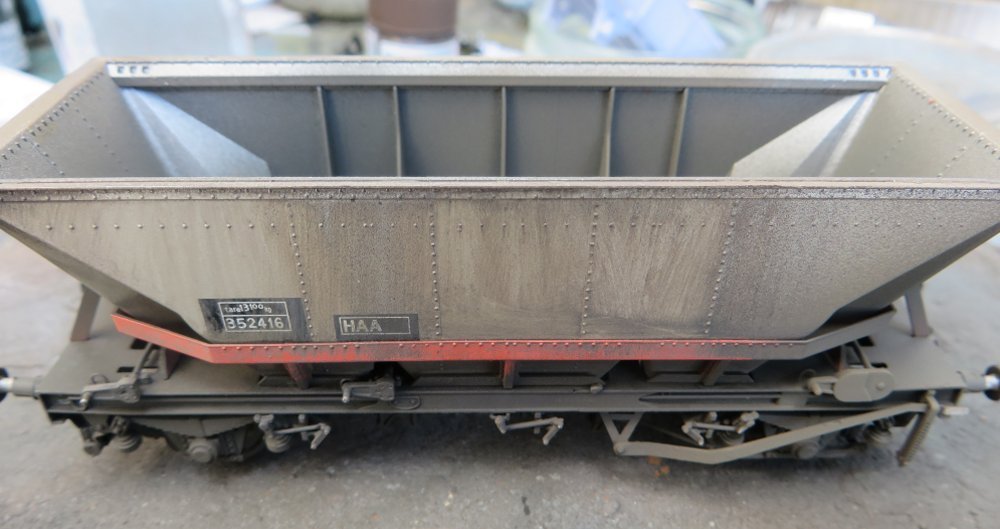 While working through a lengthy set of Cavalex and Accurascale HAA hoppers I found myself
wondering how I was going to weather the insides of the wagons with the same prototypical
accuracy I’d sought to achieve on the outsides. A pleasant hour or two browsing the websites
of Martyn Read (https://ukrailwaypics.smugmug.com/) and Andy Jupe (https://gingespotting.smugmug.com/)
gave me the prime references for this project.
While working through a lengthy set of Cavalex and Accurascale HAA hoppers I found myself
wondering how I was going to weather the insides of the wagons with the same prototypical
accuracy I’d sought to achieve on the outsides. A pleasant hour or two browsing the websites
of Martyn Read (https://ukrailwaypics.smugmug.com/) and Andy Jupe (https://gingespotting.smugmug.com/)
gave me the prime references for this project.
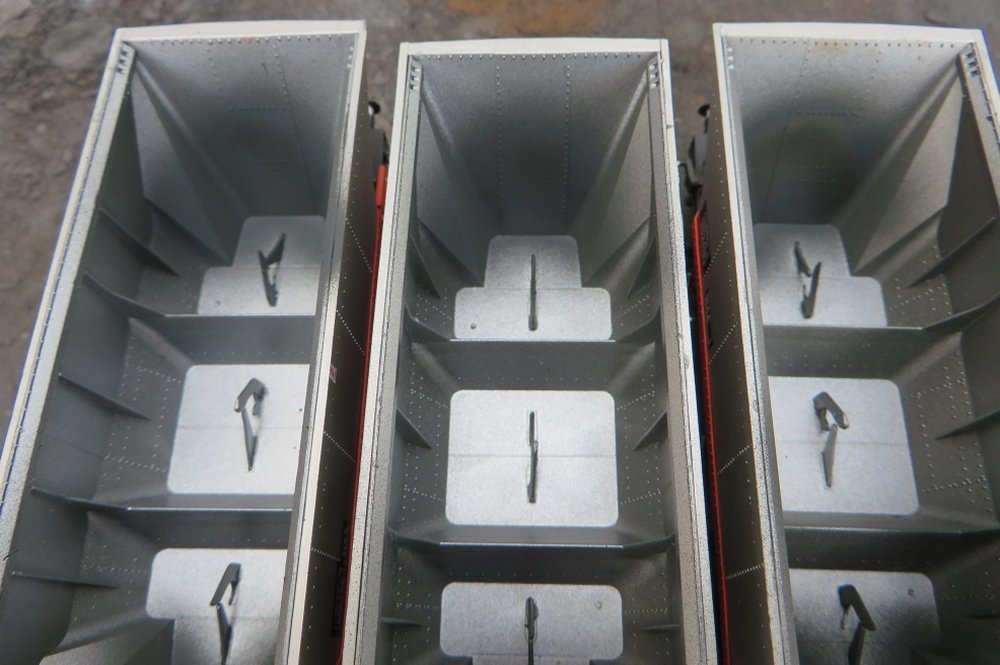 The first step is to airbrush the witness marks that have collected from the many thousands
of heaps of coal that have been loaded into this wagon over the years. For the basic outline
I used Tamiya NATO Black acrylic (XF-69). The shapes vary on individual wagons but the mound
idea is pretty universal.
The first step is to airbrush the witness marks that have collected from the many thousands
of heaps of coal that have been loaded into this wagon over the years. For the basic outline
I used Tamiya NATO Black acrylic (XF-69). The shapes vary on individual wagons but the mound
idea is pretty universal.
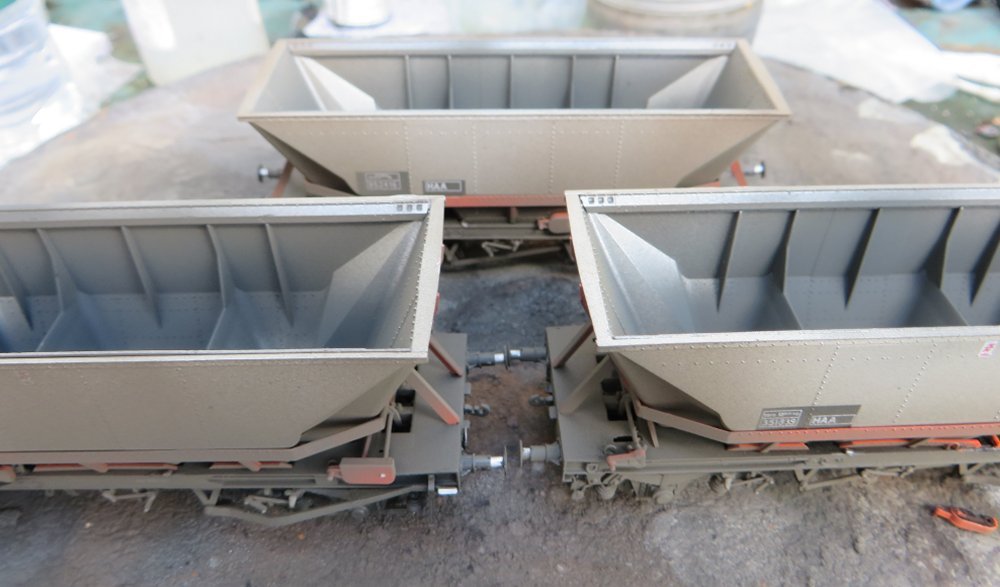 We’re not aiming for a saturation-bombing approach, just a suggestion of what this wagon carries.
There are several stages still to follow and if the results appear inadequate, we can always
come back and add more. I try not to overdo things – removing over-enthusiastic weathering
from beneath the canopy of an HFA is no sinecure . . .
We’re not aiming for a saturation-bombing approach, just a suggestion of what this wagon carries.
There are several stages still to follow and if the results appear inadequate, we can always
come back and add more. I try not to overdo things – removing over-enthusiastic weathering
from beneath the canopy of an HFA is no sinecure . . .
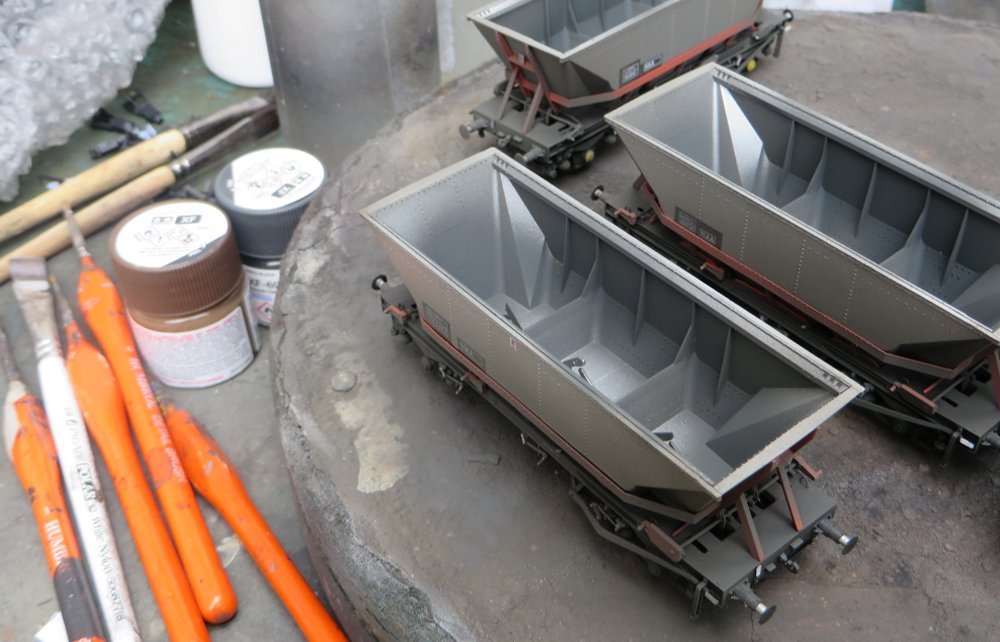 To build up tone I then like to add a faint secondary mist of NATO Black mixed 3:1 with Red
Brown (Tamiya XF-64). This is the same basic combination I’d used on the external bodywork
and underframe. So you can see what’s going on more clearly, these photos are about 20-25%
lighter than the actual models.
To build up tone I then like to add a faint secondary mist of NATO Black mixed 3:1 with Red
Brown (Tamiya XF-64). This is the same basic combination I’d used on the external bodywork
and underframe. So you can see what’s going on more clearly, these photos are about 20-25%
lighter than the actual models.
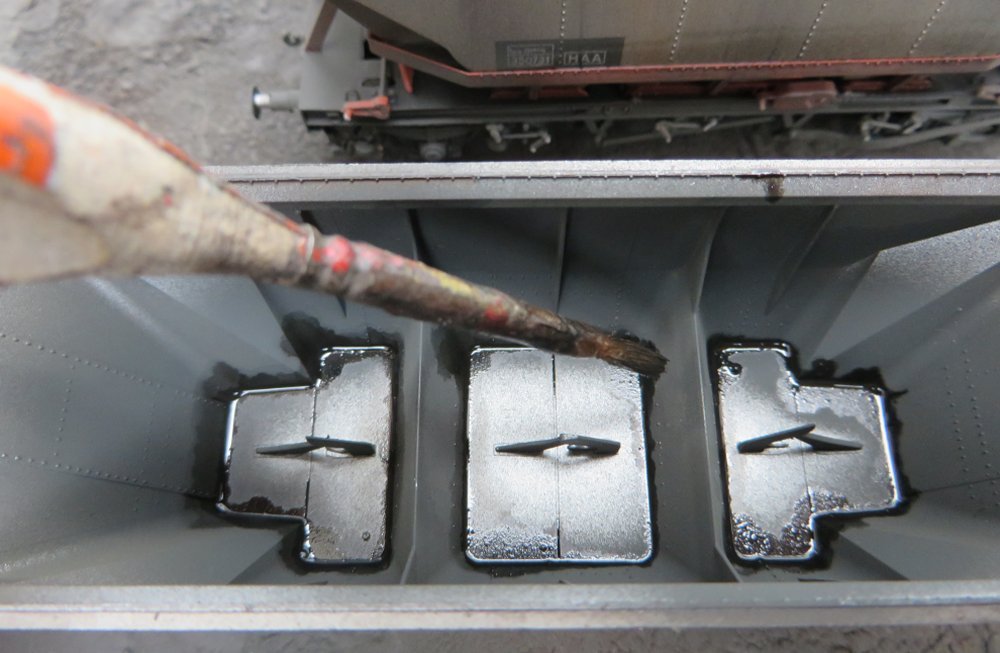 Coal residues build up around the bottom doors – these wagon are rarely fully emptied but
the amount of unloaded coal dust that goes back to the colliery is pretty minimal. I
represent this by dabbing on quantities of severely-thinned Revell Tar Black enamel, No 6,
but any old matt black will do. Unlike neat enamel, this dries very quickly and collects in
all the right places.
Coal residues build up around the bottom doors – these wagon are rarely fully emptied but
the amount of unloaded coal dust that goes back to the colliery is pretty minimal. I
represent this by dabbing on quantities of severely-thinned Revell Tar Black enamel, No 6,
but any old matt black will do. Unlike neat enamel, this dries very quickly and collects in
all the right places.
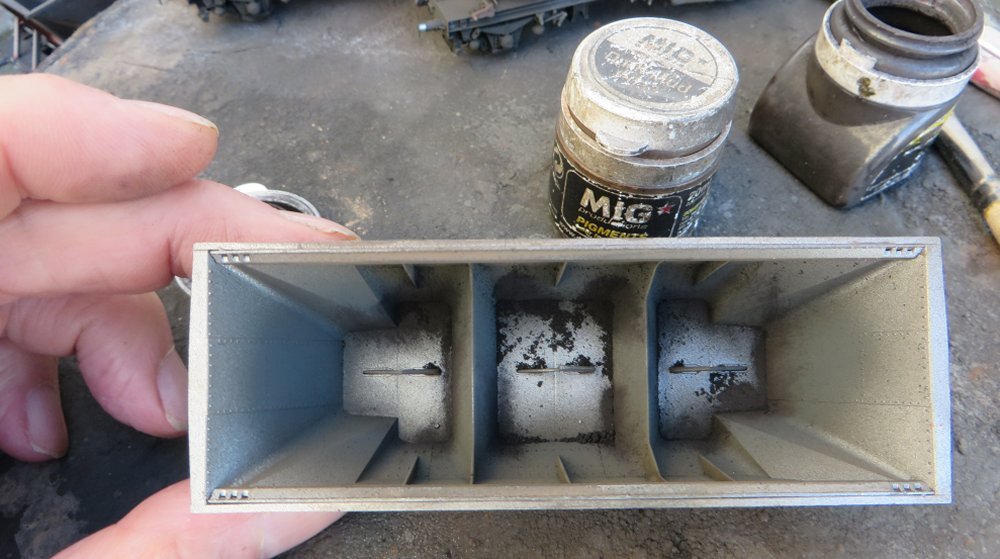 To represent the coal fines I’ve used MIG Black Smoke weathering powder. This is rather a
waste of one of the best weathering products on the market and I should have used some of
the third-rate pigments I’ve never had the heart to throw away. Humbrol powders are
particularly poor in my view.
To represent the coal fines I’ve used MIG Black Smoke weathering powder. This is rather a
waste of one of the best weathering products on the market and I should have used some of
the third-rate pigments I’ve never had the heart to throw away. Humbrol powders are
particularly poor in my view.
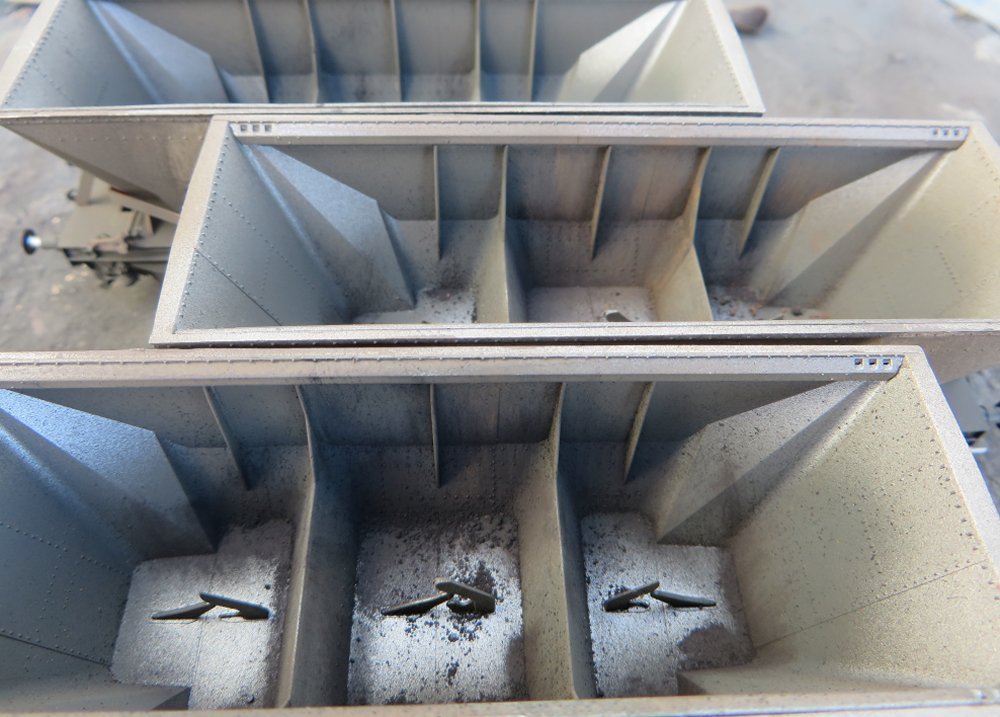 If you look at the middle wagon you can see how I’ve worked subtle tints of MIG Dark Mud over
the dark matter on the inner wagon sides, to replicate the discolouration often seen in this area.
If you look at the middle wagon you can see how I’ve worked subtle tints of MIG Dark Mud over
the dark matter on the inner wagon sides, to replicate the discolouration often seen in this area.
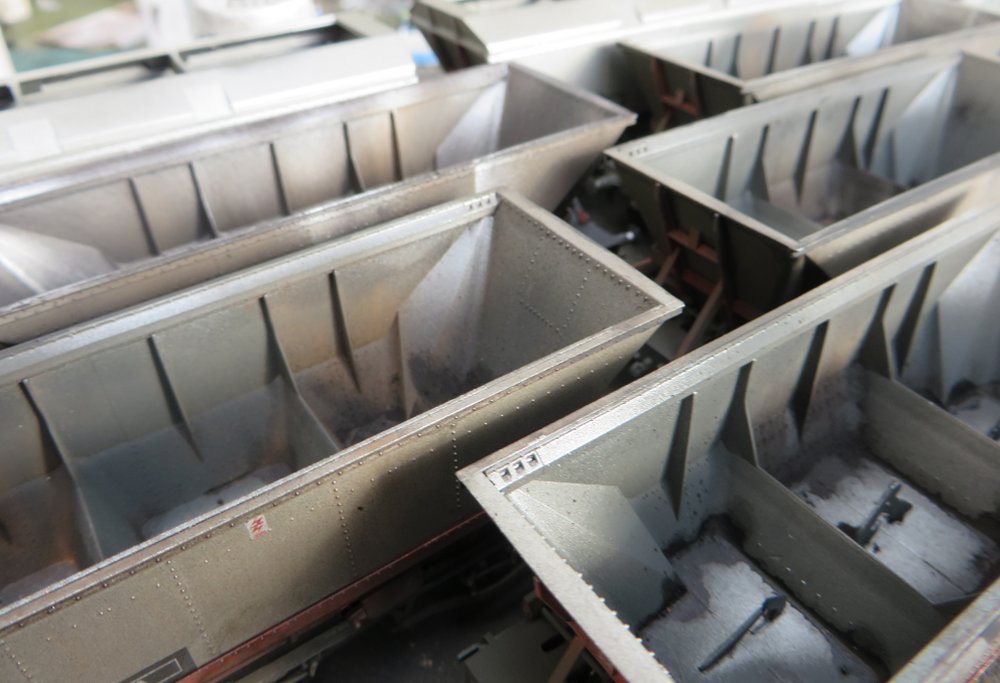 The magic happens when you blend hints of MIG Gun Metal powder with the Dark Mud. You can see
this slight metallic sheen all the time in photographs but, as ever, be careful not to overstate things.
The magic happens when you blend hints of MIG Gun Metal powder with the Dark Mud. You can see
this slight metallic sheen all the time in photographs but, as ever, be careful not to overstate things.
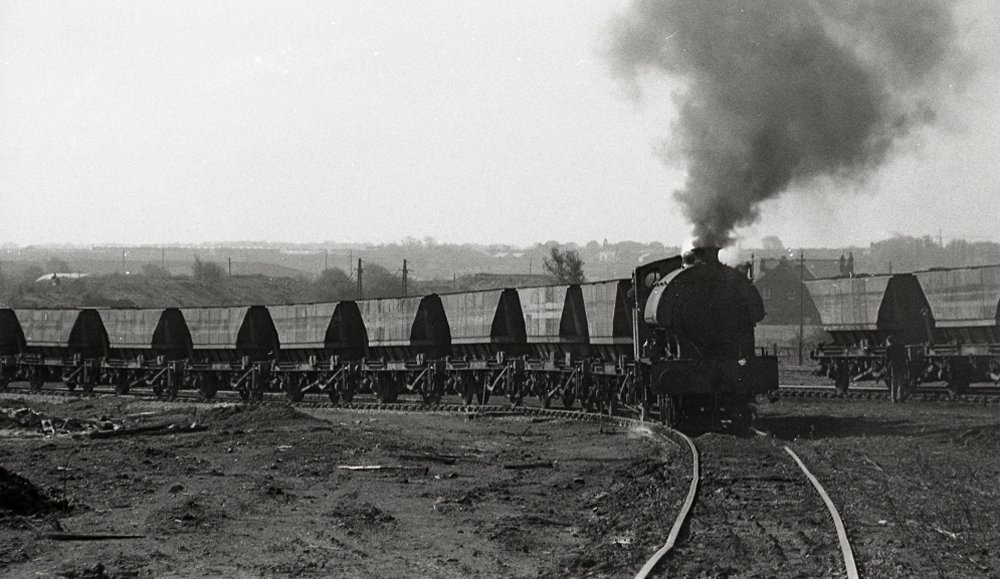 Here’s a reminder that many collieries loading merry-go-round trains were still using steam
power well into the 1970s – mostly Austerity saddle tanks by this time. Here at Bickershaw
colliery on 9 May 1976 (my birthday) one of the late survivors shunts a rake of hoppers out
of the exchange sidings. These are the original HOP32AB design, still with remnants of the
internal cross-bracing with which they were built and showing the ‘tyre marks’ on the side
panels from the machinery used to propel them through colliery screens.
Here’s a reminder that many collieries loading merry-go-round trains were still using steam
power well into the 1970s – mostly Austerity saddle tanks by this time. Here at Bickershaw
colliery on 9 May 1976 (my birthday) one of the late survivors shunts a rake of hoppers out
of the exchange sidings. These are the original HOP32AB design, still with remnants of the
internal cross-bracing with which they were built and showing the ‘tyre marks’ on the side
panels from the machinery used to propel them through colliery screens.

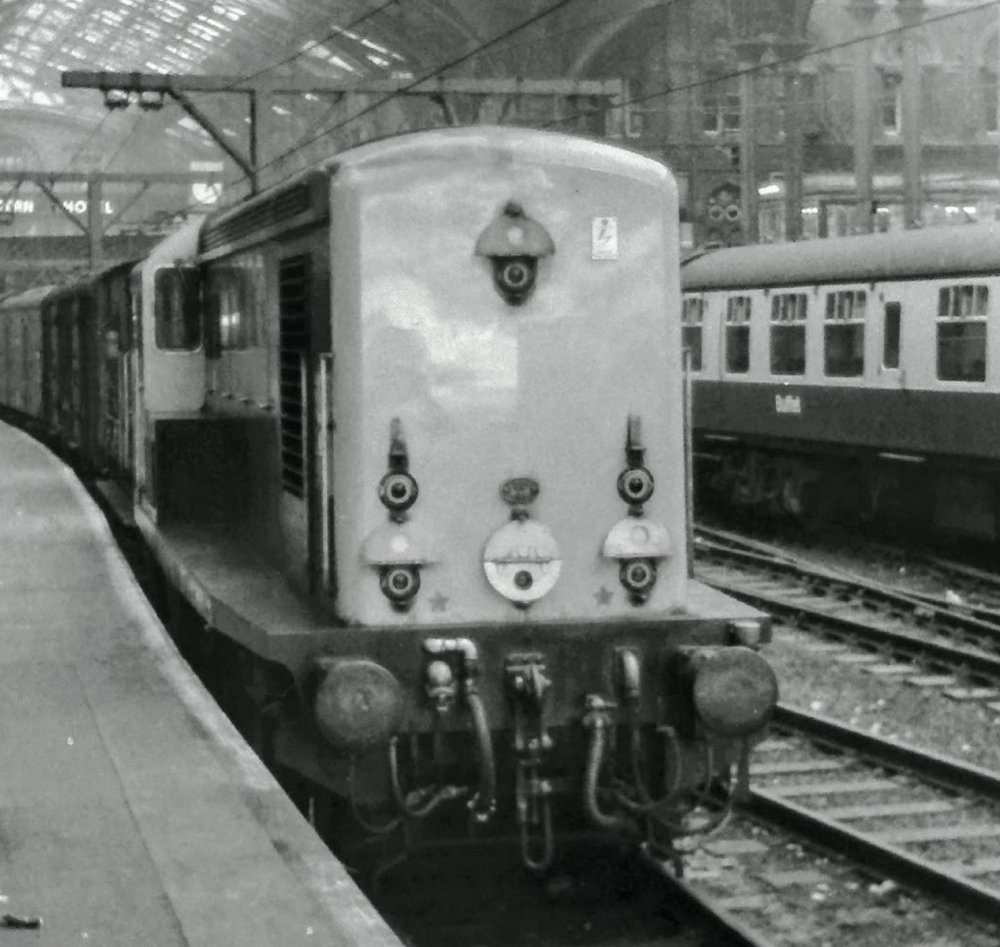 As promised, here's a few more pictures of the London spotting day on the 4th of October 1969
featured in last month's update.
Seen elsewhere on this site, but for completeness is this
photograph of station pilot D8234 at Liverpool Street.
As promised, here's a few more pictures of the London spotting day on the 4th of October 1969
featured in last month's update.
Seen elsewhere on this site, but for completeness is this
photograph of station pilot D8234 at Liverpool Street.
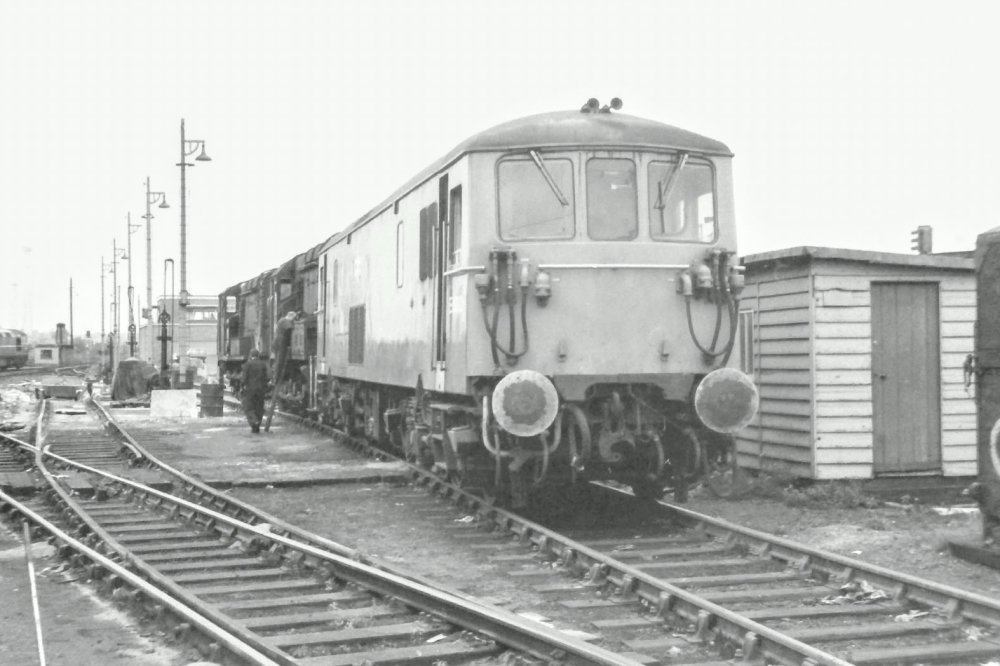 E6002 at 73C Hither Green.
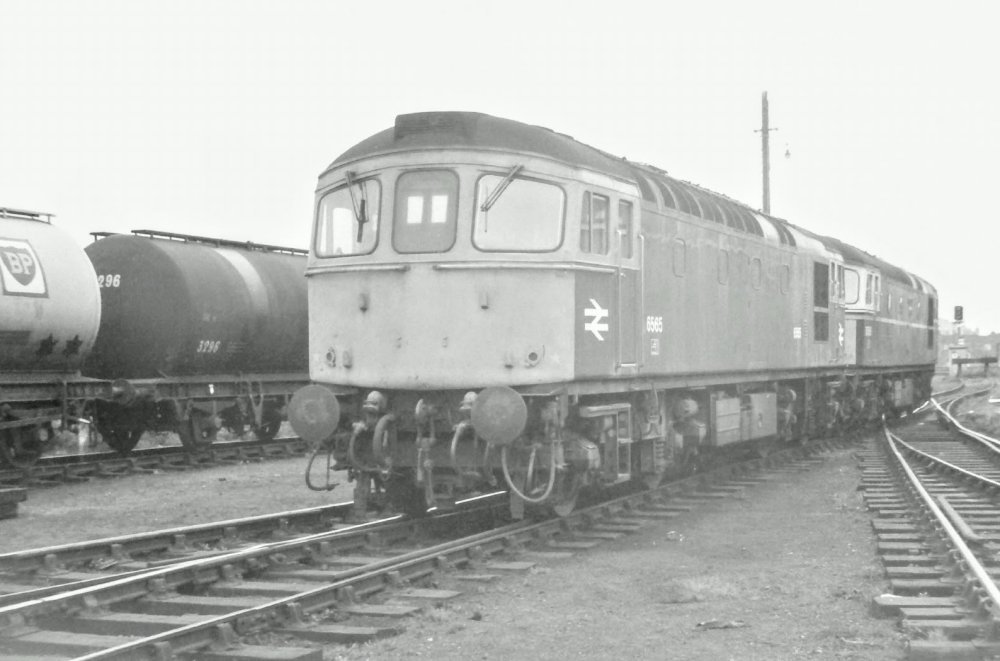 Just as we got to Hither Green, these 2 were moving off shed. Regrettably I was a fraction too
late with getting the camera ready as this is the going away shot, and annoyingly the front one
is the money shot as it still had small yellow warning panels.
6565 & D6556.
Just as we got to Hither Green, these 2 were moving off shed. Regrettably I was a fraction too
late with getting the camera ready as this is the going away shot, and annoyingly the front one
is the money shot as it still had small yellow warning panels.
6565 & D6556.
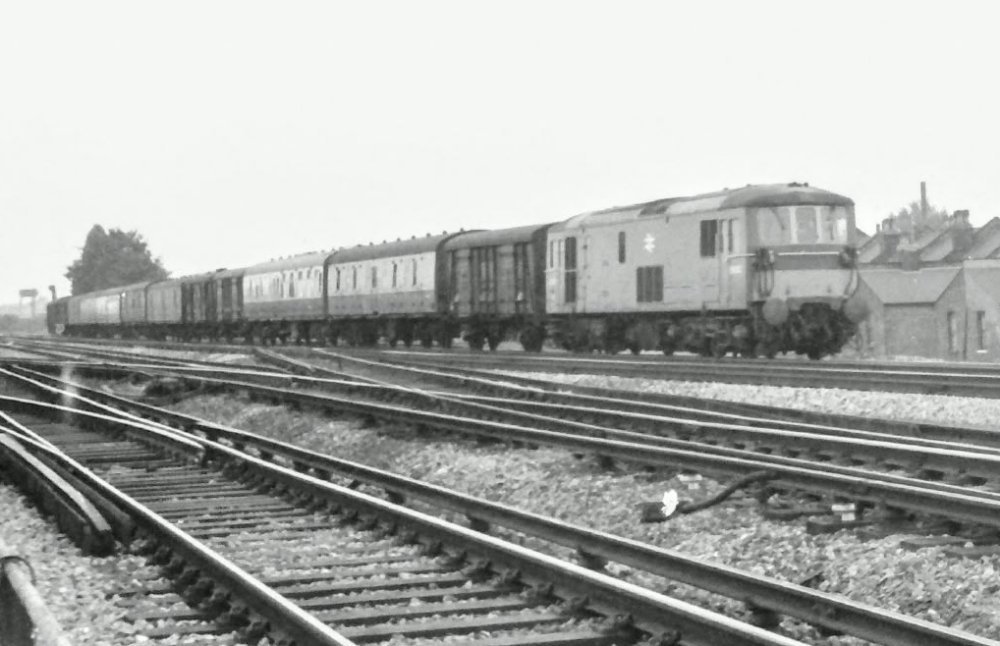 Indicative of the amount of parcels traffic into London, even on a Saturday are the next 2 pictures.
Firstly here's E6022 at Hither Green station.
Indicative of the amount of parcels traffic into London, even on a Saturday are the next 2 pictures.
Firstly here's E6022 at Hither Green station.
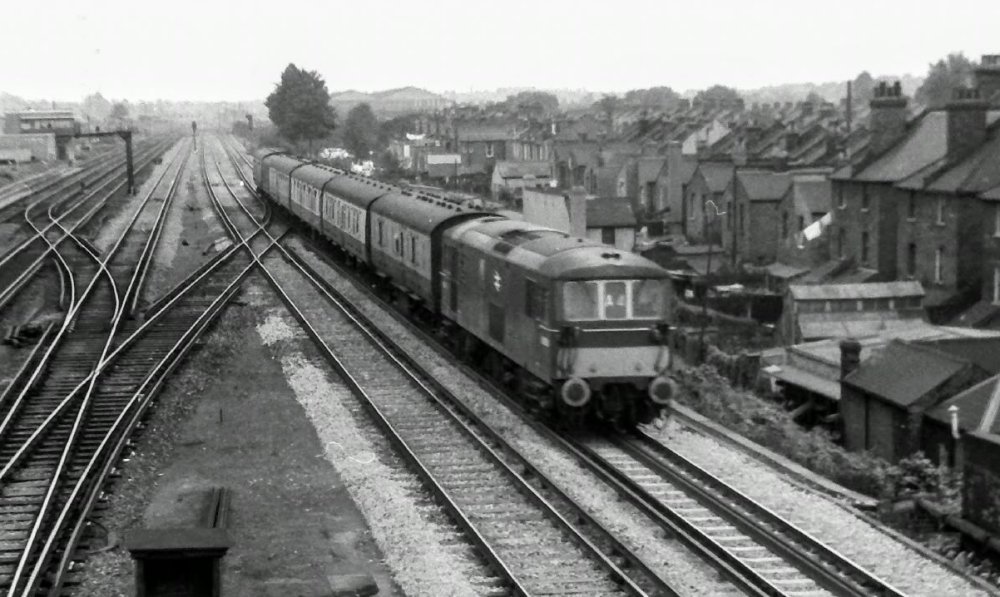 Followed by E6036 in my favourite livery - the as built blue with small yellow panels.
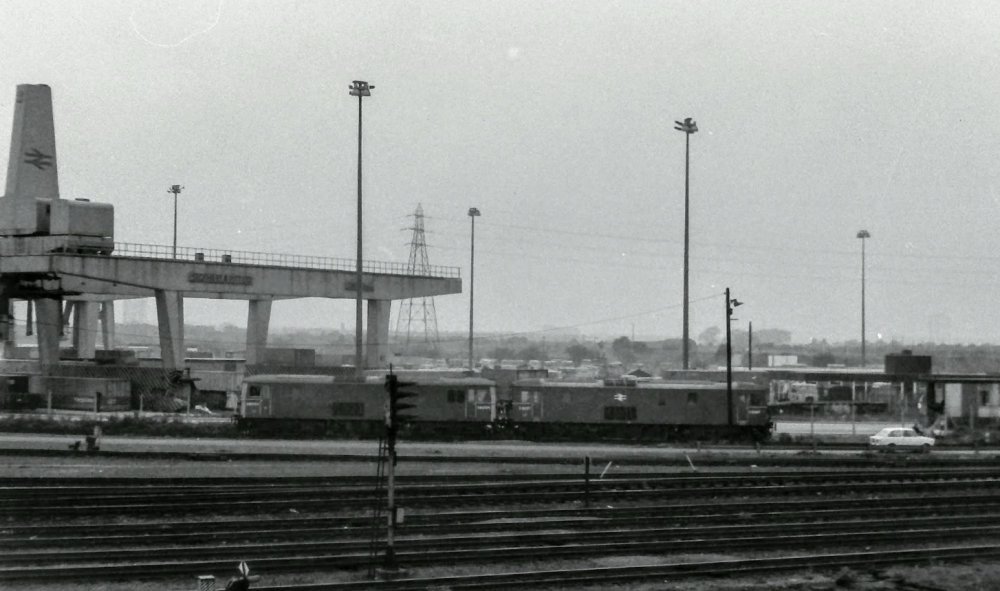 Stratford 30A was visited but it was a bad day for access, so what we did see was viewed at a
snappy pace with no photos taken.
There was a more relaxed view of the lines down by the
Freightliner depot, capturing E6004 & E6027.
Stratford 30A was visited but it was a bad day for access, so what we did see was viewed at a
snappy pace with no photos taken.
There was a more relaxed view of the lines down by the
Freightliner depot, capturing E6004 & E6027.
 Back in the shock horror department, I had saved my apprentice wages and my camera was a Rank
Aldis Rangefinder purchased from Dixon's with cold hard cash!
It was not an SLR, but, as its
name implies, it had a viewing window at the top right hand corner which only generally
approximated to the actual composition, but I got used to it's foibles.
One thing it did have
though was a bloody lens cap, which could sometimes be inadvertently left on. As for this shot,
you must believe me, was a pair of BTH D82xxs passing the aforementioned freightliner depot.
Back in the shock horror department, I had saved my apprentice wages and my camera was a Rank
Aldis Rangefinder purchased from Dixon's with cold hard cash!
It was not an SLR, but, as its
name implies, it had a viewing window at the top right hand corner which only generally
approximated to the actual composition, but I got used to it's foibles.
One thing it did have
though was a bloody lens cap, which could sometimes be inadvertently left on. As for this shot,
you must believe me, was a pair of BTH D82xxs passing the aforementioned freightliner depot.
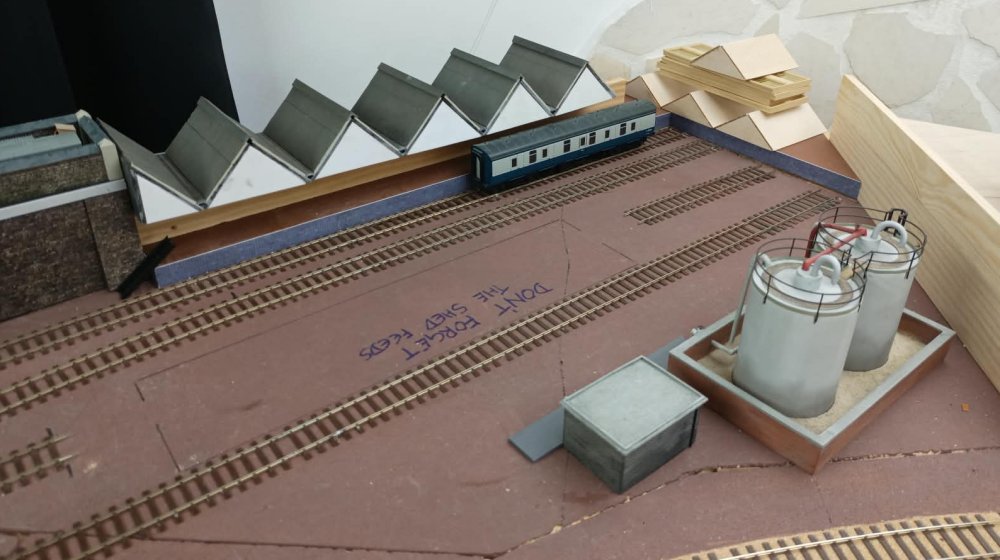 On the layout it's primarily been scenic work starting off with the Motorail yard. I couldn't
decide what to actually do with the platform area, as the 2 previous efforts didn't look right.
Then I had a brainwave, tying in with my efforts to keep as much of the original layout as
possible, there was a pitched roof available. I'll spare you the gory details, but it was cut
down the middle with a sliding chop saw after taking the obligatory brave pill!
The shrapnel
from previous efforts are lurking / hiding in the background awaiting further use.
Girders,
framework, support columns, valancing etc will be added along with platform buildings and details.
On the layout it's primarily been scenic work starting off with the Motorail yard. I couldn't
decide what to actually do with the platform area, as the 2 previous efforts didn't look right.
Then I had a brainwave, tying in with my efforts to keep as much of the original layout as
possible, there was a pitched roof available. I'll spare you the gory details, but it was cut
down the middle with a sliding chop saw after taking the obligatory brave pill!
The shrapnel
from previous efforts are lurking / hiding in the background awaiting further use.
Girders,
framework, support columns, valancing etc will be added along with platform buildings and details.
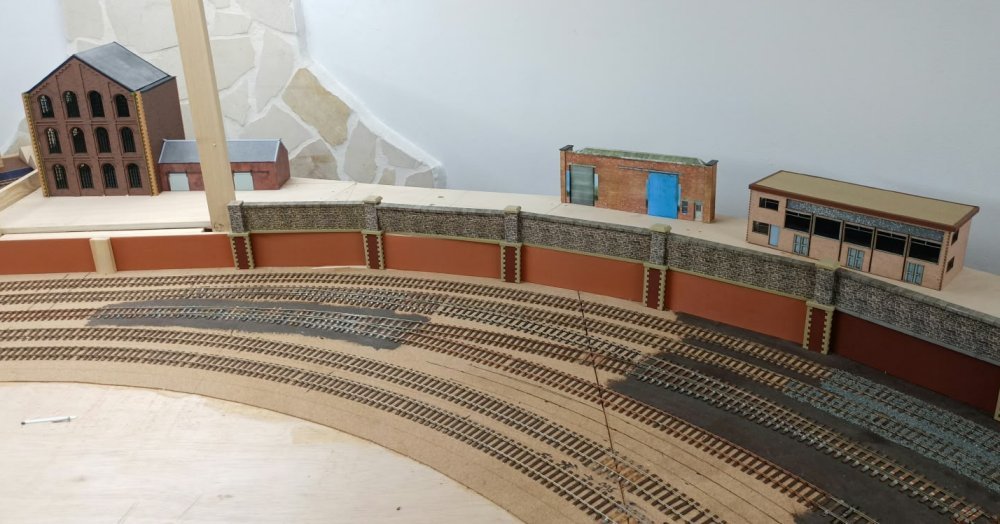 Work has continued on this scenic area, the walls and pillars clad and temporarily placed in
position, and a few buildings constructed to give a feel for where this bit will be going.
Work has continued on this scenic area, the walls and pillars clad and temporarily placed in
position, and a few buildings constructed to give a feel for where this bit will be going.
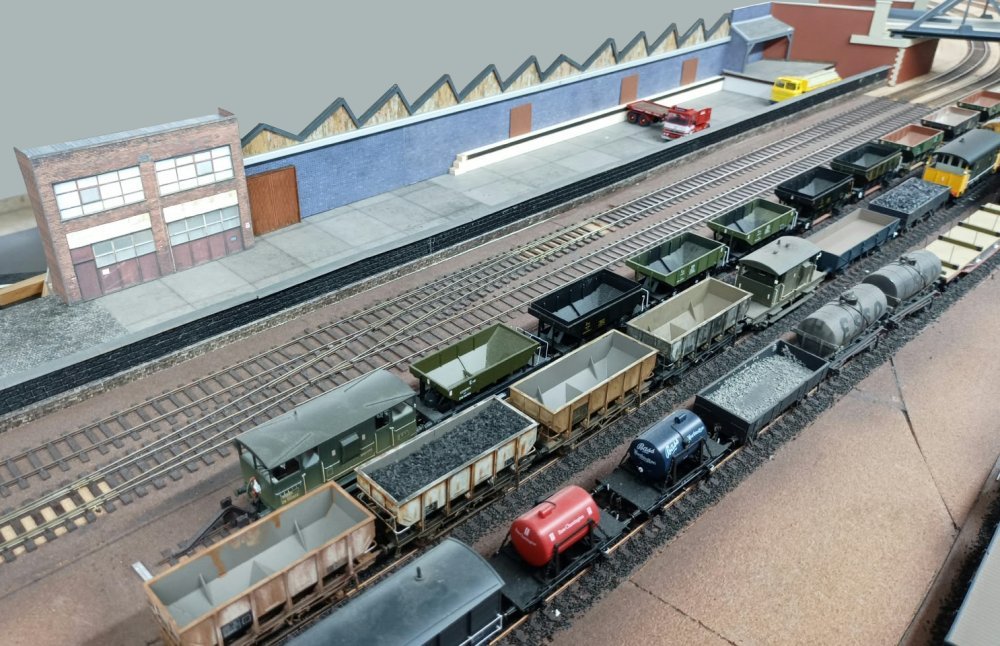 Another area worked on has been the low relief north light warehouse. Loading platforms added
with squares of brown card to give an idea of the doors. The metal conduit is the electrical
supply and will have a ground level incomer box and vertical conduit to connect it.
An awning
of some sort will protect the loading bays.
The front wall is screwed down with coping stones
leaning on top, this will be cut down lengthwise to accommodate the crossing gates to the PW yard.
Another area worked on has been the low relief north light warehouse. Loading platforms added
with squares of brown card to give an idea of the doors. The metal conduit is the electrical
supply and will have a ground level incomer box and vertical conduit to connect it.
An awning
of some sort will protect the loading bays.
The front wall is screwed down with coping stones
leaning on top, this will be cut down lengthwise to accommodate the crossing gates to the PW yard.

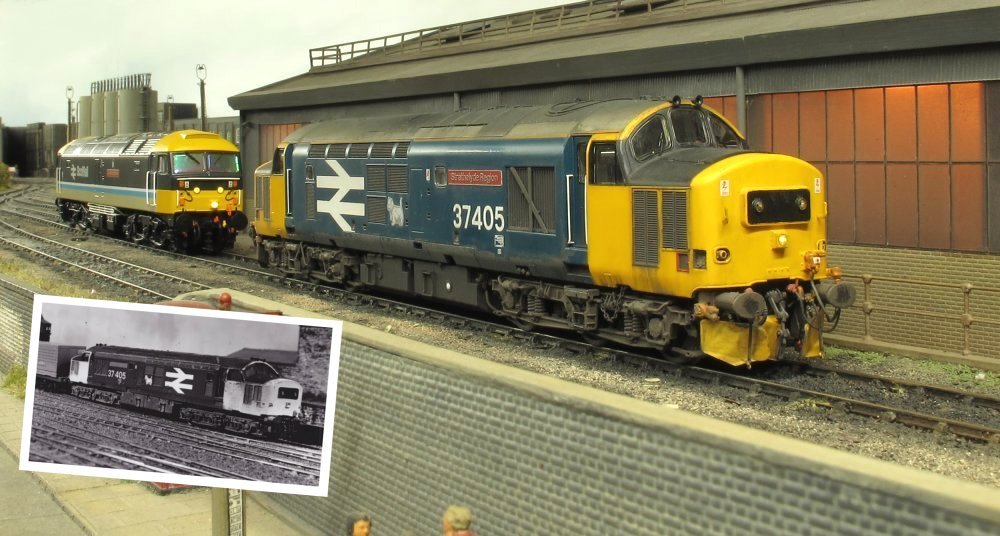 There's a slight diversion into the 1980s this month with the latest project - a Class 37/4
in large logo livery 37405 Strathclyde Region. This locomotive has always been a favourite of
mine, the inset showing a Lima version of the model which was regularly seen on my 1980s
themed EM gauge layout 'Holmeworth'.
There's a slight diversion into the 1980s this month with the latest project - a Class 37/4
in large logo livery 37405 Strathclyde Region. This locomotive has always been a favourite of
mine, the inset showing a Lima version of the model which was regularly seen on my 1980s
themed EM gauge layout 'Holmeworth'.
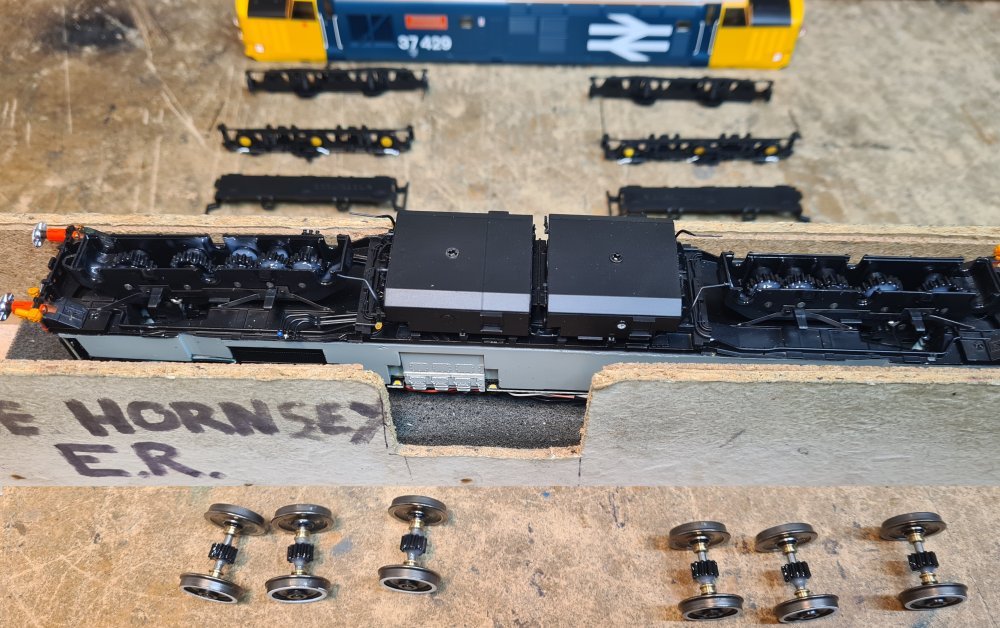 Accurascale's 37429 was chosen, as I managed to get it for a good price. Showing the white
rimmed wheels and bogie sideframes removed as part of the regauging and weathering process. The
handbrake levers can easily be pulled from the chassis, without the need to dismantle the chains.
Accurascale's 37429 was chosen, as I managed to get it for a good price. Showing the white
rimmed wheels and bogie sideframes removed as part of the regauging and weathering process. The
handbrake levers can easily be pulled from the chassis, without the need to dismantle the chains.
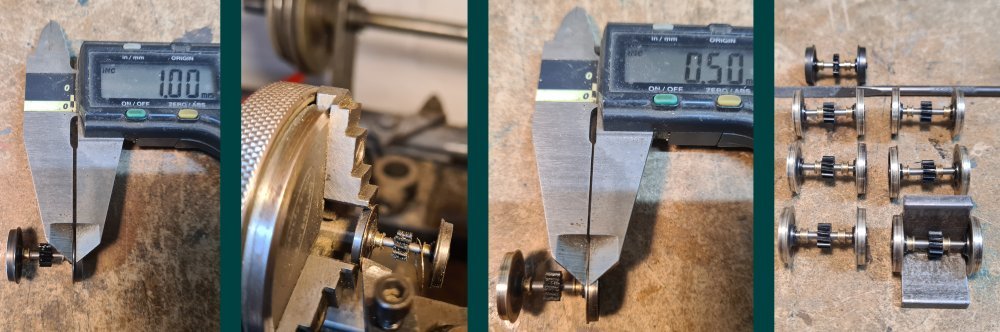 A pictorial sequence showing the usual method of regauging the original wheelsets, so that
the wheels only need to be moved 0.5mm on the existing axles. The 3-jaw chuck is always used
with Accurascale wheels, as they have a tendency to slip out of the collets, unlike other
manufacturer's wheels.
A pictorial sequence showing the usual method of regauging the original wheelsets, so that
the wheels only need to be moved 0.5mm on the existing axles. The 3-jaw chuck is always used
with Accurascale wheels, as they have a tendency to slip out of the collets, unlike other
manufacturer's wheels.
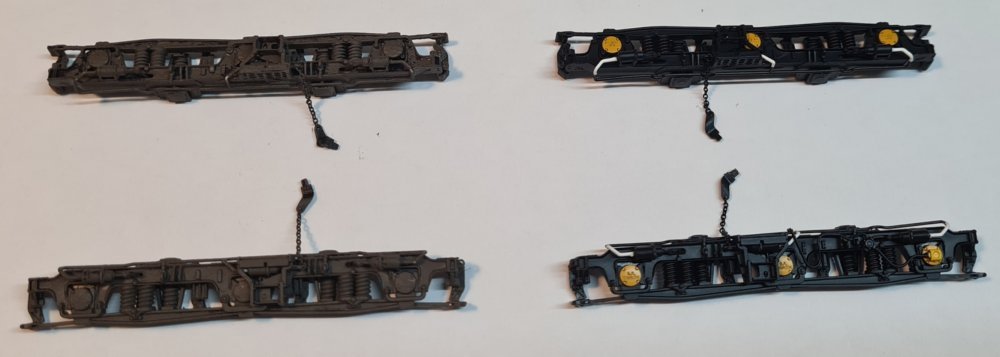 With the bogie sideframes free from the model, it's a good opportunity to make a start on
the weathering process by painting them Humbrol 98 brown as a base colour.
With the bogie sideframes free from the model, it's a good opportunity to make a start on
the weathering process by painting them Humbrol 98 brown as a base colour.
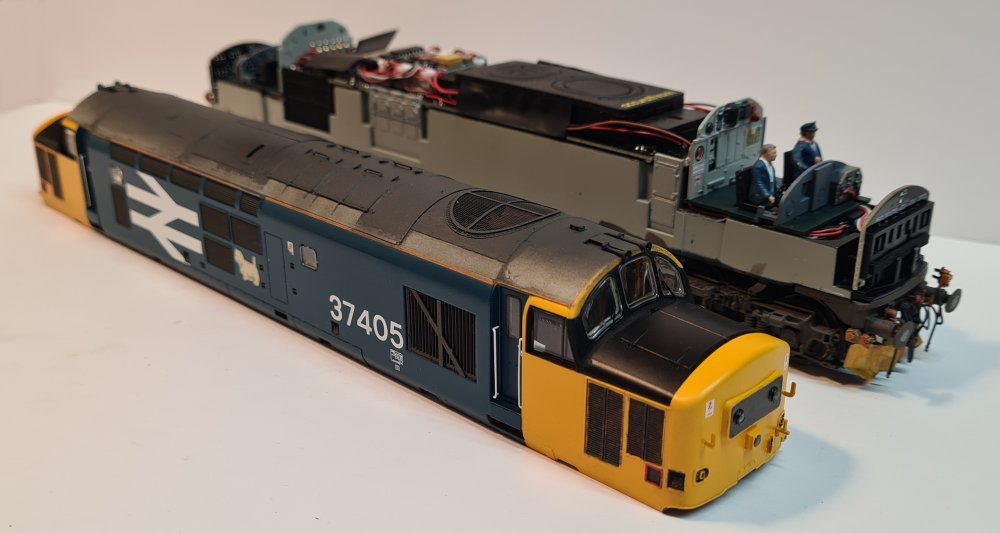 The body has been masked off to concentrate on the roof weathering, fist by brush painting
the dirty panels, and finishing off with the airbrush using a mix of greys and browns, with
black around the exhaust ports. A driver and secondman have been painted and fitted, using
Jonny's 3D printed figures.
The body has been masked off to concentrate on the roof weathering, fist by brush painting
the dirty panels, and finishing off with the airbrush using a mix of greys and browns, with
black around the exhaust ports. A driver and secondman have been painted and fitted, using
Jonny's 3D printed figures.
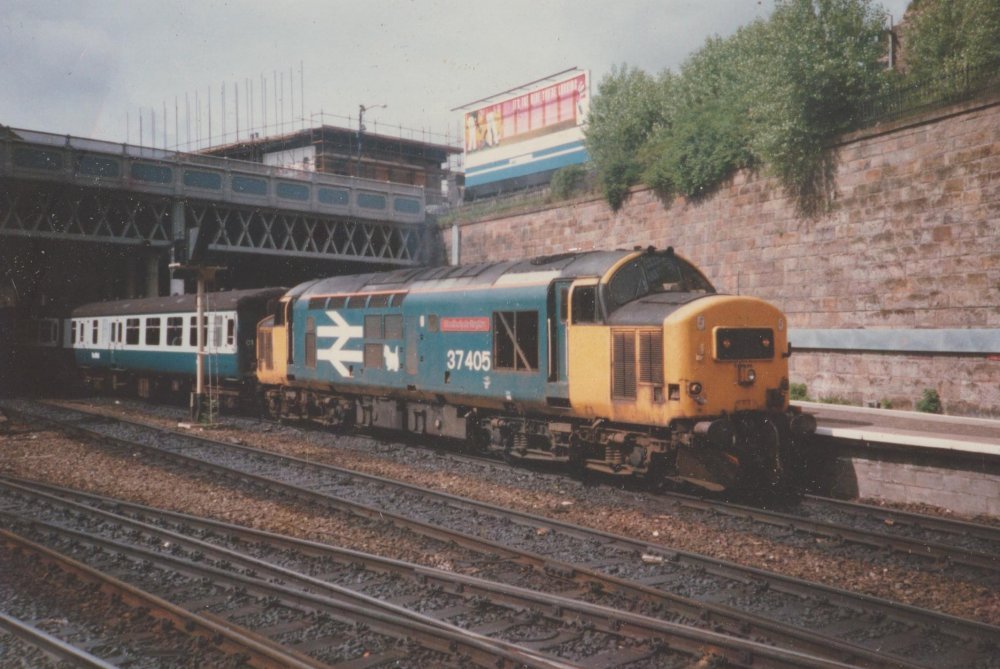 The inspiration for this 37/4 project, bringing back memories of a trip to Scotland in
June 1988 - 37405 Strathclyde Region. Of note is that this locomotive retained its Western
Region style lamp brackets after a rebuild from Cardiff Canton allocated 37282, before
heading to Scotland and becoming part of the Eastfield fleet.
The inspiration for this 37/4 project, bringing back memories of a trip to Scotland in
June 1988 - 37405 Strathclyde Region. Of note is that this locomotive retained its Western
Region style lamp brackets after a rebuild from Cardiff Canton allocated 37282, before
heading to Scotland and becoming part of the Eastfield fleet.
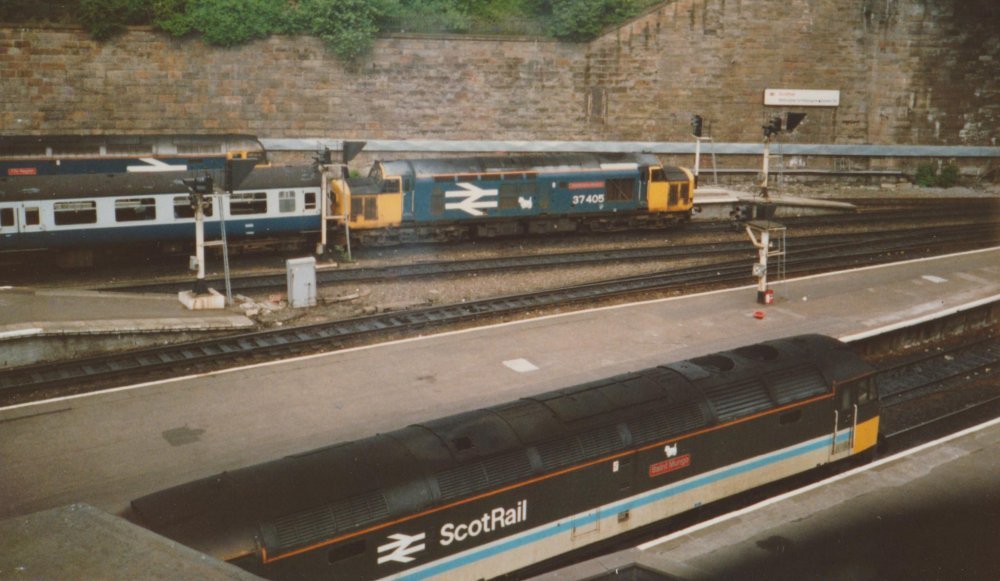 With 37405 in the centre of this image, 47703 Saint Mungo nearest and 47641 Fife Region
furthest away, all ready for departure from Glasgow Queen Street on the 2nd of June 1988.
With 37405 in the centre of this image, 47703 Saint Mungo nearest and 47641 Fife Region
furthest away, all ready for departure from Glasgow Queen Street on the 2nd of June 1988.
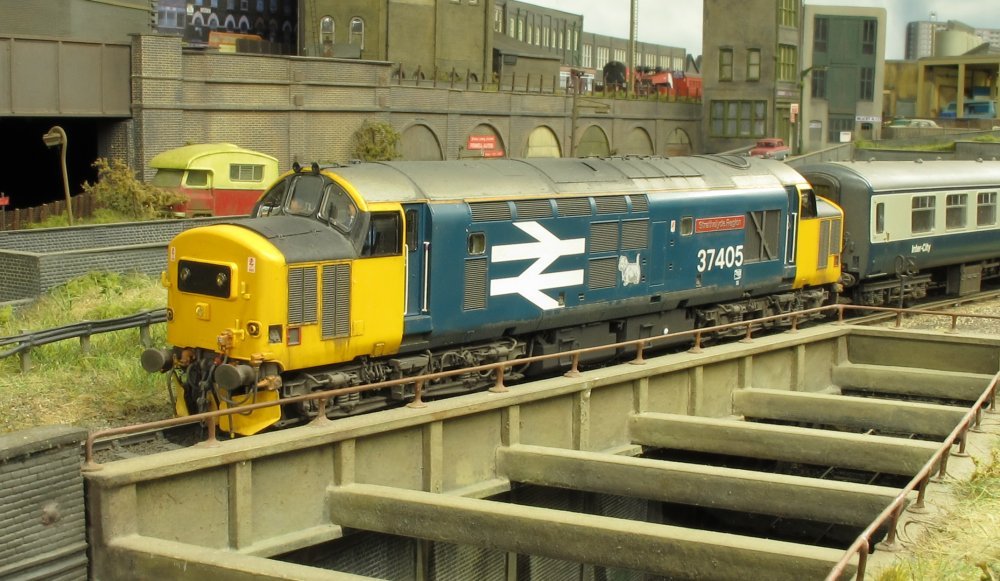 37405 in service with a short rake of mark 2 coaches - captured in North London and a long
way from home! The Terrier transfer is from Railtec, as is the 3D printed nameplate.
37405 in service with a short rake of mark 2 coaches - captured in North London and a long
way from home! The Terrier transfer is from Railtec, as is the 3D printed nameplate.
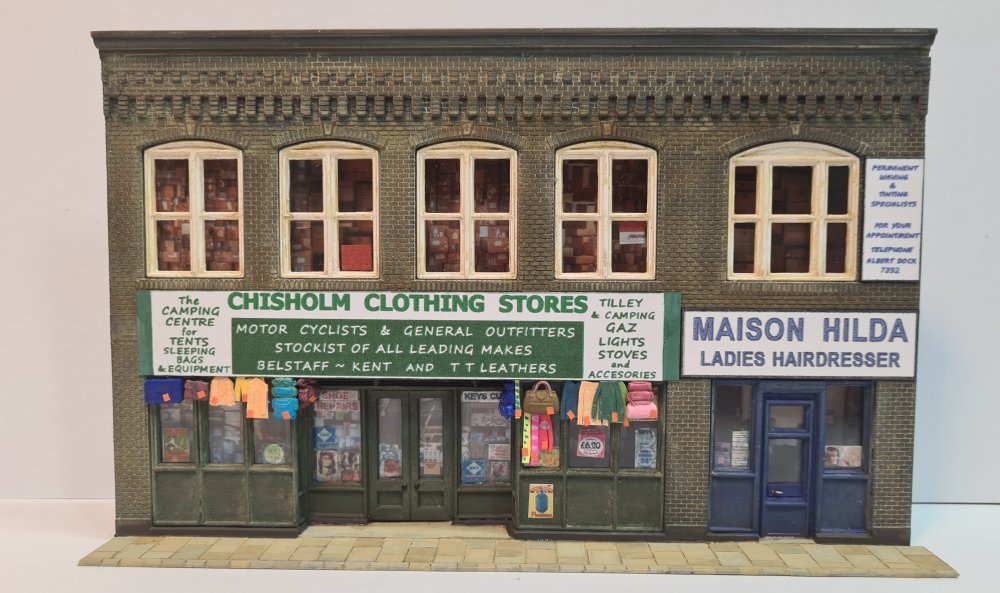 And now back to the 1970s at Ferry Road where another building is nearing completion. The
basic structure is a Walthers Merchants Row kit with additional printed signage inspired
by photographs of similar London based businesses from the late 1960s.
And now back to the 1970s at Ferry Road where another building is nearing completion. The
basic structure is a Walthers Merchants Row kit with additional printed signage inspired
by photographs of similar London based businesses from the late 1960s.
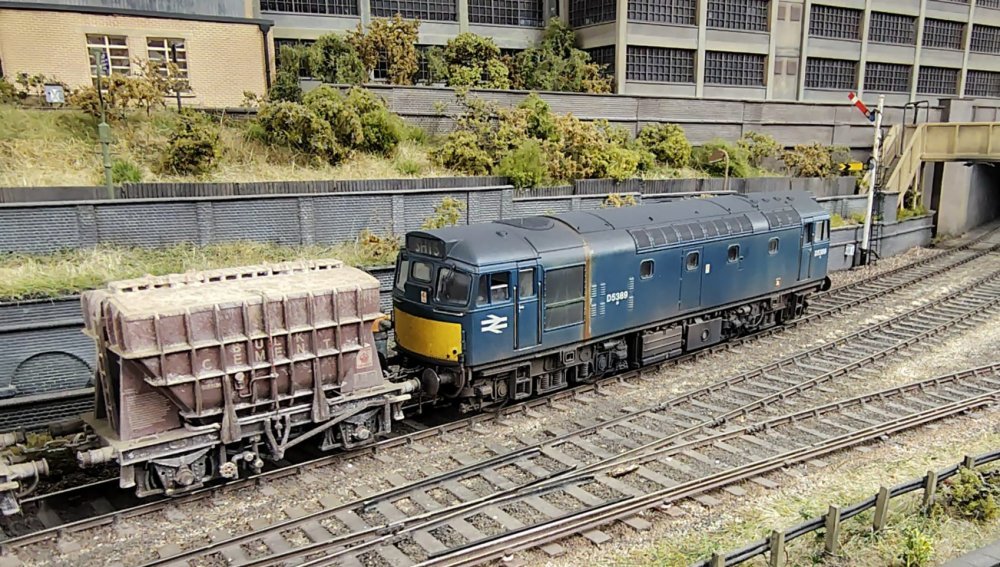 Captured during a recent running session, D5389 from the Shenston Road fleet is seen
at the head of a mixed freight.
Captured during a recent running session, D5389 from the Shenston Road fleet is seen
at the head of a mixed freight.

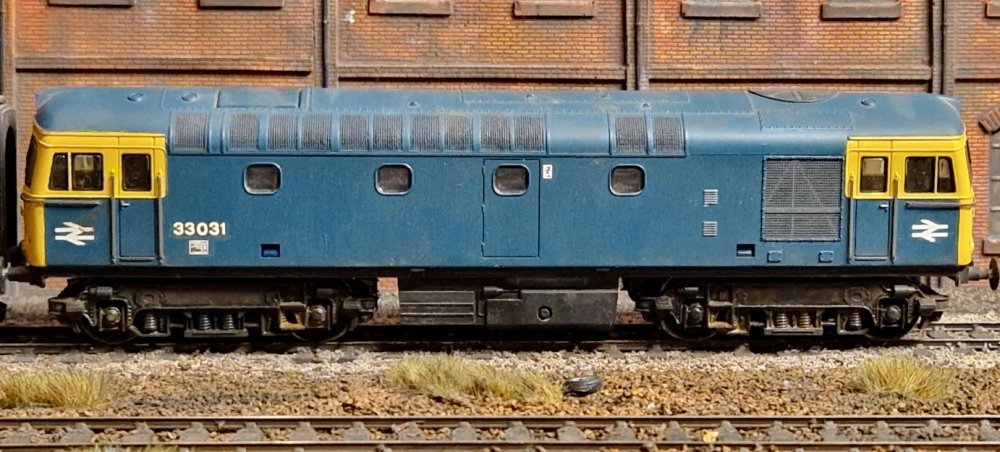 This month I've been working on another Lima Class 33 which I converted to EM gauge a few
months ago using Ultrascale wheels. It's been weathered with my usual 50% IPA washes and
5 different browns and greys to get a grimey look, and has a replacement larger Shawplan
brass roof grill added, new metal buffers and wire hand rails added to the front and sides.
Flush glaze windows added and black surrounds to the glass in the frames with etched brass
windscreen wipers. The body is fully repainted and new decals added. Next up will be pipes,
snowploughs and couplings.
This month I've been working on another Lima Class 33 which I converted to EM gauge a few
months ago using Ultrascale wheels. It's been weathered with my usual 50% IPA washes and
5 different browns and greys to get a grimey look, and has a replacement larger Shawplan
brass roof grill added, new metal buffers and wire hand rails added to the front and sides.
Flush glaze windows added and black surrounds to the glass in the frames with etched brass
windscreen wipers. The body is fully repainted and new decals added. Next up will be pipes,
snowploughs and couplings.

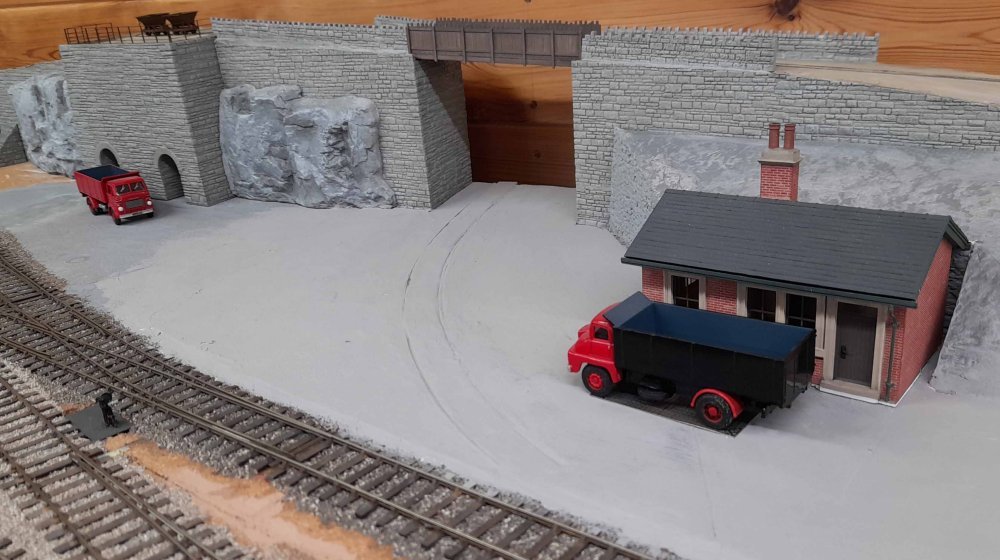 Work this month has focussed on the viaduct / quarry area of the Kentside Station part of
the layout. Here I’ve added a line of redundant rails buried in the quarry roadway area.
My thinking is that this was a siding into the quarry along which loaded coal wagons were
shunted to an unloading point within, from where they could be emptied into the mine tubs /
tippers used to access the charging platform on the Spencer kiln. The latter in my period
is being depicted as an out of use facility.
Work this month has focussed on the viaduct / quarry area of the Kentside Station part of
the layout. Here I’ve added a line of redundant rails buried in the quarry roadway area.
My thinking is that this was a siding into the quarry along which loaded coal wagons were
shunted to an unloading point within, from where they could be emptied into the mine tubs /
tippers used to access the charging platform on the Spencer kiln. The latter in my period
is being depicted as an out of use facility.
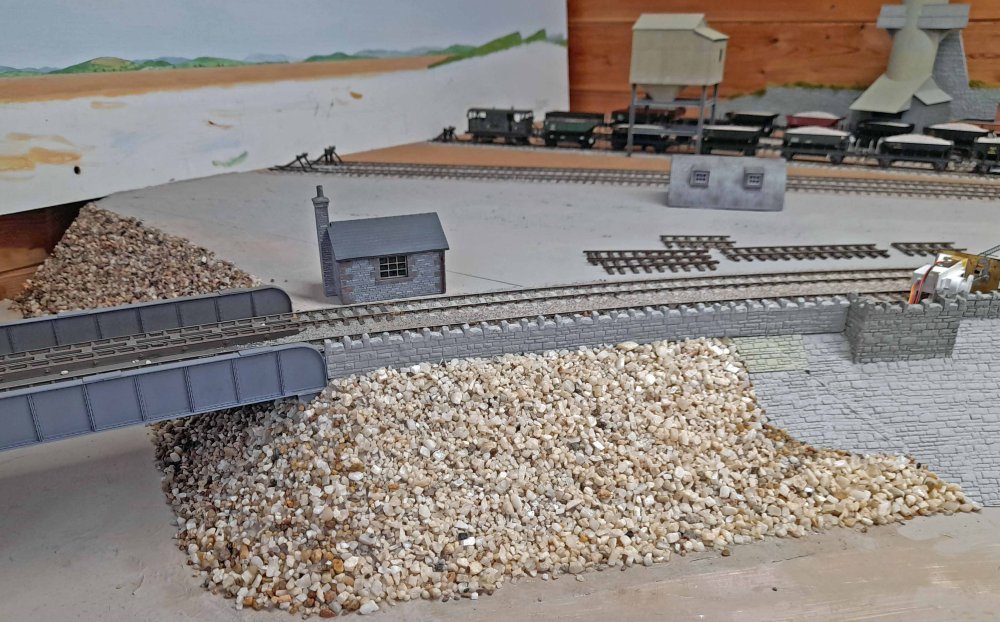 To represent the boulder faced slopes adjacent to the viaduct I’ve used fish tank gravel
(a mix of 1-3mm and 3-5mm types) bedded into PVA, here at the Kentside end. I wasn’t happy
at this stage how it ‘mated’ with the stone clad portion….
To represent the boulder faced slopes adjacent to the viaduct I’ve used fish tank gravel
(a mix of 1-3mm and 3-5mm types) bedded into PVA, here at the Kentside end. I wasn’t happy
at this stage how it ‘mated’ with the stone clad portion….
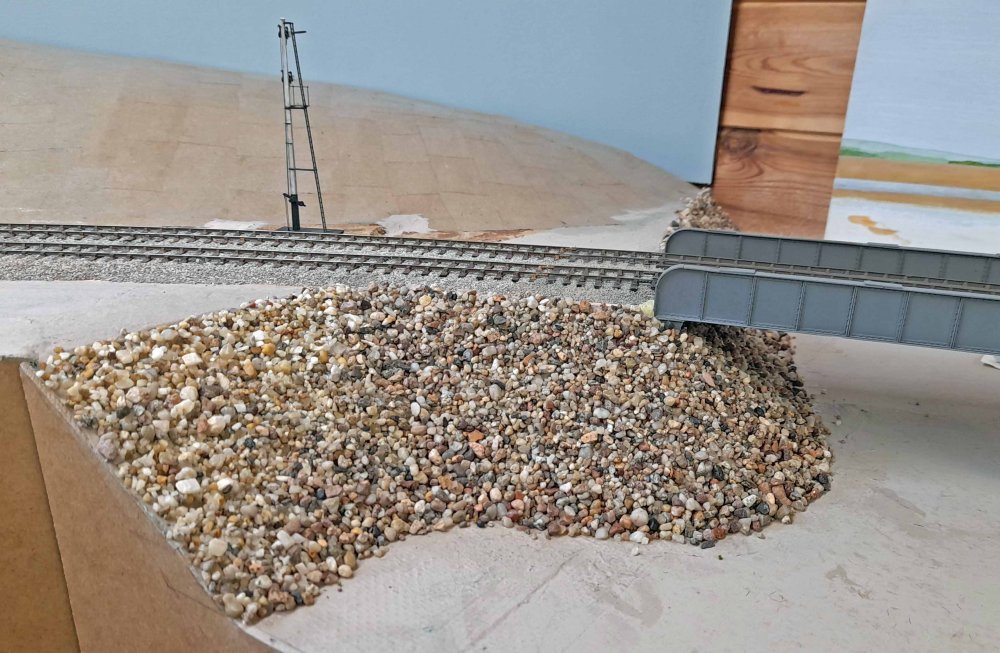 And here at the Heversham end of the viaduct.
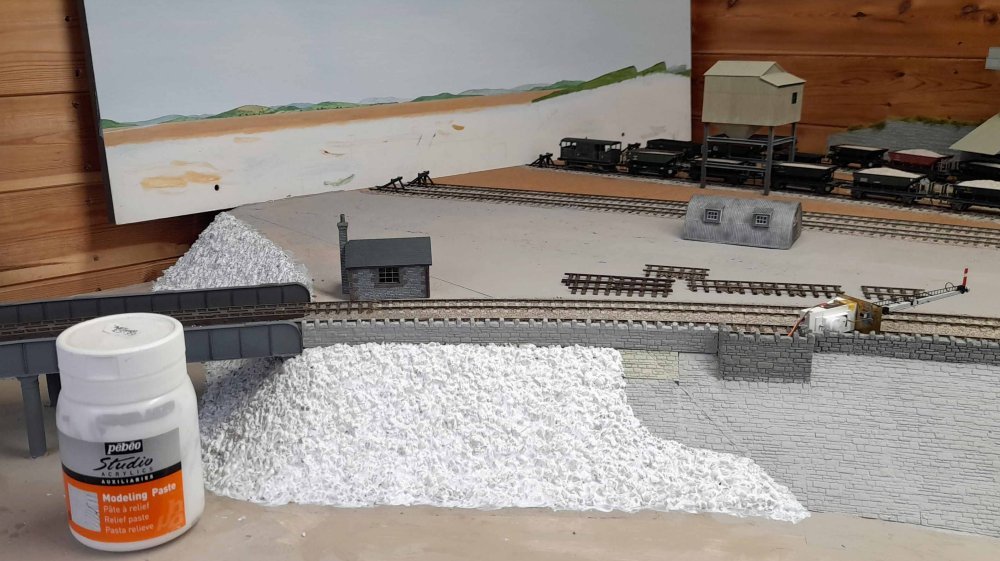 This first stage I felt was too ‘open’ between the stones, so to address this an
application of acrylic modelling paste was painted on to tie everything together.
This first stage I felt was too ‘open’ between the stones, so to address this an
application of acrylic modelling paste was painted on to tie everything together.
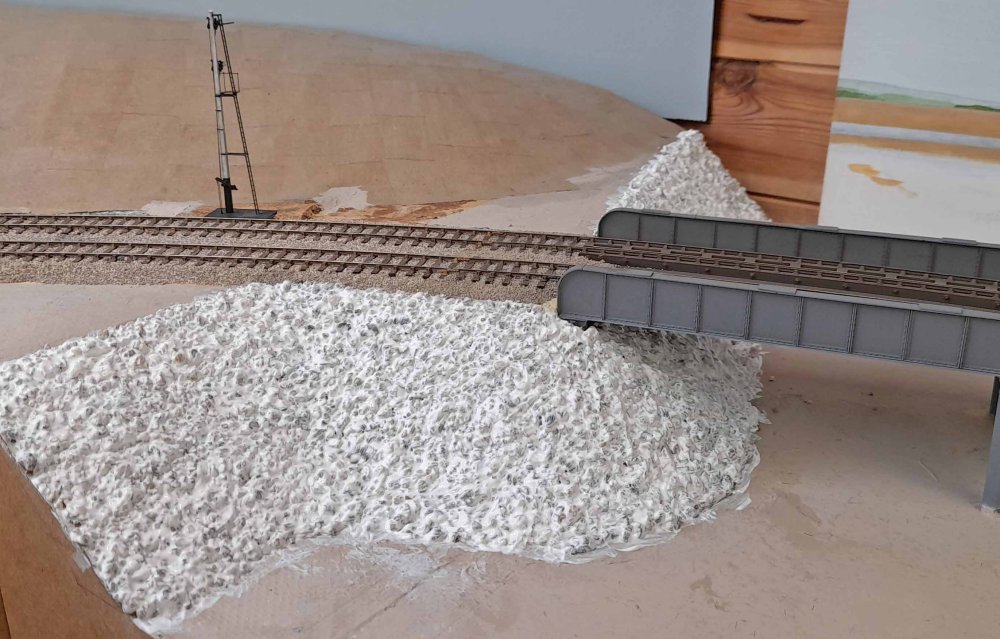 And again, at the other end of the viaduct.
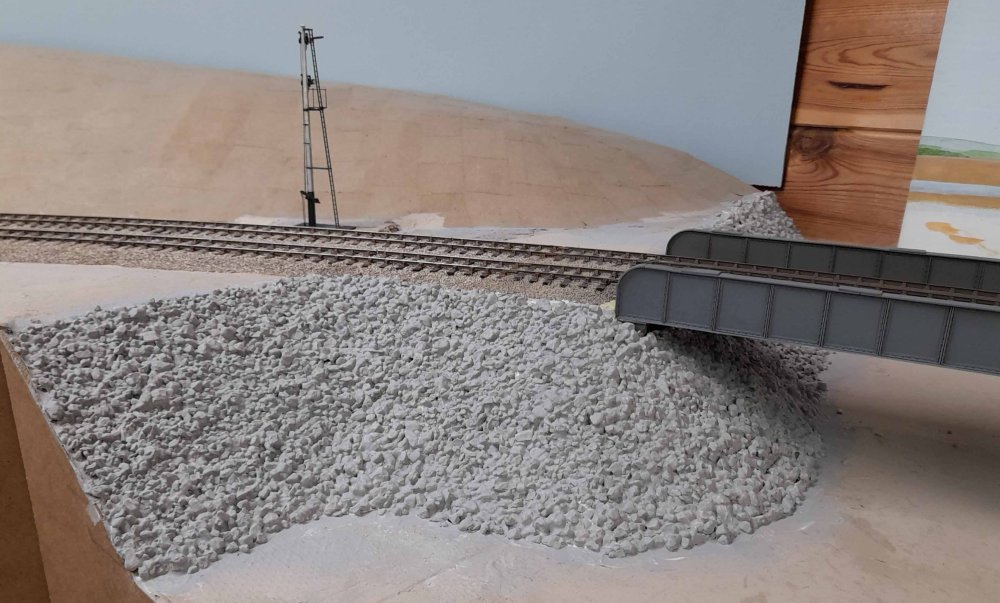 Same location, now painted a base colour, starting to look a bit more like….
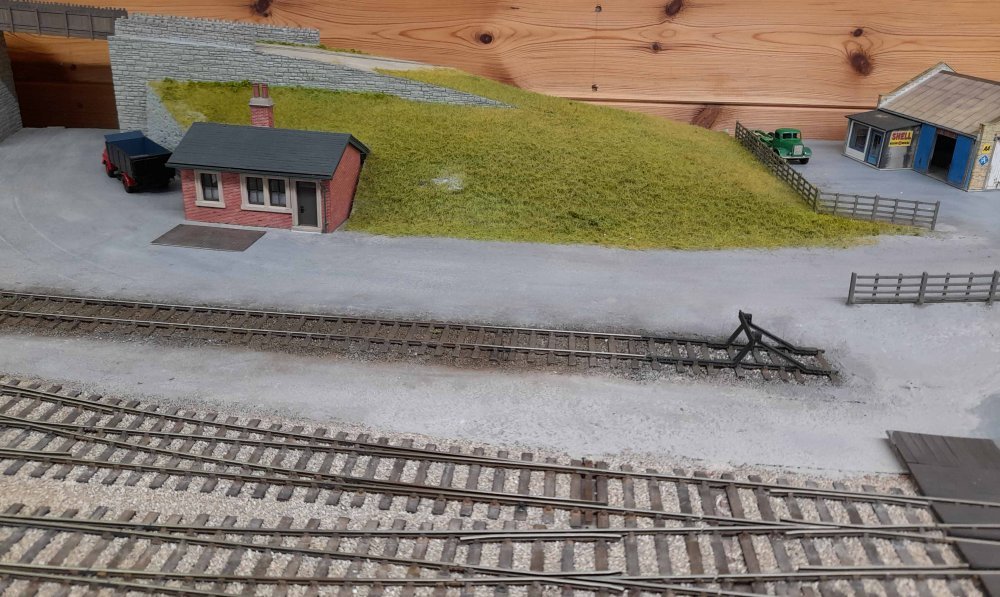 And now back to the quarry, where a start on some static grass has been made – well
outside of my comfort zone! A bit uniform at present and will eventually be detailed
with bushes, weeds and trees etc. Texturing and painting of the ground surfaces has
now also been completed.
And now back to the quarry, where a start on some static grass has been made – well
outside of my comfort zone! A bit uniform at present and will eventually be detailed
with bushes, weeds and trees etc. Texturing and painting of the ground surfaces has
now also been completed.
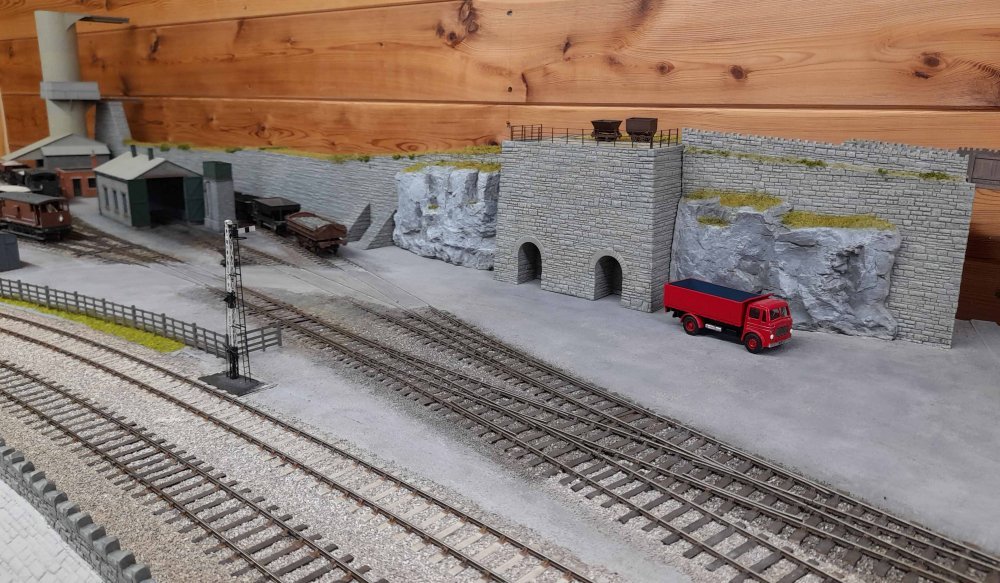 Looking further along the quarry, as well as the ground surface, lineside fencing has
been added (Ratio) and more static grass, effecting an almost instant transformation.
Obviously, gaps around the (removable) stone walling / exposed limestone faces to be
disguised with vegetation etc. and a lot of ‘clutter’ to be added, but it’s getting there.
Looking further along the quarry, as well as the ground surface, lineside fencing has
been added (Ratio) and more static grass, effecting an almost instant transformation.
Obviously, gaps around the (removable) stone walling / exposed limestone faces to be
disguised with vegetation etc. and a lot of ‘clutter’ to be added, but it’s getting there.
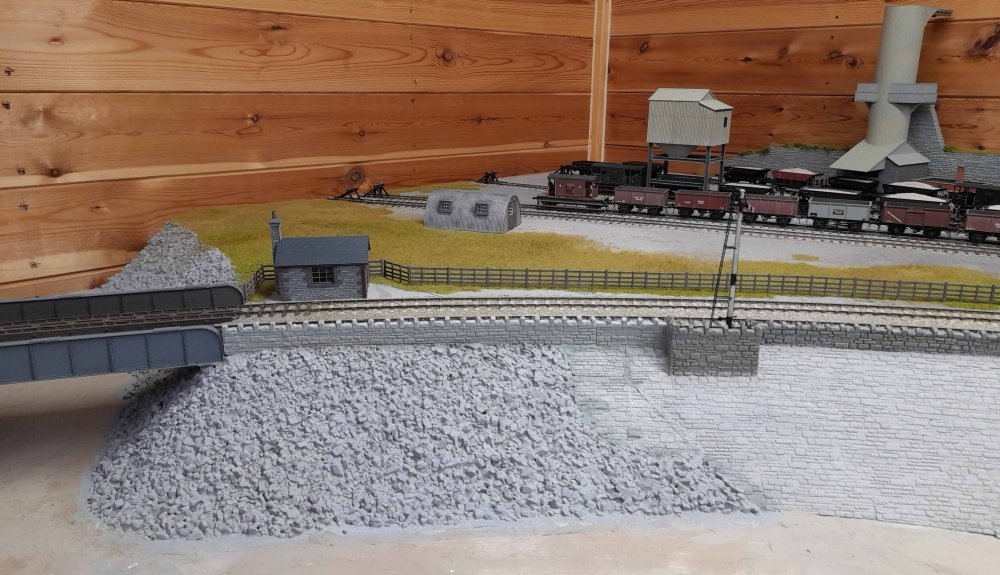 And indeed, 'grassing’ has continued all the way to the estuary edge, with some work being
done on disguising the join between gravel bank and stonework. Eventual application of
vegetation areas here will hopefully further help here….
And indeed, 'grassing’ has continued all the way to the estuary edge, with some work being
done on disguising the join between gravel bank and stonework. Eventual application of
vegetation areas here will hopefully further help here….
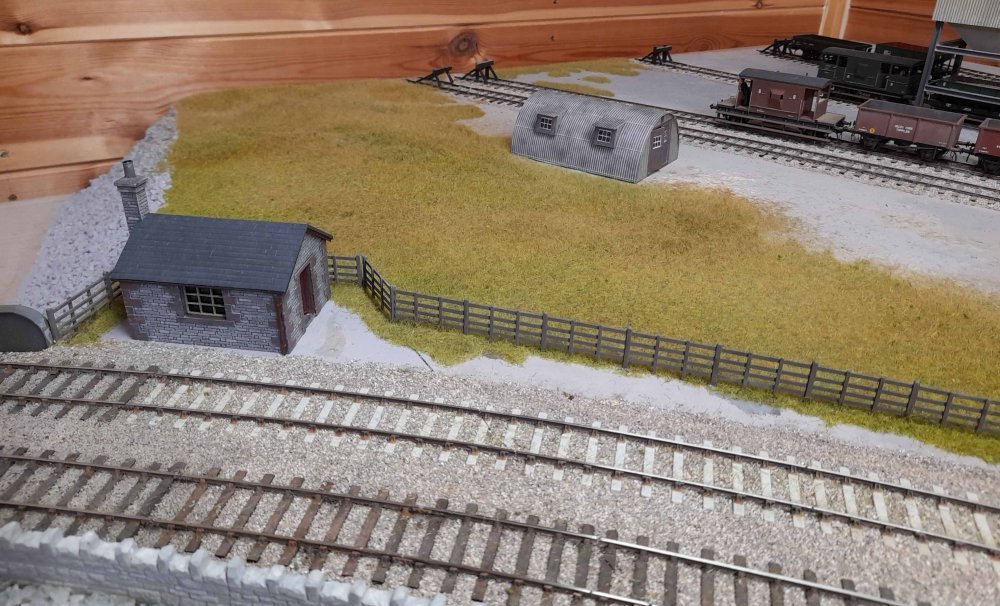 Again, this static grass will be the base layer, with scrub and other vegetation still to
be added, but it’s all starting to look a bit more like a scenic layout!
Again, this static grass will be the base layer, with scrub and other vegetation still to
be added, but it’s all starting to look a bit more like a scenic layout!
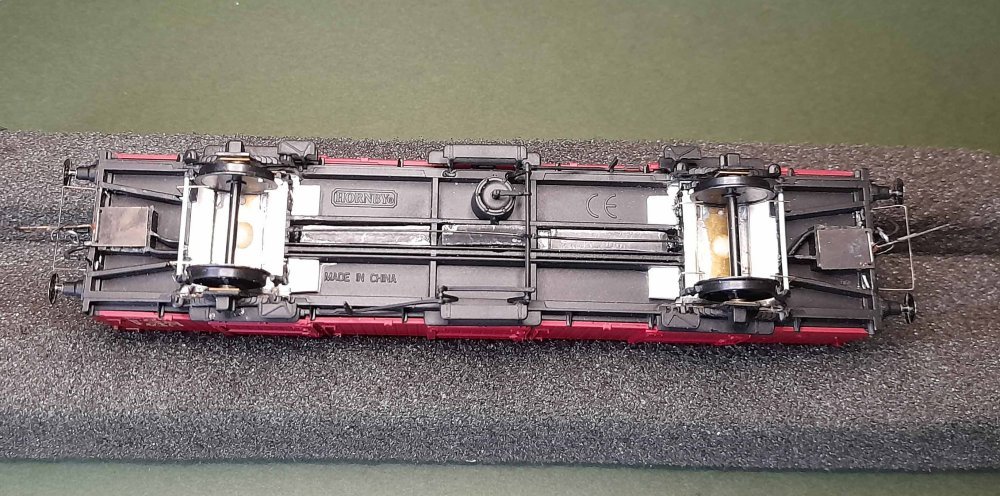 I was interested last month in what Kier was saying about the Hornby ex-LNER CCT with the
‘peculiar inside bearing arrangement’. I had been working on one of the models myself and
decided to solve the issue by using Bill Bedford sprung axleguards, as here. This involved
cutting openings in the floor and fitting plastic rectangles on top so as to get the
axleguards to sit at the correct level. Having done that and got them fitted, I was able
to re-attach the original spring / axlebox units (once removed from what remained of the
original axleguards). Now fitted with brake yokes (0.8mm plastic rod) and safety loops from
0.3mm brass wire, plus some extra weight below the floor.
I was interested last month in what Kier was saying about the Hornby ex-LNER CCT with the
‘peculiar inside bearing arrangement’. I had been working on one of the models myself and
decided to solve the issue by using Bill Bedford sprung axleguards, as here. This involved
cutting openings in the floor and fitting plastic rectangles on top so as to get the
axleguards to sit at the correct level. Having done that and got them fitted, I was able
to re-attach the original spring / axlebox units (once removed from what remained of the
original axleguards). Now fitted with brake yokes (0.8mm plastic rod) and safety loops from
0.3mm brass wire, plus some extra weight below the floor.
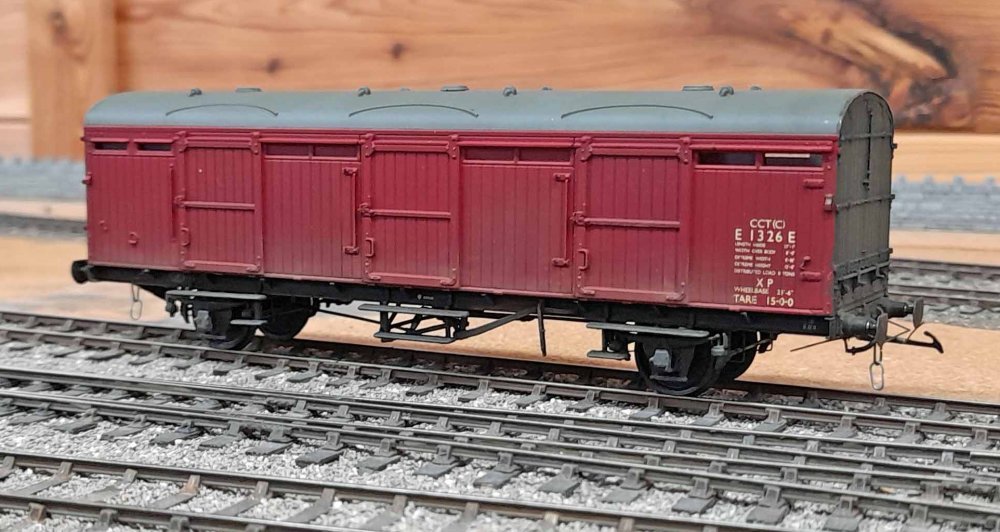 And here is the finished result, painting of the new additions completed and some subtle
weathering added. A nice addition to the parcel stock fleet.
And here is the finished result, painting of the new additions completed and some subtle
weathering added. A nice addition to the parcel stock fleet.