*********************************************************************************************************************************************
FEBRUARY 2025 UPDATE
*********************************************************************************************************************************************
MATT OWEN
*********************************************************************************************************************************************
STEVE HARROD
*********************************************************************************************************************************************
ANDY LEE
*********************************************************************************************************************************************
KIER HARDY
*********************************************************************************************************************************************
MIKE WHITCHURCH
*********************************************************************************************************************************************
KARL CROWTHER
*********************************************************************************************************************************************
*********************************************************************************************************************************************
![]()
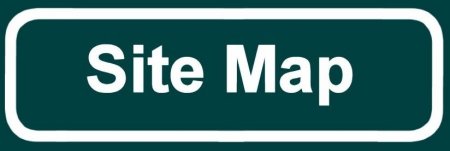
 I've had a couple of Bachmann vans for a number of years, they've been repainted a couple of times
during this time, but I was never too happy with the original underframe. As they now needed
re-wheeling to EM, I thought it was as good a time as any to do this work.
I've had a couple of Bachmann vans for a number of years, they've been repainted a couple of times
during this time, but I was never too happy with the original underframe. As they now needed
re-wheeling to EM, I thought it was as good a time as any to do this work.
 The first van is a VAA - as intended by Bachmann. The worst part of these models is the
representations of the w-irons so these were the first thing to go, being replaced with etched
items from Bill Bedford. I also replaced the brake levers and used brass wire to improve the linkages.
The first van is a VAA - as intended by Bachmann. The worst part of these models is the
representations of the w-irons so these were the first thing to go, being replaced with etched
items from Bill Bedford. I also replaced the brake levers and used brass wire to improve the linkages.
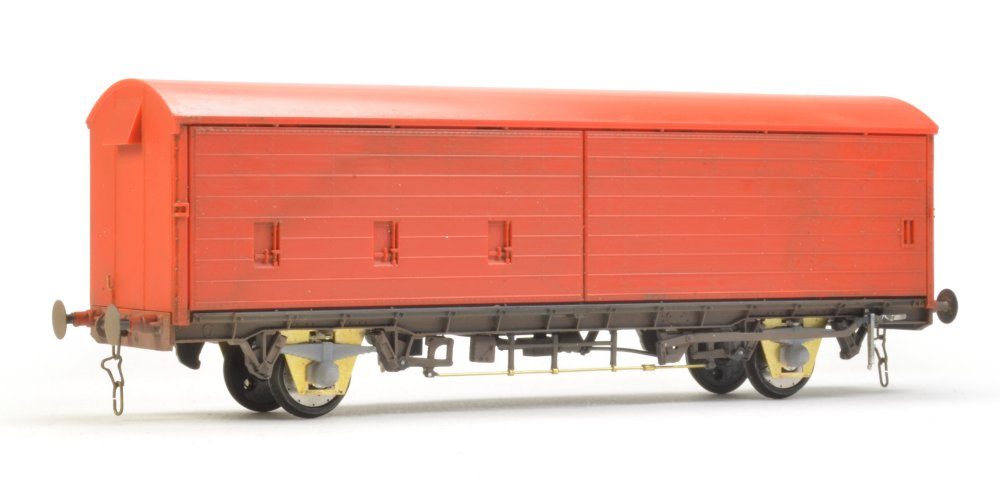
 The non-ventilated versions of these vans were far more common, and I decided to convert the
second van to represent one of these. Now I know Bachmann produce a non-ventilated version... but
where's the fun in that? Doing it this way was also more friendly to my wallet!
The non-ventilated versions of these vans were far more common, and I decided to convert the
second van to represent one of these. Now I know Bachmann produce a non-ventilated version... but
where's the fun in that? Doing it this way was also more friendly to my wallet!
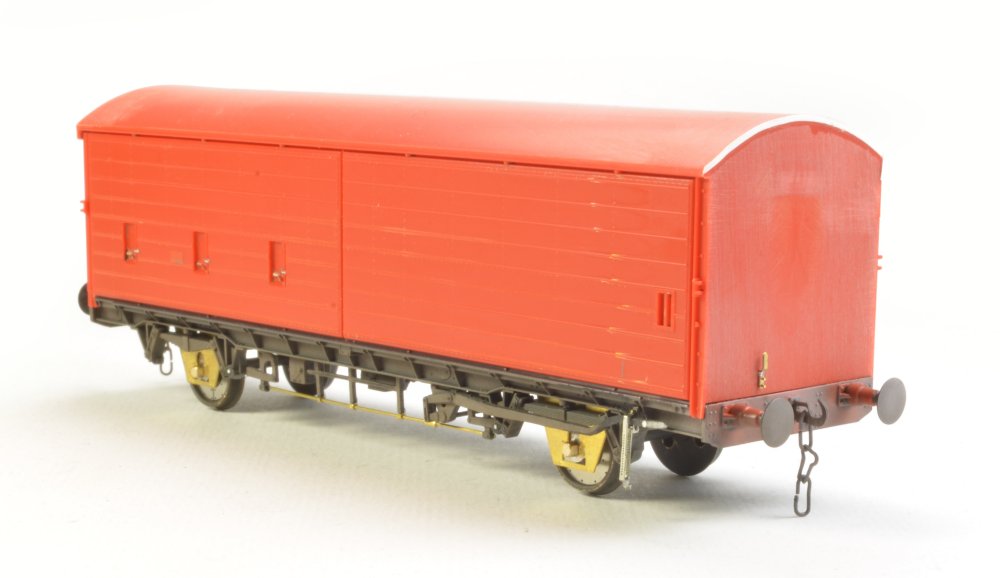 The vents were removed with a razor saw, and then the entire end was tidied up with sanding sticks
and files. The underframe was then treated exactly the same as the first van.
The vents were removed with a razor saw, and then the entire end was tidied up with sanding sticks
and files. The underframe was then treated exactly the same as the first van.
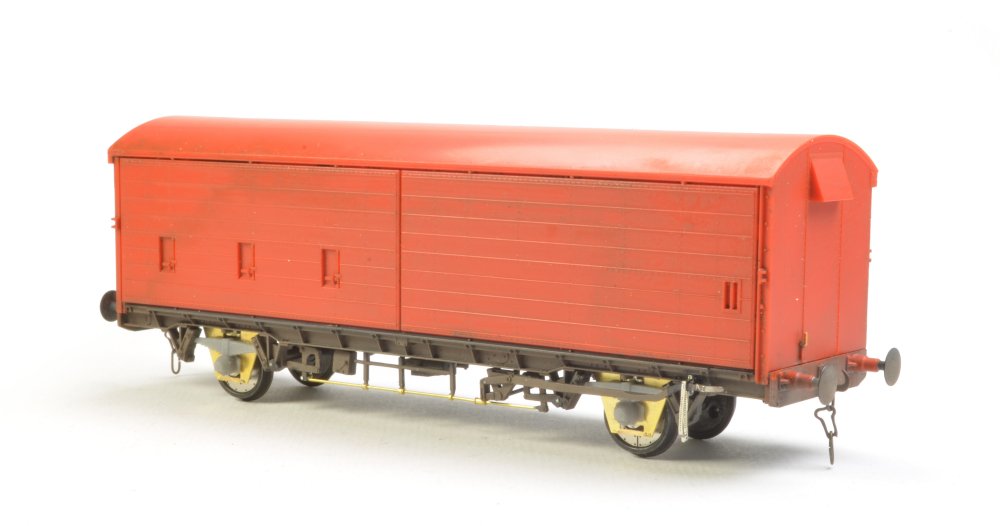
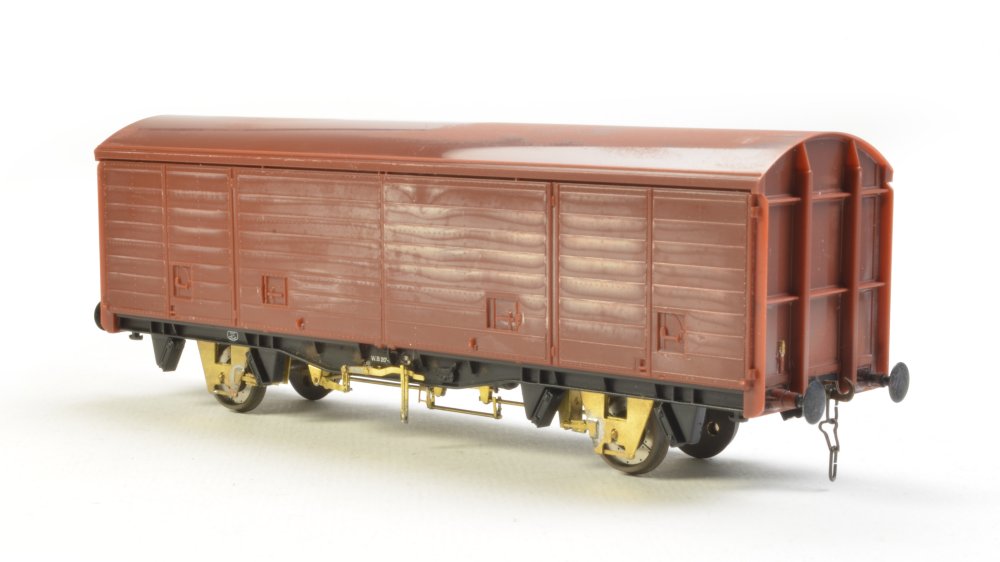 The final van is a VDA and this time I decided to use an etched detail set from Stenson Models
/ Will's Workbench. This builds up into a beautifully detailed representation of the underframe
- it looks too good to paint!
The final van is a VDA and this time I decided to use an etched detail set from Stenson Models
/ Will's Workbench. This builds up into a beautifully detailed representation of the underframe
- it looks too good to paint!
![]()
 I'm planning a very small EM gauge layout (3’ x 14”) that can easily be accommodated in my
model room based on Cheltenham St James station locomotive siding in 1965, when the Westerns
(red diesels as my mother called them) took over the London Paddington trains. I will have a
couple of steam engines in dire condition, a Gloucester class 122 DMU, some Hymeks and a
Brush type 4 to support my Western fleet, and represent the diesels that would have been
seen before the Beeching axe fell.
I'm planning a very small EM gauge layout (3’ x 14”) that can easily be accommodated in my
model room based on Cheltenham St James station locomotive siding in 1965, when the Westerns
(red diesels as my mother called them) took over the London Paddington trains. I will have a
couple of steam engines in dire condition, a Gloucester class 122 DMU, some Hymeks and a
Brush type 4 to support my Western fleet, and represent the diesels that would have been
seen before the Beeching axe fell.
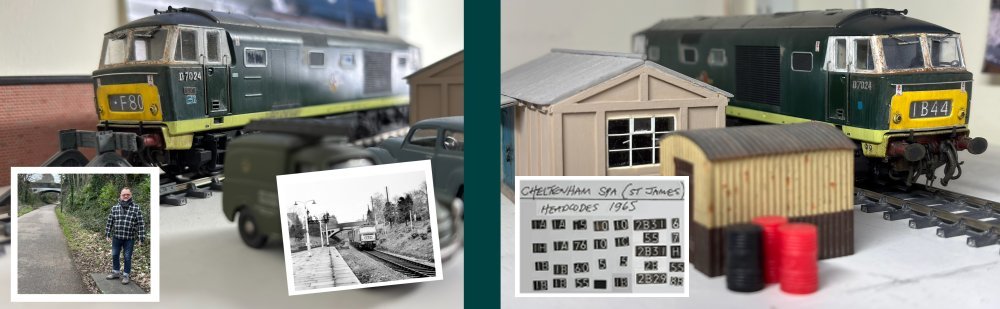 I've borrowed a couple of the buildings I scratchbuilt for Newton Abbot, along with some new
ones and a water tower. I may have to backdate my Hymek, as D7024 is in 1971 condition with the
data panels and door handle modification, so will have to fill that in and give her an
appropriate 2B29 headcode. Thankfully the old St James station site is still accessible
(now a Waitrose supermarket) and the line from there passing Malvern Road to Queens Road at
Lansdown is open as a pedestrian thoroughfare, which is great for inspiration. I have also
(using the 1965 WTT and WR Timetable) made up a series of appropriate headcodes for the
Westerns and Hymeks that worked in and out of St James station.
I've borrowed a couple of the buildings I scratchbuilt for Newton Abbot, along with some new
ones and a water tower. I may have to backdate my Hymek, as D7024 is in 1971 condition with the
data panels and door handle modification, so will have to fill that in and give her an
appropriate 2B29 headcode. Thankfully the old St James station site is still accessible
(now a Waitrose supermarket) and the line from there passing Malvern Road to Queens Road at
Lansdown is open as a pedestrian thoroughfare, which is great for inspiration. I have also
(using the 1965 WTT and WR Timetable) made up a series of appropriate headcodes for the
Westerns and Hymeks that worked in and out of St James station.
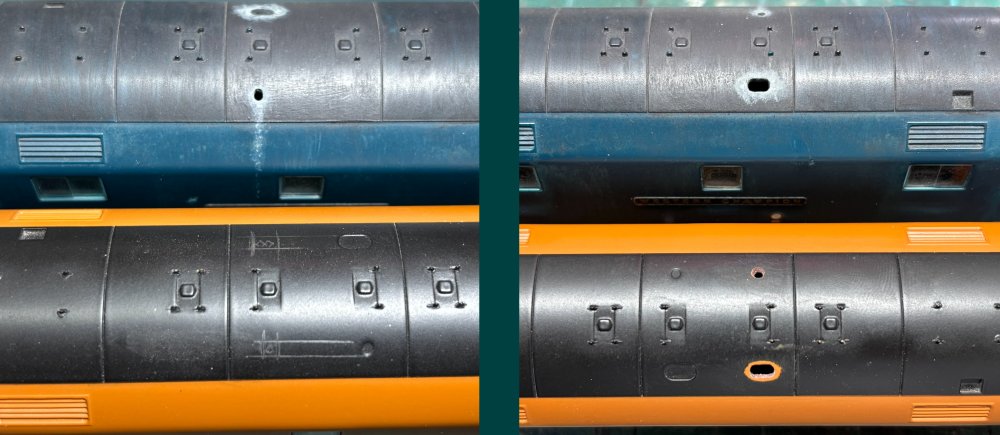 Continuing with my EM Dapol D1015 Western Champion in golden ochre livery, I have corrected
the inaccurate position of the steam heat boiler vent in the roof panels. Next up is to fill
the incorrect Dapol boiler holes with Milliput.
Continuing with my EM Dapol D1015 Western Champion in golden ochre livery, I have corrected
the inaccurate position of the steam heat boiler vent in the roof panels. Next up is to fill
the incorrect Dapol boiler holes with Milliput.
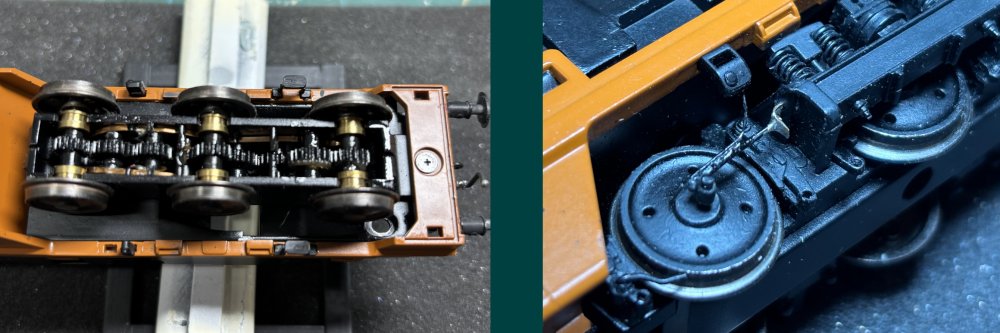 On the bogie I've removed some of the inner brake blocks to accommodate the wider axle so the
wheel sets are not impeded. I have scratchbuilt the tripometer and attachment bracket.
On the bogie I've removed some of the inner brake blocks to accommodate the wider axle so the
wheel sets are not impeded. I have scratchbuilt the tripometer and attachment bracket.
![]()
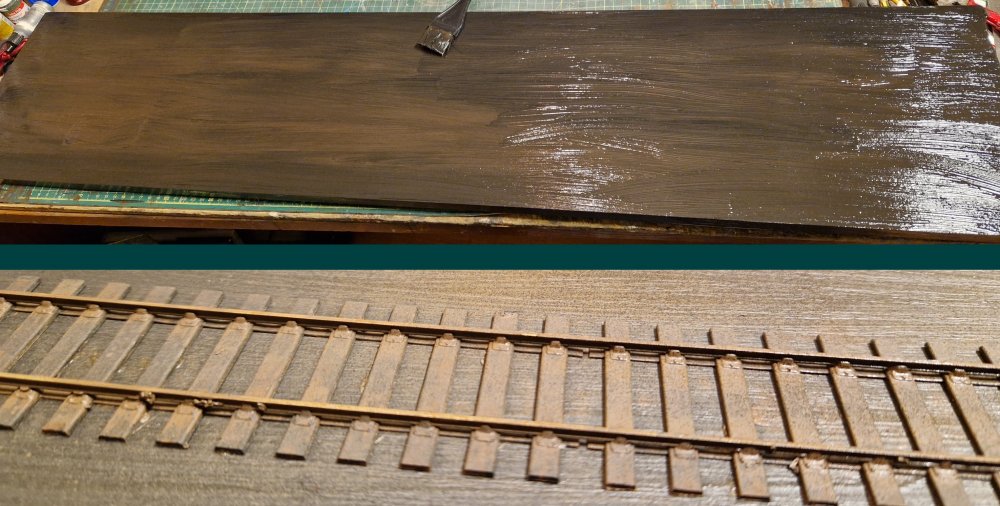 My latest project is a photograph plank / diorama on an old shelf I found in the garage.
I painted the base in a random mix of burnt umber and black acrylics paints from the Pound
Shop, and then glued some old second hand SMP EM track in place with Evostick contact
adhesive, using tin cans to weigh it down while it dried. The track was painted using
Revell no 84 leather brown, then the sleepers were painted with Pound Shop burnt umber
and randomly added Tamiya red brown XF64 in dry brush splodges all over.
My latest project is a photograph plank / diorama on an old shelf I found in the garage.
I painted the base in a random mix of burnt umber and black acrylics paints from the Pound
Shop, and then glued some old second hand SMP EM track in place with Evostick contact
adhesive, using tin cans to weigh it down while it dried. The track was painted using
Revell no 84 leather brown, then the sleepers were painted with Pound Shop burnt umber
and randomly added Tamiya red brown XF64 in dry brush splodges all over.
 I was after the red / brown tone of ballast found on some parts of the West Highland line,
using 4 different types of ballast made by Maxey Models, Woodland Scenics and Busch
to create different tones, glued down with the usual PVA water washing up liquid blend.
I was after the red / brown tone of ballast found on some parts of the West Highland line,
using 4 different types of ballast made by Maxey Models, Woodland Scenics and Busch
to create different tones, glued down with the usual PVA water washing up liquid blend.
 The track was weathered using a dark grey / black mix acrylic with a wash of 50% IPA,
then some oil patches with Tamiya matt black and gloss varnish over areas so it has an
oil sheen. I added some patches of static grass clumps and then made litter from 3mm square
pieces of masking tape to look like crisp packets, chocolate wrappers and newspapers. For the
moment I have used a stone wall for the rear cast from a silicone mould and painted and weathered.
The track was weathered using a dark grey / black mix acrylic with a wash of 50% IPA,
then some oil patches with Tamiya matt black and gloss varnish over areas so it has an
oil sheen. I added some patches of static grass clumps and then made litter from 3mm square
pieces of masking tape to look like crisp packets, chocolate wrappers and newspapers. For the
moment I have used a stone wall for the rear cast from a silicone mould and painted and weathered.
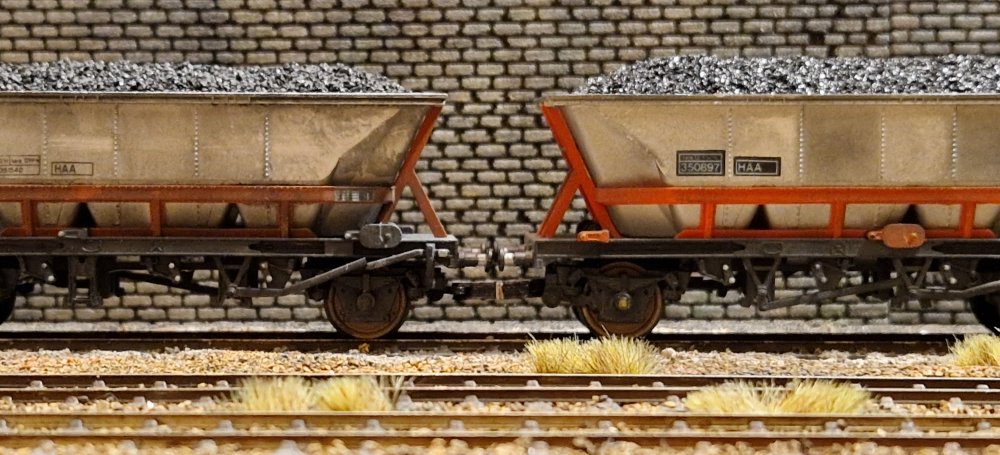
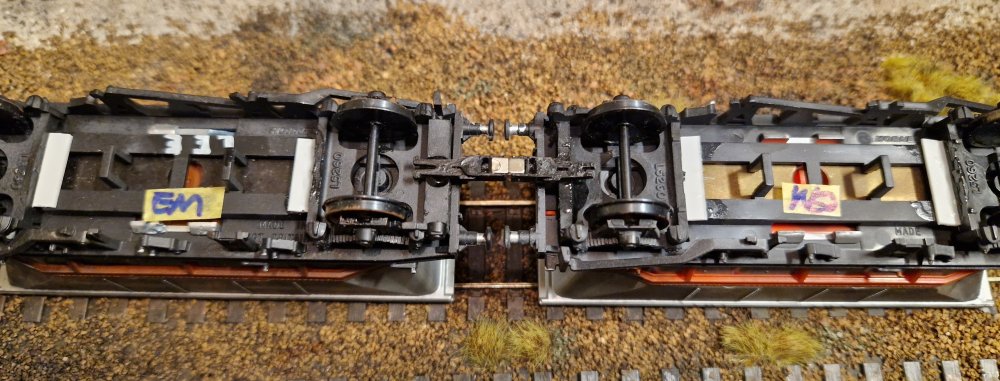 I have repainted and weathered 15 Hornby HAA hopper wagons, and added Gibson 14mm wheels. One
axle pivot has been glued solid and the other has a styrene strip added to allow the pivot
to rock but not rotate, effectively giving 3-point suspension as featured on in the hopper
wagon gallery on this website. Weathering is the usual IPA washes and a dark grey / black
blend of Tamiya airbrushed. Magnetic couplings by Porter House Models on eBay for blocks of
7 wagons, the end ones fitted with Smiths 3 link couplings.
I have repainted and weathered 15 Hornby HAA hopper wagons, and added Gibson 14mm wheels. One
axle pivot has been glued solid and the other has a styrene strip added to allow the pivot
to rock but not rotate, effectively giving 3-point suspension as featured on in the hopper
wagon gallery on this website. Weathering is the usual IPA washes and a dark grey / black
blend of Tamiya airbrushed. Magnetic couplings by Porter House Models on eBay for blocks of
7 wagons, the end ones fitted with Smiths 3 link couplings.
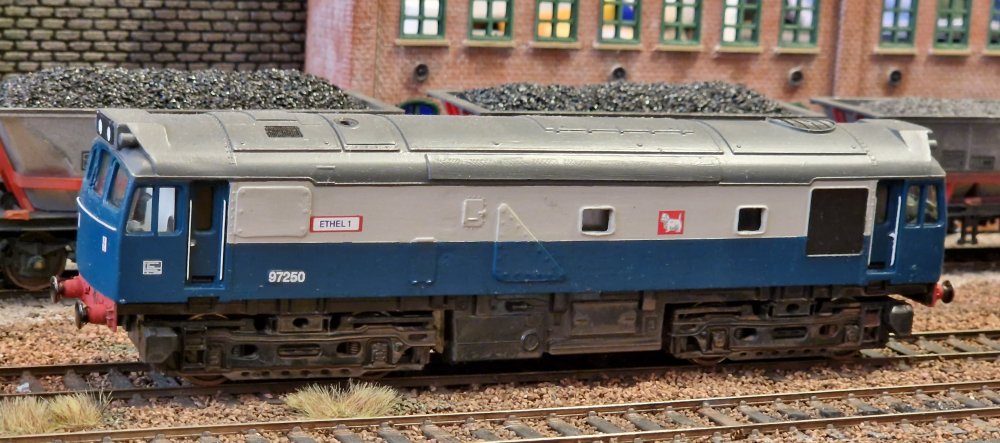 Ex-Class 25 Ethel 1 train heating loco is a modified Hornby Model from Ingegoodier on ebay.
I've added Ultrascale wheels and next up will be to add couplings, pipes and weathering.
Ex-Class 25 Ethel 1 train heating loco is a modified Hornby Model from Ingegoodier on ebay.
I've added Ultrascale wheels and next up will be to add couplings, pipes and weathering.
 This is the Vitrains Class 37 featured last month, now fitted with snowploughs and pipework.
Image showing the litter added to the trackwork.
This is the Vitrains Class 37 featured last month, now fitted with snowploughs and pipework.
Image showing the litter added to the trackwork.
![]()
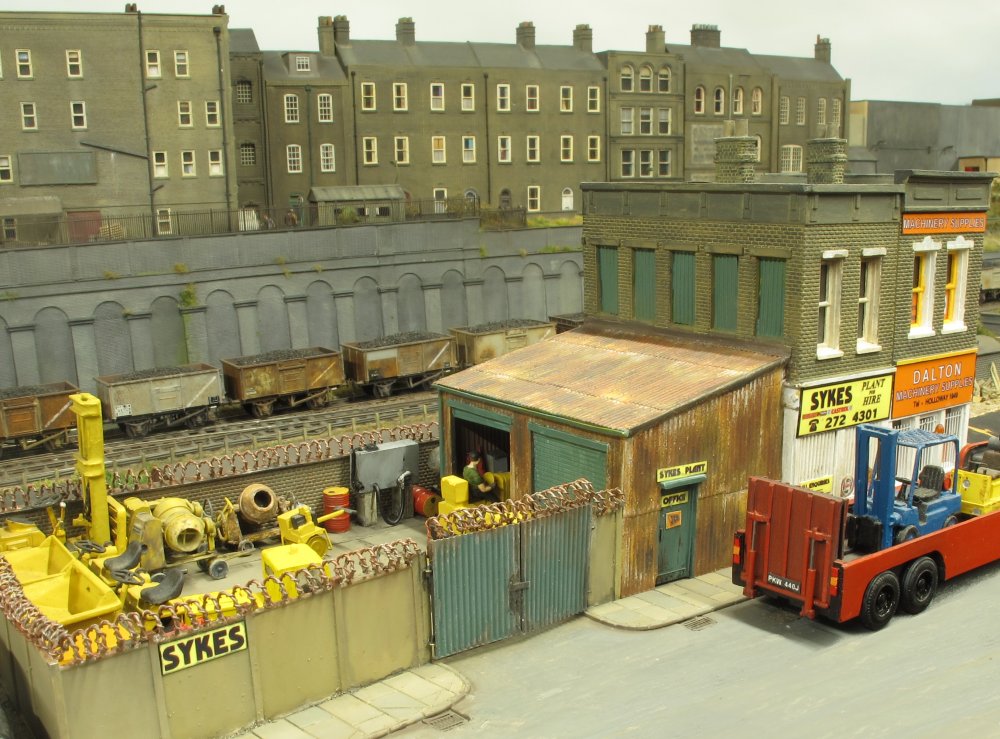 Some detail work has been carried out at Sykes plant hire yard. As well as a fuel storage
tank, barbed wire has been added to the tops of the walls. The appearance of this
commercially
available product is a bit chunkier than I would have liked, so if it bugs me enough I may
replace it with something finer.
Some detail work has been carried out at Sykes plant hire yard. As well as a fuel storage
tank, barbed wire has been added to the tops of the walls. The appearance of this
commercially
available product is a bit chunkier than I would have liked, so if it bugs me enough I may
replace it with something finer.
 A view showing the gates opened in preparation for the next delivery by low loader.
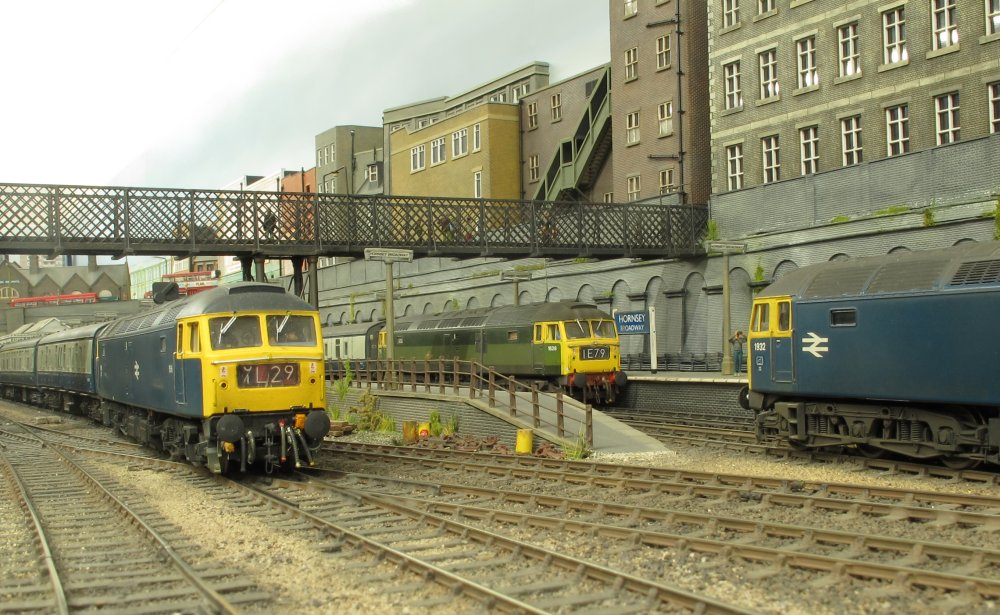
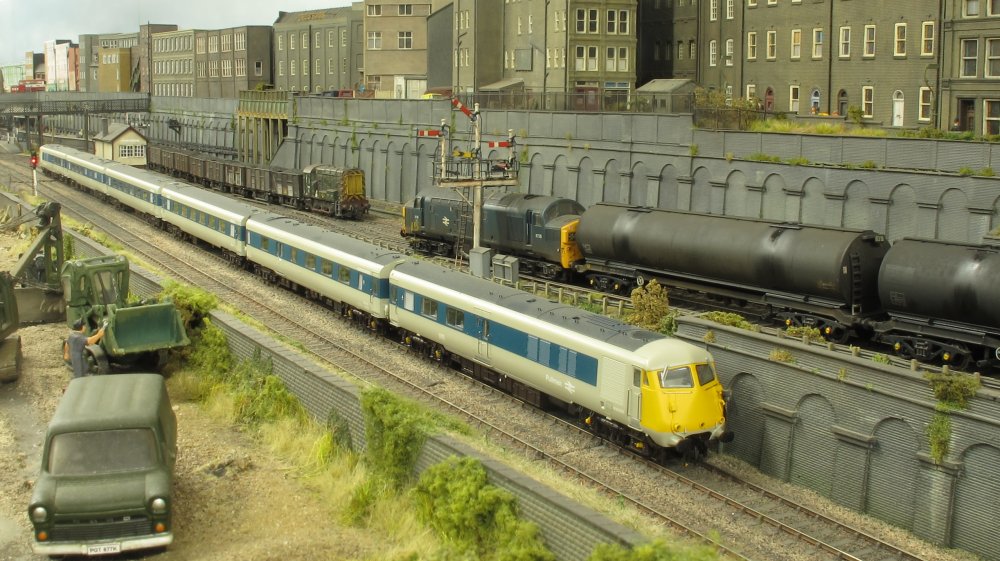 A Western Pullman heads south, whilst a Stratford Class 37 heads north with an oil train
from Ripple Lane, and a Class 08 trundles along with a local trip coal working.
This Pullman sound fitted unit was my first venture into DCC control,
with a Bachmann Dynamis Ultima controller included, and although 95% of the Hornsey loco
fleet is analogue controlled, I've realised that DCC control does have certain operational
benefits even without the gimmiky lighting and sound functions. The Dynamis system was a
good introduction into another world away from analogue control, and we've now changed
over to the NCE controllers, allowing advance adjustments to be carried out.
A Western Pullman heads south, whilst a Stratford Class 37 heads north with an oil train
from Ripple Lane, and a Class 08 trundles along with a local trip coal working.
This Pullman sound fitted unit was my first venture into DCC control,
with a Bachmann Dynamis Ultima controller included, and although 95% of the Hornsey loco
fleet is analogue controlled, I've realised that DCC control does have certain operational
benefits even without the gimmiky lighting and sound functions. The Dynamis system was a
good introduction into another world away from analogue control, and we've now changed
over to the NCE controllers, allowing advance adjustments to be carried out.
 A bit of a Brush 4 moment at the south end of the station showing a trio of Heljan models -
some of the fleet previously had poor starting characeristics. On a gradient with 10+ coaches
they would either stall or lurch forward, going slow up gradients and racing away down the
other side. Now all my Heljan locomotives are chipped with cheap(ish) Hornby R8249 decoders,
bringing with it another dimension to the controlability with constant speed regardless of
the gradients. At the flick of a switch on the control panel, any of the 6 circuits can be
operated on either analogue or DCC control.
A bit of a Brush 4 moment at the south end of the station showing a trio of Heljan models -
some of the fleet previously had poor starting characeristics. On a gradient with 10+ coaches
they would either stall or lurch forward, going slow up gradients and racing away down the
other side. Now all my Heljan locomotives are chipped with cheap(ish) Hornby R8249 decoders,
bringing with it another dimension to the controlability with constant speed regardless of
the gradients. At the flick of a switch on the control panel, any of the 6 circuits can be
operated on either analogue or DCC control.
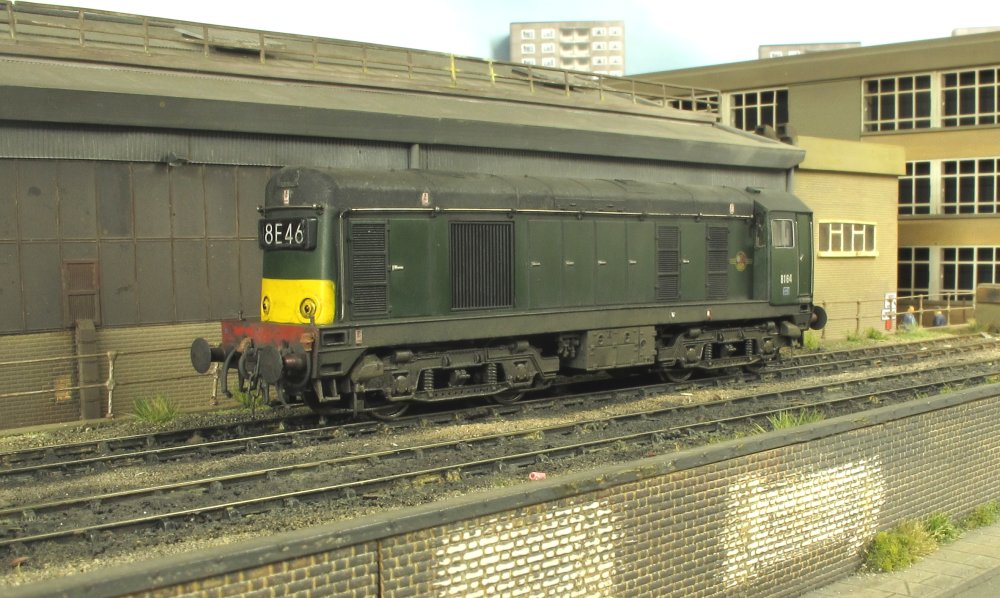 English Electric type 1 number 8164 was a Toton allocated loco and one of the last Class
20s in 1970 to wear small yellow panels. New into the Hornsey fleet,
this is a 2nd generation Bachmann model with 21-pin DCC basic sound, no lights.
After a few CV adjustments, it runs very well with my recent 8304 (3rd generation)
with both models producing slight variations in sound without echoing each other.
English Electric type 1 number 8164 was a Toton allocated loco and one of the last Class
20s in 1970 to wear small yellow panels. New into the Hornsey fleet,
this is a 2nd generation Bachmann model with 21-pin DCC basic sound, no lights.
After a few CV adjustments, it runs very well with my recent 8304 (3rd generation)
with both models producing slight variations in sound without echoing each other.
 DCC 8164 paired with 8304, and passing the opposite direction analogue 8077 paired with 8145.
![]()
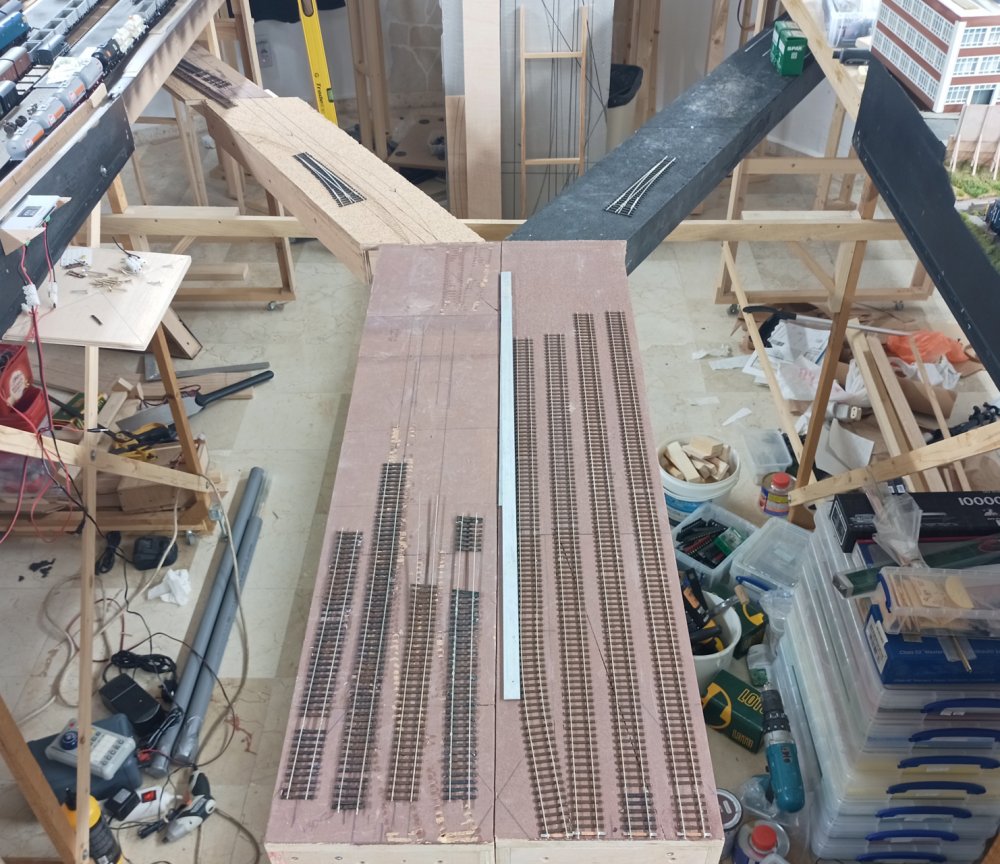 After further consideration of the practicalities, I think I'm on about plan J for the
storage yard. This version should give me 8 or 9 roads of 4 metres, and it's all accessible.
There's still room to walk down the sides and operate the layout, so minimum gymnastics
required which is the main reason for the (yet another) rethink.
After further consideration of the practicalities, I think I'm on about plan J for the
storage yard. This version should give me 8 or 9 roads of 4 metres, and it's all accessible.
There's still room to walk down the sides and operate the layout, so minimum gymnastics
required which is the main reason for the (yet another) rethink.
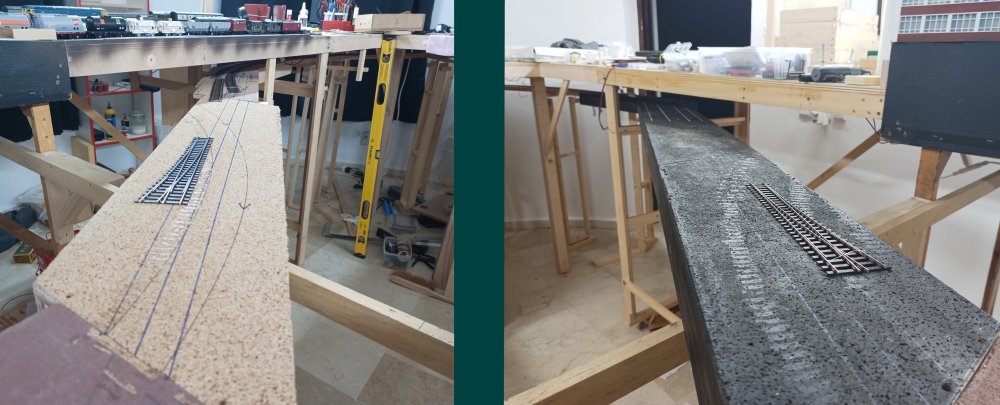 Being a true Yorkshireman I've re-used the existing boards where I can, hence it's looking
a bit scrappy, but it will be tidied up and painted in time. The next stage is getting the
rest of the boards built and track laid and wired, so watch this space.
Being a true Yorkshireman I've re-used the existing boards where I can, hence it's looking
a bit scrappy, but it will be tidied up and painted in time. The next stage is getting the
rest of the boards built and track laid and wired, so watch this space.
![]()
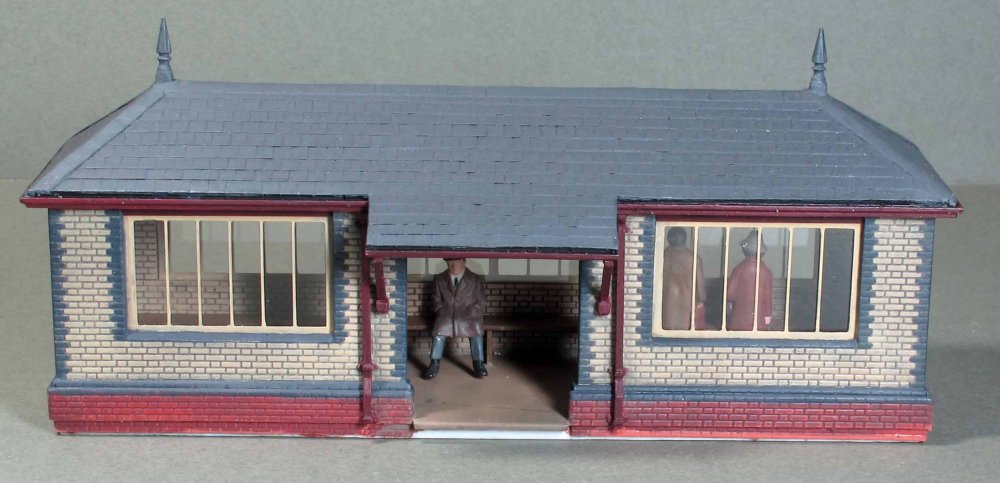 The Kentside down platform shelter is now completed and I’m really pleased with how it’s
turned out. The roof slates were cut from normal computer paper with a grid pattern drawn
onto it, while the two finials are actually Midland Railway ones from Wizard Models. Not
quite like those on the real structure, but the same type I used on the signal box, so at
least it’s they match each other.
The Kentside down platform shelter is now completed and I’m really pleased with how it’s
turned out. The roof slates were cut from normal computer paper with a grid pattern drawn
onto it, while the two finials are actually Midland Railway ones from Wizard Models. Not
quite like those on the real structure, but the same type I used on the signal box, so at
least it’s they match each other.
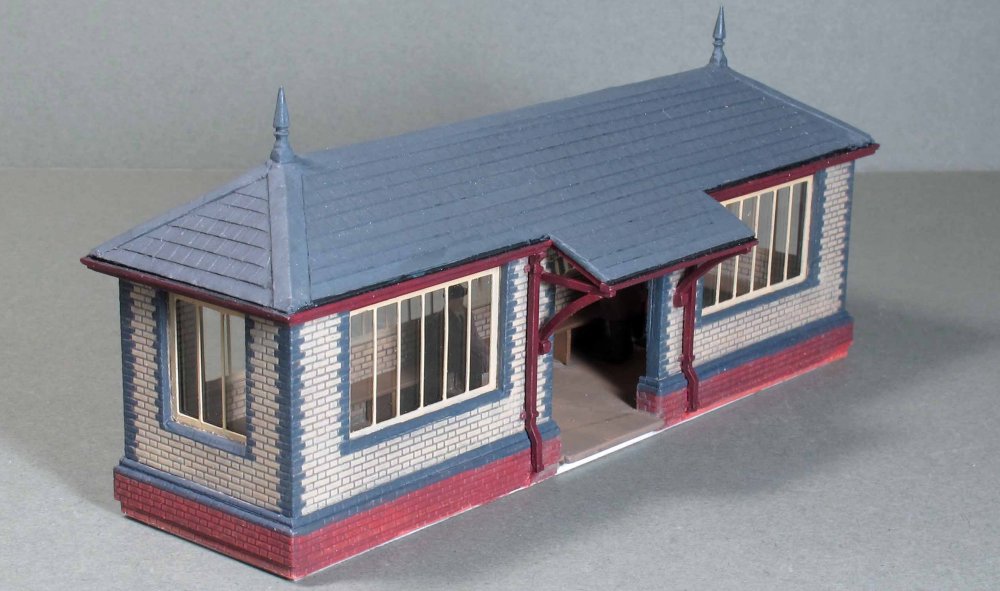 Painting was with Humbrol enamels, the main yellow brick colour was No. 103, then treated
with a dark wash followed by some gentle dry brushing. The blue engineering brick courses
used No 79 (dary grey) with around 25% 104 (dark blue) mixed in. The BR maroon was from the
same pot I used on the original buildings, labelled HR 116, so I think one of the old
‘Railway Colours’ series and must be over 60 years old and still going strong!
Painting was with Humbrol enamels, the main yellow brick colour was No. 103, then treated
with a dark wash followed by some gentle dry brushing. The blue engineering brick courses
used No 79 (dary grey) with around 25% 104 (dark blue) mixed in. The BR maroon was from the
same pot I used on the original buildings, labelled HR 116, so I think one of the old
‘Railway Colours’ series and must be over 60 years old and still going strong!
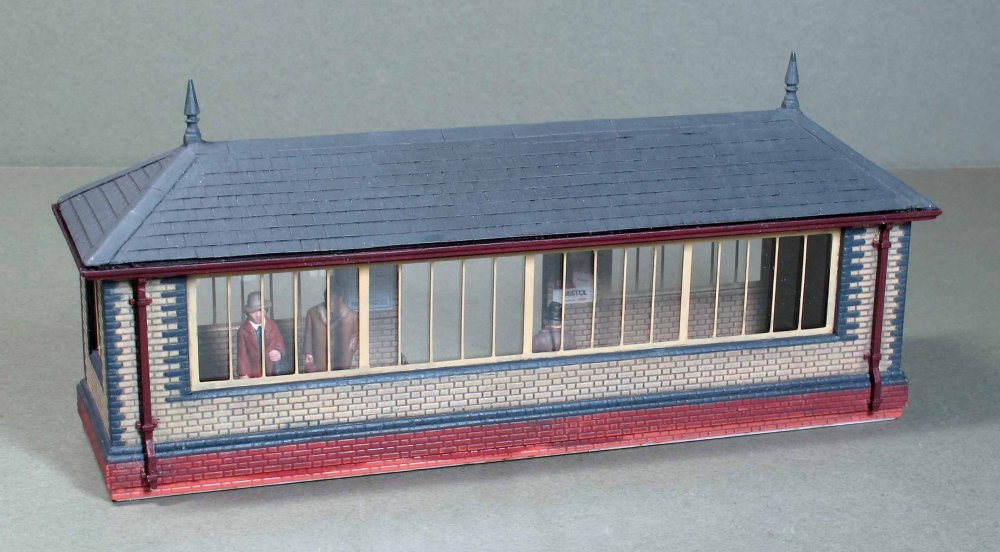 From the estuary side with suitable figures admiring the view across Morecambe Bay!
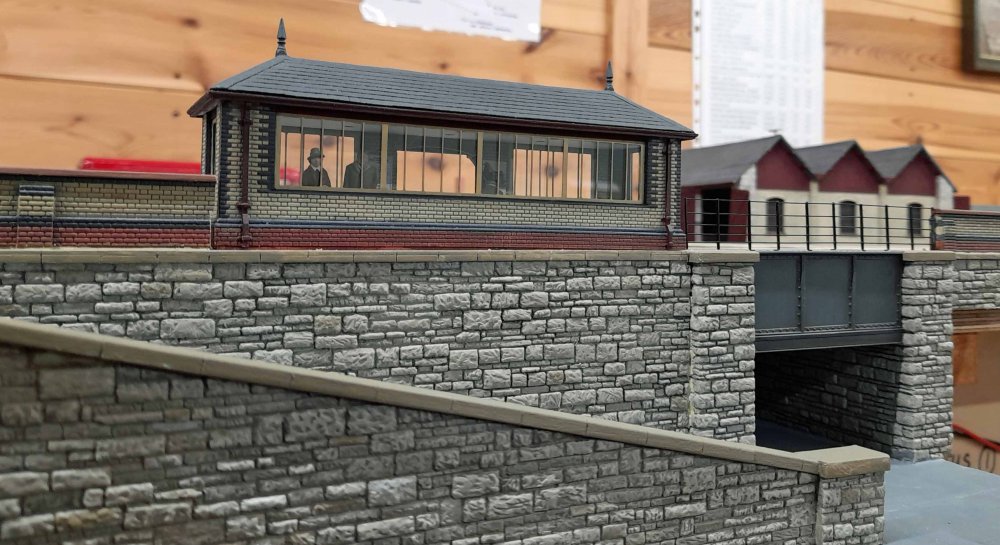 And now installed on the layout – there’s a bit of a gap where it meets the boundary wall,
which I will have to somehow sort out.
And now installed on the layout – there’s a bit of a gap where it meets the boundary wall,
which I will have to somehow sort out.
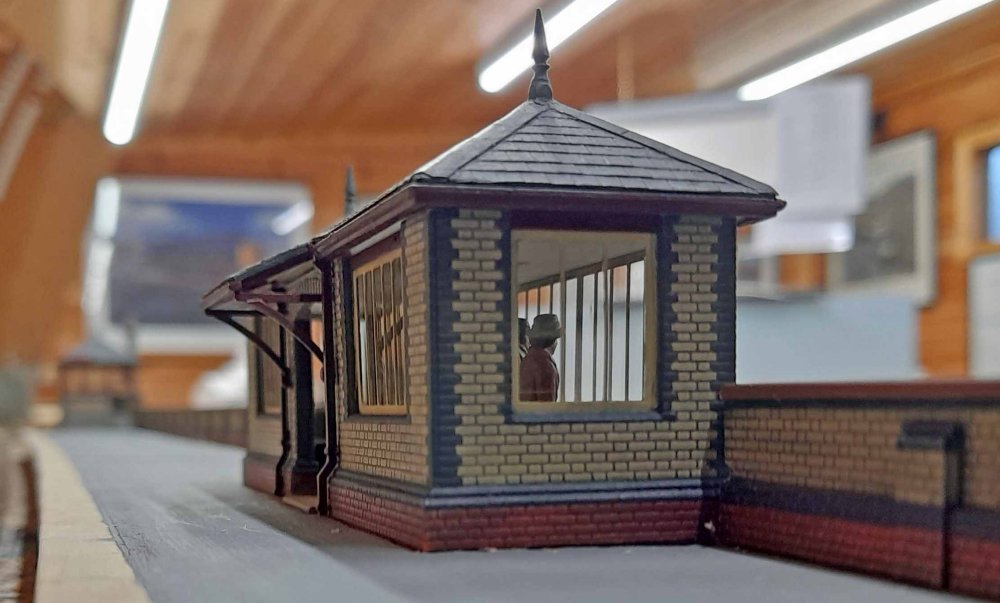 And from the platform side – obviously needs proper ‘bedding in’ to the platform.
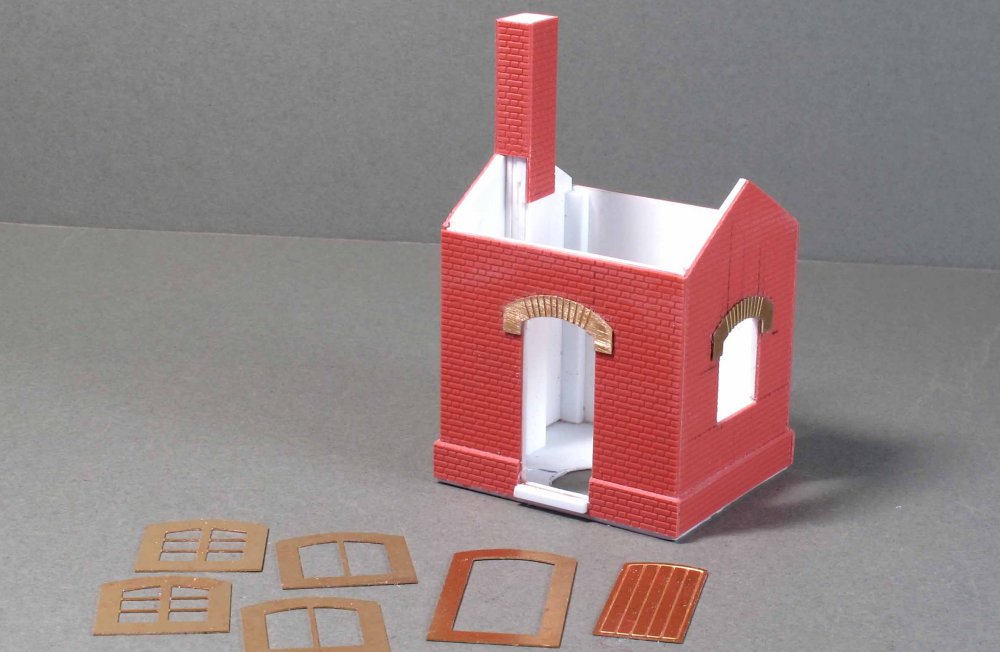 Encouraged by this I’ve also been tackling the Kentside weighbridge building, again based on
drawings of a proposed structure at Greenodd (though I’ve never seen any photos of the real
thing, so I’m not sure if it was ever actually built). Again, it uses some etched windows etc.
that I had done previously, construction following the same methods as for the platform shelter.
Encouraged by this I’ve also been tackling the Kentside weighbridge building, again based on
drawings of a proposed structure at Greenodd (though I’ve never seen any photos of the real
thing, so I’m not sure if it was ever actually built). Again, it uses some etched windows etc.
that I had done previously, construction following the same methods as for the platform shelter.
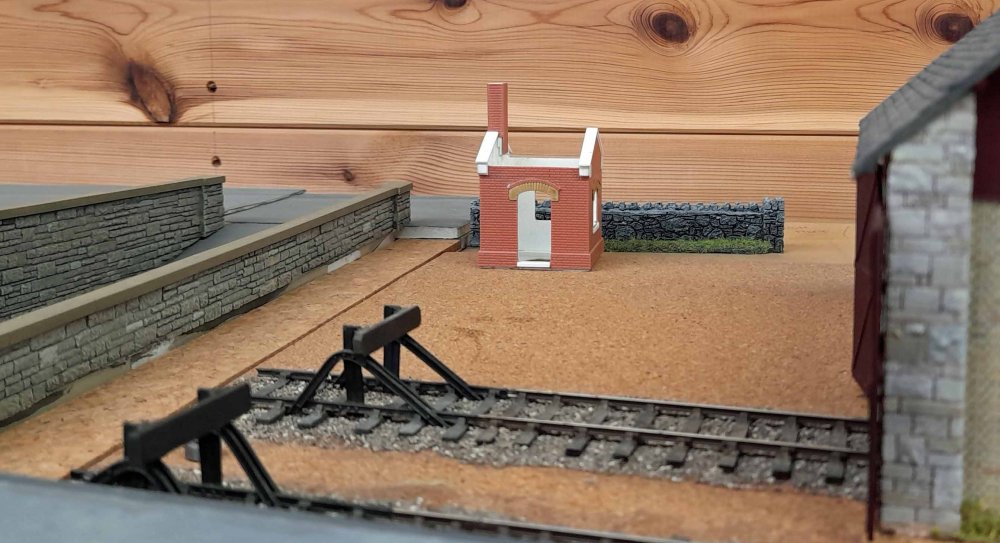 And here it is on the layout, a little further advanced – it’s a tiny building, not much
bigger than an outside WC!
The latest video from Hornsey Broadway.
And here it is on the layout, a little further advanced – it’s a tiny building, not much
bigger than an outside WC!
The latest video from Hornsey Broadway.
Two pairs of Class 20s and a Class 40.
Please click on the above image to view the latest videos.