*****************************************************************************************************************************************************************
JANUARY 2014 UPDATE
*****************************************************************************************************************************************************************
PETE JOHNSON *****************************************************************************************************************************************************************
KARL CROWTHER *****************************************************************************************************************************************************************
GREG BROOKES *****************************************************************************************************************************************************************
KIER HARDY *****************************************************************************************************************************************************************
FEBRUARY 2014 UPDATE
*****************************************************************************************************************************************************************
KARL CROWTHER *****************************************************************************************************************************************************************
KIER HARDY *****************************************************************************************************************************************************************
PETE JOHNSON *****************************************************************************************************************************************************************
KEITH TRUEMAN *****************************************************************************************************************************************************************
MARCH 2014 UPDATE
*****************************************************************************************************************************************************************
KEITH TRUEMAN *****************************************************************************************************************************************************************
KARL CROWTHER *****************************************************************************************************************************************************************
PETE JOHNSON *****************************************************************************************************************************************************************
KIER HARDY **************
Paul James helped out at the 2014 Bristol 0 gauge exhibition, operating Bill Connelly's layout
************** GUEST SPOT **************
BILL CONNELLY (BLOWERS GREEN WAGON REPAIR YARD) GAUGE 0 LAYOUT
*****************************************************************************************************************************************************************
APRIL 2014 UPDATE
*****************************************************************************************************************************************************************
KIER HARDY *****************************************************************************************************************************************************************
KARL CROWTHER *****************************************************************************************************************************************************************
PETE JOHNSON *****************************************************************************************************************************************************************
HYWEL THOMAS *****************************************************************************************************************************************************************
![]()
 The rear section of the newsagents is nearing completion with the window frames
and doors fitted, along with gutters and pipework.
The rear section of the newsagents is nearing completion with the window frames
and doors fitted, along with gutters and pipework.

The main part of the building is at a similar stage. Some basic interior details need
adding before the two parts can be joined up.

Finished just in time for Santa’s visit! The chimney uses Slater’s plastic, topped
with fittings from the Wills pack.

A clip-in interior for the Burton's building has been started, and is easily
removable to gain access to the windows if repairs are ever needed. This section will eventually
feature ovens and conveyors.... all that's needed now is 10,000 scale biscuits!

Some long-running locomotive projects have also moved forward. The last of my Heljan
Western trio is shown after completion. D1001 ‘Western Pathfinder’ carried the majestic maroon livery
longer than most members of the class, and would have appeared this way throughout most of the 1960s.

The feature of the Heljan Western that looks most obviously wrong is the cab roof above
the windscreens. These three views show the process I use to improve this area and better capture the
character of the type. To begin, the centre region in front of the horn box is filed down quite a lot
to reduce the height and overhang at the middle of the brow. At the two outside corners flats are
created, and pieces of 1,5mm plasticard securely bonded in position with plenty of liquid poly. These
bonds are then allowed to harden for a week or more before the next stage.

The added plastic is then carefully shaped to blend with the rest of the roof but also
increase the overhang of the brow at both corners. The shaping also extends the rainstrips to the front
corners. At the same time I have removed mould lines from the shell, slightly enlarged the headcode
openings and added beading around the edges, and reshaped the marker lights to the characteristic raised
dome used on the class.

A profile view comparing the cab roof shape before and after the rework. Photos from a
similar angle in books about the class show the ‘after’ shape to be a close match to real profile. The
step recesses in the front valance have been deepened by drilling through, and step plates have also
been added on the buffer housings.

To toughen up the brake gear on the Heljan bogies I use 0,45mm brass wire for the tie
rod systems, this makes the models far less prone to damage during handling. The EM wheelsets are by Ultrascale.

Class 33/2 number 33 201 has recently been completed, and is shown after final
weathering and addition of cab details.

This second view of 33 201 shows the translucent fibreglass roof panels fitted on
the type. The reinforcing members beneath the top skin cause a characteristic square grid pattern
within the shades of brown.
![]()
 Portrait of a BR standard brake van based around the old Airfix kit and a Dave
Bradwell replacement etched chassis (as featured in MRJ Issues 211 & 212). I must get round to
adding point levers to the track!
Portrait of a BR standard brake van based around the old Airfix kit and a Dave
Bradwell replacement etched chassis (as featured in MRJ Issues 211 & 212). I must get round to
adding point levers to the track!

Re-worked Hornby CCT now just about complete. There's a very slight difference
between the original body colour and patch-painted areas around the re-modelled windows, but hopefully
this won't show once (heavily) weathered. Windows are the Laser-Glaze product, while the bars behind
are 0.3mm nickel-silver wire pre-sprayed with grey primer. Electrification warning flases still need
to be added to the van ends.

Progress is being made over the festive period with the remaining assemblage of mill
buildings. Again these make use of laser-cut components, courtesy Brian Lewis of Timber Tracks. Here
the main walls of 3mm MDF have been positioned to make a final check as to how they will fit into the
scene. A full article on how these buildings have been made will hopefully appear in a future issue of MRJ.
![]()
 It's been a busy period at Shenston Road with various wagon and loco projects on the go,
and I hope to have these finished in the New Year with photographs to follow. In the meantime here's a
couple of snaps taken by Kier Hardy of recent projects, firstly English Electric number 402 on a rake of
mark 2d coaches passing the brewery.
It's been a busy period at Shenston Road with various wagon and loco projects on the go,
and I hope to have these finished in the New Year with photographs to follow. In the meantime here's a
couple of snaps taken by Kier Hardy of recent projects, firstly English Electric number 402 on a rake of
mark 2d coaches passing the brewery.

A six-car Pullman set waits in the loop whilst on acceptance trials in the area.
Supplied, resprayed and detailed by Lord & Butler of Cardiff, and converted to EM gauge by Paul
James using the existing Bachmann wheels.

Roving photographer Paul James has also been at the lineside capturing various
workings. This view shows D1012 Western Firebrand (Heljan) hauling a rake of COVHOP wagons (Bachmann).

A few minutes later D1015 Western Champion (Heljan) heads north with another freight....

.... and is seen later the same day heading back with a passenger service.

D836 Powerful approaches the station on a Paddington bound service.
![]()
 The final building for Long Row is started, utilising South Eastern embossed plasticard
and surplus windows from a Walthers kit.
The final building for Long Row is started, utilising South Eastern embossed plasticard
and surplus windows from a Walthers kit.

Lintels and cills have been added using styrene strip, and the whole structure sprayed with
Humbrol matt brown and toned down with enamels before fitting the windows.

Meanwhile, D7098 has been on running-in tests and is seen here, with Greg Brookes
weedkilling train heading in the opposite direction behind D838 Rapid.

Shenston Road's D838 Rapid.

A view showing one of the water tanks and the storage / mixing vehicle.

This formation was regularly seen during the 1970s around the British Rail network,
and this particular model made regular exhibition appearances on the Eastwell Ironstone layout.

Back to the buildings - to the right is a hacked about City Classics structure finished
off with a flat roof.

A busy moment at Hornsey Broadway with Long Row forming the backdrop, as a loaded coke
train passes a rake of empty 21 ton hoppers behind Baby Deltic D5905. In the background can be seen a
Brush type 2 hauling tank wagons to a local destination.
![]()
 Since the last update, further progress has been made with this group of mill buildings.
Stonework has been added to the MDF walls using Slaters’ embossed sheet, with cills/lintels etc. being
represented using various sizes of Microstrip. The roofs were built up on a base of mounting card, with
‘slate strips’ cut from 80gm computer paper, pre-printed with slates of an appropriate size. The
walls/roofs will next be painted, after which the windows can then be inserted into their openings.
Since the last update, further progress has been made with this group of mill buildings.
Stonework has been added to the MDF walls using Slaters’ embossed sheet, with cills/lintels etc. being
represented using various sizes of Microstrip. The roofs were built up on a base of mounting card, with
‘slate strips’ cut from 80gm computer paper, pre-printed with slates of an appropriate size. The
walls/roofs will next be painted, after which the windows can then be inserted into their openings.

The upgraded Hornby CCT seen in a previous update has now been weathered and the
patch-painted areas of the model have blended in quite effectively. It now just needs a few chalk marks.

This BR Ferry Van is based on the old Hornby model. The body seemed to be fairly
accurate, so just has new handrails and some missing vertical framing on the ends. However, it was found
to be around 0.8mm too narrow so it was cut in half transversely and widened using Microstrip.
Everything on the chassis was cut back to leave just the basic solebars and new underpinnings built up
from a variety of sources. These included Bill Bedford sprung W-irons embellished with the original
moulded details redeployed as cosmetic features. Some very nice ferry van tie-down cleats and loops
came from the Wizard Models range. Finding appropriate transfers has been a bit of a challenge and the
livery as shown here is perhaps more appropriate for a vehicle in barrier van use.
![]()
 A pair of unfitted 21 ton hopper wagons parked in the siding by the station. Static
grass weeds appear to be springing up everywhere, but with careful use of a hot air gun
it's an ideal way to reduce the growth!
A pair of unfitted 21 ton hopper wagons parked in the siding by the station. Static
grass weeds appear to be springing up everywhere, but with careful use of a hot air gun
it's an ideal way to reduce the growth!

Having seen the 2 Parkside hopper kits above, I thought it would be a good idea to
progress further with 3 ex-LNER design hoppers that I part started about 2 years ago. I can't remember
seeing any handrail brackets in the kit, so new ones were made from plasticard and threaded onto the
0.030" brass wire.
![]()
 A start has been made on the yard lamps, with the posts being shaped from 3 x 3mm
square brass bar. The lamps are models of the reinforced concrete style used in Princes Dock Liverpool,
the main post blending from a square base into a tapered triangular upper section.
A start has been made on the yard lamps, with the posts being shaped from 3 x 3mm
square brass bar. The lamps are models of the reinforced concrete style used in Princes Dock Liverpool,
the main post blending from a square base into a tapered triangular upper section.

The newsagents back has had basic interior fittings added and is ready for joining
onto the main part of the building.

The waterside Downing building has had the windows fitted, and a start has been made
on painting the brickwork pattern.

Painting is also underway on the Burtons factory, this view shows the company name
being sign-written in blue paint to a pre-drawn pencil outline.

A general view of Burtons with the basic colours applied and window frames fitted.
![]()
 Things have been relatively quiet at Lesney Park lately, but a start has been made on
the modern office block. The colour of the brick is straight out of the Humbrol tin, and will be
subdued during the weathering process.
Things have been relatively quiet at Lesney Park lately, but a start has been made on
the modern office block. The colour of the brick is straight out of the Humbrol tin, and will be
subdued during the weathering process.
![]()
 A bit of progress has been made on the interior for the office block, made from styrene sheet.

Showing the interior of the low relief structure. A bit of extra detail
and some weathering next on the list.
![]()
 Over the last 18 months I’ve been working on this Class 25 model, just completed. It’s
a much-re-worked Bachmann offering and features replacement donor cabs taken from a spare Hornby Class 25
body. The drive system has also been upgraded using one of Ian Penberth’s sprung bogie suspension kits. A
full account of all the work undertaken is due to appear in forthcoming issues of Model Railway Journal.
Over the last 18 months I’ve been working on this Class 25 model, just completed. It’s
a much-re-worked Bachmann offering and features replacement donor cabs taken from a spare Hornby Class 25
body. The drive system has also been upgraded using one of Ian Penberth’s sprung bogie suspension kits. A
full account of all the work undertaken is due to appear in forthcoming issues of Model Railway Journal.

Another portrait of 25 274 posed in the coal yard at Hebble Vale Goods. I’ve been playing
around with Helicon Focus stacking software to good effect, but if you look closely at this shot there’s a
small area in the middle of the loco that’s out of focus! Also, does anyone know a more successful means
than Blu-tack of securing a camera down onto a baseboard whilst taking multiple exposures?

Since the photo of the BR Ferry Van appeared in last month’s update, inevitably I’ve now
managed to find the photos of it under construction I thought I had somewhere! This first image shows the
widened body on the stripped-back underframe (I did manage to retain the buffers). The original doors are
separate pieces (they actually slid open) and the body went quite banana-shaped when taken off the chassis,
but this was eventually remedied.

Underneath, the new axleguards are the Bill Bedford type. Note the saw cuts above the
door that were needed to bend the body back to shape. It you look at last month’s photo of the completed
van, an idea of the amount of work then went on below the solebars will hopefully be evident.
![]()
 A fire escape for the Burtons building is nearing completion, although a counterweight
system for the hinged stairs still needs to be added. The escape has been made by adapting parts from
three of the Langley etched brass kits.
A fire escape for the Burtons building is nearing completion, although a counterweight
system for the hinged stairs still needs to be added. The escape has been made by adapting parts from
three of the Langley etched brass kits.

A Sea Gull’s eye view of the Downing buildings before weathering. This view must give
a taste of the appearance they would have had in the early 1900s, soon after the Gloucester maltings were
extended, although for the model the floorplan of the buildings has been changed quite a bit to suit the layout.

A street level view showing the route the railway lines will take, between the two buildings,
to access the rest of the docks.

The waterside building awaits weathering paint - which will aim to add the grime of more
than half a century.

A close-up view, highlighting some of the detail under the connecting over-bridge.

The R&W Paul building is also getting painted, with Humbrol matt 28 giving a good base
for the layers of cast concrete. Final weathering will add the brown tones found on old concrete.
![]()
 I think I'm about half way through the Hornsey Broadway layout project, and
probably a good time to record progress to date. This is Baseboard-A, and although all of the
trackwork is complete, the points still require motors and relay logic for route control. Most of
the surrounding buildings have started to take shape, but still require detailing and weathering.
I think I'm about half way through the Hornsey Broadway layout project, and
probably a good time to record progress to date. This is Baseboard-A, and although all of the
trackwork is complete, the points still require motors and relay logic for route control. Most of
the surrounding buildings have started to take shape, but still require detailing and weathering.

Baseboard-B lacks any foreground structure due to the incomplete background.
Any reaching or stretching over the 3ft depth of scene may cause damage to the nearer structures, so
generally these remain removable until the last phase of scenic work.

The background buildings are almost complete in this view of Baseboard-C, and a
start has been made on the foregound area.

Baseboard-D is the most complete to date. Most of the scenic work is in place,
with just some trackwork to finish on the upper level adjacent to the 24.5 ton mineral wagons.

There is still a lot of trackwork to build around the depot throat and fuelling
point on Baseboard-E, with most of it marked out ready to construct. All the buildings are
removable, giving a large flat area for ease of access.

The depot building and holding sidings are nearing completion on Baseboard-F,
with only a small amount of trackwork required towards the back of the scene. With each 4 foot
long baseboard being aligned to the next with pattern-makers dowels, they're easy enough to
separate and swivel around to access different parts of a scene.

It's now time to take a break from Hornsey and revisit Wibdenshaw, which will
be appearing at the Crawley MRS exhibition in April. A fitting transition from North London C1970,
to West Yorkshire C1976 comes in the form of 03111 featuring a tea stained cabside! Long term
resident at Bradford Hammerton Street, it is seen here paired with ex-'conflat A' number DB701983
to aid with track circuiting.

The 3 hoppers are at the painting stage and awaiting number transfers.
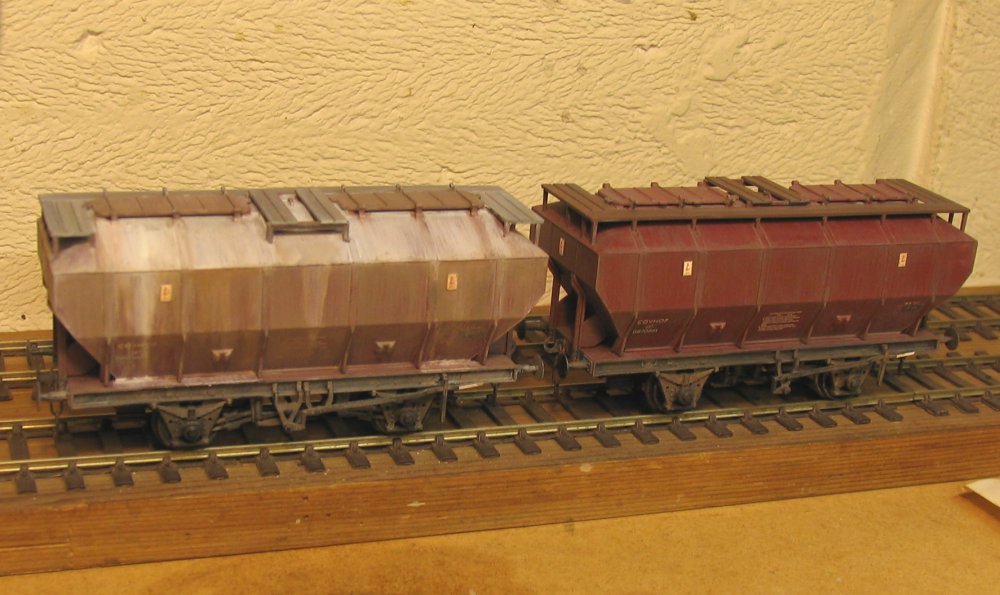
These 2 Bachmann Covhops were bought in the BIS Rockware livery, which has been
removed with methylated spirit and a cotton bud. One looking rather scruffy in their own unique
style, and one with a more workaday look about it.

The Covhops are basically straight out of the box with replacement wheels & couplings.
The weathering has been achieved by applying several thin washes of paint at different times during a
10 day period (I prefer to use enamels), with each wash being toned back with a brush dampened with
thinners. Too much thinners will have the tendency to wash away any paint you have applied, and keep
the brush strokes flowing with gravity, put to one side and leave for a couple of days. Keep going
back to apply more washes of paint, but more importantly, add a different colour each time. It's
always best to work from a photograph of your chosen wagon, and Paul Bartlett's wagon site (link on
links page) is invaluable for this process.
'Blowers Green Wagon Repair Yard'. Although the scale is far removed from the normal website content,
Bill's attention to detail is excellent and there's a 70s theme, so I think it deserves a guest spot!

Blowers Green wagon repair yard.

Blowers Green wagon repair yard.

Blowers Green wagon repair yard.

Blowers Green wagon repair yard.

Blowers Green wagon repair yard.

Blowers Green wagon repair yard.

Blowers Green wagon repair yard.

Blowers Green wagon repair yard.

Blowers Green wagon repair yard.

Blowers Green wagon repair yard.
![]()
 Previously featured 25002 is seen with 24082 on the headshunt at Pudsey Junction stabling
point. Wibdenshaw appeared at the Horsham model railway exhibition on the 12th & 13th of April 2014,
organised by the Crawley MRS.
Previously featured 25002 is seen with 24082 on the headshunt at Pudsey Junction stabling
point. Wibdenshaw appeared at the Horsham model railway exhibition on the 12th & 13th of April 2014,
organised by the Crawley MRS.

'Long on the shelf' models of Bachmann class 08 - D3918 with Ultrascale replacement
wheelsets ended up with slipped cranks, so with plenty of other available shunters, it was stored unservicable
until its recent appearance in a freight train along with sister D4040. En-route to BR Works, D3918 will
re-emerge in blue livery and hopefully with windscreen wipers! The rods have been removed and stowed in the
cab, allowing them to be towed at up to 25MPH, usually in a mixed freight train.

In preparation of the forthcoming exhibition, some of the scenic areas on Wibdenshaw have
been refreshed, notably with nature taking over and grass growing up between the cracks.

Clumps of static grass fibres stand end-up in pools of white glue, and the surrounding
area starts to attract the attention of the flytippers.

The following pictures feature some of the recently transferred locos to Paul James
Eastwell fleet. With the opportunity to take a few snaps, here's some of the ex-Shenston Road locos
captured at the lineside. English Electric type 4 number D337 (Bachmann) approaches with the Bradford
to Manchester Red Bank parcels train.

1015 Western Champion (Heljan) heads a railtour north through Wibdenshaw.

One for the album - a trio of Westerns await their
next turn of duty. D1012 Western Firebrand in maroon with FYE, D1046 Western Marquis in maroon SYP, and D1017
Western Warrior in blue with SYP (all Heljan).

D5385 & D5389 in blue head south with a mixed freight (Heljan leading Lima). Modified
Bachmann class 108 to the right.

A bit of 80s / 90s keeps creeping into frame.... this time in the shape of a
Mainline class 56, and a Heljan 58020 'Doncaster Works' on the headshunt!
![]()
 To conclude what has been said about the ferry van in recent updates, here's a photo
of the underside of the finished model. Note how an area of the original floor had to be removed so that
the axleguards would sit at the correct height. The spring/axlebox mouldings were reused from the
original model. The vacuum cylinder and clasp brakes were ABS castings whilst the air tank was formed
from thin styrene wound round a suitable former. The trussing was made up from 1mm brass angle and the
brake levers/guards came (I think) from some Mike Clark Masokits etches. Steps, vacuum pipes, brake
safety loops and handrails etc. were made up from various combinations of brass strip and rod. Ferry
hooks and cleats from the Wizard Models range finished the job off very effectively.
To conclude what has been said about the ferry van in recent updates, here's a photo
of the underside of the finished model. Note how an area of the original floor had to be removed so that
the axleguards would sit at the correct height. The spring/axlebox mouldings were reused from the
original model. The vacuum cylinder and clasp brakes were ABS castings whilst the air tank was formed
from thin styrene wound round a suitable former. The trussing was made up from 1mm brass angle and the
brake levers/guards came (I think) from some Mike Clark Masokits etches. Steps, vacuum pipes, brake
safety loops and handrails etc. were made up from various combinations of brass strip and rod. Ferry
hooks and cleats from the Wizard Models range finished the job off very effectively.

I've also been working on the coal yard office. This has been based on a picture of a
building from the G.N. yard at Halifax that I found in an issue of "Model Railways" magazine. As with the
main structures, it's laser cut from MDF (2mm thickness this time) and then covered with Slater's embossed
sheet (2mm scale Dressed Stone again). Windows and door frames have also been laser-cut from 0.8mm plywood.
Seen here in Humbrol 121 Pale Stone base coat and ready for the walls to be dry-brushed with my usual concotion.
Hebble Vale Goods appeared at the Littleborough Coach House exhibition on the 12th & 13th of April 2014,
organised by the Rochdale MRG.
![]()
 As a bit of a diversion, one of the dockside ‘clutter’ items has been made this month.
The buoy is modelled to features on ones preserved at Liverpool and Swansea. The main shape is laminated
from a stack of 80 thou plastic discs, skinned with a wrap of 10 thou before rivet detail was added.
As a bit of a diversion, one of the dockside ‘clutter’ items has been made this month.
The buoy is modelled to features on ones preserved at Liverpool and Swansea. The main shape is laminated
from a stack of 80 thou plastic discs, skinned with a wrap of 10 thou before rivet detail was added.

The dockside concrete on baseboard 4 and 5 has also been done. This detail view shows how
the tramway style track of the dockside has been made using copper clad sleepers and solder. The flangeway
has been made by using lengths of phosphor-bronze strip set on edge.

For the concrete I have used coloured flexible tile grout – very much like laying real
concrete but in miniature. Because of the limited working time of the grout mix the hardstanding was
poured in a series of panels.

The recessed point levers are modelled to those found at Birkenhead. For the textured
cast-iron covers press-moulded pieces of plastic were made using a square-mesh etched brass sheet.

A view looking down baseboard 4 - showing the dockside area well underway.

With baseboard 5 end screens completed, it was time to get ‘drastic with the
plastic’….The lengths and angles were checked more than once before a slitting disc was taken to the
end of the main Downing building to cut it to the finished length.
![]()
 I’ve made a bit of progress with my latest wagon project….. the early part of
this build looks nothing like the planned end result, so I thought I'd post the photos as a kind
of guess the end result? My project started out with 2 Palitoy Mainline wagons (Made in Hong Kong)!
I’ve made a bit of progress with my latest wagon project….. the early part of
this build looks nothing like the planned end result, so I thought I'd post the photos as a kind
of guess the end result? My project started out with 2 Palitoy Mainline wagons (Made in Hong Kong)!

It makes a nice change from all the layout hardware which has been going on, as Morfa
Banks Sidings are being rebuilt to accept their new surroundings.

So as well as the surprise wagon shown here, there are plans to utilise some Preiser
walling, which I’m hoping to combine with Wills sheets for the long runs of retaining wall I’m going
to need…so things are happening slowly…very slowly!