*****************************************************************************************************************************************************************
JANUARY 2017 UPDATE
*****************************************************************************************************************************************************************
PETE JOHNSON *****************************************************************************************************************************************************************
KIER HARDY *****************************************************************************************************************************************************************
HYWEL THOMAS *****************************************************************************************************************************************************************
FEBRUARY 2017 UPDATE
*****************************************************************************************************************************************************************
KIER HARDY *****************************************************************************************************************************************************************
PETE JOHNSON The layout will be out again this month, appearing at Stafford on the 4th and 5th.
*****************************************************************************************************************************************************************
MARCH 2017 UPDATE
*****************************************************************************************************************************************************************
HYWEL THOMAS *****************************************************************************************************************************************************************
PETE JOHNSON *****************************************************************************************************************************************************************
KEITH TRUEMAN *****************************************************************************************************************************************************************
KARL CROWTHER *****************************************************************************************************************************************************************
KIER HARDY *****************************************************************************************************************************************************************
APRIL 2017 UPDATE
*****************************************************************************************************************************************************************
KIER HARDY *****************************************************************************************************************************************************************
PETE JOHNSON *****************************************************************************************************************************************************************
![]()
 The protracted build of the two North British 0-4-0s has seen a little more
progress, with painting of the running plate and below completed.
The protracted build of the two North British 0-4-0s has seen a little more
progress, with painting of the running plate and below completed.

The North British locos were a little unusual in having the buffer beams edges
lined out. A bit of careful work with a fine brush has attempted to reproduce this livery feature
on the models.

A project that I have had in mind to do for a while has finally been started –
some more finescale versions of the 35T BRT Grain Hopper. Comparison of the Bachmann model with
the BR diagram and photos of the early style wagon, show it to be about 3mm under-length, mostly
taken from near the ends. The models have been stripped down and had the ends cut away with a
razor saw to allow the length to be increased.

A detail view showing the (black) plastic additions bonded to the end of the hopper tub.

With the glue completely dried, the added plastic is smoothed to the profile of the tub.

With the ends refitted the hopper tub becomes scale length. The repositioned side
stanchions near the ends have still to be fitted, and the roof has been smoothed ready for etched
walkways to be added.

The Lima model of the later BRT hopper style is good for length, but suffers
from inaccurate rendering of the poster boards. To correct this, the centre section has been cut
out and replaced with 1.5mm plastic, the central stanchion has then been added.

A project on behalf of Steve of the Canada Street operating team is this Bachmann
Class 25/3. The rainstrip arch over the windscreens of the Bachmann model has always looked a
little shallow to my eye, so as this view shows, these have been rebuilt using fine strips of
0.12mm plastic. The centre of the arch has been raised about 0.5mm, which may not seem much,
but visually makes quite a difference. The framing rebate around the centre windscreen has also
been extended upwards by a similar amount.

The re-worked model is shown renumbered and ready for weathering. Removing 0.5mm
from across the base of the nose end also helps the proportions, and it is perhaps puzzling that
Bachmann has never re-tooled these features of the model.

‘Canada Street’ is due to appear at the Stevenage exhibition in mid-January. It
has also recently featured in Volume 251 of the Model Railway Journal…..
![]()
 The Hornby Gresley buffet car featured last month has now entered service after
its modifications. Built at York in 1937, these vehicles lasted well into the mid 1970s.
The Hornby Gresley buffet car featured last month has now entered service after
its modifications. Built at York in 1937, these vehicles lasted well into the mid 1970s.

As well as the reconfiguration of the bodyside, other work incorporated changes
to the roof ventilators, moving the emergency communication gear to the correct end of the coach,
and the fitting of curtains to the seating bay windows.

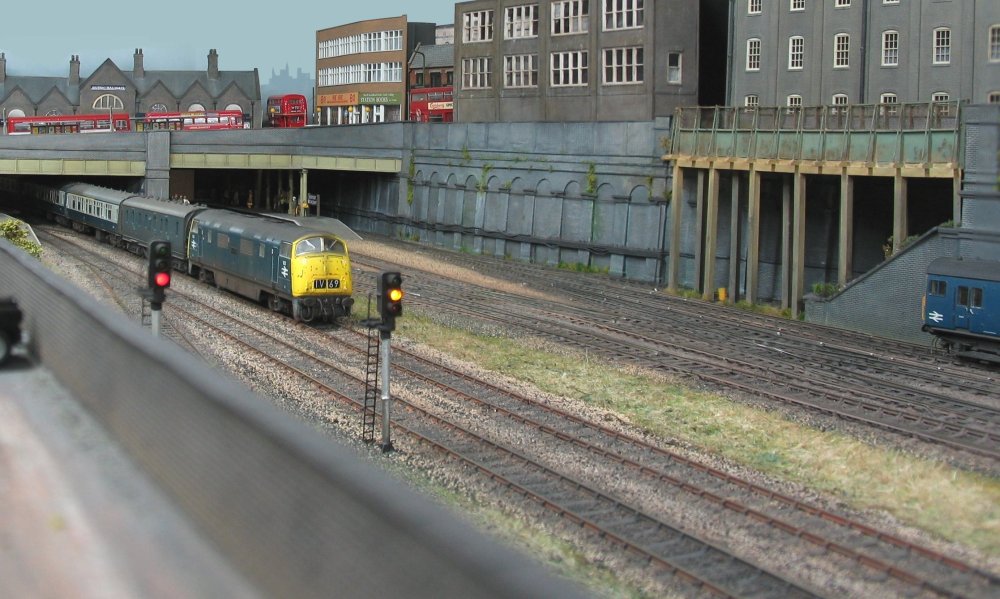
Brush 4 number D1100 heads north with the 1B66 Cambridge Buffet service,
comprising SO, SO, FK, RB, BSK, SO, SO. This formation was a common sight in the
late '60s / early '70s.

Visiting stock this month courtesy of Mr James - a Peckett 0-4-0 saddle tank loco.

Conversion to EM gauge requires the repositioning of the outside cylinders, a bit of
lathe work for the wheels, and making sure there's a good supply of fibre washers by the look of things.

Fast-forward to the latter part of the 20th century sees an EW&S liveried
class 60 number 60010 passing through on a power station coal train.
![]()
 The start of the process - two 80 thou pieces welded together and scribed
with an Olfa Cutter.
The start of the process - two 80 thou pieces welded together and scribed
with an Olfa Cutter.

The site for the middle gates, these are under the rail bridge to the lower
level so they’ll be partially hidden in the gloom.

The last gates before the river. These are the only ones to include a gate
paddle (the hole at the bottom). The start of the wood effect was done with the trusty Olfa.

A test fit for the almost completed gate with some more detail still to go.

The first gate primed. The gate paddle mechanism stops at the water level
on this side - in reality it continued down to the paddle.

The front of that same gate ready for painting.
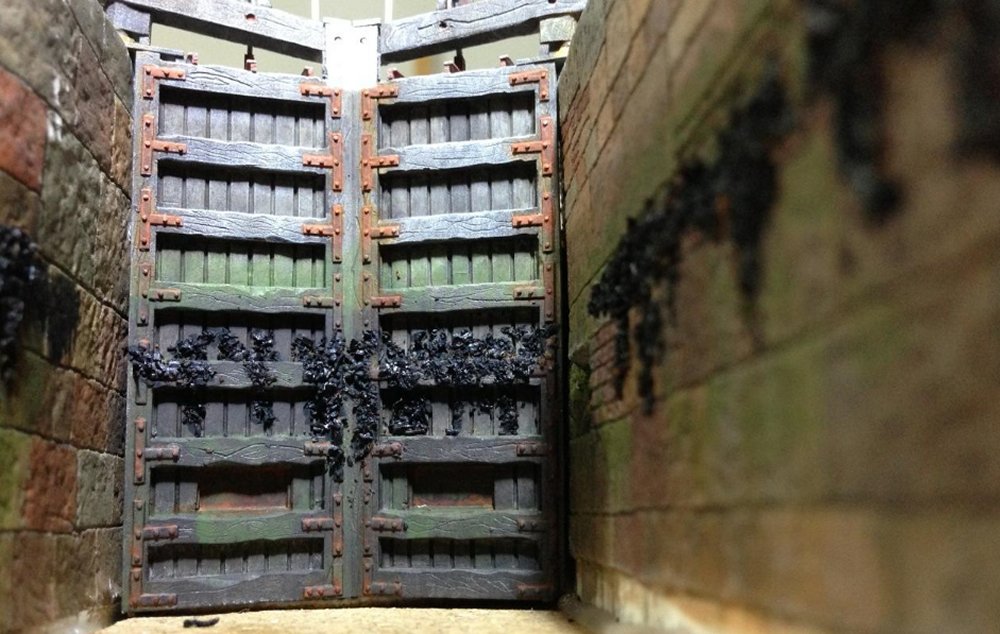
Painted and test fitted to line up the seaweed!

The final piece ready to install, suitably weathered.

The next gate along. This lock uses ground paddles only so has no gear fitted to the gates.
![]()
 Looking across Hornsey Road beyond the Merchant's House towards the fuel
storage tanks which have just been built and installed at the depot. At the time there was
no requirement for a bund, and similarly the one at Finsbury Park wasn't constructed until 1981.
Looking across Hornsey Road beyond the Merchant's House towards the fuel
storage tanks which have just been built and installed at the depot. At the time there was
no requirement for a bund, and similarly the one at Finsbury Park wasn't constructed until 1981.

The tanks are made from plastic kitchen waste pipe, capped and detailed with
brass wire and tube. Plastruct 'T' section has been used on the high level access walkway,
drilled and fitted with .45mm brass wire. The cast whitemetal valves were acquired in a box
of bits (source unknown) and fitted with replacement etched brass handwheels.

This view shows a Bachmann resin cast building that has been chopped and modified
to represent the pump house. It wasn't until the tanks had been given a blast of grey primer that
I noticed the ladder assembly had suffered with shrikage and bowing, and initially thought the
problem was as a result of the paint. This picture shows that before painting it had already
suffered, so the Kibri plastic had reacted with either the superglue or the solvent used
to attach the ladder to the tanks. Luckily the effected ladder sections were easily cut out and
replaced without having to remove the vertical safety cage.

The tank unloading road has been constructed in the same way as the fueling
roads using a balsawood base with C&L chairs melted into gauge using poly solvent. A gully has
yet to be cut into the base for collection of any spilt fuel, which can be drained away to an
interceptor. Another channel with chequer plate covers will run alongside with standpipes and
valves, with hoses to couple up to the tank wagons. The square hole by the way is just a means
for handling the sub baseboard, and will be covered over once work on this section is complete.

Shenston Road resident D1039 Western King is seen visiting Hornsey Road depot
before heading back to the Western Region. Detailed and weathered by Greg, the Dapol model
captures collision damage to the front corner and side.

Class 73 number E6048 hauls class 71 number E5004 (and QM brake van)
past a trio of class 15 locos heading for the depot. The Dapol class 73 is again from Greg's
Shenston Road fleet, recently repainted from purple into blue, with the class 71 originating
from the Hornby stable.
Finally from the Hornsey ramblings is another of Greg's locos - this time
Warship 825 Intrepid passing through with a football special.
![]()
 Class 25 ‘25 323’ is pictured after weathering. Looking badly in need of a
trip through the washing plant, the loco is modelled to a picture from the mid-1980s which
shows it working an explosives trip for the North Wales slate quarries.
Class 25 ‘25 323’ is pictured after weathering. Looking badly in need of a
trip through the washing plant, the loco is modelled to a picture from the mid-1980s which
shows it working an explosives trip for the North Wales slate quarries.

A new project on the bench is this pair of Class 17 bodyshells, one being a
bargain sell-off bare shell from the Heljan stand at Warley that has been waiting its moment
for several years. The plan is to add a GSYP and GFYE swop-body option to the layout roster –
these can then appear in Tyneside sequences of the middle sixties, or as the more well-known
Scottish allocations of the sixties/early seventies.

The cabs are having wire handrails and door handles added, as well as having
the tablet catcher recess shape improved.

More by accident than design ‘Canada Street’ features again in the new Model
Railway Journal (No. 252) just out – this time with a piece concentrating on the R&W Paul and
Burton buildings.
![]()
 A general view of the remodelled scrapyard at Morfa Bank. There are two
sidings in the yard, one for overflows of either full or loaded wagons and the other runs
beneath the gantry for loading, or unloading the wagons. To the left are several scrap
coils, rejected by the customer after uncoiling and some old mill rolls. Alongside the
siding is a small narrow gauge diesel put to one side in case it can be sold on. Still
much to do but the flavour of a yard is taking shape!
A general view of the remodelled scrapyard at Morfa Bank. There are two
sidings in the yard, one for overflows of either full or loaded wagons and the other runs
beneath the gantry for loading, or unloading the wagons. To the left are several scrap
coils, rejected by the customer after uncoiling and some old mill rolls. Alongside the
siding is a small narrow gauge diesel put to one side in case it can be sold on. Still
much to do but the flavour of a yard is taking shape!

As well as working around the back of the scrapyard, here's
something a bit different. The Allis Chalmers as bought - the right length for 1/76 scale but
almost two feet too wide. I’ve just started masking the various cuts, of which they’ll
be a lot, as I try to reduce the width by 6mm. This should bring the rear wheel track
to the same as the front wheels as per prototype.

The various rivets have been cut off and the back of the bowl cut away
and reduced in width. This won’t be a rivet counter’s build but hopefully will give a
flavour of these impressive machines. And I’d always wanted one of these since I was
about four so getting one many, many years later for a few pounds at a toy fair was a bargain!

Now it gets complicated! Here I’ve removed the required amount from
the centre of the apron. Next up is the more involved cut of the bowl arms. It was still
a bit of a mystery at this stage if it was going to fit back together again.

Here we see the bowl with the wheel supports removed and the axle cut
through to get the wheels out. Bit by bit the toy is becoming a kit of parts.

Both sides of the bowl have been cut away now. Two strips just over
2.5mm wide have also been cut from the remaining bowl structure to bring this to the right width.

Here are all the parts ready for re-assembly. The same 2.5mm width
pieces have been cut off the support arms and next everything needs filing flush and
square ready for reassembly using two-part epoxy resin.

And here it is, stuck back together again, right length and right
width and awaiting the next stage - quite a lot of detailing and a mass of hydraulic
pipes. It’ll probably also get a strip back to bare metal and probably emerge in yellow.
But that’s for another day!

I needed to create a muddy track down the far side of the scrap yard
area. On the last layout I’d modelled this using filler but while perusing a book on
plant and machinery (looking for scraper pictures - see above!) I saw a well rutted
track that looked like a pile of muddy string…so why not? And here’s the first few
strings laid. The puddle was laid into the foam board surface prior to the first string going down.

And once the first rows had dried they were painted with a gritty
earth texture acrylic from a war-games supplier. These products have been used
extensively and are very useful for terrain modelling.

Here we see all the string stuck down and several layers of the acrylic
painted over the top. The muddy track will continue around the top of the scene. The
access road to the scrap yard runs off scene to the left beyond the platform. The
barbed wire, by the way, has yet to be painted!

And here is the first section finished apart from some additional
paint and varnish. The rest of the yard surface is also almost finished - just more
weeds and scrap to go. The next section has the first pieces of string stuck down
and you can also see the oblong of acrylic that will form the next puddle.
![]()
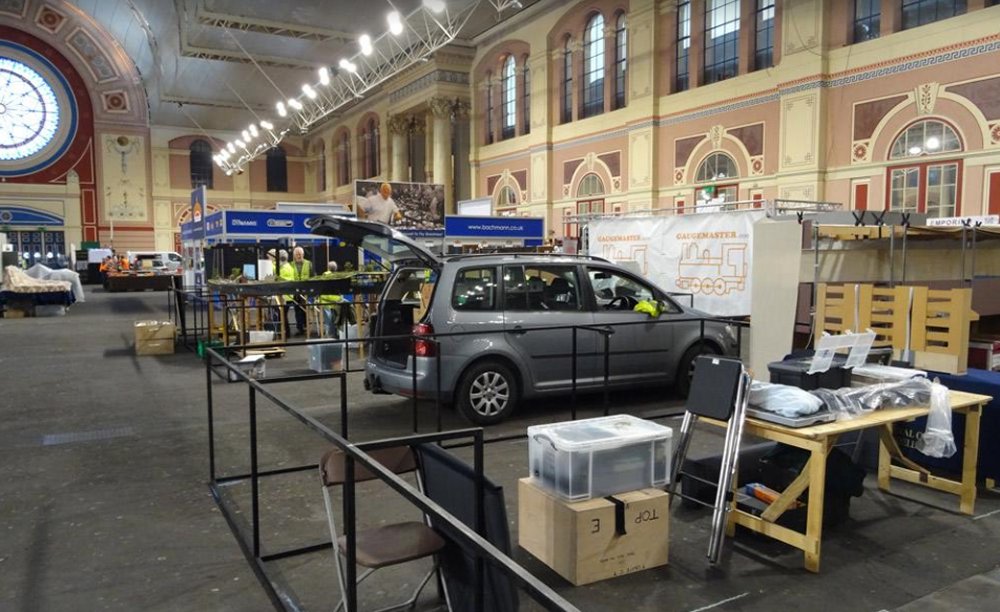
 Early last month saw the layout appear at the Stafford show, one of the
few on the circuit where a drive-in unload is allowed – perfect to escape the icy wind of
that Friday afternoon!
Early last month saw the layout appear at the Stafford show, one of the
few on the circuit where a drive-in unload is allowed – perfect to escape the icy wind of
that Friday afternoon!

Moody lighting across the Canada Dock before opening at Stafford…..the
layout is out again towards the end of this month at The London Festival of Modelling
at Alexandra Palace.

This VW T2 has recently been finished, with added flush glazing at the
sides and back, wing mirrors, and a slightly modified paint scheme.

The Oxford Die-cast basis for the model captures the proportions of this
iconic 1970s vehicle well.

The two Class 17 shells have been making steady progress. The GSYP
example is pictured after re-fitting of the cab unit, but bonnet door handles and lamp
brackets still need to be added.

The nose ends of the models have had improvements made to the marker
lights, headcodes, roof fans and buffer shanks, as well as re-positioning of the multiple
working cable to match the chosen prototype.

Some customers have finally got pictured at Dee’s Teas, I’m sure she’ll
be enjoying the company – and trade!
![]()
 Every now and then I put the HO scale projects to one side, and do a bit
more on Lesney Park. This view shows work recently carried out at the back of the layout
constructing a wall alongside the roadway, with the gates providing a convenient break midway.
Every now and then I put the HO scale projects to one side, and do a bit
more on Lesney Park. This view shows work recently carried out at the back of the layout
constructing a wall alongside the roadway, with the gates providing a convenient break midway.

The Lima class 31 bodyshell as featured previously - new exhaust ports have
been constructed and a start made on drilling holes for the roof grab handles. Short and sweet
for this update from Down-Under, but still plugging away.
![]()
 Here is a small selection of photos taken at the Solent MRS show which was
held on the 25th & 26th of February. 03371 pauses during shunting activity.
Here is a small selection of photos taken at the Solent MRS show which was
held on the 25th & 26th of February. 03371 pauses during shunting activity.

37095 arrives at Hebble Vale with another consignment of vans.

A glimpse of the recently completed backscene.

A very clean Ford Granada NHK 259M. Not sure about the size of those wheels!

Messrs. Edmondson and Cooper in charge of proceedings
![]()
 With the majority of the depot trackwork complete, the time has come
to build the control panel. Perhaps investing in a Hornby Zero 1 might erradicate the need
for all the section switches and wires! The plan has been drawn out on a piece of A4
paper, stuck to the back of a some 4mm clear acrylic sheet, and various holes drilled
in preparation for the next stage.
With the majority of the depot trackwork complete, the time has come
to build the control panel. Perhaps investing in a Hornby Zero 1 might erradicate the need
for all the section switches and wires! The plan has been drawn out on a piece of A4
paper, stuck to the back of a some 4mm clear acrylic sheet, and various holes drilled
in preparation for the next stage.

Using slivers of masking tape cut on a sheet of glass, they are laid onto
the back of the clear panel prior to blasting it with some matt black spray paint. This shows
the first coat being applied.

When the black paint has dried, the slivers of masking tape are removed
to reveal a clear line, painted in a variety of colours
to represent different routes or building outlines. The panel framework is fitted with
2 sliding 8mm steel bars, mounted on either the rear or front of the layout.

The panel framework is shown finished and in position at the rear of
the layout - the steel rods inserted into holes which go through the baseboard frame and
into wooden blocks for rigidity. The controller DIN sockets are already in place, along
with a couple of slide switches for reversal of polarity for when the panel is located
on the front (viewing side) of the layout. The protruding part of the switch has been cut
down to about 2mm, and can be changed over using a knife blade or tweasers when required.

As with the mainline panels, the up = off with all the toggle section
switches when operating from behind the layout. This would usually be under exhibition
conditions and best to avoid any confusion. That of course changes when the panels are
fitted to the viewing side during casual operation, so mistakes or added confusion isn't
a problem!

There's still a bit of trackwork for me to finish, but that hasn't
stopped Greg putting down the first sprinklings of ballast now that the trackwork
has been thoroughly tested on most of the depot area.

A view looking the other way and highlighting the soldered feeds
which are all on the rear side of the rail when viewed from the front.

With just a few more wires to attach, the rest have been bundled up
ready for the final push. Only 1 pole of the double pole toggle switch is used for
the isolation of a loco, the double pole packs by Expo strangeley being the same
price as the single pole packs. The large point control switches are sprung loaded momentary
contact rated at 20 amps, so worth the space constraints for longevity and reliability.

In addition to the goings on at the depot, Paul has been out with his
box brownie taking snaps of Polly & Nellie, the latest additions to his Eastwell fleet.

The following pictures were also snapped, showing a selection of
visiting locos from Shenston Road. Here's Swindon built diesel hydraulic D9535
with the test freight of the day.

More Western Region power in the form of Canton's D6972 at the head
of a ballast train, with unidentified BRCW type 2 on a Toton to Temple Mills freight.

Another BRCW type 2 - this class of loco were commonplace in North London until around 1970.
![]()
 The trackwork is 90% complete at Hornsey Road Depot, so it's time for a
change from working on the layout, and concentrate on some rolling stock instead. In the
meantime, here's a few snaps taken on shed.
The trackwork is 90% complete at Hornsey Road Depot, so it's time for a
change from working on the layout, and concentrate on some rolling stock instead. In the
meantime, here's a few snaps taken on shed.

Listening to the Napier roar.

A line up of English Electric type 5 Deltic power, bolstered up on this
occasion with 3 from Shenston Road (to the right).

These ex-Wibdenshaw class 25s (Bachmann) have just been
back-dated to suit the early 1970s period, and shows the variations in cab decoration.

Three of Greg's hydraulics (centre) join the Hornsey
Warship & Western, bringing back memories of holidays in Devon.

Thank you to Alan in Northamptonshire, and Mike in Wiltshire for helping
me to find the 1969, 1970 & 1971 edition of the Locoshed Book. Although not wanting to turn
this website into a Trading Post, recent tidy-ups and clear-outs have resulted in a
few items for disposal - please have a look at the Items for Sale section, which will be
regularly updated until I get some shelf space back!
![]()
 A quick swop-body project has been Class 03 ‘D2027’. Making use of
the Bachmann re-tool in a mid-60s green livery, this will be a useful alternative
appearance for the mechanism from all-green D2019.
A quick swop-body project has been Class 03 ‘D2027’. Making use of
the Bachmann re-tool in a mid-60s green livery, this will be a useful alternative
appearance for the mechanism from all-green D2019.

With the small amount of detailing complete, the shell was weathered
in time to appear at the London Festival of Railway Modelling late in March.
Alexandra Palace was another drive-in unload, this view being early on
the Friday evening as set-up begins.

“…some of the fans are on the pitch, they think it’s all over!!”…..a
busy scene from during the Saturday - traction inspector James discusses his views on
dress code for layout operators with driver Manderson, and a snapper with a back-stage
pass captures the action in front of a packed house – Thanks Paul and Ian for some
superb operating, and to all who came for a look at the layout!

Back on the hobby bench, the two Class 17s make steady progress,
D8610 (GFYE) ready for weathering……

….and GSYP D8599 at the same stage.

The same bodyshell a few days later, with typical mid-60s grime added.

Another Hornby Class 08 is also well underway. 08 296 will be finished
in a well faded condition to replace long serving Lima-based 08 114.

The build of the two North British 0-4-0s has taken over 3 years so far,
but is finally nearing completion. D2774 is pictured after addition of the livery details.

With those two Mike Edge kits almost done, I have launched into a third…..
the Hunslet Class 05 low-roof 0-6-0 bodyshell went together well and is pictured almost
ready for paint. This is to be finished as an Ipswich loco from the mid-60s.

D3381 takes a well deserved rest, awaiting the next shunting task at Canada Street.